[PYTHON] Easily make a TweetBot that notifies you of temperature and humidity with Raspberry Pi + DHT11.
Development environment
| HD | RaspberryPi B+ |
|---|---|
| OS | Debian GNU/Linux 7.8 (wheezy) |
| Python | ver 2.7.3 |
_ * If there is no problem, the latest Raspberry Pi2,3 and OS will work with Jessie, so you don't have to worry too much. _
Used equipment
| name | Use applications |
|---|---|
| DHT11 | For temperature and humidity measurement |
| Jumper(Scalpel-male) | For GPIO connection |
We recommend purchasing at Akizuki or Marutsu Parts. _
setup
- Here, we will proceed with the discussion before the OS was already installed on the Raspberry Pi.
Install git.
Install it to download dht11.py, which will come out later.
sudo apt-get install git
Install RPi.GPIO.
RPi.GPIO is a module that can control GPIO pins of Raspberry Pi using Python. It is indispensable for operating RaspberryPi and electronic devices such as LEDs and sensor devices. Without it, even with a GPIO pin, it would be a high-end box that could supply 5 (v) and 3.3 (v) voltages, so let's introduce it.
In addition, it seems that it is installed by default from the release of Jessi. So it seems that you can use it immediately by importing this package at the beginning of the Python program.
Official Site 26th Control GPIO of Raspberry Pi (Python)
However, since it is a big deal here, I will describe the installation method for those who have not moved to Jessi yet (like me).
For pip
sudo pip install rpi.gpio

apt-For get
sudo apt-get install python-rpi.gpio
If you can introduce it here, please do L Chika by all means while looking at the GPIO pin correspondence table of Raspberry Pi as a practice. This is the first step because L-Chika behaves like a so-called'Hello wold'.
L-Chika using Python's RPi.GPIO on Raspberry Pi
Install twython.
sudo apt-get install python-setuptools
sudo easy_install pip
sudo pip install twython
twython is a Twitter library program written in Python. When it comes to what you can do specifically, the official says this.
Twython is the premier Python library providing an easy (and up-to-date) way to access Twitter data. Actively maintained and featuring support for Python 2.6+ and Python 3. It's been battle tested by companies, educational institutions and individuals alike. Try it today!
Twython is the best Python library that provides an easy (and up-to-date) way to access your Twitter data! In particular, it mainly supports Python 2.6+ and Python3. Twython is also actively tested by companies, educational institutions and individuals. Please try it!
When creating a Twitter Bot, this Twython usually does the difficult work behind the scenes, so we can easily write a Twiiter Bot in Python with a Twitter API Key. Convenient.
If you want to know the back side and detailed usage, I recommend you to read the official source code.
Official: https://github.com/ryanmcgrath/twython
Twitter Bot tweeting CPU temperature of Raspberry Pi Introduction and testing of twython
This completes the rough setup. Next, enter the hardware circuit connection.
Connect Raspberry Pi and DHT11.
The connection diagram looks like this.

The correspondence table between DHT11 and GPIO pins is as follows.

| RaspberryPi B+ | DHT11 |
|---|---|
| VDD | 5.0(v) |
| DATA | GPIO4 |
| GND | GND(PIN:6) |
- DATA may be GPIO14 or GPIO17. I chose GPIO4 as a practice here.
Depending on the product, the resistor is already connected (this), but the basics are like this. Since the correspondence table with GPIO pins differs depending on each Raspberry Pi, please connect while looking at the correspondence table of GPIO pins.

This completes the connection on the hardware side. Next, let's actually measure the room temperature and temperature from the connected DHT11 and check the operation.
Control DHT11 with Python.
Since the code to control DHT11 has already been written in Python, let's execute git clone while thanking the creator.
https://github.com/szazo/DHT11_Python
cd
git clone https://github.com/szazo/DHT11_Python.git
Go to the directory where you git clone and check the files.
Notice the two files in it, dht11.py and dht11_examle.py.
dht11.py
import time
import RPi


class DHT11Result:
    'DHT11 sensor result returned by DHT11.read() method'

    ERR_NO_ERROR = 0
    ERR_MISSING_DATA = 1
    ERR_CRC = 2

    error_code = ERR_NO_ERROR
    temperature = -1
    humidity = -1

    def __init__(self, error_code, temperature, humidity):
        self.error_code = error_code
        self.temperature = temperature
        self.humidity = humidity

    def is_valid(self):
        return self.error_code == DHT11Result.ERR_NO_ERROR


class DHT11:
    'DHT11 sensor reader class for Raspberry'

    __pin = 0

    def __init__(self, pin):
        self.__pin = pin

    def read(self):
        RPi.GPIO.setup(self.__pin, RPi.GPIO.OUT)

        # send initial high
        self.__send_and_sleep(RPi.GPIO.HIGH, 0.05)

        # pull down to low
        self.__send_and_sleep(RPi.GPIO.LOW, 0.02)

        # change to input using pull up
        RPi.GPIO.setup(self.__pin, RPi.GPIO.IN, RPi.GPIO.PUD_UP)

        # collect data into an array
        data = self.__collect_input()

        # parse lengths of all data pull up periods
        pull_up_lengths = self.__parse_data_pull_up_lengths(data)

        # if bit count mismatch, return error (4 byte data + 1 byte checksum)
        if len(pull_up_lengths) != 40:
            return DHT11Result(DHT11Result.ERR_MISSING_DATA, 0, 0)

        # calculate bits from lengths of the pull up periods
        bits = self.__calculate_bits(pull_up_lengths)

        # we have the bits, calculate bytes
        the_bytes = self.__bits_to_bytes(bits)

        # calculate checksum and check
        checksum = self.__calculate_checksum(the_bytes)
        if the_bytes[4] != checksum:
            return DHT11Result(DHT11Result.ERR_CRC, 0, 0)

        # ok, we have valid data, return it
        return DHT11Result(DHT11Result.ERR_NO_ERROR, the_bytes[2], the_bytes[0])

    def __send_and_sleep(self, output, sleep):
        RPi.GPIO.output(self.__pin, output)
        time.sleep(sleep)

    def __collect_input(self):
        # collect the data while unchanged found
        unchanged_count = 0

        # this is used to determine where is the end of the data
        max_unchanged_count = 100

        last = -1
        data = []
        while True:
            current = RPi.GPIO.input(self.__pin)
            data.append(current)
            if last != current:
                unchanged_count = 0
                last = current
            else:
                unchanged_count += 1
                if unchanged_count > max_unchanged_count:
                    break

        return data

    def __parse_data_pull_up_lengths(self, data):
        STATE_INIT_PULL_DOWN = 1
        STATE_INIT_PULL_UP = 2
        STATE_DATA_FIRST_PULL_DOWN = 3
        STATE_DATA_PULL_UP = 4
        STATE_DATA_PULL_DOWN = 5

        state = STATE_INIT_PULL_DOWN

        lengths = [] # will contain the lengths of data pull up periods
        current_length = 0 # will contain the length of the previous period

        for i in range(len(data)):

            current = data[i]
            current_length += 1

            if state == STATE_INIT_PULL_DOWN:
                if current == RPi.GPIO.LOW:
                    # ok, we got the initial pull down
                    state = STATE_INIT_PULL_UP
                    continue
                else:
                    continue
            if state == STATE_INIT_PULL_UP:
                if current == RPi.GPIO.HIGH:
                    # ok, we got the initial pull up
                    state = STATE_DATA_FIRST_PULL_DOWN
                    continue
                else:
                    continue
            if state == STATE_DATA_FIRST_PULL_DOWN:
                if current == RPi.GPIO.LOW:
                    # we have the initial pull down, the next will be the data pull up
                    state = STATE_DATA_PULL_UP
                    continue
                else:
                    continue
            if state == STATE_DATA_PULL_UP:
                if current == RPi.GPIO.HIGH:
                    # data pulled up, the length of this pull up will determine whether it is 0 or 1
                    current_length = 0
                    state = STATE_DATA_PULL_DOWN
                    continue
                else:
                    continue
            if state == STATE_DATA_PULL_DOWN:
                if current == RPi.GPIO.LOW:
                    # pulled down, we store the length of the previous pull up period
                    lengths.append(current_length)
                    state = STATE_DATA_PULL_UP
                    continue
                else:
                    continue

        return lengths

    def __calculate_bits(self, pull_up_lengths):
        # find shortest and longest period
        shortest_pull_up = 1000
        longest_pull_up = 0

        for i in range(0, len(pull_up_lengths)):
            length = pull_up_lengths[i]
            if length < shortest_pull_up:
                shortest_pull_up = length
            if length > longest_pull_up:
                longest_pull_up = length

        # use the halfway to determine whether the period it is long or short
        halfway = shortest_pull_up + (longest_pull_up - shortest_pull_up) / 2
        bits = []

        for i in range(0, len(pull_up_lengths)):
            bit = False
            if pull_up_lengths[i] > halfway:
                bit = True
            bits.append(bit)

        return bits

    def __bits_to_bytes(self, bits):
        the_bytes = []
        byte = 0

        for i in range(0, len(bits)):
            byte = byte << 1
            if (bits[i]):
                byte = byte | 1
            else:
                byte = byte | 0
            if ((i + 1) % 8 == 0):
                the_bytes.append(byte)
                byte = 0

        return the_bytes

    def __calculate_checksum(self, the_bytes):
        return the_bytes[0] + the_bytes[1] + the_bytes[2] + the_bytes[3] & 255
This source code is mainly obtained from DHT11 and is a class file that processes digital signals in Python. Therefore, you can understand that you can easily obtain the measured values of humidity and temperature by using the object created when instantiating the class of dht11.py.
Let's see an example of actually using an instance.
dht11_example.py(Before correction)
import RPi.GPIO as GPIO
import dht11
import time
import datetime

# initialize GPIO
GPIO.setwarnings(False)
GPIO.setmode(GPIO.BCM)
GPIO.cleanup()

# read data using pin 14
instance = dht11.DHT11(pin=14)

while True:
    result = instance.read()
    if result.is_valid():
        print("Last valid input: " + str(datetime.datetime.now()))
        print("Temperature: %d C" % result.temperature)
        print("Humidity: %d %%" % result.humidity)

    time.sleep(1)
Please note that ʻinstance = dht11.DHT11 (pin = 14)is the default. If you are already connected with GPIO14, you do not need to do anything here, but if you selectedGPIO4` when designing the circuit earlier, please correct it like this.
import RPi.GPIO as GPIO
import dht11
import time
import datetime

# initialize GPIO
GPIO.setwarnings(False)
GPIO.setmode(GPIO.BCM)
GPIO.cleanup()

# read data using pin 14
-instance = dht11.DHT11(pin=14)
+instance = dht11.DHT11(pin=4)

while True:
    result = instance.read()
    if result.is_valid():
        print("Last valid input: " + str(datetime.datetime.now()))
        print("Temperature: %d C" % result.temperature)
        print("Humidity: %d %%" % result.humidity)

    time.sleep(1)
This completes the code for measuring temperature and humidity from DHT11. Let's execute it as an operation check.
sudo python dht11_example.py
_ * Be sure to execute with root privileges or sudo !. Otherwise you will get an Error. _
Hopefully the command line will show the temperature and humidity. If you can confirm the above, the operation check of DHT11 is completed. thank you for your hard work.
Register with Twitter API to create TweetBot.
Register with the Twitter API to create TweetBot.
From here, jump to the dedicated page and press Create New App to register. https://apps.twitter.com/
[Caution 1] A phone number is required to register the Twitter API, and the language is set to [English].
A phone number is required to register for the Twitter API. Otherwise, you will get angry like this.

So I register my phone number and enter the number I received from the message to authenticate my phone ... but that still doesn't work.
Whether it's a bug or a use, or if a Twitter engineer isn't working ~~, I don't know the details, but I'll change the Twitter language setting from [Japanese] to [English].
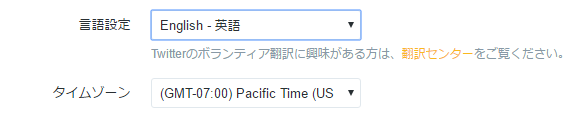
If you perform phone authentication again in this state, you can safely go to the Twitter API registration page, so register the API.
[Caution 2] You cannot continue to post the same post in a short time.
It is not possible to tweet the same post in succession using the Twitter API, probably because of spam prevention, so let's use a time stamp so that you can post similar tweets in a short period of time. When posting the temperature and room temperature like this time, the same tweet may be made, so it is recommended to intentionally put a time stamp in between.
Tweet from Raspberry Pi.
After registering with the API, you will need the following four API keys.
- CONSUMER_KEY
- CONSUMER_SECRET
- ACCESS_KEY
- ACCESS_SECRET
These correspond to the numbers following the following four items on the Twitter API page.

If you can confirm the above 4 keys, let's make a Twitter Bot and check the operation.
tweet.py
#!/usr/bin/env python
#coding:utf-8

import os
from twython import Twython

#Twiiter API
CONSUMER_KEY ='API_key1'
CONSUMER_SECRET ='API_key2'
ACCESS_KEY ='API_key3'
ACCESS_SECRET ='API_key4'
api = Twython(CONSUMER_KEY,CONSUMER_SECRET,ACCESS_KEY,ACCESS_SECRET)

#time stamp
timestamp = 'date +%F_%H:%M:%S'
current_time=os.popen(timestamp).readline().strip()


api.update_status(status='[Test] The current time is'+current_time+'is!')
Even if an error occurs, the time stamp is inserted, so you can post continuously, so you can debug immediately. If the post is successful, the current time should be posted to your TL. This is the end of the operation check with the Twitter API.
Run dht11_tweet.py on a regular basis with crontab.
At this point, by combining the dht11_example.py that I made first and the tweet.py that I just made, I can imagine that the temperature and humidity can be posted on Twitter.
Finally, let's finish the target dht11_tweet.py using two source codes.
dht11_tweet.py
# -*- coding: utf-8 -*

import RPi.GPIO as GPIO
import dht11
import time
import datetime
import os
from twython import Twython

# initialize GPIO
GPIO.setwarnings(False)
GPIO.setmode(GPIO.BCM)
GPIO.cleanup()

instance = dht11.DHT11(pin=4)

#Twiiter API
CONSUMER_KEY ='API_key1'
CONSUMER_SECRET ='API_key2'
ACCESS_KEY ='API_key3'
ACCESS_SECRET ='API_key4'
api = Twython(CONSUMER_KEY,CONSUMER_SECRET,ACCESS_KEY,ACCESS_SECRET)

#time stamp
timestamp = 'date +%F_%H:%M:%S'
current_time=os.popen(timestamp).readline().strip()

while True:
    result = instance.read()
    if result.is_valid():
        api.update_status(status = '[Temperature and humidity information]'+'Current time'+current_time
            +'temperature:'+str(result.temperature)+'It is ℃.'+'Humidity:'+str(result.humidity)
            +'%is.')

        break

    time.sleep(1)
As you can see by executing dht11_example.py several times, DHT11 (temperature and humidity sensor) is not so accurate. Therefore, the measured value is not always returned when executed, and it often happens that the data cannot be read. In that case, since ʻinstance itself is not generated, result.temperatureandresult.humidity built in ʻapi.update_status are not called, so an error occurs and the post fails. .. For that reason
while True:
    result = instance.read()
Repeat until instance is generated by while statement = __ [state where temperature and room temperature can be measured] __. In addition, since the post can be the first time when instance generation is successful, put break at the end of api.update_status.
By doing this, it is possible to tweet only once while reliably measuring the temperature and humidity.
With the above, TweetBot that mutters the rough temperature and humidity is completed.
However, this is still a manual method, so at the end, register it in crontab to make it look like a bot and mutter regularly.
The explanation of crontab is omitted here, but in short, think of it as a task scheduler.
A program that executes commands and scripts at specified times.
[Summary of how to use crontab. ](Http://bakunyo.hatenablog.com/entry/2013/06/20/crontab%E4%BD%BF%E3%81%84%E6%96%B9%E3%81%BE%E3%81% A8% E3% 82% 81% E3% 80% 82)
Type crrontab -e to open crontab. By the way, overwrite save is Ctr + o and exit is Ctr + x. Keep in mind that these two commands are often used.
For example, if you want to post from TweetBot every 15 minutes, write as follows.
*/15 * * * * sudo python /home/pi/(....)/dht11_tweet.py
If this does not work properly, please debug while looking at the following site.
Three points to check when crontab does not work + α
This completes TweetBot, which mutters temperature and humidity every 15 minutes. thank you for your hard work.
Since this code is all written in Python, for example, if you display Graph or reach the specified temperature, I think it will be possible to sound the buzzer, so if you are interested, please try it.