Try installing OpenAM on Amazon Linux
0. Introduction
Try installing OpenAM on Amazon Linux.
1. 1. Create an EC2 instance for Amazon Linux
- From the E2 console page, select the Amazon Linux AMI and create an EC2 instance.
- AMI ID :
- amzn-ami-hvm-2017.03.0.20170401-x86_64-gp2 (ami-859bbfe2)
- Instance Type :
- t2.micro
- Security Groups :
- SSH
- HTTPS
- AMI ID :
- Then assign an Elastic IP.
2. Initial settings and security settings
- Make general initial settings and security settings.
- Setting the root user password
- Change host name
* /etc/sysconfig/network
* /etc/hosts
*
hostname - Japanese setting * /etc/sysconfig/i18n
- Time zone setting * /etc/cloud/cloud.cfg * /etc/sysconfig/clock * /etc/localtime
- SSH settings
- iptables settings * SSH * HTTPS
3. 3. Install and work with Apache and Tomcat
- First, install Apache.
sudo yum install httpd
sudo chkconfig httpd on
2. Next, configure HTTPS settings.
sudo yum install openssl openssl-devel mod_ssl
- Change the settings in /etc/httpd/conf.d/ssl.conf
- SSLProtocol
- SSLCipherSuite
- SSLCertificateFile
- SSLCertificateKeyFile
- SSLCACertificateFile
- Note: How to start Apache without entering a passphrase. \ | GMO GlobalSign for SSL / Digital Certificate
sudo service httpd restart
3. Then install tomcat
sudo yum install java-1.7.0-openjdk-devel
sudo yum install tomcat7 tomcat7-webapps tomcat7-admin-webapps
sudo chkconfig tomcat7 on
4. Tomcat Web Application Manager Settings
- Comment out the admin settings in /etc/tomcat7/tomcat-users.xml
diff /etc/tomcat7/tomcat-users.xml.ORG /etc/tomcat7/tomcat-users.xml
50c50
< <!-- <user name="admin" password="adminadmin" roles="admin,manager,admin-gui,admin-script,manager-gui,manager-script,manager-jmx,manager-status" /> -->
---
> <user name="admin" password="[PASSWORD]" roles="admin,manager,admin-gui,admin-script,manager-gui,manager-script,manager-jmx,manager-status" />
5. Setting up integration with Apache
- /etc/tomcat7/server.xml
diff /etc/tomcat7/server.xml.ORG /etc/tomcat7/server.xml
71c71
<     <Connector port="8080" protocol="HTTP/1.1"
---
>     <Connector port="8009" protocol="AJP/1.3" URIEncoding="UTF-8"
4. Get the OpenAM installation media
- Access the following site and log in. (You need to sign up for an account in advance)
- Click the Downloads link.
- Click the links in the following order.
- product family ... : AM
- produc ... : OpenAM Enterprise
- release ... : 13.0.0
- item ... : OpenAM 13
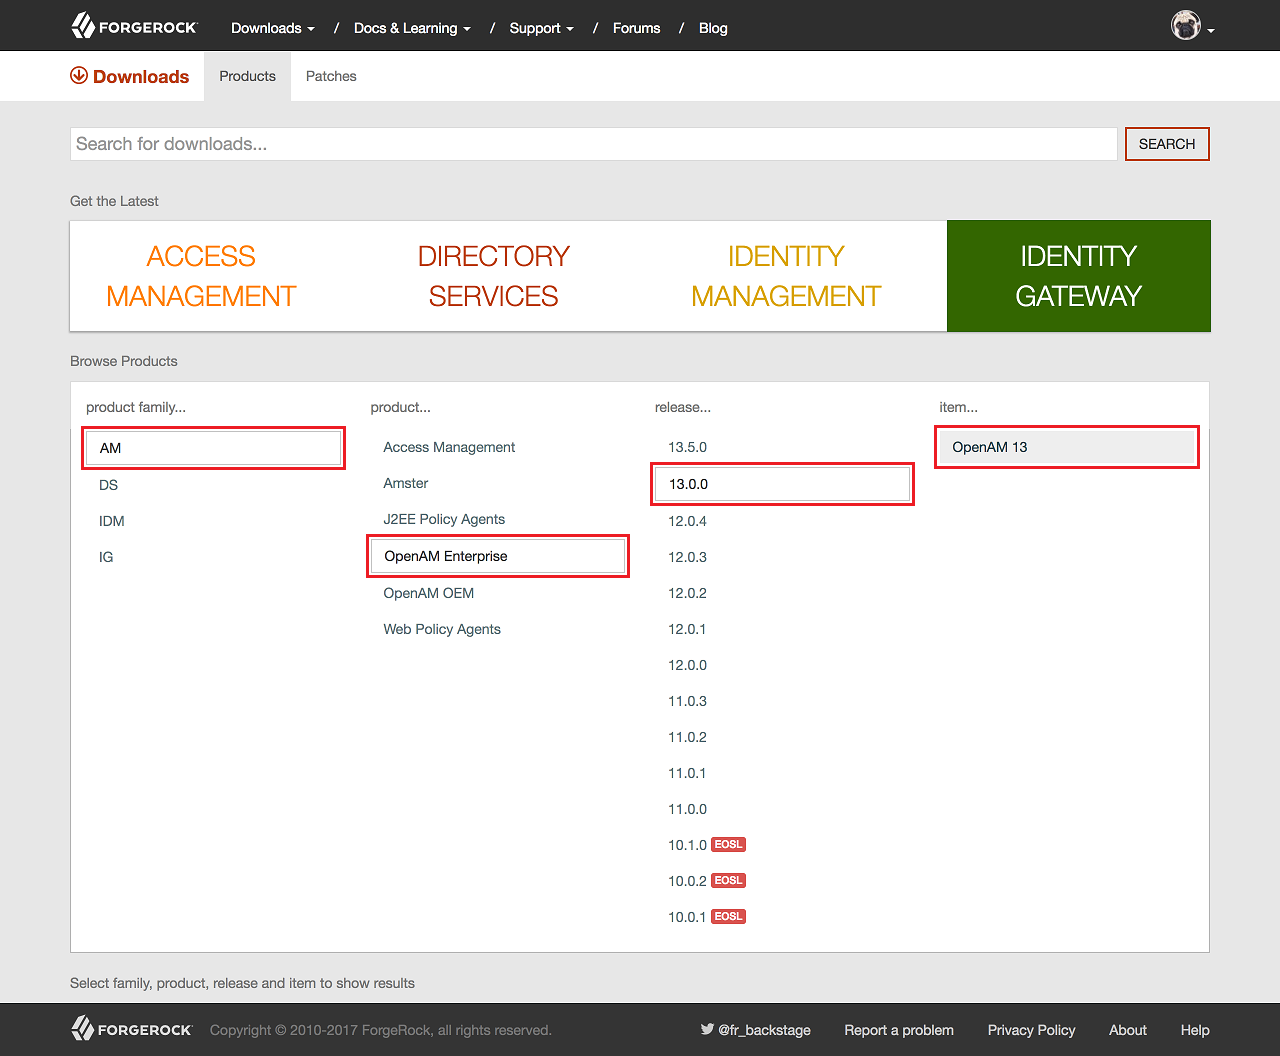
- The Download screen will be displayed. Select the "war" tab and press the "DOWNLOAD" button.


- Installation media: OpenAM-13.0.0.war
5. Install OpenAM
- Add the following settings to the Security Group and iptables inbound settings.
- 1689 0.0.0.0/0
- 4444 0.0.0.0/0
- 50389 0.0.0.0/0
- Store the obtained installation media (OpenAM-13.0.0.war) in the following directory.
- /usr/share/tomcat7/webapps/
- openam.war * Rename from OpenAM-13.0.0.war
- Access the site and press the "Manager App" button.
- The login dialog will be displayed. Enter the account information set in /etc/tomcat7/tomcat-users.xml to log in.
- When the "Tomcat Web Application Manager" screen is displayed, click the "/ openam" path link in the "Applications" list.
- When the "Setting Options" screen is displayed, click the "Create New Setting" link under "Custom Settings".
- The "License Agreement Confirmation" screen will be displayed. Check it and click the "Continue" button.
- The "Step 1: General-Custom Settings Options" screen will be displayed. Set the default user password and click the "Next" button.
- The "Step 2: Server Settings-Custom Settings Options" screen will be displayed. Set the following items and click the "Next" button.


- Server URL: * Default
- Cookie domain: * Default
- Platform locale: ja_JP
- Settings directory: * Default

- The "Step 3: Settings Datastore Settings-Custom Settings Options" screen will be displayed. Set the following items and click the "Next" button.
- ● First instance ○ Do you want to add to an existing deployment? ※Default
- Settings datastore: * Default
- SSL enabled: * Default
- Hostname: * Default
- Port: 50389
- Administrator port: 4444
- JMX port: 1689
- Settings directory: * Default
- Settings directory: * Default

- The "Step 4: User Data Store Settings-Custom Settings Options" screen will be displayed. Set the following items and click the "Next" button.
- ● OpenAM user data store
- ○ Other data stores

- The "Step 5: Site Settings-Custom Settings Options" screen will be displayed. Set the following items and click the "Next" button.
- ● No
- ○ Yes

- The "Step 6: Default Policy Agent User-Custom Settings Options" screen will be displayed. Set a password and click the "Next" button.
*
- The "Setting Tool Overview and Details-Custom Setting Options" screen will be displayed. Check it and click the "Create Settings" button.
*
- A dialog will appear, so wait for a while.
*
- But ... I'm not sure, but the completion screen is not displayed no matter how long I wait, so if the completion message is displayed in the following installation log file, it seems OK.
- Installation log file: /usr/share/tomcat7/openam/install.log
- 「Finished dumping all configuration parameters」
- 「Finished dumping all configuration parameters」
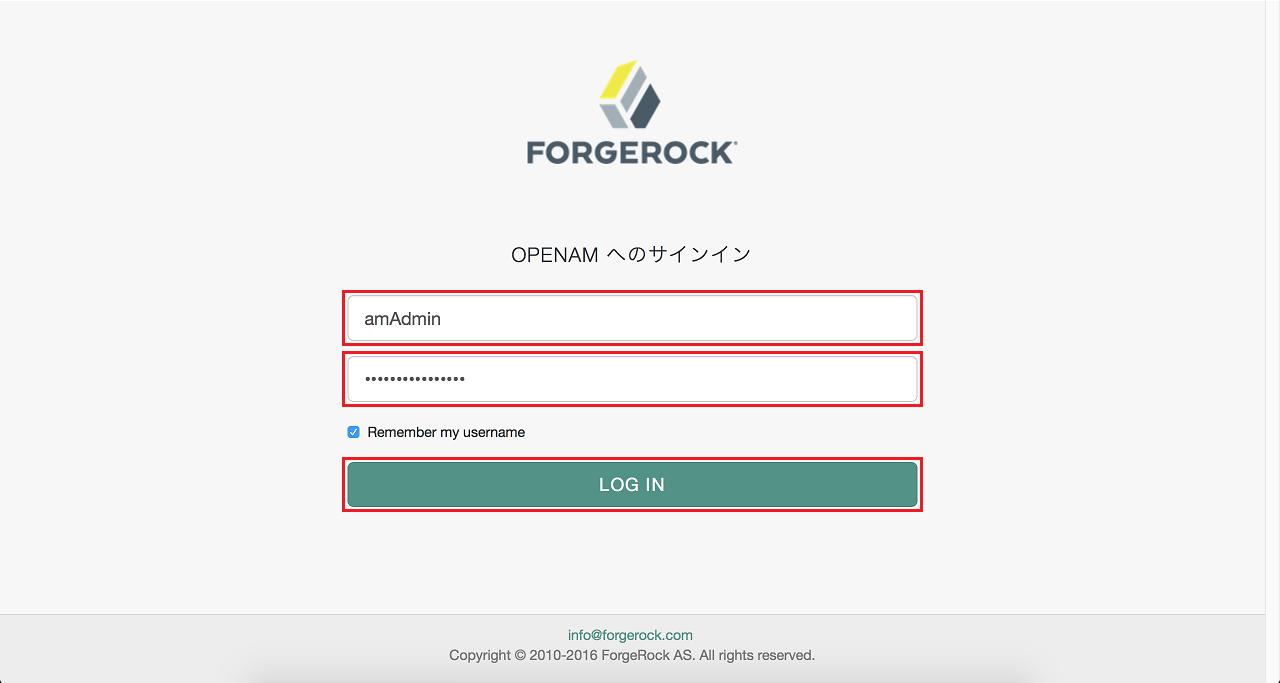
- When you access https: // ~ / openam /, the login screen will be displayed.
Enter the set default user (amAdmin) account information, and if you can log in, the installation is complete.
*
6. Creation and replacement of signing key
Create a signing key based on the procedure on the following site and replace it with the signing key (test) set by default.
- (OpenAM Technology Tips Vol.2 "OpenAM SAML Setting Procedure") [http://www.openam.jp/wp-content/uploads/techtips_vol2.pdf]
After creating the signing key Create a public key by referring to the following site.
- (Generate a certificate using the keytool utility (Sun Java System Application Server 9.1 Administration Guide)) [https://docs.oracle.com/cd/E19159-01/820-4604/ablrb/index.html]
7. Debug level change
Refer to the following site and change the debug level to "Message".
- (About OpenAM debug log | OSS ∞ Lab) [https://t246osslab.wordpress.com/2016/06/19/openam%E3%81%AE%E3%83%87%E3%83%90%E3 % 83% 83% E3% 82% B0% E3% 83% AD% E3% 82% B0% E3% 81% AB% E3% 81% A4% E3% 81% 84% E3% 81% A6 /]
99. Addictive point
- First, I tried to do it with the default settings, but it didn't work ...
There is no choice but to make custom settings ...
- On the "Step 3: Settings Datastore Settings-Custom Settings Options" screen, I changed various settings, but in the end, it didn't work unless the settings were described. Also, I forgot that I had to open a port with Security Group or iptables, and I groaned ...
- Also, the installation completion screen never appears ...
XX. Summary
Next, let's check the cooperation of various authentication functions.
Recommended Posts