[PYTHON] Let's make a remote rumba [Software]
Introduction
This article is a sequel to Let's make a remote rumba [Hardware]. If you haven't seen the first part yet, please take a look there first.
Target
This time, we will actually control the rumba prepared up to the last time.
environment
The programming language used is ** Python 3.7 **. I think that it is installed as standard on Raspberry OS. In general, it seems that many people use ROS to control Roomba, but I haven't used ROS so much and am not used to it. From the viewpoint of flexibility and ease of understanding in developing Roomba in the future, this article will control Roomba using only Python.
Source code
1. Control
1-1. Preparation of actual machine
Basically, the code that controls Roomba is in the iRobot officially issued specification iRobot Roomba 500 Open Interface (OI) Specification. It's open to the public, and if you send it to Roomba as a serial signal, it will work as it should. (Although the specification says 500, there is no change in the command in any series)
However, as you read through this specification, you'll have to write some code to get the finer details. Therefore, Martin Schaef has created and published the Roomba API for Python in the past, so I will borrow it.
martinschaef/roomba ↑ The source code is here.
The problem is that the code itself is old and programmed for ** Python 2.7 **. Therefore, just copying and pasting the corresponding code will not work at all. ** You need to modify it yourself **.
The code to modify is create.py. This is the original Roomba API.
First, in this code, all serial commands are written in chr type.
create.py
START = chr(128)    # already converted to bytes...
BAUD = chr(129)     # + 1 byte
CONTROL = chr(130)  # deprecated for Create
SAFE = chr(131)
FULL = chr(132)
POWER = chr(133)
SPOT = chr(134)     # Same for the Roomba and Create
CLEAN = chr(135)    # Clean button - Roomba
etc...
When I run this code in Python3, I get the following error:
TypeError: unicode strings are not supported, please encode to bytes: '\x80'
The implication is that the str type does not support serial communication. But this works fine in Python 2.7. What on earth is this? The answer is that Python 2 and Python 3 handle the chr type differently. Specifically, it has been changed as follows.
| Python2 | Python3 | |
|---|---|---|
| int to bytes | chr(i) | bytes([i]) |
I got stuck in the pot here, but if you look closely, it means that the bytes type needs to describe the number in ** () using [] **. Please do not forget to write it down.
By the way, if you just want to convert the chr type to bytes, you may think that you should add .encode (). Sure, that would eliminate the error in the program itself, but Roomba wouldn't work at all. Therefore, if you check the character string when .encode () is attached, it will be written as follows.
128 b'\xc2\x80'
129 b'\xc2\x81'
130 b'\xc2\x82'
131 b'\xc2\x83'
132 b'\xc2\x84'
133 b'\xc2\x85'
Originally, when sending a numerical value in hexadecimal, it should be written as 0x80 or / x80. However, in the result, all the values are accompanied by the value / xc2. This means that the information that it is ʻUTF-8 is added. If you think about it, you're not converting a simple ʻint type, but you're converting a str type to bytes, so that information was added as well. Therefore, in this case, the value ʻU + 0081has been converted, and if you simply add.encode ()` from this result, Roomba will not work.
** So sorry to all of you, but I would like you to convert all the parts corresponding to chr (i) type to bytes ([i]) in this code. ** **
create.py
START = bytes([128]) # already converted to bytes...
BAUD = bytes([129]) # + 1 byte
CONTROL = bytes([130]) # deprecated for Create
SAFE = bytes([131])
FULL = bytes([132])
POWER = bytes([133])
SPOT = bytes([134]) # Same for the Roomba and Create
CLEAN = bytes([135]) # Clean button - Roomba
etc...
Also, with the above modification, the operation itself will work, but since the originally written message by print is written in the python2 grammar, it is all ignored. It's too dull, so I think you should rewrite it in the same way.
create.py
print 'Serial port did open, presumably to a roomba...'
                          ↓
print('Serial port did open, presumably to a roomba...')
At this point, let's try to see if you can actually connect to Roomba. Use the following code for confirmation.
test_roomba.py
import create
import time

ROOMBA_PORT="/dev/ttyAMA0"
robot = create.Create(ROOMBA_PORT)

robot.printSensors()
robot.toSafeMode()
robot.go(0,10)

robot.close()
If you connect the Raspberry Pi and Roomba and execute the above code, you will get the value of Roomba's sensor and it will be displayed on the command line, and Roomba should rotate a little.
If an error is output and "Key Error:is displayed, it is possible that Roomba and Raspberry Pi are not connected properly. There are two possible causes: 1. Roomba is not running, 2. The cable is broken. In the former case, lightly press theCLEAN` button in the center of Roomba to activate it and try again. In the latter case, check the continuity of the cable.
Also, if you can get the sensor value but Roomba doesn't work at all, try running the code below.
test_roomba.py
import serial
ser = serial.Serial('/dev/ttyAMA0', 115200)
ser.write(b'0x80')
If Roomba starts looking for a charging dock with the above code, serial communication may be at RS232C level. Convert it to TTL level again and connect again.
Next, rumba control is performed by inputting from the keyboard. A little modification of game.py from the source code martinschaef / roomba of Martin Schaef. To use.
game.py
ROOMBA_PORT = "/dev/tty.usbserial-DA017V6X"
              ↓
ROOMBA_PORT = "/dev/ttyAMA0"
Since the connection destination is different in the original source code, please correct the 21st line as above.
game.py
if event.key == pygame.K_x:
   robot.seekDock()
   time.sleep(2.0)
   pygame.quit()
   return
game.py
screen.blit(
  font.render("Clean Mode Roomba with c, press key x make Roomba back to the dock.",
                        1, (10, 10, 10)), (10, 580))
I also wanted the ability to automatically return to the charging dock during remote control, so I added the above code to lines 115 and 166, respectively.
Finally, create a new ʻimgfolder in the directory containing these executable files, putroomba.png` in it, and the preparation of the actual machine is completed.
1-2. Host computer preparation
I want to control Roomba remotely, so I need to prepare here as well. Use VcXsrv (X server) to move the control screen displayed on the Raspberry Pi to the host computer.
Install VcXsrv (X server) on Windows and operate Linux GUI remotely ↑ The details of this item are very detailed on this page and are summarized in an easy-to-understand manner. Please refer to here.
1-3. Operation check
Once you have completed all of the above items, you will actually be able to control Roomba. Try running it on Python 3 right away. I think that the detailed control method is described on the displayed screen, but for the time being, I will explain briefly, w to move forward, s to move backward, ʻa, dto move left and right. It is a rotation to. It is a temporary pause withspace and ends with ʻesc. I think that the values acquired in real time for each other sensor are displayed.
2. Video transfer
Next, I would like to create a program that transfers the video data acquired by the webcam to the host computer. At first, I tried to open the video on Raspberry Pi using open_cv and transfer the window to the host computer with VcXsrv, but it didn't work so well, so I decided to use the method of video transfer by socket communication.
Install ʻopencv-pythonin the library with pip. If you try to install the latest version of opencv4.4.0.42, Python 3.7 may not finish building forever. In such a case, if you lower the version a little and install it around 4.1.0.25`, it seems to be smooth.
pip3 install opencv-python==4.1.0.25
Below is the program to run on the Raspberry Pi.
video_server.py
import socketserver
import cv2
import sys

HOST = "192.168.XXX.XXX"#This is the IP address of Raspberry Pi
PORT = 5569

class TCPHandler(socketserver.BaseRequestHandler):
    videoCap = ''

    def handle(self):
        self.data = self.request.recv(1024).strip()
        ret, frame = videoCap.read()
        encode_param = [int(cv2.IMWRITE_JPEG_QUALITY), 100]
        jpegsByte = cv2.imencode('.jpeg', frame, encode_param)[1].tostring()
        self.request.send(jpegsByte)

videoCap = cv2.VideoCapture(0)
socketserver.TCPServer.allow_reuse_address = True
server = socketserver.TCPServer((HOST, PORT), TCPHandler)

try:
    server.serve_forever()
except KeyboardInterrupt:
    server.shutdown()
    sys.exit()
The following is the program to run on the host computer.
video_client.py
import socket
import numpy
import cv2

HOST = "192.168.XXX.XXX"#This is the IP address of Raspberry Pi
PORT = 5569

def getimage():

    sock=socket.socket(socket.AF_INET,socket.SOCK_STREAM)
    sock.connect((HOST,PORT))

    buf=b''
    recvlen=100
    while recvlen>0:
        receivedstr=sock.recv(1024*8)
        recvlen=len(receivedstr)
        buf += receivedstr
    sock.close()

    narray=numpy.fromstring(buf,dtype='uint8')
    return cv2.imdecode(narray,1)

while True:
    img = getimage()
    cv2.imshow('Capture',img)
Start these programs from server.py, and if the connection is successful, the video should be transferred to the host computer side.
3. Automatic start
Finally, when you turn on the power of Raspberry Pi, set the previous programs to start automatically. We will create a service file according to Systemd.
Go to / etc / systemd / system / with Raspberry Pi and create a roomba.service file. Please describe the following as the contents.
[Unit]
Description = Roomba

[Service]
ExecStart=/bin/bash /home/pi/roomba.sh
Restart=always

[Install]
WantedBy=multi-user.target
The purpose of starting each program with a shell script here is to make it easier to edit in consideration of future changes.
So next create the /home/pi/roomba.sh file.
#!/bin/sh
sudo python3 /home/pi/roomba/server.py &
sudo python3 /home/pi/roomba/game.py &
Check the service, enable it and you're done.
$ sudo systemctl enable roomba
$ sudo systemctl start roomba
Summary
At this point, you should be able to see both video and control from the host computer for the time being.
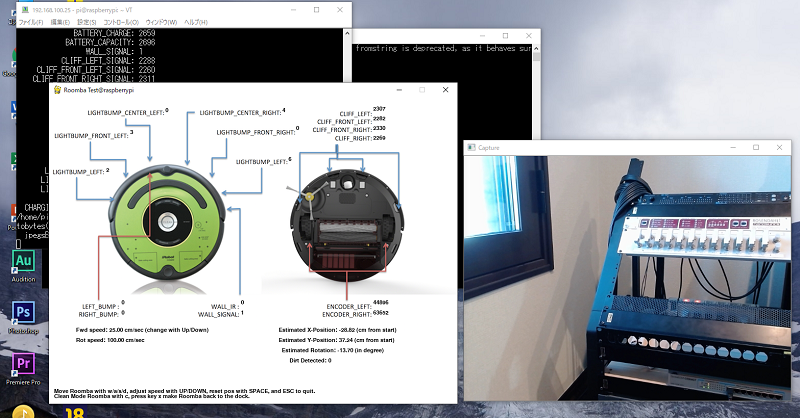 ↑ I think it is displayed like this.
When I actually operate it, it is very difficult to do with the camera image alone, and the existing code game.py seems to behave quite awkwardly when curving.
However, the degree of freedom should be very high because all the processing is done in Python. There are many systems that could be added, such as automatic driving programs and person detection by image processing, so I would like to develop them in various ways. Please give it a try.
Thank you for staying with us until the end.
References
1.iRobot Roomba 500 Open Interface (OI) Specification 2.martinschaef/roomba 3. Notes on differences between Python 2 and Python 3 Unicode strings and byte strings 4. Send video with Python and OpenCV
Recommended Posts