[PYTHON] Let's make a remote rumba [Hardware]
Introduction
Did you know that Roomba can be controlled? Roomba is equipped with a serial port as standard, and it seems that you can use that port to run Roomba as programmed (it seems to be a famous story from a long time ago).
I recently got a rumba and decided to play around with it because it was a big deal. I hope you can keep up with me until the end.
Target
In this article, the goal is to operate Roomba remotely. The articles are divided into [Hardware] and [Software], and this time we will summarize the preparations before controlling Roomba. Even if you can't go home because of a certain virus, if you have Roomba, you can easily go home remotely.
Used equipment
1.Roomba Controllable Roomba is limited. Basically, there are only serial ports up to ** 500, 600, 700, 800 series **. However, it seems that the 900 series is equipped with microUSB instead of the serial port. By the way, the above rumba is a little old series, so recently it is possible to get it at a very cheap price such as Yahoo Auction. If you don't have one, why don't you take this opportunity to get one?
[[IRobot Roomba770] Junk Essay](https://furuya-base.net/home/2020/09/09/%e3%80%90irobot-roomba770%e3%80%91%e3%82%b8%e3% 83% a3% e3% 83% b3% e3% 82% af% e3% 82% a8% e3% 83% 83% e3% 82% bb% e3% 82% a43 /) You can use it quite well if you take care of junk items like ↑.
2.Raspberry Pi Raspberry Pi is used to control. Basically any type is fine as long as you have GPIO, but ** 3 ** is recommended if you want to operate remotely. The reason is that higher-end models such as the 3 Model B + and 4 consume more power than this and are very likely to stop running on mobile batteries.
3. Mobile battery
For driving Raspberry Pi. USB Type-A must have a supply capacity of ** 2.4 [A] ** or higher.
4. Webcam
I use it because I want to see the image when operating it remotely. I think any USB connection is fine. It might be convenient to have an autofocus function.
5. Roomba and Raspberry Pi connection cable
Used to connect Roomba and Raspberry Pi. However, basically this cable is not sold, so you need to ** make your own **. So, I have described how to make it below. Male-female jumper wires are fine for those who are not particular about their appearance.
Production
1. Connection cable production
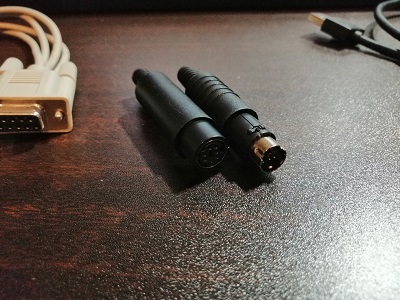 First, we will make the cable. Prepare a Mini-DIN 7Pin male connector. In Akihabara, you can get it for about 150 yen on the 2nd floor of Sengoku Tsusho.
 According to the Rumba specifications officially issued by iRobot, pins 3 and 4 are used for serial transmission and reception. Also, since the signal level of serial communication is described as 0-5 [V], it seems that communication at TTL level is required instead of ** RS232C signal level **. Therefore, it cannot be controlled directly from a computer without a level converter. Therefore, this time, I will connect GPIO of Raspberry Pi and Roomba to communicate.
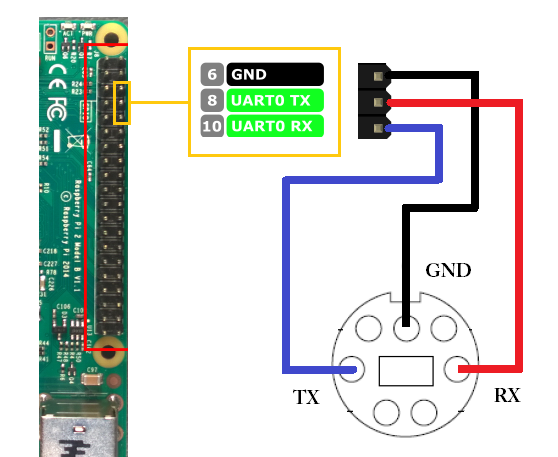 Specifically, wire as shown in this figure. ** Please wire so that TX and RX of each other are connected **. Please note that you cannot communicate with TX-TX or RX-RX.
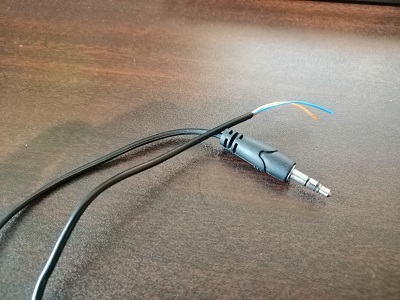 As an aside, for the cable, we recommend the 3.5φ stereo mini plug cable of Daiso's 300 yen speaker, which is optimal in both thickness and length. (However, the speaker cannot be used)
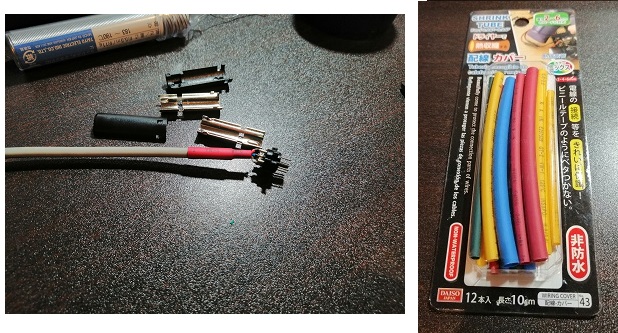
It is also recommended to use the shrink tube of Daiso products because it can be made to look good.
2. Rasppie setup
I will set the Raspberry Pi. I think Raspberry Pi OS is safe as the OS.
2-1. Connect to WiFi
Connect the Raspberry Pi to any WiFi. In this case, it is OK if you can set anything from the GUI. However, since you want to access it from the host computer later, it is recommended to attach a fixed IP.
Set a fixed IP address for the wireless LAN of Raspberry Pi 3 (Raspbian Jessie) ↑ I think this person's explanation is easy to understand and helpful.
2-2. Enable SSH
After that, I want to control it from the command line, so enable SSH.
SSH connection setting method from outside the LAN of Raspberry Pi 3 ↑ I think this person's explanation is easy to understand and helpful. In this case, it explains in detail how to connect from outside the local area, so it is ideal in terms of remote control. However, if you want to check the operation and enjoy it at first, you can enable only SSH.
2-3. Connection from the host computer
Anything is OK as long as the terminal can be connected to Raspberry Pi. We are using Tera Term. If you can connect by typing the user name and password into any IP address, update it for the time being.
$ sudo apt-get update
$ sudo apt-get upgrade
$ sudo apt-get dist-upgrade
2-4. Enable UART
Raspberry Pi has serial communication disabled by default and must be enabled.
Enable UART on Raspberry Pi + serial communication ↑ I think this person's explanation is easy to understand and helpful.
3. Check the continuity of the cable
For the time being, what I'm curious about when I come here is whether the cable is manufactured correctly. So let's actually send a signal and receive it by ourselves. If it conducts well, you should be able to receive it correctly.
$pip3 install PySerial
Add the above library to python3 with pip.
test_serial.py
import serial

def main():

    #'/dev/serial0'
    #'/dev/ttyAMA0'

    port = '/dev/ttyAMA0'
    ser = serial.Serial('COM3', 115200, timeout=0.1)

    while True:

        tx = bytes([128])
        ser.write(tx)
        print("tx:", tx)

        rx = ser.readline()
        print("rx: ", rx)

if __name__ == '__main__':
    main()
The language used is Python 3.7. Do this on the Raspberry Pi and short the Mini-DIN pins 3 and 4 with a clip or something. Hopefully you'll only receive the value rx: b'\ x80' during the short circuit.
If the value is rx: b'', there is a high possibility that the wire is broken somewhere. If you get could not open port'/ dev / ttyAMA0', you may have failed to enable UART, so please check there.
Also, 2.7 is called by default when running Python on Raspberry Pi, so please be sure to run it on Python3. ** (Python2 should not have a function called bytes, so it seems to be an error.)
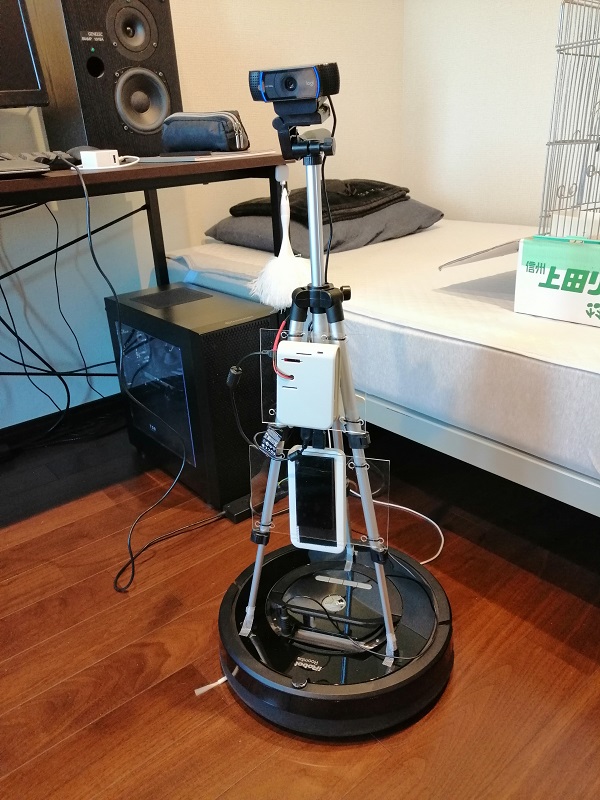
4. For more comfortable use
It's a digression from here. Placing each device on top of Roomba when controlling Roomba is messy and doesn't look very good. Therefore, it is an introduction that I am doing like this.
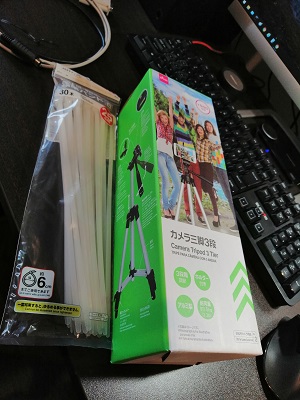 This is a tripod and cable tie sold to Daiso. The webcam I used had a screw hole for fixing the tripod, so I used this tripod because I thought it was cheap and just right. The angle of view of the camera is also easy to adjust, making it ideal for adding systems such as image processing in the future. In addition, all the devices are fixed to this tripod, and when using Roomba normally, it is only necessary to remove the tripod.
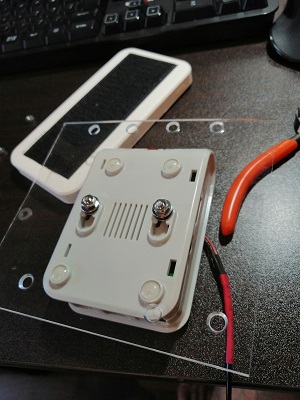 For the Raspberry Pi itself, I made a hole in a plastic van of appropriate size and thickness using the fixing hole in the attached case and fixed it to the tripod with a binding band. Velcro is attached to devices that are frequently removed, such as mobile batteries.
next time
If this is completed, the hardware setup is complete for the time being. However, Roomba does not work with this, so next time, Let's make a remote Roomba [Software], basic Roomba control and remote using a camera I would like to build a system.
References
1.iRobot Roomba 500 Open Interface (OI) Specification 2. Set a fixed IP address for the wireless LAN of Raspberry Pi 3 (Raspbian Jessie) 3. Enable UART on Raspberry Pi + serial communication
Recommended Posts