Acquisition of 3D point cloud with Softbank Pepper (Choregraphe, Python)
2015/03/01 Aldebaran Atelier Akihabara Pepper Development Touch & Try Record
Using the 3D camera (Xtion's Depth sensor), which is the eye of Pepper, I created a box to acquire a 3D point cloud. Reference article: thorikawa's [Pepper-kun Point Cloud](http://qiita.com/thorikawa/items/a625b4766dcd283b783b#pcd%E3%83%95%E3%82%A1%E3%82%A4%E3% 83% AB% E3% 81% AE% E5% 87% BA% E5% 8A% 9B)
Create a getPointCloud box
Launch Choregraphe 2.1.2 and create a box for your Python script. Right-click → New Box → Python Script, or Box Library standard → Templates → Python Script.

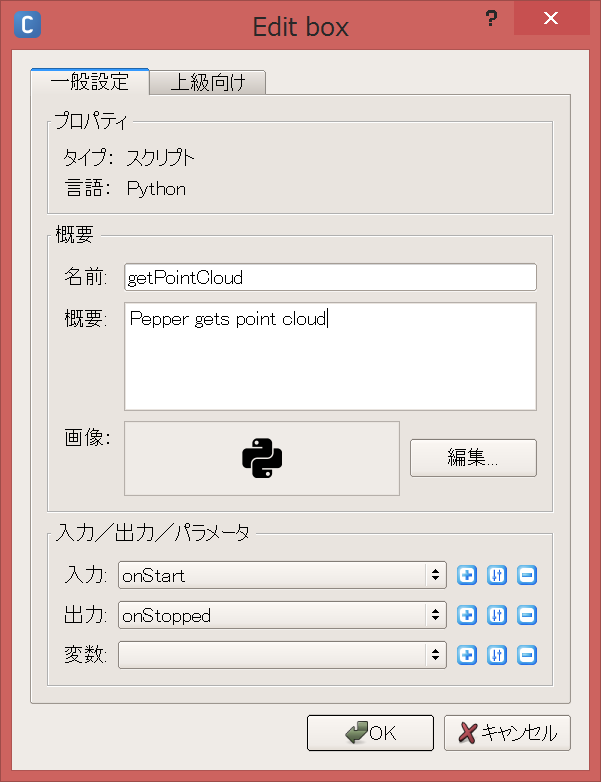
Enter the name and outline of the box and press the OK button.
Right-click on the box and edit the Python script.

Define the getPointCloud function as follows:
class MyClass(GeneratedClass):
    def __init__(self):
        GeneratedClass.__init__(self)

    def onLoad(self):
        #put initialization code here
        pass

    def onUnload(self):
        #put clean-up code here
        pass

    def getPointCloud(self):
        import argparse
        import Image
        import time

        # Camera parameters (only tested on Pepper)
        # Focal length
        FX = 525.0 / 2
        FY = 525.0 / 2
        # Optical center
        CX = 319.5 / 2
        CY = 239.5 / 2

        # millimeter to meter
        UNIT_SCALING = 0.001

        NAME = "depth_camera"
        CAMERA_ID = 2 # depth
        RESOLUTION = 1 # 320*240
        FRAMERATE = 15
        COLOR_SPACE = 17 # mono16 Note: this is not documented as of Dec 14, 2014

        video = ALProxy('ALVideoDevice')
        client = video.subscribeCamera(NAME, CAMERA_ID, RESOLUTION, COLOR_SPACE, FRAMERATE)

        try:
            image = video.getImageRemote(client)

            if image is None:
                print 'Cannot obtain depth image.'
                exit()

            width = image[0]
            height = image[1]
            array = image[6]

            cloud = []
            for v in range(height):
                for u in range(width):
                    offset = (v * width + u) * 2
                    depth = ord(array[offset]) + ord(array[offset+1]) * 256
                    x = (u - CX) * depth * UNIT_SCALING / FX
                    y = (v - CY) * depth * UNIT_SCALING / FY
                    z = depth * UNIT_SCALING
                    cloud.append((x, y, z))
        finally:
            video.unsubscribe(client)

        fileName = '/home/nao/recordings/cameras/cloud%f.ply' % time.time()

        f = open(fileName, 'w')
        num = len(cloud)
        header = '''ply
 format ascii 1.0
 comment Pepper 3D generated
 element vertex %d
 property float x
 property float y
 property float z
end_header
'''

        f.write(header % (width*height))
        f.write("\n")
        for c in cloud:
            f.write('%f %f %f' % (c[0], c[1], c[2]))
            f.write("\n")
        f.close()
        pass

    def onInput_onStart(self):
        #self.onStopped() #activate the output of the box
        self.getPointCloud()
        pass

    def onInput_onStop(self):
        self.onUnload() #it is recommended to reuse the clean-up as the box is stopped
        self.onStopped() #activate the output of the box
Run
Upload to the robot and play (F5), Save the 3D point cloud in ply format locally in Pepper.
The one connected by the line is executed first.

Even if it is not connected by a line, after it is uploaded to the robot, you can execute it by itself by clicking the input (play button).

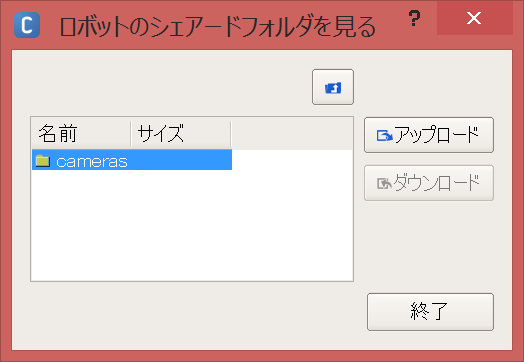
Download point cloud file
From the menu bar, click Connect → Advanced → Transfer File ID:nao Password:nao You can see Pepper's local folder with.
The point cloud file is saved in recordings / cameras /, so let's download it.


Display of point group
If you open it with Meshlab, you can see the 3D point cloud.

Summary
Using Pepper's 3D camera, I was able to save the 3D point cloud as ply, download it locally, and display it in Meshlab. Next, I would like to do SLAM that uses Depth's raw data (16bit, png image) to create a map and estimate the self-position at the same time. Create a dataset of odometry (acceleration), RGB (color), and Depth (depth) when traveling on the target trajectory (move_traj.pmt).
Supplement
SLAM is used when you want to move the robot autonomously in a certain trajectory or when you want to understand the driving environment. It is more accurate and reliable than internal sensors such as encoders and accelerometers.
3D cameras can also be applied to plane extraction, object detection, face recognition, etc. Pepper has two 2D cameras (RGB cameras), so if you use a stereo camera, you can get a point cloud (Is there only a part that looks common? W), and a point cloud that you can get from a 3D camera. You can also color it.
- Always Rest when you don't use Pepper. To prolong life. Lol
Recommended Posts