From building an AWS cloud environment to deploying a Spring Boot app (for beginners)
As an application engineer, I haven't had much experience in infrastructure design in my daily work, but I was impressed that I could easily build an infrastructure infrastructure even though I had almost zero knowledge of infrastructure through AWS. This time, for the same beginners as me, I will share the procedure from building the AWS cloud environment to deploying the Spring Boot app.
Environmental configuration diagram
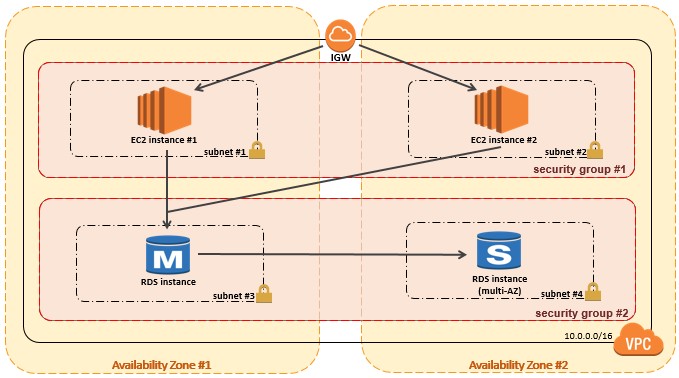
For the AWS configuration, we will adopt a redundant configuration using two Availability Zones (AZ) within the Tokyo region. EC2 instances will be distributed in the two AZs, and access will be distributed via ALB (load balancer). In addition, the RDS instance will be configured in Multi-AZ so that it will be distributed in two AZs as in EC2.
- This configuration exceeds the AWS Free Tier, so there is a charge! Please be careful. *

First, build a VPC!
Each instance in AWS must be assigned an IP address and properly routed so that it can reach the instances in AWS from the external network. The service that provides such a virtual network is called Amazon Virtual Private Cloud (VPC).
About VPC configuration
Although it is practice, we are aiming for a VPC environment that is close to the actual battle. This VPC consists of two types: ** public subnet ** for internet communication and ** private subnet ** that is blocked from the internet. Apply different security groups to each to control access to the two subnets. The AP server is built on the public subnet, and the DB server is built on the private subnet.

VPC creation
After registering a new AWS account, the default VPC environment was already created, but this time I will build the following VPC from scratch without using it.

-
- ʻAWS Management Console
⇒ ClickVPC⇒ SelectVPCfrom the menu on the left ⇒ Press theCreate VPC` button.
- ʻAWS Management Console
- Enter an appropriate name in the VPC creation screen, and enter the IP address range in the CIDR block field. (Enter "10.0.0.0/16" this time.)
-
- Press the
Yes, createbutton.
- Press the
Subnet creation
Create a subnet inside the VPC above. Since a subnet cannot be created across multiple AZs, be sure to specify one AZ when creating it. For load distribution and redundancy, build two subnets for AP server and two subnets for DB server.

-
- Select
Subnetfrom the menu on the left ⇒ Click theCreate Subnetbutton.
- Select
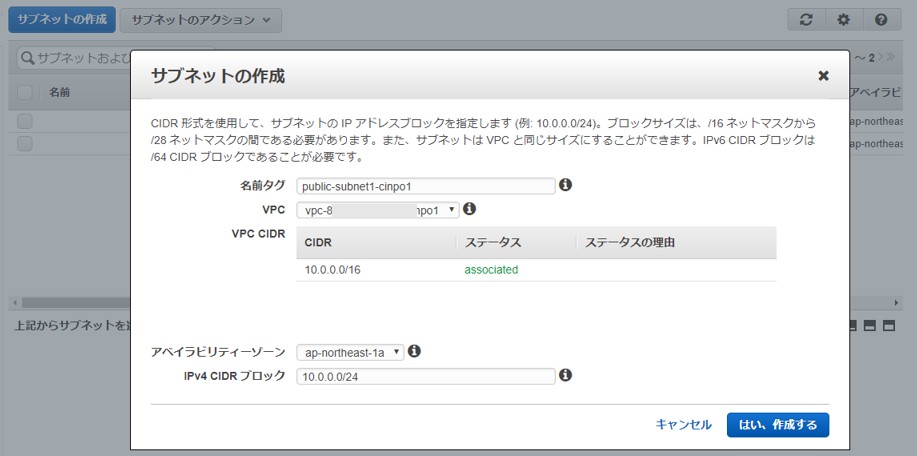
- On the subnet creation screen, enter an appropriate name, select the VPC created above, and enter the CIDR block. (Subnet1 is "10.0.0.0/24".)
-
- Follow the same procedure as above to build Subnet2, Subnet3, and Subnet4.
| Subnet | AZ | IPv4 CIDR block |
|---|---|---|
| public-subnet1 | ap-northeast-1a | 10.0.0.0/24 |
| public-subnet2 | ap-northeast-1c | 10.0.1.0/24 |
| private-subnet1 | ap-northeast-1a | 10.0.2.0/24 |
| private-subnet2 | ap-northeast-1c | 10.0.3.0/24 |
Subnet list screen after completion

Creating an internet gateway (IGW) and route table
The ** Internet Gateway (IGW) **, as the name implies, is the gateway to the Internet and is installed to communicate between the VPC and the external network.
Also, whether the subnet created above is a public subnet or a private subnet is determined by the ** route table ** applied to that subnet.
Destination: The subnet to which the route table with IGW set as the target of 0.0.0.0/0 is applied is the public subnet. On the other hand, the subnet to which the route table (default) without IGW is set as the target of destination: 0.0.0.0/0 is a private subnet.

-
- Select
Internet Gatewayfrom the menu on the left ⇒ Click theCreate Internet Gatewaybutton.
- Select
- Enter an appropriate name and press the
Yes, createbutton.
-
- Press the
Attach to VPCbutton to link with the VPC.
- Press the
- Select
Route Tablefrom the menu on the left ⇒ Press theCreate Route Tablebutton. - To create a route table for Subnet1, which is a public subnet, enter an appropriate name, link it with a VPC, and press the
Yes, createbutton.
- Follow the same procedure as above to build public-rtb2. This time, instead of creating a route table for the private subnet, we will use the default route table.
- Register the IGW as the target of the default gateway (destination 0.0.0.0/0) in the route table for the public subnet.
 The route information "10.0.0.0/16 local" in the route table cannot be changed or deleted with the default settings. This default setting means that communication within a VPC cannot be controlled by the route table, which means that subnets within the same VPC can communicate between subnets.
Creating a security group
A security group can control inbound (inbound) and outbound (outbound) access with a firewall for each instance in AWS. You must apply at least one security group to each instance.

-
- Select
Security Groupfrom the menu on the left ⇒ Press theCreate Security Groupbutton.
- Select
- To create a security group for the AP server, enter an appropriate name, link it to the VPC, and press the
Yes, createbutton.
-
- Follow the same steps as above to create a security group for your DB server.

- Follow the same steps as above to create a security group for your DB server.
- Create inbound and outbound rules for each security group. By default, inbound is not allowed, so it will not accept access from anywhere. On the other hand, outbound has rules that allow access to all destinations / port numbers by default.
Keep the SSH port 22 and the web app 8085 port open in the security group for the AP server so that they can be accessed from the outside.
 On the other hand, the security group for DB server keeps Aurora port 3306 open to allow only DB access from the AP server.

This completes the VPC construction.
Build an RDS instance
RDS is a relational database manager service. The following 6 types of database engines can be selected with RDS.
・ Amazon Aurora
・ MySQL
・ MariaDB
・ PostgreSQL
-Oracle
· MS SQL Server
This time we will build Aurora DB. Aurora is AWS's proprietary relational DB engine that is compatible with MySQL and is said to have up to five times the throughput of MySQL and three times the performance of PostgreSQL throughput.

Creating a subnet group
You must specify a DB subnet group in your VPC as a prerequisite for creating a DB instance. A DB subnet group requires subnets in at least two Availability Zones within a particular region. You must select a DB subnet group when you create a DB instance in your VPC. Amazon RDS uses its DB subnet group and preferred Availability Zone to select a subnet and the IP addresses within that subnet to associate with your DB instance.
-
- ʻAWS Management Console
⇒ ClickRDS⇒ SelectSubnet Groupfrom the menu on the left ⇒ Press theCreate Subnet Group` button.
- ʻAWS Management Console
- Enter the name etc. appropriately, add two DB subnets (private subnet1, private subnet2), and press the
Createbutton.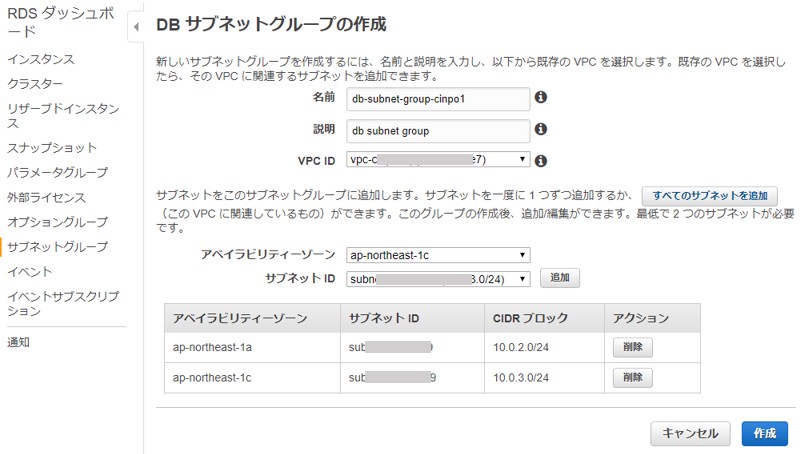
Creating a DB instance
-
- Select
instancefrom the menu on the left ⇒ Press theStart DB Instancebutton.
- Select
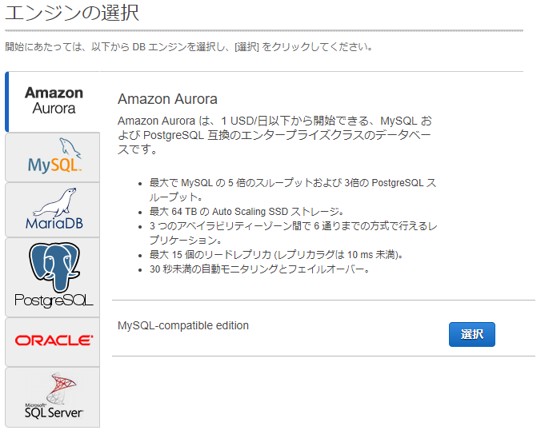
- Select Amazon Aurora on the engine selection screen.
-
- On the DB details screen, specify the DB instance class, etc., and click the
Next stepbutton.
- On the DB details screen, specify the DB instance class, etc., and click the
- If you choose the multi-AZ layout, it will cost twice as much!

- Specify the VPC, DB subnet group, preferred AZ, and security group.
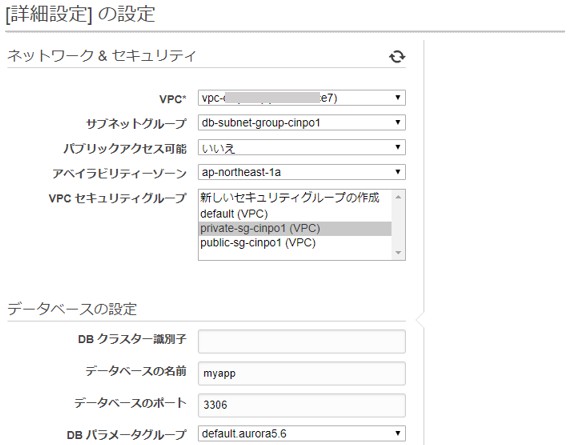
- You can confirm that the DB instance is being created after the setting is completed.

Build an EC2 instance
Finally, I arrived at EC2. Amazon Elastic Compute Cloud (EC2) is a virtual server on AWS. This time, we will build two instances for load distribution.
Creating an EC2 instance
-
- Click ʻAWS Management Console
⇒ ʻEC2⇒ SelectInstancefrom the menu on the left ⇒ Press theCreate Instancebutton.
- Click ʻAWS Management Console
- Select Amazon Linux as your instance type.

-
- On the instance type selection screen, select the type for the free tier.

- On the instance type selection screen, select the type for the free tier.
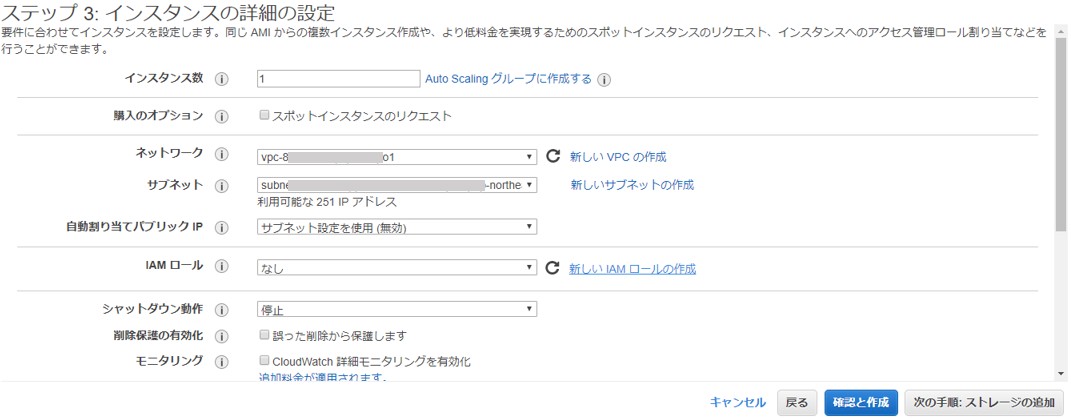
- Specify the VPC and subnet on the advanced settings screen.
- Add storage.

- Specify the security group for the AP server.

- Finally, download the key pair to log in to EC2 and press the
Create Instancebutton to complete the instance creation.
ELASTIC IP association
An ELASTIC IP assignment is required to assign a static public IP address to the above EC2 instances.
-
- Select ʻELASTIC IP
from the menu on the left ⇒ Press theAssign New Address` button.
- Select ʻELASTIC IP
- Associate with an EC2 instance.

EC2 environment initialization
Enter the above ELASTIC IP using an SSH client such as Tera Term to access your EC2 instance.
 Use the "ec2-user" user to log in with the key you downloaded earlier.


If you can log in successfully, make the initial settings for EC2.
#Update to the latest software
$ sudo yum update -y
#Host name change
$ sudo hostname ec2-1-cinpo1
$ sudo vim /etc/sysconfig/network
HOSTNAME=ec2-cinpo1;
#Edited the host file and issued from AWS<Private IP>write.
$ echo "17X.XX.X.X30 ec2-cinpo1" |sudo tee -a /etc/hosts
#Host name confirmation
$ hostname -f
#Time zone change
# /etc/sysconfig/Edit clock
$ echo -e 'ZONE="Asia/Tokyo"\nUTC=false' | sudo tee /etc/sysconfig/clock
#Change timezone file
$ sudo ln -sf /usr/share/zoneinfo/Asia/Tokyo /etc/localtime
#Check the result
$ date
#Java 8 installation
$ sudo yum install java-1.8.0-openjdk.x86_64
#Java 8 choice
$ sudo alternatives --config java
#Check the result
$ java -version
Build a second EC2.
Follow the same steps as above to build a second EC2 instance.
Data porting to Aurora environment
#Install the MySQL client to connect to the Aurora server.
$ sudo yum install mysql
#Connect to Aurora server to create new database and port data.
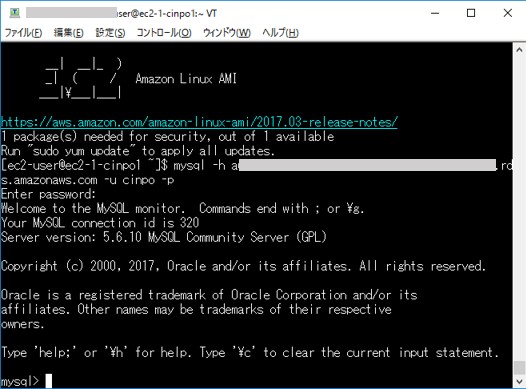
$ mysql -h <RDS instance endpoint> -u username -p
$ create database sampleDB

...The following is omitted...
Deploy Spring Boot app
-
- Use SSH SCP transfer of Tera Term to upload the Spring Boot app locally to the above two EC2 instances.
- After completion, launch the Spring Boot app as before.
$ java -jar XXXXXXXX.jar

-
- At this point, try accessing ELASTIC IP: 8085 and you should see the app screen.
Creating a load balancer
Finally, apply a load balancer (Application Load Balancer [ALB]) to achieve load balancing of the AP server.

Building a target group
As a prerequisite for applying ALB, you need to register the EC2 instance as a target in the target group. ALB acts as a single destination for clients, distributing inbound traffic to registered targets.
-
- Click ʻAWS Management Console
⇒ ʻEC2⇒ SelectTarget Groupfrom the menu on the left ⇒ Press theCreate Target Groupbutton.
- Click ʻAWS Management Console
- Register the target in the selected target group on the target group list screen.

-
- Register the EC2 instance as a target in the target group.

- Register the EC2 instance as a target in the target group.
Building ALB
-
- Select
Load Balancerfrom the menu on the left ⇒ Press theCreate Load Balancerbutton and select Application Load Balancer.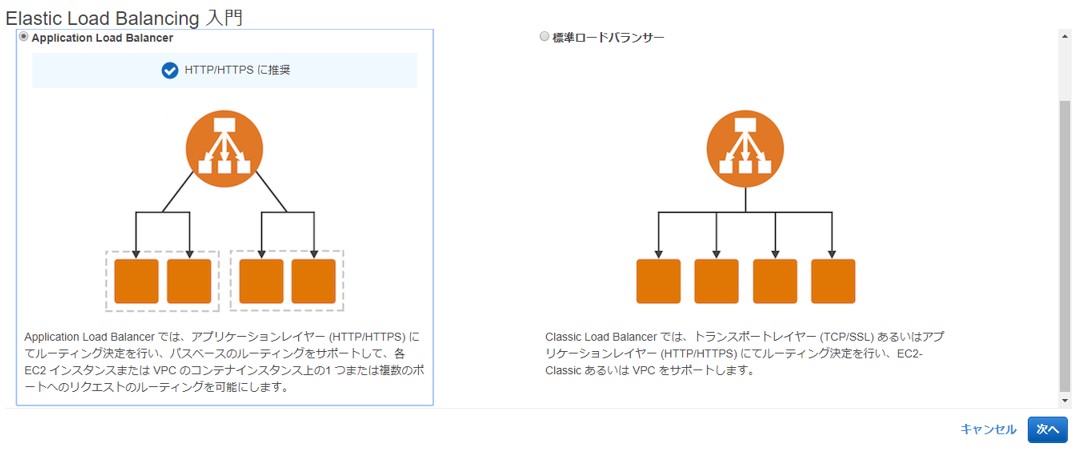
- Select
- Specify the name appropriately, and specify the listener, subnet, etc.

-
- Specify the security group.

- Specify the security group.
- Specify the target group created earlier.

- It will be in the process of being created and will be available in a minute or two.

Operation check
This completes everything from building the AWS environment to deploying the app.
http://<ALBのDNS名>:ポート/にアクセスすれば、アプリ画面が表示されたら完成です。

Recommended Posts