Introduction to Python Django (2) Mac Edition
Explains how to build a development environment for Python and Django on Mac.
Xcode、Command Line Tools
When developing on macOS, even if you do not plan to develop an iPhone application It's a good idea to include Xcode and Command Line Tools.
Xcode is from the App Store icon. Command Line Tools
$ xcode-select --install
Install at.
Install Python3
Python2 is included in Mac OS X, but if you're new to learning, you should learn Python3.
HomeBrew installation
HomeBrew is a Mac package management tool.
If you have already introduced it, please skip it. If you are a MacPorts sect, please introduce Python 3 by yourself.
To install, open the terminal and execute the following command as per the official website.
$ ruby -e "$(curl -fsSL https://raw.githubusercontent.com/Homebrew/install/master/install)"
Install Python3
Update HomeBrew to the latest View information on python3
$ brew update
$ brew info python3
python: stable 3.7.6 (bottled), HEAD
Please install the latest Python 3 at that time.
$ brew install python3
Recent brews now include 3 instead of Python 2 in brew install python.
Also, the latest version of Python at the moment is 3.8.1, but it doesn't seem to be included by default yet. It seems that you can force it with brew install [email protected], If you look it up with brew info [email protected],
[email protected] is keg-only, which means it was not symlinked into /usr/local, because this is an alternate version of another formula.
I get a disturbing message, so I haven't tried it. For now, continue with 3.7.6.
When dealing with Python in business, put anyenv, put pyenv, and perform Python version control, but it is not for beginners, so brew It is explained in. If you are interested, please check it out later.
Python 2 and 3 are compatible. Let's take a look at the version.
$ python -V
Python 2.7.16

$ python3 -V
Python 3.7.6
Installation of virtualenv and virtualenvwrapper
virtualenv is a tool for creating a virtual environment for Python. For each project
- Python version
- Python package to use and its version
Build a fixed virtual environment.
virtualenvwrapper is a wrapper that makes it a little easier to create and delete virtual environments with virtualenv.
There is also a command to create a virtual environment called venv in the Python3 standard, but this one is used.
Put pip on python2 side
$ sudo easy_install pip
Insert virtualenv and virtualenvwrapper on Python2 side
$ sudo pip install virtualenv virtualenvwrapper --ignore-installed six
Contains virtualenv virtualenvwrapper that supports both Python2 and Python3.
virtualenv virtualenv wrapper setup procedure
-
- Create a directory for the virtual environment
$ cd ~ $ mkdir ~/.virtualenvs
-
Create a .bashrc file with a text editor or similar.
.bashrc
export WORKON_HOME=$HOME/.virtualenvs
source /usr/local/bin/virtualenvwrapper.sh
- Continue to work in your home directory.
- If you can use vi, do it with vi.
- Even with a normal text editor, you can manage to save a new ".bashrc".
-
- Add the following line to the last line of .bash_profile with a text editor.
.bash_profile
    :
    :
if [ -f ~/.bashrc ]; then
    . ~/.bashrc
fi
- With a normal text editor, opening the hidden file ".bash_profile" that starts with a dot seems to be a difficult task. (It does not come out)
- Ask someone who can do vi to help you. Or remember vi.
- If the terminal stays open, import the edited .bash_profile.
$ source .bash_profile
Building a virtual environment
Create a virtual environment named env1
$ mkvirtualenv --no-site-package --python /usr/local/bin/python3 env1
--no-site-package is a specification that prevents inheritance of the base python site-package You can specify the interpreter to use with the -p or --python options, so specify python3.
Move to virtual environment
Immediately after creating a virtual environment with mkvirtualenv, the command prompt is as follows.
(env1) $
If (env1) is displayed, you are in a virtual environment. If you exit the terminal and reopen it, you can move to the virtual environment env1 with the following command.
$ workon
env1
Other commands that handle virtual environments
Since env1 will be used after this, do not hit the following command, but remember it as knowledge.
View the list of current virtual environments
$ workon
env1
Switch to env1
$ workon env1
Disable virtual environment (return to global environment)
$ deactivate
Delete unnecessary virtual environment (after deactivating. All packages put in the virtual environment with pip will be deleted.)
$ deactivate
$ rmvirtualenv env1
Install Django
Django is also one of the Python modules. Install in the virtual environment env1.
This time, I'll install the Django version specified for this course.
$ workon env1
$ pip install django==3.0.2
Check the version
Check the packages installed in the virtual environment.
$ pip freeze -l
asgiref==3.2.3
Django==3.0.2
pytz==2019.3
sqlparse==0.3.0
Installation of IDE integrated development environment
You can use any text editor to write your Django code, but we recommend that you install PyCharm Professional (https://www.jetbrains.com/pycharm/) as your IDE.
Features of PyCharm
- It's no exaggeration to say that Python engineers mostly use this.
- There are two types, --Professional version
- You can open a Django project and use this one.
- You can try it for 30 days for a fee. I think this course will end in 30 days.
- If you like it, buy it.
- Students have a free license, so please search for "Pycharm student". --Community version
- It's free, but you can't open Django projects.
- If you really want to use it for free and just want to use it as a Python editor, this may be fine.
- UI is in English. I don't think about translating it into Japanese. Let's think that there is no particular problem.
- The theme of white letters on a black background is easy on the eyes and is cool. I feel like I'm writing code. See here for a UI sample.
Recently, there is an option to use Visual Studio Code as a Python IDE. I won't explain it here, but if you like the Japanese one for free, you can choose it. · Python code completion -If you can specify where the Python interpreter of the Python virtual environment is, debug execution Etc. can be done in the same way as PyCharm.
Install PyCharm Professional
- Download the Professional version from the Download PyCharm page.
- Open the downloaded .dmg file.
- Drag PyCharm.app to your application folder as shown.

-
After installation, let's start Application> PyCharm.app.
-
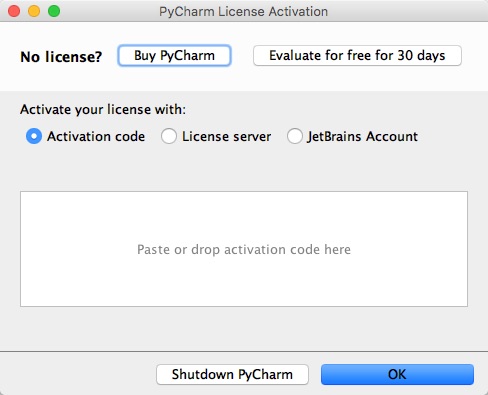
If you are new to PyCharm, you can leave this screen as it is because there is no previous settings.

- Select the one for Evaluate for free for 30 days and press OK.

- Read carefully and press Accept.

- Change only the theme. IDE theme: Darcula has a black background / white letters and I feel like writing code.

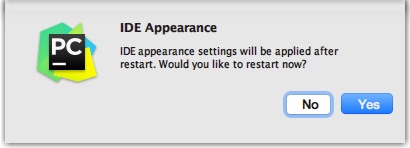
- It's in the middle of booting, but if you change the theme settings, it looks like it's restarting. Press Yes.

- Welcome to PyCharm

Once you've come this far, let's move on.
Continue to Introduction to Python Django (3)
Recommended Posts