Python installation (Mac edition) (old)
Since the content of this article is getting old, I uploaded "Python3 installation (Mac version)" again. I will leave this article as it is, but please note that it is already out of date.
0. Installation target
Installation and configuration procedure for super beginners for the following environments. Unless otherwise stated in the version, the latest version as of November 1, 2015 is used. It is assumed that it will not be used for virtual environments such as vagrant. I will write about how to install with vagrant soon. Perhaps.
--Mac OS X Yosemite (El Capitan is excluded.) --Python 2.7.5 (Currently the latest version is 2.7.10, but it is described as a method to install the past version)
- Homebrew
- pyenv
- Eclipse 4.4 Luna Pleiades --PyDev plugin
- pip
1. Install Python
There are various installation methods for using Python on a Mac. This time, I will describe 4 patterns according to the situation.
1.1. Use pre-installed Python
On Mac, Python2 series is installed by default. I think it's okay to use pre-installed Python for training and a little programming study. If you use the pre-installed Python, no further work is required. Let's just practice the command.
$ python --version
python 2.7.10
$ which python
/usr/bin/python
1.2. How to install from dmg file
This is a method to download and install the required version of the installation file (dmg file) from Python.org. This is sufficient if you are unlikely to install other versions and will only use them in IDEs such as Eclipse and PyCharm.
First, download the required version of the dmg file from the following site.
Python.org/downloads

Run the downloaded dmg file and install Python. Basically, you can just hit next repeatedly. The PATH setting should be set automatically, but when I check the location of the command from the terminal
$ which python
/usr/bin/python
If so, add the following statement to ~ / .bash_profile.
- Please match the
2.Xpart with the installed version.
~/.bash_profile
export PATH=/Library/Frameworks/Python.framework/Versions/2.X/bin:$PATH
Don't forget to check after setting the PATH.
$ source ~/.bash_profile
$ which python
/Library/Frameworks/Python.framework/Versions/2.X/bin/python
1.3. How to install using Homebrew
If you're developing a Mac in a different programming language, you're probably using a package management system such as Macport or Homebrew. This time, I will introduce the installation method using Homebrew. However, when using Homebrew
--Installing XCode command line tools from XCode or the Apple Developer site --Stable connection environment to the Internet
Is a prerequisite. How to install XCode and XCode command line tools is not explained here, so please check it yourself.
XCode command line tools can be used from an internet connection
$ sudo xcode-select --install
Please install more. You may also need to log in to the Apple Developer site.
1.3.1. Installing Homebrew
When using for the first time, you can install by copying the installation command from the following site, pasting it in the terminal and executing it.

1.3.2. Install using the brew command
Minor version differences cannot be installed with the current homebrew alone, but this is convenient if you want to install only the latest version of the current version, or if you want to switch only between 2 and 3 series.
First, enable homebrew-versions to see which versions you can install.
$ brew tap homebrew/versions
==> Tapping homebrew/versions
Cloning into '/usr/local/Library/Taps/homebrew/homebrew-versions'...
--- Omitted ---
Check the installable version with the brew search command.
$ brew search python
app-engine-python                        python
boost-python                             python3
gst-python                               wxpython
homebrew/versions/gst-python010          zpython
homebrew/apache/mod_python               Caskroom/cask/python
homebrew/python/python-dbus              Caskroom/cask/python3
homebrew/python/vpython
python is the 2nd series command, and python3 is the 3rd series command.
To install the latest version of the 2 series, execute the following command.
$ brew install python
Also, don't forget to set your PATH.
~/.bash_profile
export PATH=/usr/local/bin:$PATH
$ source ~/.bash_profile
$ which python
/usr/local/bin/python
1.4. How to install with Homebrew + pyenv
If you need more detailed version specification as well as the difference between 2 and 3 series, you need to install a version switching tool such as pyenv. Also, this time, virtualenv will be installed at the same time so that you can create a virtual environment that uses multiple libraries with the same version.
- When installing with pyenv, there is a high possibility that HEAD conflict will occur if XAMP is installed on the Mac. You need to either stop using XAMP or rewrite your PATH setting to give priority to pyenv.
1.4.1. Installing pyenv
If Homebrew is already installed, you can install pyenv and virtualenv plugin at the same time with just the following command.
$ brew install pyenv-virtualenv
Also, add the following to ~ / .bash_profile.
~/.bash_profile
export PYENV_ROOT=${HOME}/.pyenv
if [ -d "${PYENV_ROOT}" ]; then
    export PATH=${PYENV_ROOT}/bin:$PATH
    eval "$(pyenv init -)"
    eval "$(pyenv virtualenv-init -)"
fi
Check the list that can be installed with pyenv.
$ pyenv install -l
Available versions:
  2.1.3
  2.2.3
  2.3.7
  2.4
  2.4.1
  2.4.2
  2.4.3
  2.4.4
    .........
1.4.2. Installing the version used by Pyenv
Specify the required version and install.
$ pyenv install 2.7.5
$ pyenv install 3.5.0
Python installed with pyenv is installed under ~ / .pyenv.
Check the installed version.
$ pyenv versions
system (set by /Users/username/.pyenv/version) 2.7.5 3.5.0
Decide which version to use.
Use the global option to specify the version you want to use by default, or the local option after navigating to the folder you want to use to specify the version to use only in a specific directory.
$ pyenv global 3.5.0
$ python --version
  Python 3.5.0
$ mkdir ~/Python2
$ cd ~/Python2
$ pyenv local 2.7.5
$ python --version
  Python 2.7.5
If you do like the above example, Python2.7.5 will be called by the python command under the ~ / Python2 directory, and Python3.5.0 will be called by the python command in other directories.
1.4.3. Managing multiple versions using the virtualenv environment
If you want to prepare multiple versions of Python installed by pyenv, including the library to be used, you can manage it using virtualenv.
First, create the environment you want to use with any name.
$ pyenv virtualenv 2.7.5 study_2.7.5
$ pyenv versions
- system (set by /Users/username/.pyenv/version) 3.5.0 2.7.5 study_2.7.5
Create, move, and set the directory that runs the specified environment.
$ mkdir ~/study_python2
$ cd ~/study_python2
$ pyenv local study_2.7.5
$ python --version
  Python 2.7.5
Now, apart from the Python 2.7.5 environment created earlier, you have created a Python environment that can be used only under the ~ / study_python2 directory.
2. Install Eclipse
2.0. Check Java environment
If you want to use Eclipse, you need to have Java installed. Check if Java is installed with the following command, and if an error occurs, download and install the Java SDK from the Oracle site. http://www.oracle.com/technetwork/java/javase/downloads/index.html
$ java -version
java version "1.8.0_51"
Java(TM) SE Runtime Environment (build 1.8.0_51-b16)
Java HotSpot(TM) 64-Bit Server VM (build 25.51-b03, mixed mode)
2.1. Installation of Eclipse itself
The current latest version is Eclipse 4.6 (Neon), but the following example uses Eclipse 4.4 (Luna). Download Eclipse itself from Eclipse.org. (As of November 1, 2015, it can be downloaded from the following link. The link destination may change. In that case, from the top page of Eclipse.org, "Eclipse luna" Please search for.) https://eclipse.org/downloads/packages/release/luna/sr2 Please download the target of the bit that matches your machine.

Unzip the downloaded tar file and move the ** "eclipse" ** folder to the application folder as it is.
!! !! Don't start yet at this point! !!

2.2. Installation of Pleiades plugin (Japanese localization package)
If you want to use eclipse in Japanese environment, download and install the Pleiades plugin. The Windows version can be downloaded as a set with Eclipse, but the Mac version and Linux version need to be installed separately.
(Added on 2016.12.27) Mac version of Pleiades has been released. Please refer to the following articles from Eclipse4.6 Neon. Eclipse Pleiades All in One for Mac released
The following is the installation method for Eclipse 4.5 and earlier versions.
Download the Pleiades plugin (pleiades.zip) from the official website.
http://mergedoc.osdn.jp

Copy all the contents of the unzipped pleiades, and overwrite copy (combine folders) ** to the ** "eclipse" folder you moved earlier.

After overwriting, right-click ʻeclipse.app` and select" Show Package Contents ".
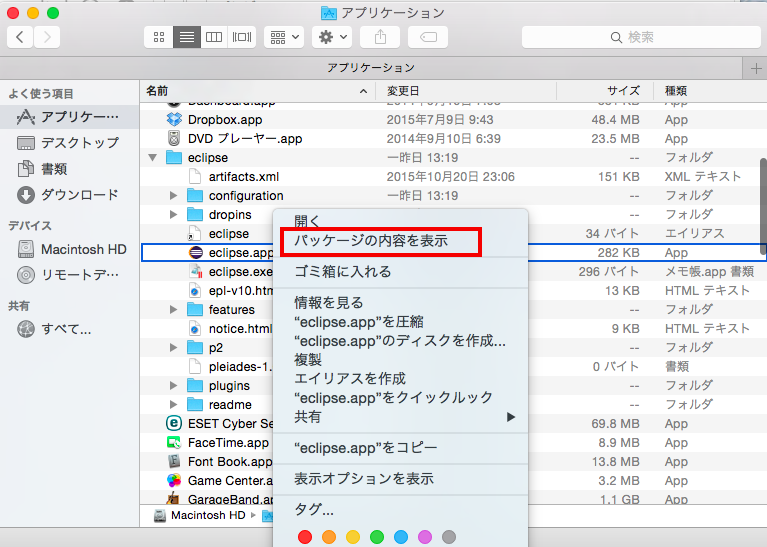
eclipse.app/Contents/MacOS/eclipse.iniファイルをテキストエディタで開きます。

Add the following contents to eclipse.ini at the end of the file and save it by overwriting.
eclipse.ini
    -Xverify:none
    -javaagent:plugins/jp.sourceforge.mergedoc.pleiades/pleiades.jar
After editing the ini file, start ʻeclipse.app`. If the menu etc. are translated into Japanese, it is complete.
3. Install and configure the PyDev plugin
3.1. Installing the PyDev plugin
After starting eclipse, select ** [Help]-> [Eclipse Marketplace] ** from the menu bar.
Once the Marketplace is up, search for ** "pydev" ** and run the installation.

3.2. PyDev settings
After the PyDev installation is complete, specify the Python version to run.
** [Eclipse]-> [Preferences]-> [PyDev]-> [Interpreter]-> [Python Interpreter] **
Then press the ** "New" ** button, Specify the Python executable that you have already installed. Do not uncheck the directories that are automatically selected for the library, and press ** "OK" **. Also, use the ** "Up" and "Down" ** buttons so that the version you want to use with the highest priority is on top. (It is also possible to change the version used for each project.)
If you installed Python with pyenv, it's OK if it looks like the following.
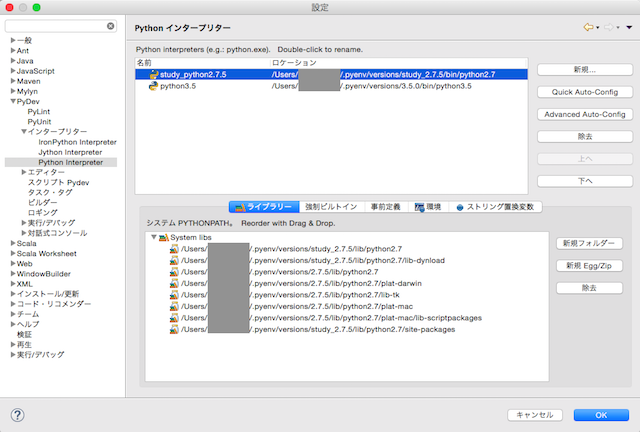
Caution!! The latest version of PyDev is compatible with Python 2.7.8 and later. Python 2.7.5 installed this time is installed as an example only, so if you use the latest version of PyDev, please use Python 2.7.9 or later for the subsequent work.
4. Install pip
Package management is essential when working with Python, and pip is a tool that makes it easy.
--Python 2.7.9 or later --Python 3.4 or later --When installed using pyenv
By default, pip is already installed, so let's check if it is installed.
$ pip -V
pip 7.1.2 from /Users/username/.pyenv/versions/study_2.7.5/lib/python2.7/site-packages (python 2.7)
If not, install it using the curl command.
curl -kL https://raw.github.com/pypa/pip/master/contrib/get-pip.py | python
(Reference) Installation of PyCharm
I introduced Eclipse as an IDE, but if you do not use it for web application development such as Django or Google App Engine, the Free version of PyCharm as an IDE for Python is lightweight and easy to set up. It may not be for beginners because there is no Japanese environment, but if you are comfortable with the English environment, we recommend it over Eclipse + PyDev.
Please download the Community Edition dmg file from the official website. https://www.jetbrains.com/pycharm/download/

Run the downloaded dmg file and install it. The virtualenv environment is also created on the IDE.
Recommended Posts