Handle rabbimq with python
Introduction
RabbitMq allows you to exchange messages between software and queue messages (AMQP). There are many sites that describe how to use it, but there are few that actually describe how to manage messages, so I have summarized from preparing RabbitMq and python pika to checking messages.
environment
- python:3.6.5 --Image: rabbitmq: 3-management
What you need to use RabbitMq
- RabbitMq server: what receives and sends messages (where to store messages)
- producer: The one that sends the message (client)
- consumer: The one that receives the message (host)
1. Preparation of RabbitMq
Get docker RabbitMq image
There are two RabbitMq images, the standard one and the one with the management plugin enabled. This time I want to see the status of the queue, so I will pull the one of the management plugin. A container is provided with the name rabbitmq, so pull the image.
docker pull rabbitmq:3-management
For regular rabbitmq, pull `rabbitmq` instead of `rabbitmq: 3-management`.
Start RabbitMq
Start RabbitMq. This time, I added the `-d` option because I want it to keep running in the background. Also, since I want to see the management screen for the port, I link 15672 in the container to 8080 on the host, and the port that actually exchanges queues to 5672 in the container and 5672 on the host. In addition, the name ``` --hostname` `` is used to identify the queue.
docker run -d --hostname my-rabbit --name some-rabbit -p 5672:5672 -p 8080:15672 rabbitmq:3-management
For normal rabbitmq, run `rabbitmq` instead of `rabbitmq: 3-management` and you don't even need `-p 8080: 15672`.
RabbitMq startup confirmation
This time, I started a container with the management plugin enabled, so I will access `localhost: 8080` from a browser and take a look at the contents. When you access it, you will be taken to the login screen, so enter with the default `guest`. You can see the current state. Nodes contains the name you specified earlier with ``` --hostname` ``.

2. producer: Prepare a message sender (client)
To create a producer, python exchanges queues, so we use a library called pika to access rabbitmq.
pika installation
Installation of pika is normally done with pip.
pip install pika
Implementation of producer
The following steps are required to send a message. All of these steps are done for rabbitmq, so no consumer is needed.
--Create a connection --Channel creation / acquisition --Cue creation / acquisition --Send message
Create connection
Make a connection from python to RabbitMq. Give settings such as host name (IP address), port number, and timeout to the parameters to be created. Since the RabbitMq container is tied to the host's 5672 port, I gave localhost as a parameter and did not specify it because the port remains the default 5672. After that, parameters are given to create a connection and the connection is completed.
client_main.py
import pika

pika_param = pika.ConnectionParameters('localhost')
connection = pika.BlockingConnection(pika_param)
Channel creation / acquisition
After the connection is completed, the next step is to create a channel. A channel is like a road to RabbitMq. Producers and consumers with the same channel are the targets of message exchange.
client_main.py
import pika

pika_param = pika.ConnectionParameters('localhost')
connection = pika.BlockingConnection(pika_param)
channel = connection.channel()
Only the last line has been added. Enter the channel identification number in this argument if required.
Queue creation / acquisition
After creating the channel, create the queue. This queue is like a place to store messages. Therefore, messages cannot be exchanged unless the queue names are the same. Unlike channels, you must specify it.
client_main.py
import pika

pika_param = pika.ConnectionParameters('localhost')
connection = pika.BlockingConnection(pika_param)
channel = connection.channel()

channel.queue_declare(queue='hello')
Only the last line has been added. Enter the queue settings in this argument if required.
Send message
Now that we are ready, we will send you a message. Specify the name of the queue in `routing_key` of `basic_publish ()` and specify the message you want to send to `body`.
client_main.py
import pika

pika_param = pika.ConnectionParameters('localhost')
connection = pika.BlockingConnection(pika_param)
channel = connection.channel()

channel.queue_declare(queue='hello')

channel.basic_publish(exchange='', routing_key='hello', body='Hello World!')

connection.close()
Finally, close the connection when the transmission is completed.
I will actually send it
Now that we have the source for sending to RabbitMq, let's run it. The command will come back soon.
PS C:\Users\xxxx\program\python\pika> python .\client_main.py
I will also check it on the management screen of RabbitMq. If you look at the Queues tab, you can see that Message is Ready: 1.

3. consumer: Prepare the one (host) to receive the message
Consumers also use a library called pika to access RabbitMq to exchange queues with python.
Implementation of consumer
The following steps are required to send a message. All of these steps are done for RabbitMq, so you don't need a producer to boot. From connection creation to queue creation is the same as producer.
--Create a connection --Channel creation / acquisition --Cue creation / acquisition --Creating a callback (processing on reception) --Start accepting queue messages
Creating a callback (processing on reception)
Describe the function you want to process when a message is received. Specify the response function basic_ack ()` `` to remove the message from the queue since it was received at the end of the function. This time, as an example, the function `` `callback that displays the received message is described.
host_main.py
import pika
pika_param = pika.ConnectionParameters(host='localhost')
connection = pika.BlockingConnection(pika_param)
channel = connection.channel()
channel.queue_declare(queue='hello')

def callback(ch, method, properties, body):
print("{} Received".format(body))
ch.basic_ack(delivery_tag = method.delivery_tag)
Start accepting queue messages
Specify the queue name and callback function in `basic_consume ()` of the created channel. Then start receiving the message with the `start_consuming ()` function. When this function is started, it waits for a message endlessly in the function, so when it ends, it is necessary to put a trigger of termination in the callback function.
host_main.py
import pika

pika_param = pika.ConnectionParameters(host='localhost')
connection = pika.BlockingConnection(pika_param)
channel = connection.channel()

channel.queue_declare(queue='hello')

def callback(ch, method, properties, body):
    print("{} Received".format(body))
    ch.basic_ack(delivery_tag = method.delivery_tag)

channel.basic_consume(
    queue='hello', on_message_callback=callback)

channel.start_consuming()
Actually receive
Now that we have a source for receiving from RabbitMq, let's run it.
PS C:\Users\xxxx\program\python\pika> python .\host_main.py
b'Hello World!' Received
You can confirm that the message sent by the producer can be received and output as standard.
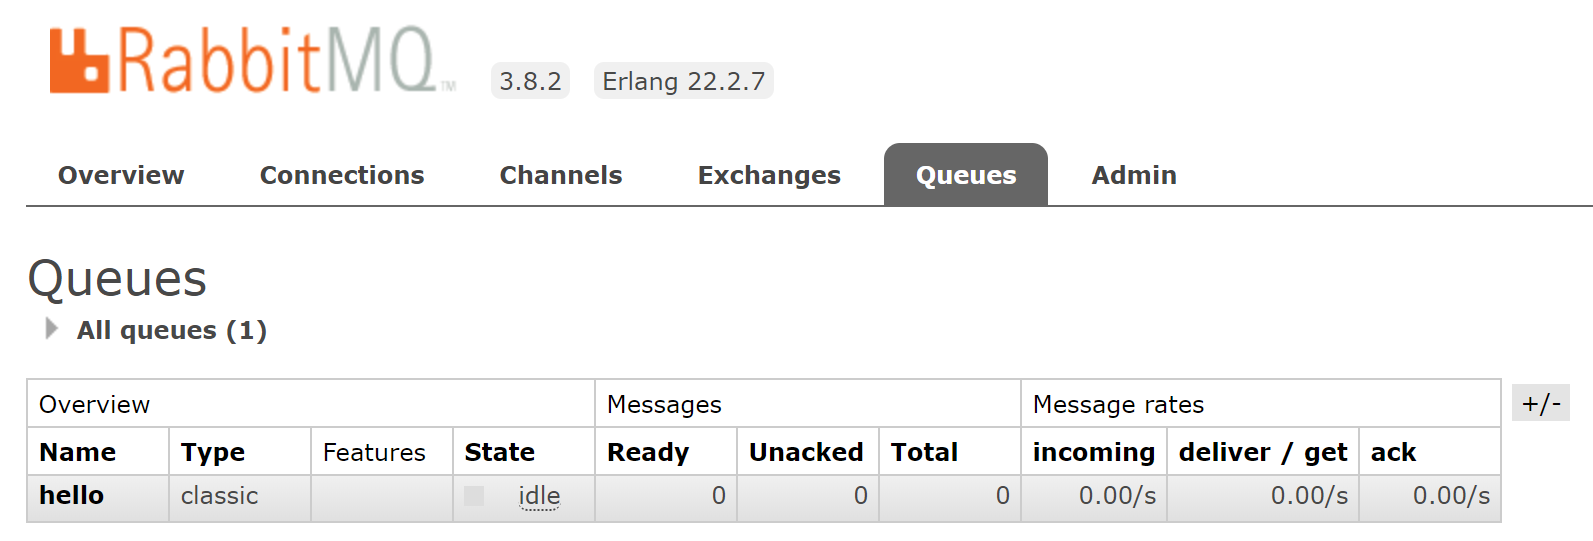
I will also check it on the management screen of RabbitMq. If you look at the Queues tab, you can see that Message is Ready: 0.

in conclusion
I summarized how to exchange messages with python using RabbitMq. However, it is almost the same as the official content. By using this, it seems that asynchronous processing and processing related to queues can be easily performed.
Recommended Posts