[PYTHON] Make an air conditioner integrated PC "airpi" with Raspberry Pi 3!
Introduction
My name is Ryosuke Kamei and I am an IT consultant based on the idea of "gentle IT"! Currently, in my work, I am doing upstream processes focusing on requirements analysis and requirements definition, but I also write programs! As part of our friendly IT activities, we will introduce the goods and services programs created with "Raspberry Pi 3" (commonly known as Raspberry Pi), which has the philosophy of "providing inexpensive PCs that can be programmed for education"!
specification
Join the Rasppie Contest 2016! I asked my daughter to write a proposal ~ The name is "Air conditioner integrated PC airpi"!
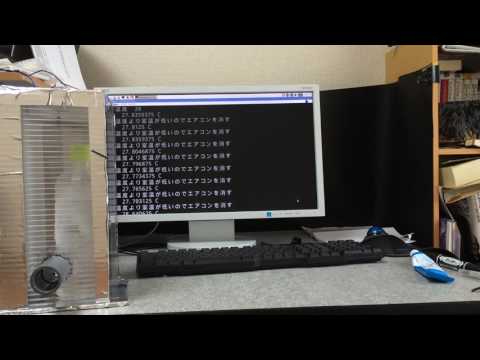
It's done
The motor was weak and there wasn't much wind (laughs) It may be practical if you change the housing or raise the voltage to make the fan stronger.
appearance
 (It's a Raspberry Pi, and I wrote it with tux paint.)
specification
Air conditioner with sensor to cool the room automatically Temperature setting 27 ℃ (Temperature can be set with Raspberry Pi) When it's hot
- The temperature rises
- Sensor catches
- Read by Raspberry Pi
- Bring the room to 27 ° C
When it's cold
- The temperature goes down
- Sensor catches
- Read by Raspberry Pi
- Stop once
appeal When I'm using a computer, the wind blows and it gets cooler.
Implementation
Actually, I wanted my daughter to do everything, but because I live far away, my father will take over from here.
reference
[Razpai Magazine-June 2016 Special Feature 1 Akiba's Popular Parts Wiring Diagram Best 17](https://www.amazon.co.jp/ Razpai Magazine-June 2016 Issue-Nikkei BP PC Best Mook- Nikkei Linux-ebook / dp / B01EH2RX42 / ref = as_li_ss_tl? ie = UTF8 & dpID = 61P3o6Agz + L & dpSrc = sims & preST = OU09__BG0,0,0,0_FMpng_AC_UL160_SR120,160 & psc = 1 & refRID = 31SKG5E0DGKBSF9BWNGV & linkCode = ll1 & tag = sr2smail-22 & linkId = 18fd04738627edef8d6fffd6c9b8f9c2) [Razpai Magazine-August 2016 Special Feature 1 Basic Patterns for Electronic Work 12](https://www.amazon.co.jp/%E3%83%A9%E3%82%BA%E3%83%91 % E3% 82% A4% E3% 83% 9E% E3% 82% AC% E3% 82% B8% E3% 83% B3-2016% E5% B9% B48% E6% 9C% 88% E5% 8F% B7 -% E6% 97% A5% E7% B5% 8CBP% E3% 83% 91% E3% 82% BD% E3% 82% B3% E3% 83% B3% E3% 83% 99% E3% 82% B9% E3% 83% 88% E3% 83% A0% E3% 83% 83% E3% 82% AF-% E6% 97% A5% E7% B5% 8CLinux / dp / 4822237710 / ref = as_li_ss_tl? Ie = UTF8 & qid = 1471057119 & sr = 8-4 & keywords =% E3% 83% A9% E3% 82% BA% E3% 83% 91% E3% 82% A4 & linkCode = ll1 & tag = sr2smail-22 & linkId = c42c3f78bd8af3af1414020a400090fe)
procedure
It uses a digital temperature sensor "ADT7410" and a motor driver.
- [Preparation] Install libi2c-dev
- [Preparation] Write to the configuration file
- [Preparation] Set to use I2C
- [Preparation] Check if I2C can be used
- Digital temperature sensor circuit diagram
- Get the value of the digital temperature sensor digital_temperature_sensor.py
- Run the digital temperature sensor program
- Circuit diagram with motor driver and motor added
- A program airpi.py that controls the on / off of the air conditioner according to the set temperature.
- Move airpi
1. [Preparation] Install libi2c-dev
To use the digital temperature sensor "ADT7410", you need to install libi2c-dev!
libi2c-install dev
$ sudo apt-get install libi2c-dev
2. [Preparation] Write to the configuration file
bash:/etc/modprobe.d/i2c.Write settings to conf
$ sudo sh -c 'echo "options i2c_bcm2708 combined=1" >> /etc/modprobe.d/i2c.conf'
3. [Preparation] Set to use I2C
Menu → Settings → Raspberry settings → Interface tab → I2C is "enabled" → Click "OK"
[ ](http://www.youtube.com/watch?v=5S- w_pb1XS0)
4. [Preparation] Check if I2C can be used
Confirmed with i2cdetect (it seems to be 0 depending on the partial version of 1)
$ sudo /usr/sbin/i2cdetect -y 1

5. Digital temperature sensor circuit diagram

6. Get the value of the digital temperature sensor digital_temperature_sensor.py
The program is [Razpai Magazine-June 2016 Issue Special Feature 1 Akiba's Popular Parts Wiring Diagram Best 17 ⑥ Digital Temperature Sensor](https://www.amazon.co.jp/ Razpai Magazine-June 2016 Issue- Nikkei BP PC Best Mook -? Nikkei Linux-ebook / dp / B01EH2RX42 / ref = as_li_ss_tl ie = UTF8 & dpID = 61P3o6Agz + L & dpSrc = sims & preST = OU09__BG0,0,0,0_FMpng_AC_UL160_SR120,160 & psc = 1 & refRID = 31SKG5E0DGKBSF9BWNGV & linkCode = ll1 & tag = sr2smail-22 & linkId = 18fd04738627edef8d6fffd6c9b8f9c2 ) Was used as a reference.
The source is uploaded to GitHub, so please use it as you like.
Clone with git
$ git clone https://github.com/RyosukeKamei/raspberrypi3.git
digital_temperature_sensor.py
#Preparation
# $ sudo apt-get install libi2c-dev
# $ sudo sh -c 'echo "options i2c_bcm2708 combined=1" >> /etc/modprobe.d/i2c.conf'

#Library to control GPIO
import wiringpi
#Timer library
import time
#Call the library required to read from the I2C device
import os
import struct
#Get arguments
import sys

#Argument specification
param = sys.argv
set_temperture = int(param[1])
print("Preset temperature", set_temperture)

#Create an instance of I2C
wiringpi.wiringPiSetup()
i2c = wiringpi.I2C()

#I2C settings
#Specify the I2C address of the device to communicate
temperture_dev = i2c.setup(0x48)

#Get 16-bit temperature data
#Others Set to register 0x03
i2c.writeReg8(temperture_dev, 0x03, 0x80)

while True:
    #Read 2 bytes of temperature sensor
    temperture_data = struct.unpack('2B', os.read(temperture_dev, 2))

    #The value is divided into 2 bytes, so combine them into one.
    temperture = ( ( temperture_data[0] << 8 ) + temperture_data[1] )

    #Convert numbers for negative values
    if ( temperture_data[0] >= 0x80 ):
        temperture = temperture - 65536

    #Calculate the temperature by dividing the acquired value by 128
    temperture = temperture / 128

    #Temperature display
    print ( "temperature" , temperture , "C" )

    if ( temperture > set_temperture ):
        print ( "Turn on the air conditioner because the room temperature is higher than the set temperature" )
    else:
        print ( "Turn off the air conditioner because the room temperature is lower than the set temperature" )

    #Every second
    time.sleep(1)
7. Run the digital temperature sensor program
Set the set temperature to 28 ° C
$ sudo python3 digital_temperature_sensor.py 28

8. Circuit diagram with motor driver and motor added
I added a motor driver (TA7291P) and a motor to control the motor to the circuit diagram (breadboard) earlier.
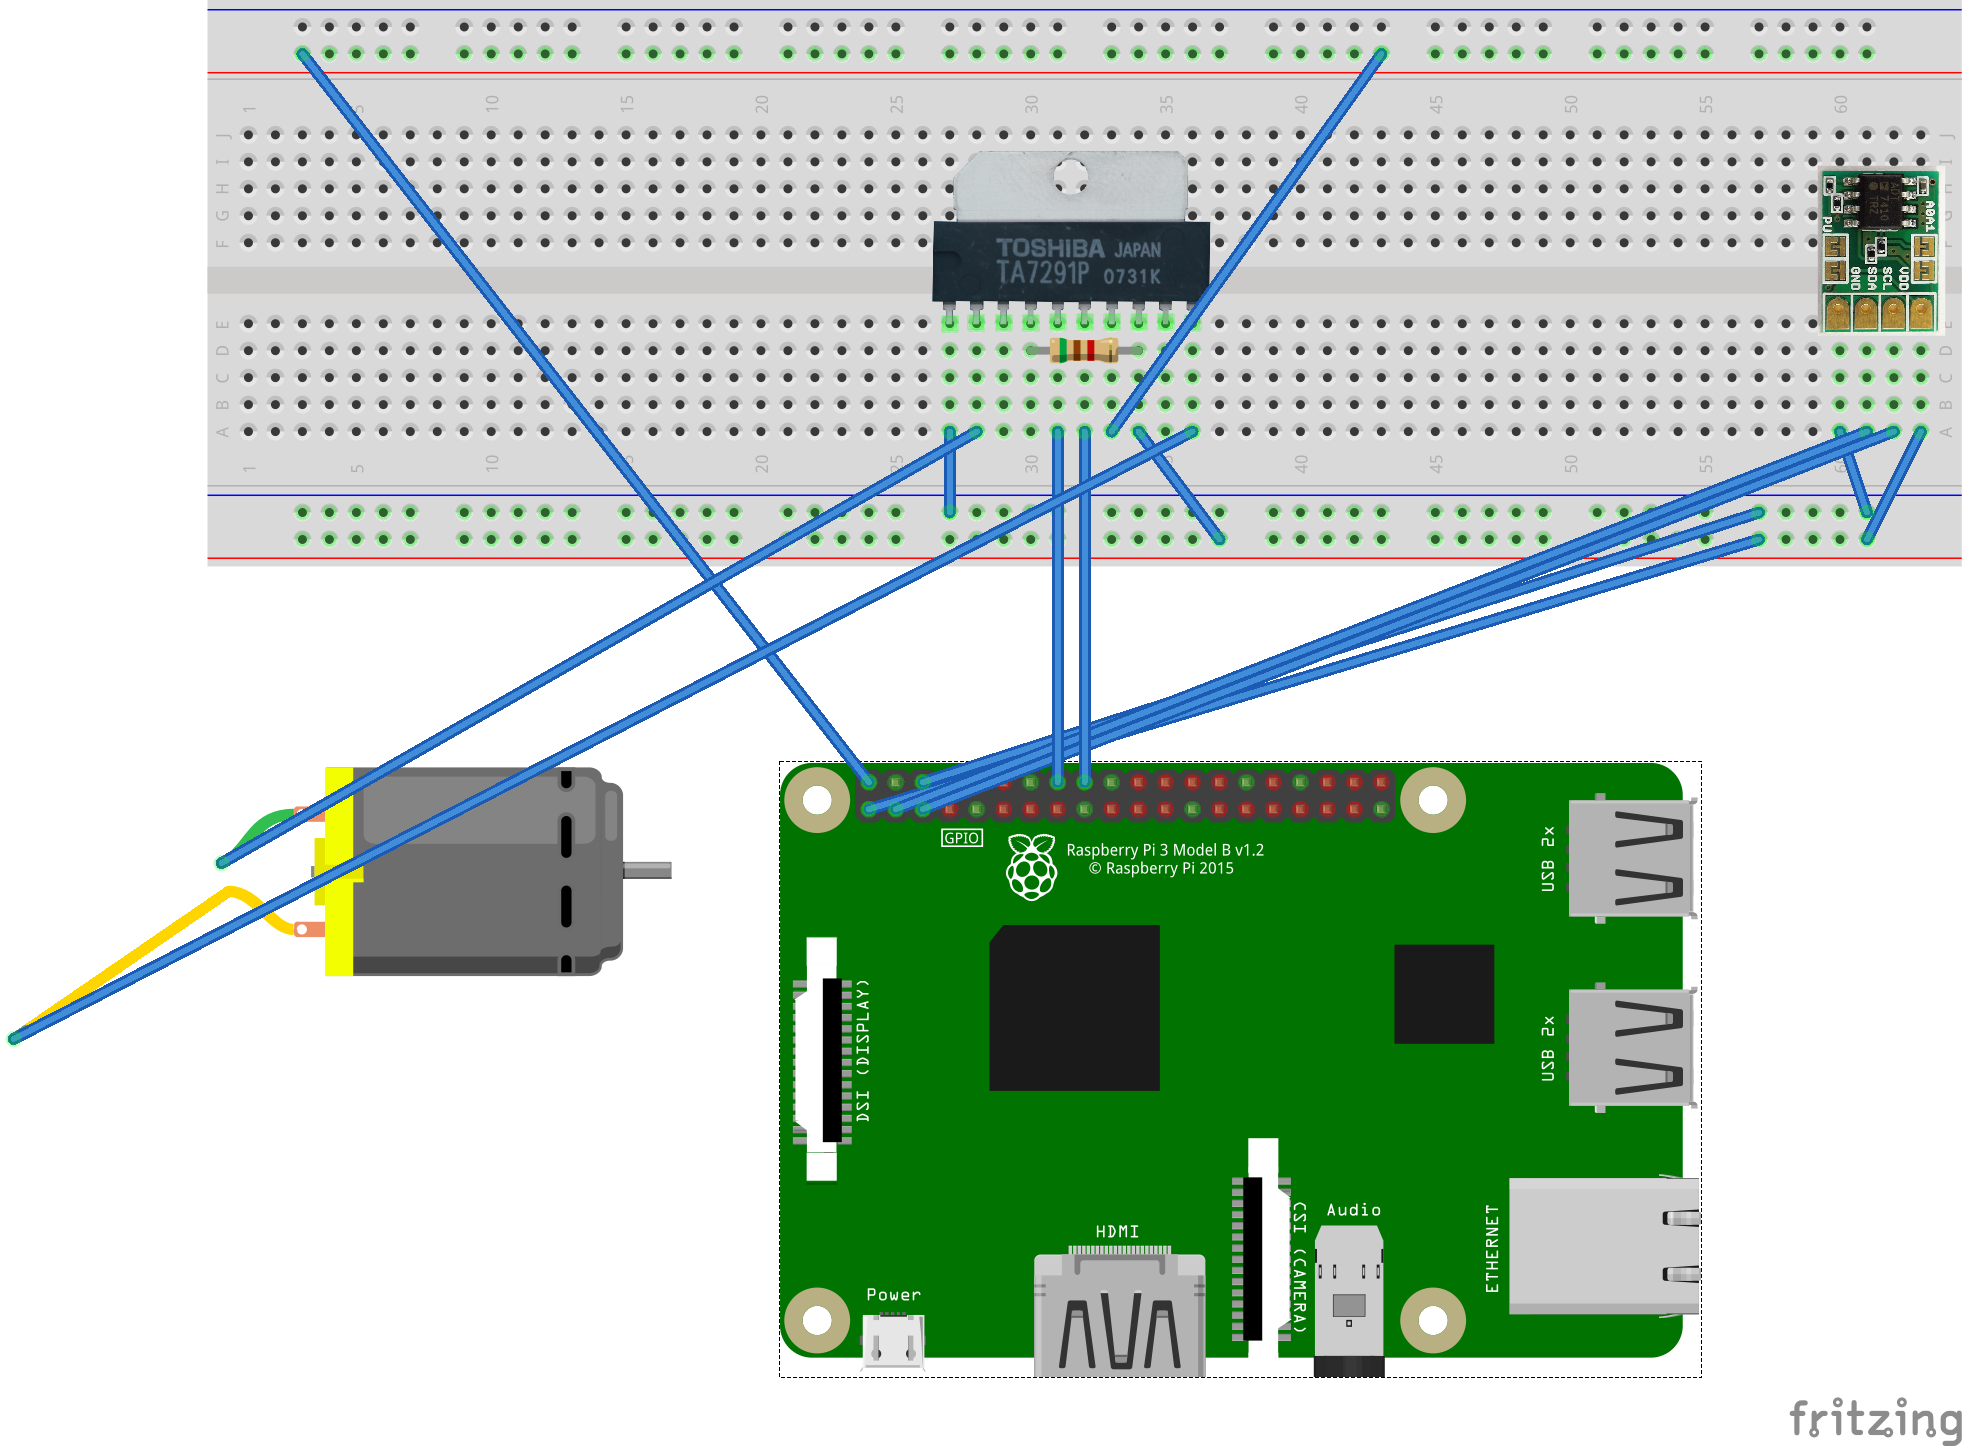
9. A program airpi.py that controls the on / off of the air conditioner according to the set temperature.
airpi.py
#Preparation
# $ sudo apt-get install libi2c-dev
# $ sudo sh -c 'echo "options i2c_bcm2708 combined=1" >> /etc/modprobe.d/i2c.conf'

#Library to control GPIO
import wiringpi
#Timer library
import time
#Call the library required to read from the I2C device
import os
import struct
#Get arguments
import sys

#GPIO terminal settings
motor1_pin = 23
motor2_pin = 24

#Set GPIO output mode to 1
wiringpi.wiringPiSetupGpio()
wiringpi.pinMode( motor1_pin, 1 )
wiringpi.pinMode( motor2_pin, 1 )

#Argument specification
param = sys.argv
set_temperture = int(param[1])
print("Preset temperature", set_temperture)

#Create an instance of I2C
i2c = wiringpi.I2C()

#I2C settings
#Specify the I2C address of the device to communicate
temperture_dev = i2c.setup(0x48)

#Get 16-bit temperature data
#Others Set to register 0x03
i2c.writeReg8(temperture_dev, 0x03, 0x80)

while True:
    #Read 2 bytes of temperature sensor
    temperture_data = struct.unpack('2B', os.read(temperture_dev, 2))

    #The value is divided into 2 bytes, so combine them into one.
    temperture = ( ( temperture_data[0] << 8 ) + temperture_data[1] )

    #Convert numbers for negative values
    if ( temperture_data[0] >= 0x80 ):
        temperture = temperture - 65536

    #Calculate the temperature by dividing the acquired value by 128
    temperture = temperture / 128

    #Temperature display
    print ( "temperature" , temperture , "C" )

    if ( temperture > set_temperture ):
        print ( "Turn on the air conditioner because the room temperature is higher than the set temperature" )
        wiringpi.digitalWrite( motor1_pin, 1 )
        wiringpi.digitalWrite( motor2_pin, 0 )
    else:
        print ( "Turn off the air conditioner because the room temperature is lower than the set temperature" )
        wiringpi.digitalWrite( motor1_pin, 0 )
        wiringpi.digitalWrite( motor2_pin, 0 )
    #Every second
    time.sleep(1)
10. Move airpi
Set temperature is 28 ℃
$ sudo python3 airpi.py 28
site map
Raspberry Pi 3 setup
Install Raspberry Pi 3 → Wireless LAN → Japanese input / output → Operate from Mac
Build a Python + MySQL environment with Docker on Raspberry Pi 3!
Install Docker on RaspberryPi3 Build a Python + bottle + MySQL environment with Docker on RaspberryPi3![Easy construction] Build a Python + bottle + MySQL environment with Docker on RaspberryPi3![Trial and error]
Make an air conditioner integrated PC "airpi" with Raspberry Pi 3!
Make an air conditioner integrated PC "airpi" with Raspberry Pi 3!
Finally ... Make a radio control using python on Raspberry Pi 3!
Motor moves while pressing the button The motor moves while the magnet is brought closer The motor moves when the magnet is brought closer and stops automatically
Let's play with Raspberry Pi 3 (Raspberry Pi) and python Record of Raspberry Pi struggle
Programming with Node-RED programming with Raspberry Pi 3 and programming normally Light the LED with python on Raspberry Pi 3 (Hello World) Detect switch status on Raspberry Pi 3 Run a servo motor using python on Raspberry Pi 3 Control the motor with a motor driver using python on Raspberry Pi 3! Detect slide switch using python on Raspberry Pi 3! Detect magnet switch using python on Raspberry Pi 3! Detect temperature using python on Raspberry Pi 3! Sound the buzzer using python on Raspberry Pi 3! Detect analog signals with A / D converter using python on Raspberry Pi 3! Detect "brightness" using python on Raspberry Pi 3! Detect "temperature (using A / D converter)" using python on Raspberry Pi 3! Output to "7-segment LED" using python on Raspberry Pi 3! Use python on Raspberry Pi 3 to light the LED with switch control! Use python on Raspberry Pi 3 and turn on the LED when it gets dark!
Rules focused on test-driven development
Coding rules "Let's write gentle code" (FuelPHP) Naming convention "Friendly to yourself, team-friendly, and unseen members after 3 months"
Web application development with Docker + Python
Easy to develop environment construction (Docker + PHP)
PHP environment + Eclipse is linked to Apache using Docker Building FuelPHP development environment using Docker Create CRUD skeleton using initial settings of FuelPHP development environment using Docker and scaffold FuelPHP database migration
Recommended Posts