Discord Bot with recording function starting with Python: (1) Introduction discord.py
Introduction
In this article, we will create a Discord Bot in Python with recording capabilities from scratch several times.
discord.py is a wrapper library for Discord API. In this article, we will divide it into several times, from creating a bot with discord.py to adding your own functions. The order is to start with the environment construction, implement a set of functions, and then implement the recording function.
As I added explanations about various things, it became a ridiculously long article, so I decided to post it separately.
We plan to write 7 times in total, and have finished writing up to 5 articles.
- Discord Bot with recording function starting with Python: (1) Introductory discord.py
- Discord Bot with recording function starting with Python: (2) Convenient function (Bot extension, Cog, Embed)
- Discord Bot with recording function starting with Python: (3) Cooperation with Database
- Discord Bot with recording function starting with Python: (4) Play music files
- Discord Bot with recording function starting with Python: (5) Directly operate Discord API
There may be an error in the implementation method in this article. In that case, please point out in the comment section.
How did you come to write this article
Discord.py has all the features that can reach the itch. For example, when you want to make music ** playback ** Bot, you should originally "authenticate with WebSocket → connect to WebSocket for Voice Channel and prepare to send voice → make UDP connection and Opus encode with RTP You have to perform complicated processing such as "encrypt and send 20ms of music data" [^ 1], but this discord.py has all such functions implemented and can be used easily.
[^ 1]: You don't have to read the inside of these brackets now. It's OK to recognize that you are doing difficult things.
However, regarding the ** recording ** function (reception of voice data),
https://github.com/Rapptz/discord.py/issues/1094
As mentioned in this issue, there have been voices requesting implementation for several years, but PR to the head family has not yet been carried out. For the time being, the recording function itself seems to be implemented in Discord.js, which is a wrapper for the JS version. If it wasn't impossible, I tried to implement it myself, so I started thinking about writing an introductory article on discord.py along with an introduction to it.
Notes
--I will not give a rudimentary explanation of Python itself.
- Operating environment
- Ubuntu 20.04
- Python 3.8.2
- Docker 19.03
- docker-compose 1.26
- discord.py 1.4.1
- VSCode 1.47.3
- Pipenv 2018.11.26 --Installation of Python, Pipenv, Docker, docker-compose, VS Code is not explained.
Please see here for Pipenv.
Please see here for docker-compose.
Environment
Creating a bot
First, create a bot from Discord's Developer Portal. Create it by naming it appropriately from New Application. (The name of the bot is DBot here)
When the creation is completed, the screen will look like this. You can also change the icon image.
Next, we will issue the tokens required to create the bot. If this token is leaked ** For example, if the token is leaked for a bot with administrator privileges, a third party can operate the server with the administrator privileges for all the servers to which the bot is added. It will be possible. It is necessary to manage it with the utmost care so that it will never leak. ** **
To issue a token, select [Add Bot] from the Bot menu.
For Bot tokens, click the button below from the screen after creating the Bot screen.
This completes the creation of the bot, but the authentication URL for adding the bot to the server has not been issued. You can issue the authentication URL from the OAuth2 menu.
Select bot in SCOPE and select bot authority in BOT PERMISSIONS. There is no problem if you put "Administrator" authority in the development stage. There are many existing bots that require Administrator, but it may seem a bit dangerous just because it is a bot that requires administrator privileges, so it may be necessary to review it when it is open to the public.
You can invite the bot to the server by clicking the URL that appears in the center of the screen. ** In order to install Bot, you need to have the management authority of the server you want to install. ** [^ 2]
[^ 2]: Server owner or user with the role of "administrator" or "server administrator"
Directory structure
In this project, we will develop based on the following directory structure. You don't need to create it yet because it will be created in order.
.
|- src                      #All roots of source code for services
|  |- app                   #Source code for the application
|  |  |- [bot name]         #Choose the name of your bot as you like.
|  |  |  |- cogs            # discord.Collect files for adding functions to py in this folder
|  |  |  |- core            #The definition of the bot itself, auxiliary functions, extensions, etc. are summarized here.
|  |  |  |- __init__.py     #Treat as a module
|  |  |  |- __main__.py     #File for startup
|  |  |
|  |  |- config.ini         #Various settings are made outside the module
|  |  |- Pipfile            # (It is automatically generated so you don't have to make it)
|  |  |- entrypoint.dev.sh
|  |
|  |- dev.dockerfile
|
|- docker-compose.dev.yml
If you just want to run it, you only need one file, but here we have a slightly complicated directory structure assuming that you want to run a larger service.
First, run Python. Create a virtual environment with Pipenv and run the bot in that environment.
$ mkdir src
$ cd src
$ mkdir app
$ cd app
$ mkdir dbot
$ echo 'print("Yay")' > ./dbot/__main__.py
$ pipenv --python 3.8.2
This completes the Python environment. I am using a special file name called __main__.py, but by writing Python code in this file The call to __main__.py
#If Python is originally on your PC
$ python -m dbot
Yay

#When running in the created Pipenv environment
$ pipenv run python -m dbot
You can do it with. When executing a self-made module, this one is cleaner and better.
Let's move the bot!
Now that you can run the Python code, let's actually install discord.py and make the bot work.
I divided the directories in detail in the previous section, but since the purpose of this article is to check the operation, I will write all the code in __main__.py.
$ pipenv install discord.py[voice]
After the installation is complete, edit __main__.py with an editor.
__main__.py
import discord

#A character string like this is a token(The token below is suitable)
TOKEN = "MTE0NTE0MzY0MzY0ODEwOTMx.Adiade.Oosak0_Majide_Hampana1tteee"

#Creating an object to move the bot
client = discord.Client()


@client.event
async def on_ready():
    #This function is called when the bot is ready to start
    print("Started")


@client.event
async def on_message(message):
    #This function is displayed when a message is sent
    #Message contains various information about the message sent by the user.

    #Does not respond to messages from bots
    if message.author.bot:
        return

    print("Message was sent")
    print("sender", message.author.display_name)
    print("Contents", message.content)

    #If a sentence with the content Yay is sent...
    if message.author != client and message.content == 'Yay':
        #Send the message back to the channel to which the message was sent
        await message.channel.send("You're on discord.py!")

client.run(TOKEN)
If you can input up to this point, save it and execute it again.
When it starts and the console displays Started, try typing the word Yay on the server where the bot is actually installed.
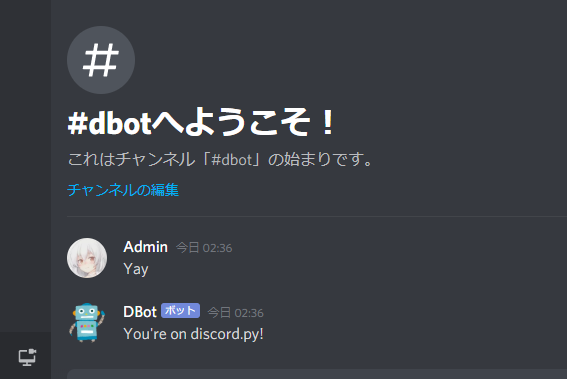
The following is displayed on the console.
$ pipenv run python -m dbot
Started
Message was sent
Sender Admin
Content Yay
Yay! You're on discord.py!
It's a very short code, but it's enough to make a simple bot work. Below are some supplements.
In this code, there are some places where @ client.event is attached on top of the function [^ 3] called ʻasync def on_Nanchara`. These are based on Python functionality, and each one
[^ 3]: Strictly speaking, ʻasync def ~~` is a coroutine function
async~await--Grammar used when writing asynchronous processing@client.event--@is a function called a decorator --By writing this in advance, the function below it will be fired when an event for the bot occurs.
There is a function / meaning. If you are a beginner, it is okay to recognize that you should write this for the time being.
By adding a @ client.event decorator to a function that starts with ʻon_, such as ʻon_ready, ʻon_message`, ** when a specific event occurs **, ** perform specific processing **, etc. Can be easily described. A list of supported events can be found on the API reference page (there are quite a few).
https://discordpy.readthedocs.io/ja/latest/api.html#event-reference
Also, there are places where ʻawait is used to call the function, but how to determine whether it is a function that requires ʻawait is Reference Page. In the description of the function (/latest/api.html),
This function is a coroutine.
If there is a place where it is written, the function must be prefixed with ʻawait`.
Also, in discord.py, information such as the content of the message and the sender of the message can be acquired as class properties. Therefore, even if you do not know the actual state of the code, it is easy to understand what kind of processing is being performed just by looking at the code. On the other hand, until you get used to it, you need to look at which property or method is in which class as a reference. ([Supplement](# 1-% E3% 82% 88% E3% 81% 8F% E4% BD% BF% E3% 81% 86% E3% 82% AF% E3% 83% A9% E3% 82% B9% E3% 81% A8% E3% 82% A4% E3% 83% 99% E3% 83% B3% E3% 83% 88) introduces some of the discord.py classes.)
Well, in short, if you're in trouble, take a look at the reference. The answer is 95% there. ** RTFM !!!**
Also, here we defined the event by directly instantiating discord.Client, but the same processing is possible even if you define your own class that inherits discord.Client. (This writing method is used for the reference page.)
__main__.py
import discord

TOKEN = "..."


class Bot(discord.Client):
    async def on_ready(self):
        print("Started")

    async def on_message(self, message):
        if message.author.bot:
            return
        print("Message was sent")
        print("sender", message.author.display_name)
        print("Contents", message.content)
        if message.content == 'Yay':
            await message.channel.send("You're on discord.py!")


Bot().run(TOKEN)
For the time being, let's run this service on a Docker container, assuming that we will add Bot functions later.
Creating a Docker container
Create three types of Docker-related files as seen in the directory configuration example at the beginning. As it is named dev, we are considering separating the environment during development and production execution.
- dev.dockerfile --Creating a base Docker image
- entrypoint.dev.sh --Script to run at startup
- docker-compose.dev.yml --Design document to make it easy to control Docker container
How to write Dockerfile [this article](https://qiita.com/Aruneko/items/796d7eeb61e1f36ae4a0#dockerfile%E3%81%AE%E6%9B%B8%E3%81%8D%E6%96% Following B9), create an image for execution after installing the Python package with the builder.
dev.dockerfile
FROM python:3.8 as builder
WORKDIR /bot
RUN apt update -y && \
    apt upgrade -y
COPY ./app/Pipfile ./app/Pipfile.lock /bot/
RUN pip install pipenv && \
    pipenv install --system

FROM python:3.8-slim
WORKDIR /bot
RUN apt update -y && \
    apt upgrade -y && \
    apt install -y nodejs npm curl && \
    npm install -g n && \
    n stable && \
    apt purge -y nodejs npm && \
    apt install -y ffmpeg && \
    apt autoremove -y
RUN npm install -g nodemon

ENV PYTHONBUFFERED=1
COPY --from=builder /usr/local/lib/python3.8/site-packages /usr/local/lib/python3.8/site-packages

COPY . /bot
In the build part of the image for execution, nodemon and ffmpeg are installed in the middle. nodemon is used to detect file changes and restart without having to stop and restart the bot during development, and ffmpeg is used to perform media-related processing such as music playback.
ʻEntrypoint.dev.sh` starts using nodemon.
shell:entrypoint.dev.sh
nodemon --signal SIGINT -e py,ini --exec python -m dbot
Finally, write docker-compose.dev.yml as follows
yml:docker-compose.dev.yml
version: "3.8"
services:
  dbot:
    build:
      context: ./src
      dockerfile: dev.dockerfile
    tty: true
    working_dir: /bot/app
    entrypoint: bash ./entrypoint.dev.sh
    volumes:
      - ./src:/bot
With these settings, the following src will be mounted on the bot of the container, and when the script is updated on the host, the change will be detected and the bot will be restarted. By making it a docker environment, it can be easily expanded when you want to add a database or Web front later.
After writing so far, return to the project root and execute the following command.
$ chmod +x ./src/app/entrypoint.dev.sh
$ docker-compose -f docker-compose.dev.yml -p dev build #Creating an image
$ docker-compose -f docker-compose.dev.yml -p dev up #Start-up
It has a long description of docker-compose -f docker-compose.dev.yml -p dev, but it is necessary to describe it like this because the environment is divided. If it is troublesome, you can be happy if you make a script like the following
run.sh
#!/bin/bash
cmd="docker-compose -f docker-compose.$1.yml -p $1 ${@:2}"
echo $cmd
eval $cmd
$ ./run.sh dev build
$ ./run.sh dev up
After confirming the startup, let's edit __main__.py as a trial.
dbot_1  | [nodemon] 2.0.4
dbot_1  | [nodemon] to restart at any time, enter `rs`
dbot_1  | [nodemon] watching path(s): *.*
dbot_1  | [nodemon] watching extensions: py,ini
dbot_1  | [nodemon] starting `python -m dbot`
dbot_1  |Started
dbot_1  | [nodemon] restarting due to changes...
dbot_1  | [nodemon] starting `python -m dbot`
dbot_1  |It has started
Detecting the save, the bot was restarted. This makes it possible to greatly improve development efficiency.
At the end
In this article, we have set up an environment suitable for basic bot construction and development.
Next time, I will explain the design for making a larger bot and the embedded elements that are not introduced in this article.
Supplement
1. Frequently used classes
-** Notation ** - List[type] --List of element type type - Optional[type] --Type is type or None - Union[type1, type2, ...] --Type is one of type1, type2, ... - *args --Variadic
Not all function arguments are listed, only frequently used ones are picked up.
discord.Message
Click to expand
https://discordpy.readthedocs.io/ja/latest/api.html#message
Property name
Mold
Description
id
int
Unique identifier
author
discord.Member
The person who posted the message
content
str
Message content
guild
discord.Guild
The server where the message was posted(guild)
channel
If it's on the serverdiscord.TextChannel
The channel where the message was posted(DM etc. will be another class, but I will not mention it here)
mentions
List[discord.Member]
List of people who skipped mentions
reactions
List[discord.Reaction]
Emoji reaction to the message
created_at
datetime.datetime
Post date and time
edited_at
Optional[datetime.datetime]
Edit date and time(If uneditedNone)
jump_url
str
Link to jump to that message
await delete()- message.
- Bot needs to think about message management authority.
await edit(content: str, ...)- message.
Specify with
- keyword as
edit (content = "hoge") .
- It must be a message posted by the bot itself.
-
await add_reaction (emoji: str etc.)
- Add reaction to message
- Unicode pictograms can be entered as is: ramen:
-
await remove_reaction (emoji: str etc, member: discord.Member)
- Delete the specified emoji reaction of the specified member
-
await clear_reaction (emoji: str etc.)
- Delete the specified emoji reaction
https://discordpy.readthedocs.io/ja/latest/api.html#message
| Property name | Mold | Description |
|---|---|---|
| id | int | Unique identifier |
| author | discord.Member | The person who posted the message |
| content | str | Message content |
| guild | discord.Guild | The server where the message was posted(guild) |
| channel | If it's on the serverdiscord.TextChannel | The channel where the message was posted(DM etc. will be another class, but I will not mention it here) |
| mentions | List[discord.Member] | List of people who skipped mentions |
| reactions | List[discord.Reaction] | Emoji reaction to the message |
| created_at | datetime.datetime | Post date and time |
| edited_at | Optional[datetime.datetime] | Edit date and time(If uneditedNone) |
| jump_url | str | Link to jump to that message |
await delete()
Delete - message.
- Bot needs to think about message management authority.
await edit(content: str, ...)
Edit - message.
Specify with
- keyword as
edit (content = "hoge") .- It must be a message posted by the bot itself.
- keyword as
-
await add_reaction (emoji: str etc.)- Add reaction to message
- Unicode pictograms can be entered as is: ramen:
- Add reaction to message
-
await remove_reaction (emoji: str etc, member: discord.Member)- Delete the specified emoji reaction of the specified member
-
await clear_reaction (emoji: str etc.)- Delete the specified emoji reaction
discord.Member
Click to expand
Property name
Mold
Description
id
int
Unique identifier
name
str
username
nick
Optional[str]
Name set on the server
display_name
str
If there is nick, nick,If not name
mention
str
A string to mention to a member
guild
discord.Guild
The server to which the member belongs
roles
List[discord.Role]
List of all roles of members
top_role
discord.Role
Member's best role
avatar_url
str
Avatar image URL
joined_at
datetime.datetime
Date and time when the member joined the server
created_at
datetime.datetime
The date the member registered their Discord account
The reason of the following method is displayed in the audit log.
await ban(reason: Optional[str], ...)- member from the server.
- BAN privileges are required and the user will not be able to join the server until unbanned
await unban(reason: Optional[str], ...)- Release the BAN of the member who banned from the server.
- BAN authority is required, and after executing the process, the user can join the server
await kick(reason: Optional[str], ...)- Exile the user from the server
- Kick authority is required.
await add_roles(*roles: discord.Role)- Give the user a role
- The roles that can be assigned have the following restrictions.
- 1. Cannot be executed without role management privileges
- 2. Roles such as Bot and Server Booster cannot be granted
- 3. Of the rolls that the bot has, rolls that are higher than the highest roll cannot be attached
await remove_roles(*roles: discord.Role)- Steals roles from users
| Property name | Mold | Description |
|---|---|---|
| id | int | Unique identifier |
| name | str | username |
| nick | Optional[str] | Name set on the server |
| display_name | str | If there is nick, nick,If not name |
| mention | str | A string to mention to a member |
| guild | discord.Guild | The server to which the member belongs |
| roles | List[discord.Role] | List of all roles of members |
| top_role | discord.Role | Member's best role |
| avatar_url | str | Avatar image URL |
| joined_at | datetime.datetime | Date and time when the member joined the server |
| created_at | datetime.datetime | The date the member registered their Discord account |
The reason of the following method is displayed in the audit log.
await ban(reason: Optional[str], ...)
BAN the - member from the server.
- BAN privileges are required and the user will not be able to join the server until unbanned
await unban(reason: Optional[str], ...)- Release the BAN of the member who banned from the server.
- BAN authority is required, and after executing the process, the user can join the server
await kick(reason: Optional[str], ...)- Exile the user from the server
- Kick authority is required.
await add_roles(*roles: discord.Role)- Give the user a role
- The roles that can be assigned have the following restrictions.
- 1. Cannot be executed without role management privileges
- 2. Roles such as Bot and Server Booster cannot be granted
- 3. Of the rolls that the bot has, rolls that are higher than the highest roll cannot be attached
- The roles that can be assigned have the following restrictions.
await remove_roles(*roles: discord.Role)- Steals roles from users
discord.TextChannel
Click to expand
Property name
Mold
Description
id
int
Unique identifier
name
str
Channel name
guild
discord.Guild
Server with channel
members
List[discord.Member]
List of members who have permission to view the channel
mention
str
A string to mention to the channel
created_at
datetime.datetime
Creation date and time
await send(content: str, embed: discord.Embed, file: discord.File)- Send a message
await purge(limit: int, check)- Delete the message
- Search for limit messages and delete the message corresponding to check
- If the argument check is None, all messages are deleted without any questions, but by taking discord.Message as an argument and giving a function that returns True for the message to be deleted, delete by specifying the condition. I can do it.
history(limit: int = 100) -> AsyncIterator- Get message history
- Be careful because the grammar is unique
Call ʻasync for ... in ~~` as follows.
async for message in channel.history():
    print(messane.author.name)
| Property name | Mold | Description |
|---|---|---|
| id | int | Unique identifier |
| name | str | Channel name |
| guild | discord.Guild | Server with channel |
| members | List[discord.Member] | List of members who have permission to view the channel |
| mention | str | A string to mention to the channel |
| created_at | datetime.datetime | Creation date and time |
await send(content: str, embed: discord.Embed, file: discord.File)- Send a message
await purge(limit: int, check)- Delete the message
- Search for limit messages and delete the message corresponding to check
- If the argument check is None, all messages are deleted without any questions, but by taking discord.Message as an argument and giving a function that returns True for the message to be deleted, delete by specifying the condition. I can do it.
- Search for limit messages and delete the message corresponding to check
history(limit: int = 100) -> AsyncIterator- Get message history
- Be careful because the grammar is unique
Call ʻasync for ... in ~~` as follows.
async for message in channel.history():
print(messane.author.name)
discord.Guild
Click to expand
Property name
Mold
Description
id
int
Unique identifier
name
str
server name
icon_url
str
URL of server icon
owner
discord.Member
Server owner
member_count
int
Number of members
text_channels
List[discord.TextChannel]
All text channels in the server
members
List[discord.Member]
All members in the server
roles
List[discord.Role]
All roles in the server
emojis
List[discord.Emoji]
A list of emojis created independently on the server
created_at
datetime.datetime
Creation date and time
There are various methods, but I will introduce them later.
| Property name | Mold | Description |
|---|---|---|
| id | int | Unique identifier |
| name | str | server name |
| icon_url | str | URL of server icon |
| owner | discord.Member | Server owner |
| member_count | int | Number of members |
| text_channels | List[discord.TextChannel] | All text channels in the server |
| members | List[discord.Member] | All members in the server |
| roles | List[discord.Role] | All roles in the server |
| emojis | List[discord.Emoji] | A list of emojis created independently on the server |
| created_at | datetime.datetime | Creation date and time |
There are various methods, but I will introduce them later.
<!-Attachment to the link below->
Recommended Posts