Discord Bot with recording function starting with Python: (3) Cooperation with Database
Introduction
This article is a continuation of the previous Discord Bot with recording function starting with Python: (2) Convenient functions (Bot extension, Cog, Embed).
In this article, we will work with a database that will be needed as bots grow in scale. Implement the function $ prefix that changes the prefix for each server using the database.
We plan to write a total of 7 times, and have finished writing up to 5 articles.
- Discord Bot with recording function starting with Python: (1) Introductory discord.py
- Discord Bot with recording function starting with Python: (2) Convenient function (Bot extension, Cog, Embed)
- Discord Bot with recording function starting with Python: (3) Cooperation with Database
- Discord Bot with recording function starting with Python: (4) Play music files
- Discord Bot with recording function starting with Python: (5) Directly operate Discord API
Use environment variables
So far, the bot token has been stuck in the source code, but this is extremely inconvenient when you want to share it with a third party on GitHub etc. So, use the function of Docker Compose to collect these as environment variables.
First, create a file called .env in the project root and register the environment variables there.
sh:./.env
BOT_TOKEN=NDIAHJffoaj.adwdeg....
Here, BOT_TOKEN = token is set. Edit docker-compose.dev.yml to make the environment variables registered in this way available on the Docker container.
yml:./docker-compose.dev.yml
version: "3.8"
services:
  dbot:
    build:
      context: ./src
      dockerfile: dev.dockerfile
    tty: true
    working_dir: /bot/app
    entrypoint: bash ./entrypoint.dev.sh
    env_file: #With this line
      - .env  #This line
    volumes:
      - ./src:/bot
The environment variable created by passing the path to the file above to ʻenv_file` is passed to the container.
Then, change the token part of __main__.py that was hit directly until now as follows.
python:./src/app/dbot/__main__.py
from dbot.core.bot import DBot
import os
DBot(os.environ["BOT_TOKEN"]).run()
By putting together information such as environment variables that you do not want to be known in this, you can upload only this file to a third party in a private format, and the purpose can be achieved. For example, if you don't want to push this .env to GitHub, create a new file called .gitignore and add .env so that it will not be monitored by Git and will not be pushed remotely.
.gitignore
.env
If you restart the container and it can be started normally, it is successful. Please note that if you edit the environment variable file, it will be reflected after the container is restarted.
Let's use the database
As bots become more complex, you may want to store some data on each server so that you can use it. As a means to realize this, for example, you can prepare a CSV file and write it directly, but there are various problems considering that requests from users come asynchronously. So this time, let's try to save the data using the database.
Creating a database
MySQL is used here, but anything is OK as long as you have your favorite database engine. Let's set up the MySQL service as a Docker container. Edit docker-compose.dev.yml as follows. The following is written following this article .. Those who have created .gitignore should exclude / db.
yml:./docker-compose.dev.yml
version: "3.8"
services:
  dbot:
    #Abbreviation
  mysql:
    image: mysql:8.0
    restart: always
    env_file:
      - .env
    command: mysqld --character-set-server=utf8mb4 --collation-server=utf8mb4_unicode_ci
    volumes:
      - ./db/data:/var/lib/mysql
      - ./db/my.cnf:/etc/mysql/conf.d/my.cnf
      - ./db/sql:/docker-entrypoint-initdb.d
As mentioned in the previous article, the MySQL container needs to enter the name of the database to be created first and the password of the user in the environment variables, so put them together in .env.
sh:./.env
BOT_TOKEN=...
MYSQL_ROOT_PASSWORD=supersecret
MYSQL_USER=docker
MYSQL_DATABASE=discord
MYSQL_PASSWORD=veryverysecret
After creating up to this point, type ./run.sh dev down and ./run.sh dev up -d mysql to start only the database.
You have to manipulate SQL to operate the database, but it is easier to define only the schema of the database as much as possible and perform the migration work automatically.
To use ORM and Migration ...
Therefore, this time, we will use SQLAlchemy, which is an object-relational mapping (** ORM **) of SQL. And, in order to run SQLAlchemy, a client that operates the database is required, but here we use aiomysql, which is a client that meets the requirement of ** asynchronous and non-blocking **.
Then use Alembic written in Python as a database migration tool. First, install these three.
At ./src/app
$ pipenv install sqlalchemy aiomysql
$ pipenv install alembic --dev
Is executed.
After installation, create the ./src/app/dbot/models folder and create the following files.
__init__.pymodel.py
Edit model.py as follows.
from sqlalchemy import MetaData, Table, Column, BigInteger, String


meta = MetaData()

guild = Table(
    "guild",
    meta,
    Column("id", BigInteger(), nullable=False, primary_key=True),
    Column("prefix", String(8), server_default="$", nullable=False)
)
Although it is a grammar peculiar to SQLAlchemy, one table is defined by combining Table and Column. The table name is written in the first argument of Table, and the column information of the table is written after the third argument, but what is the identity of meta in the second argument is a variable that stores all the definition information of the database. It corresponds. By passing this meta to the outside, you can use the information of the database created by SQLAlchemy.
The table created here is a table for changing the prefix ($) for each server.
Alembic migrates the database based on this meta. In other words, when you want to create a new table, the developer does not have to create the table directly using SQL, and can concentrate on defining the schema.
To use Alembic, you need to type the ʻalembic initcommand to make the initial settings. Create a./src/app/alembic folder and run ʻalembic init . in that folder to generate various files.
The files to edit are ʻenv.py and ʻalembic.ini. ʻAlembic.iniis specified in the format ofmysql + pymysql: // user name: password @ database container name / database name` as follows.
ini:./src/app/alembic/alembic.ini
# A generic, single database configuration.

[alembic]

#Abbreviation

# the output encoding used when revision files
# are written from script.py.mako
# output_encoding = utf-8

sqlalchemy.url = mysql+pymysql://docker:veryverysecret@mysql/discord

#Abbreviation
ʻEnv.py` needs to import the meta from earlier, but since the path to dbot is in the parent directory, edit it as follows
python:./src/app/alembic/env.py
from logging.config import fileConfig

from sqlalchemy import engine_from_config
from sqlalchemy import pool

from alembic import context

##Add the following##

import sys
import os

sys.path.append(os.pardir)

from dbot.models.model import meta

##So far##

# this is the Alembic Config object, which provides
# access to the values within the .ini file in use.
config = context.config

#Abbreviation

##Change this value
target_metadata = meta

#Abbreviation
After that, if you execute ʻalembic revision -m" Init " on the ʻalembic folder, the schema file generated as a result of reading meta will be created under the versions folder.
You can migrate this to an existing database, but the command for that is ʻalembic upgrade head. Edit ʻentrypoint.dev.sh to execute these commands.
sh:./src/app/entrypoint.dev.sh
set -eu
cd alembic
alembic upgrade head
alembic revision --autogenerate
alembic upgrade head
cd ..
nodemon --signal SIGINT -e py,ini --exec python -m dbot
Finally, install ʻalembic on the last line of dev.dockerfile`.
dockerfile:./src/dev.dockerfile
#Omission
RUN pip install alembic
Now you are ready to go. Every time you start the Docker container, the migration will be executed.
Now that we've made it automatically sensitive to schema changes, let's make these available to bots.
Bridging between DBot and MySQL
Create ./src/app/dbot/db.py to define the class to connect to the database.
python:./src/app/dbot/db.py
import os
import asyncio
from aiomysql.sa import create_engine


class DB:
    async def __aenter__(self, loop=None):
        if loop is None:
            loop = asyncio.get_event_loop()
        engine = await create_engine(
            user=os.environ["MYSQL_USER"],
            db=os.environ["MYSQL_DATABASE"],
            host="mysql",
            password=os.environ["MYSQL_PASSWORD"],
            charset="utf8",
            autocommit=True,
            loop=loop
        )
        self._connection = await engine.acquire()
        return self

    async def __aexit__(self, *args, **kwargs):
        await self._connection.close()

    async def execute(self, query, *args, **kwargs):
        return await self._connection.execute(query, *args, **kwargs)
The above implementation [this article](https://qiita.com/halhorn/items/eb2951a024ae255e6a21#aiomysql-%E3%82%A8%E3%83%B3%E3%82%B8%E3%83%B3 % E3% 82% 92% E4% BD% BF% E3% 81% A3% E3% 81% A6% E5% AE% 9F% E9% 9A% 9B% E3% 81% AB% E5% AE% 9F% E8 % A1% 8C% E3% 81% 99% E3% 82% 8B) is used as a reference. Unfamiliar coroutines such as __aenter__ are used with with. aenter means ʻa (= async) + ʻenter, so to get a connection to this database
async with DB() as db:
    db.execute("Query")
You can use it by doing like.
Don't touch SQL etc.
Finally, I don't want to write SQL as much as possible, no matter how much ORM. Therefore, create a class that can CRUD (create / acquire / update / delete) data for each table. Create ./src/app/dbot/models/guild.py and edit it as follows.
python:./src/app/dbot/models/guild.py
from dbot.models import model
from dbot.db import DB


class CRUDBase:
    @staticmethod
    async def execute(query, *args, **kwargs):
        async with DB() as db:
            result = await db.execute(query, *args, **kwargs)
        return result


class Guild(CRUDBase):
    def __init__(self, guild_id):
        self.guild_id = guild_id

    async def get(self):
        q = model.guild.select().where(self.guild_id == model.guild.c.id)
        result = await self.execute(q)
        return await result.fetchone()

    async def set(self, **kwargs):
        q = model.guild.update(None).where(
            self.guild_id == model.guild.c.id
        ).values(**kwargs)
        await self.execute(q)
        return self

    async def delete(self):
        q = model.guild.delete(None).where(self.guild_id == model.guild.c.id)
        await self.execute(q)
        return self

    @classmethod
    async def create(cls, guild_id):
        q = model.guild.insert(None).values(id=guild_id)
        guild = cls(guild_id)
        await cls.execute(q)
        return guild

    @staticmethod
    async def get_all(cls):
        q = model.guild.select()
        results = await cls.execute(q)
        return await results.fetchall()
The explanation of how to write a query in SQLAlchemy is out of the scope of this article, so I will omit it, but you can write a query with a grammar similar to SQL.
Now you can retrieve information from the database by doing ʻawait Guild (guild.id) .get ()` without worrying about SQL each time during development.
Implemented $ prefix command
To change the prefix again, follow the steps below.
- [Major premise] Change the specifications so that the prefix can be changed for each server.
- Add the record (server ID, "$") to table "guild" when the server adds a bot
- Change the table "guild" when a command like
$ prefix>comes in
It is a method to change the prefix for each server, but this is to change the part that was directly passed as "$" in __init__ of Bot with command_prefix to None and separately add a coroutine called get_prefix. Create it. Since discord.py checks this get_prefix every time a message is hit, you can get the server ID there and get the information from the database.
In order for the server to receive the event that added the bot, the event handler ʻon_guild_joinintroduced last time should be defined. Considering these,./src/app/dbot/core/bot.py` can be changed as follows.
python:./src/app/dbot/core/bot.py
import discord
from discord.ext import commands
from dbot.models.guild import Guild
import traceback


class DBot(commands.Bot):
    def __init__(self, token):
        self.token = token
        super().__init__(command_prefix=None)
        self.load_cogs()

    async def get_prefix(self, message: discord.Message):
        guild = await Guild(message.guild.id).get()
        if guild:
            print("server:", message.guild.name)
            print("Prefix:", guild.prefix)
            return guild.prefix
        else:
            guild = await Guild.create(message.guild.id)
            guild = await guild.get()
            print("server:", message.guild.name)
            print("Prefix:", guild.prefix)
            return guild.prefix

    async def on_guild_join(self, guild: discord.Guild):
        guild = await Guild.create(guild.id)
        guild = await guild.get()
        print("server:", guild.name)
        print("Prefix:", guild.prefix)

   #Abbreviation
What we are doing is simple: we are getting and inserting records based on the server ID.
All you have to do now is implement the command $ prefix. Let's create a Cog called ʻUtilsand define a$ prefix` there.
python:./src/app/cogs/Utils.py
import discord
from discord.ext import commands
from discord.ext.commands.errors import (
    MissingPermissions,
    MissingRequiredArgument
)
import random
from dbot.core.bot import DBot
from dbot.models.guild import Guild


class Utils(commands.Cog):
    def __init__(self, bot: DBot):
        self.bot = bot

    @commands.command(ignore_extra=False)
    @commands.has_permissions(administrator=True)
    async def prefix(self, ctx: commands.Context, *, prefix: str):
        if len(prefix) > 8:
            return await ctx.send("Prefix must be no more than 8 characters")
        guild = await Guild(ctx.guild.id).get()
        await Guild(ctx.guild.id).set(prefix=prefix)
        await ctx.send(f"Prefix{guild.prefix}From{prefix}Changed to")

    @prefix.error
    async def on_prefix_error(self, ctx: commands.Context, error):
        if isinstance(error, MissingPermissions):
            return await ctx.send('Only admin can run')
        if isinstance(error, MissingRequiredArgument):
            return await ctx.send('As an argument, pass the new Prefix within 8 characters')
        raise error


def setup(bot):
    return bot.add_cog(Utils(bot))
The prefix can now be changed: tada:
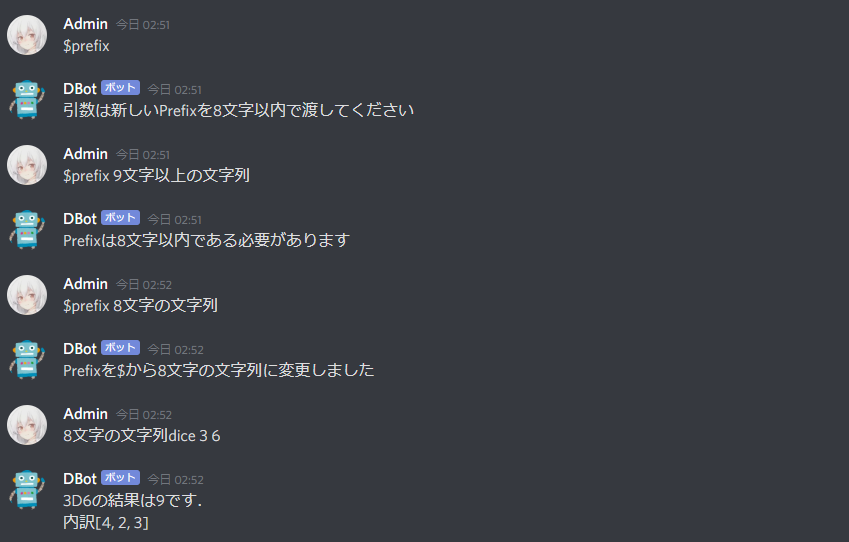
Focusing on the argument of the prefix command, there is a * in the position corresponding to the third argument, which is also one of the Python grammars. % A2% E3% 82% B9% E3% 82% BF% E3% 83% AA% E3% 82% B9% E3% 82% AF--% E4% BB% AE% E5% BC% 95% E6% 95 % B0% E5% 90% 8D% E3% 83% 8A% E3% 82% B7). In discord.py, by using this *, the behavior will be as follows.
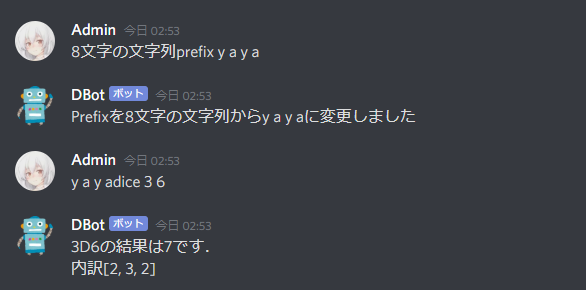
As you can see, even if there are spaces in between, those areas are regarded as one argument.
Reference: https://discordpy.readthedocs.io/ja/latest/ext/commands/commands.html#keyword-only-arguments
At the end
Now you can connect to the database and create more complex commands.
Next time, we will implement the ** send ** function of voice.
Recommended Posts