I made a high-spec Linux desktop with Intel NUC + SSD 2TB + DRAM 32GB
I bought Intel NUC before the tax increase at the end of September last year in order to make effective use of the PayPay points that were given as 20% of the purchase price when I purchased MacBook Air 2018 with PayPay in the bonus season of the year before last. I also bought SSD and DRAM in the bonus season at the end of last year and built a Linux desktop machine, so I decided to put together various things to commemorate.
This and that of my own work
- I wanted a GPU-equipped machine that can be used for free research such as deep learning, so I decided to make my own Linux machine as a starting point.
- Since I am a beginner of self-made, I decided to purchase Intel's barebone kit so that I do not have to worry about choosing a motherboard.
- I wanted to try the recently introduced eGPU, so I dared to buy a barebone compatible with Thundebolt 3.
- I will try to make GPU machine if I buy a graphic card.
Purchase of parts
For reference, the detailed information of the parts purchased this time is described. I bought the barebone before the consumption tax hike, so it is the price at that time.
| Types of parts | Model number | Maker | price | Remarks |
|---|---|---|---|---|
| Body | NUC8I7BEH | Intel | ¥66,000. | Barebone attached to CPU,¥ 44 for payment,461.Use PayPay points for minutes |
| CPU | Core i7 8559U | Intel | - | Included with barebone, 4C8T, 2.7GHz(TB time:4.5GHz) |
| SSD1 | NM610(1TB) | Lexar | ¥11,528.(Replacement guarantee:¥500.) | NVMe SSD OS,Used for boot loader installation |
| SSD2 | NS100(1TB) | Lexar | ¥10,428.(Replacement guarantee:¥500.) | /Used as a drive for home |
| DRAM | CT2K16G48FD8266 DDR4 2666(32GB) | crucial | ¥16,918. | Because the maximum mountable memory capacity of the motherboard is 32GB |
| display 21.5inch Wide |
PH15997426 | PHILIPS | ¥8,980. | HDMIx2+D-Equipped with SUB NTT-Purchased at X Store New Year Sale |
| keyboard | K380 | Logicool | ¥3,500. | You can register up to 3 PCs, so purchase. Use the existing mouse |
| heatsink | SS-M2S-HS02 | Nagao Seisakusho | ¥1,359. | We purchase for NVMe SSD cooling |
| power cable | - | - | ¥0. | Since the power cord is not attached to the AC adapter that comes with the barebone, it is borrowed from the AC adapter of an unnecessary tablet PC. |
Total cost: ¥ 107,185. (When PayPay is considered: ¥ 62,724.)
(Addition) Expandability of Intel NUC8I7BEH
The barebone used this time is palm-sized, but I think it has some expandability. (The photo below is the actual size)
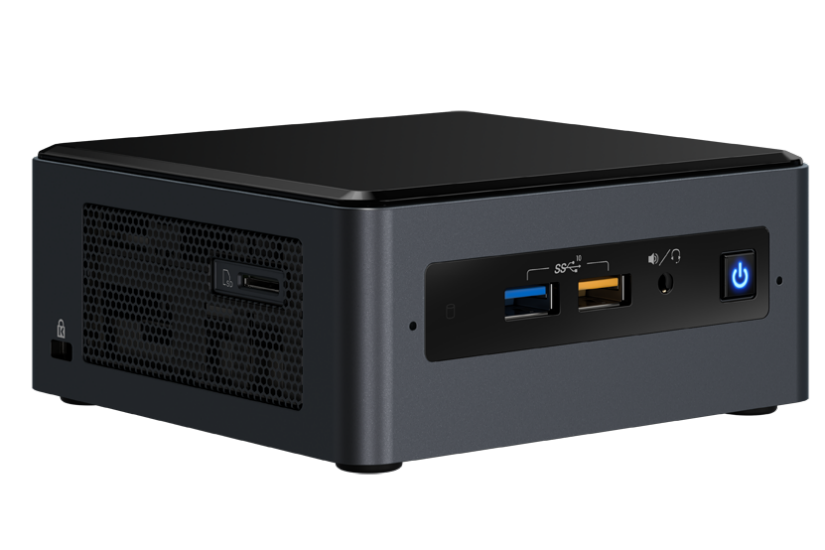
| specification |
|---|
| USB3.0 x 4(Front x2,Back x2) |
| Thunderbolt 3 port(back) |
| HDMI port(back) |
| Intel® Ethernet Connection I219-V(back) |
| Audio port (headphone / microphone compatible, front) |
| Intel® Wireless-AC 9560 + Bluetooth 5.0(Built-in) |
| Micro SD card slot(The left side) |
Reference: Intel® NUC Kit NUC8i7BEH
PC assembly
Attaching the purchased parts to the barebone is much easier than making your own from scratch. All you have to do is open the barebone and install the parts on the motherboard.
OS setup
Set up the OS so that the assembled PC can operate. This time I installed Ubuntu 18.04.4 LTS Desktop version. At first I tried to install the Server version, but I decided to install the Desktop version because the SSD was not recognized and I wanted to use the GUI as well. The partition structure is as follows.
| partition | capacity | Remarks |
|---|---|---|
| efi | 1GB | Partition for UEFI. Traditional/Partition to replace boot |
| / | 300GB | /Partition for root etc. |
| /usr | 344GB | Partition where the application to be installed is stored |
| /var | 344GB | Initially, we plan to make it about 20GB, but we increased it because it turned out to be a partition that plays an important role in KVM. |
| swap | 10GB | /~swap is assigned to NVMe SSD |
| /home | 1TB | One whole SATA SSD/Allocate for home |
Ubuntu package manager
Ubuntu's package manager is generally apt-get, but the latest version of Ubuntu seems to recommend apt. There is also a package manager called aptitude, but it seems to be deprecated in Ubuntu 18.04. I used to use aptitude, but I will take this opportunity to switch to apt. Reference: http://ultra-genma.hateblo.jp/entry/2019/04/08/233718
ufw settings
I have set up a firewall. I set it because ufw was already installed. Until 16.04, I had to install it myself, but it seems to be installed automatically. Reference: Basic operation of ufw
ssh settings
We will create a key file and hand it over so that you can log in without a password.
ssh-keygen -t rsa -f ~/.ssh/id_rsa_ubuntu18
ssh-copy-id -i ~/.ssh/id_rsa_ubuntu18 <USER_NAME>@<HOST_IP>
Reference: Pass the public key with ssh-copy-id
mDNS settings
For SSH access from within the same network, you can access it with HOST_NAME.local, and you do not need to enter the IP address.
Reference: Set up mDNS and stop typing in the IP address one by one.
Summary
I made my own Linux machine using Intel NUC. With this spec, if it is a little over 100,000 yen, I think that it was a self-made product with good cost performance. Since I made a machine with abundant resources, I would like to take advantage of KVM-based multi-node Kubernetes construction and support for Thudebolt 3 to install an eGPU and challenge to make it a GPU machine.
Future improvement schedule (consultation with budget required)
- Install Docker and turn it into a JupyterLab server
- Launch R Studio Server with Docker
- Challenge to build KVM-based multi-node Kubernetes
- Dock eGPU to make it a GPU machine
- For machines that can run TensorFlow and PyTorch on GPU
Reference https://eng-entrance.com/linux-partition Core i7-8559U
Recommended Posts