Try using Python's Tkinter
I've been using Python's Tkinter more and more, but I didn't have many sites that had the information I wanted (my favorite), so I'll summarize it.
In addition, when I had a study session on Tkinter, materials made with Python 3 system came out, so If you are interested, please. https://nnahito.gitbooks.io/tkinter/content/
* Introduction
I am a procedural person.
I don't use object orientation at all.
My favorite languages are BASIC and perl, which are endangered species.
So, object-oriented is the best Great! !! Please note that I think that the writing style is unfamiliar or unfamiliar to those who are said to be.
* What is Tkinter in the first place?
It is a ** toolkit that allows you to build a ** GUI in Python. This allows you to execute Python scripts in GUI format.
#!/usr/bin/env python
# -*- coding: utf8 -*-
import sys
import Tkinter

root = Tkinter.Tk()
root.mainloop()

* Basic
There are tons of basic Python grammars to look for, so please find your favorite commentary site. Here, I will pick up the part that I stumbled upon in Tkinter.
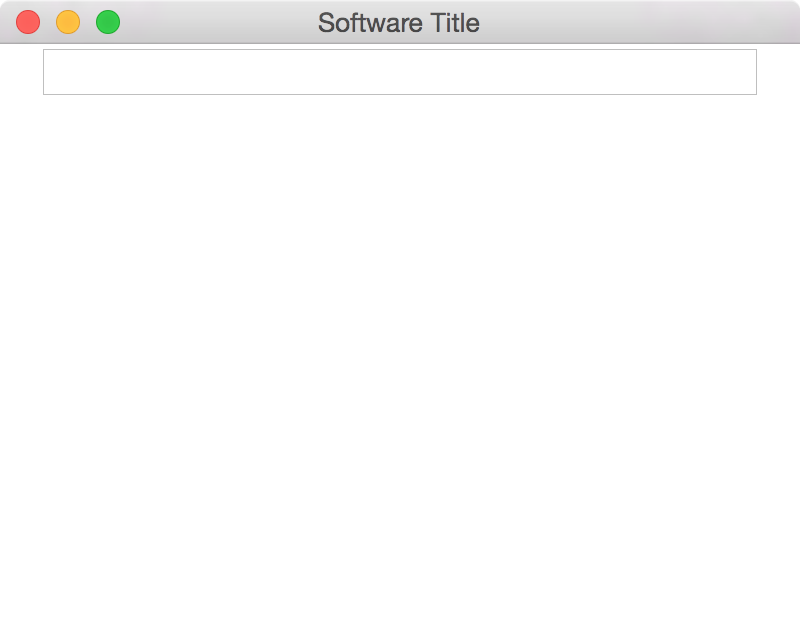
First, the basic format is as follows.
#!/usr/bin/env python
# -*- coding: utf8 -*-
import sys
import Tkinter


root = Tkinter.Tk()
root.title(u"Software Title")
root.geometry("400x300")

root.mainloop()
Doing this will bring up a 400px * 300px window.
root.title (u" window name ")
This determines the notation of the window title bar
root.geometry ("horizontal x vertical ")
This determines the window size.
Write the numerical value in lowercase X (x), such as horizontal length x vertical length.
Note that the processing of software execution contents is
root = Tkinter.Tk()
When
root.mainloop()
It is described in between.
What can be expressed in Tkinter
Details are on this page, but it is summarized in detail.
- Label
- 1-line input box
- Button
- Checkbox
- Radio buttons
- list box
- Menu
- scroll bar
- Canvas And so on.
All I needed was
- Button
- 1-line input box
- Checkbox
- Label So, I would like to introduce it by focusing on this point in particular.
Label
Use the following labels.
Label (text = u'label name')
If you change the "label name" part, the contents of the label will change.
Below is a sample.
#!/usr/bin/env python
# -*- coding: utf8 -*-
import sys
import Tkinter
root = Tkinter.Tk()
root.title(u"Software Title")
root.geometry("400x300")
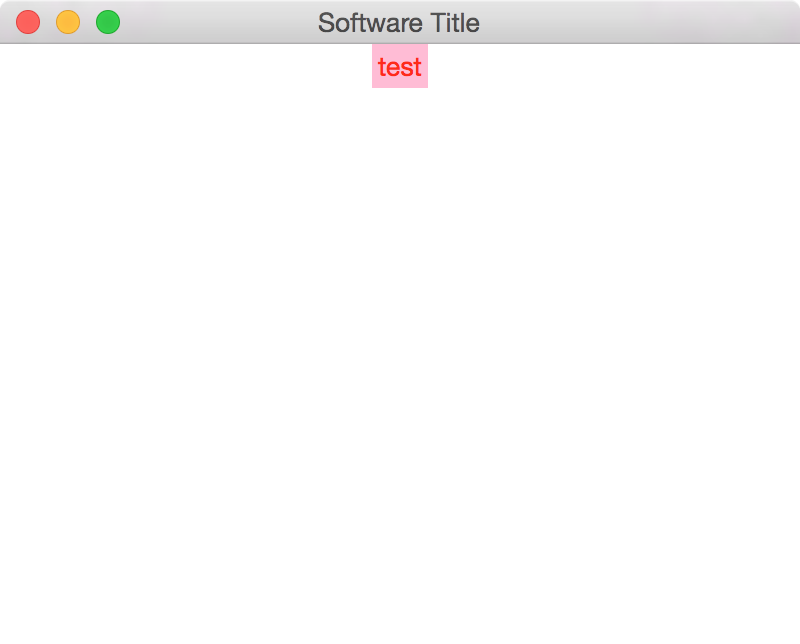
#label
Static1 = Tkinter.Label(text=u'test')
Static1.pack()
root.mainloop()

Static1 = Tkinter.Label(text=u'test')
Static1 of is the handle of the label. (That is, I put a handle in the variable)
In addition, use Static1.pack () to store the handle in the window widget.
If you break it down, it will automatically align and place it on the window.
If you want to place it anywhere,
Static1.place (x = x coordinate, y = y coordinate)
Use place (x = x coordinate, y = y coordinate) as in.
Also, widgets such as labels have some common options. It is summarized in tabular form at the top of the middle of the previous page (Easy Python / Tkinter). For example, you can change the background color of the label and the color of the text.
#!/usr/bin/env python
# -*- coding: utf8 -*-
import sys
import Tkinter


root = Tkinter.Tk()
root.title(u"Software Title")
root.geometry("400x300")

#label
Static1 = Tkinter.Label(text=u'test', foreground='#ff0000', background='#ffaacc')
Static1.pack()

root.mainloop()
Options are
Static1 = Tkinter.Label(text=u'test', foreground='#ff0000', background='#ffaacc')
It is possible to add as follows.
Furthermore, for example, if you use place, it will look like this.
#!/usr/bin/env python
# -*- coding: utf8 -*-
import sys
import Tkinter


root = Tkinter.Tk()
root.title(u"Software Title")
root.geometry("400x300")

#label
Static1 = Tkinter.Label(text=u'test', foreground='#ff0000', background='#ffaacc')
Static1.place(x=150, y=228)

root.mainloop()
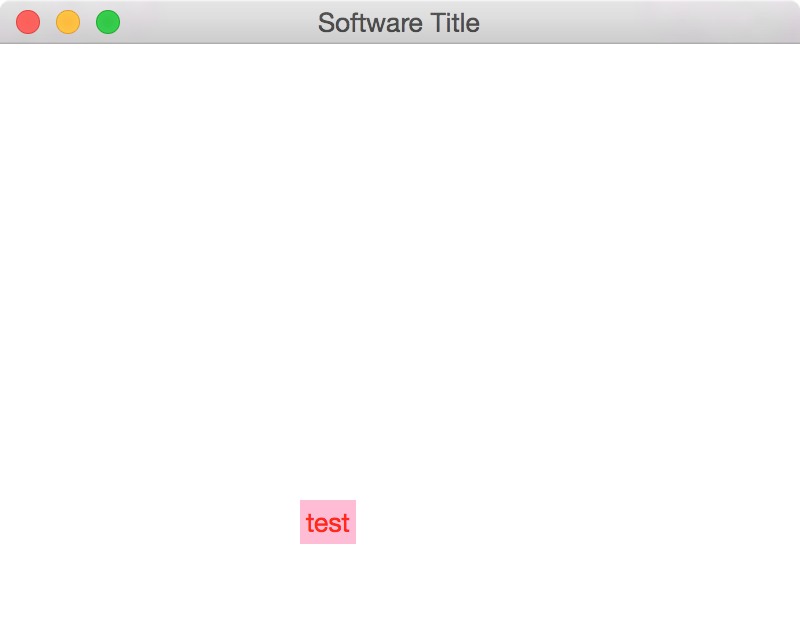
You can see that the label has moved to any position. I will use it like this.
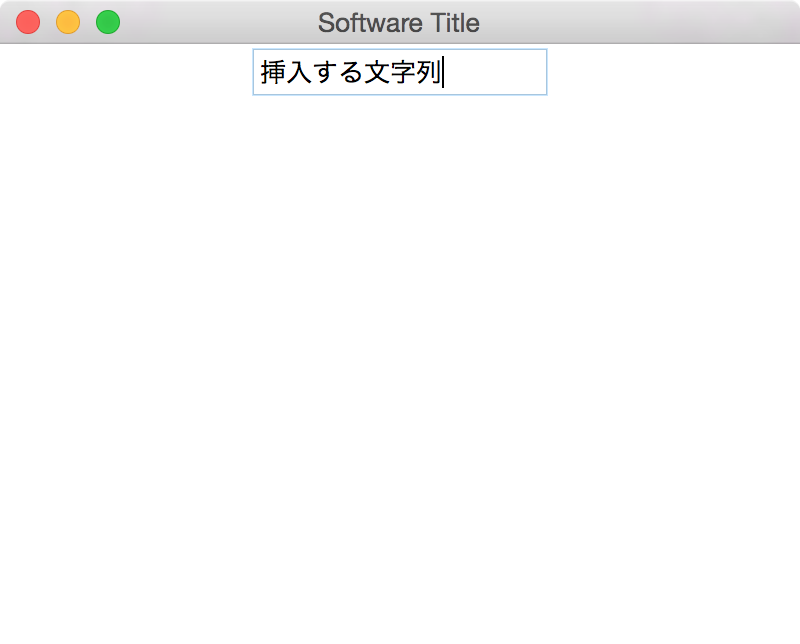
* Entry (1 line input box)
Create a one-line input box "Entry" that does not allow line breaks. Write the code as ʻEditBox = Tkinter.Entry ()`.
#!/usr/bin/env python
# -*- coding: utf8 -*-
import sys
import Tkinter


root = Tkinter.Tk()
root.title(u"Software Title")
root.geometry("400x300")

#entry
EditBox = Tkinter.Entry()
EditBox.pack()

root.mainloop()
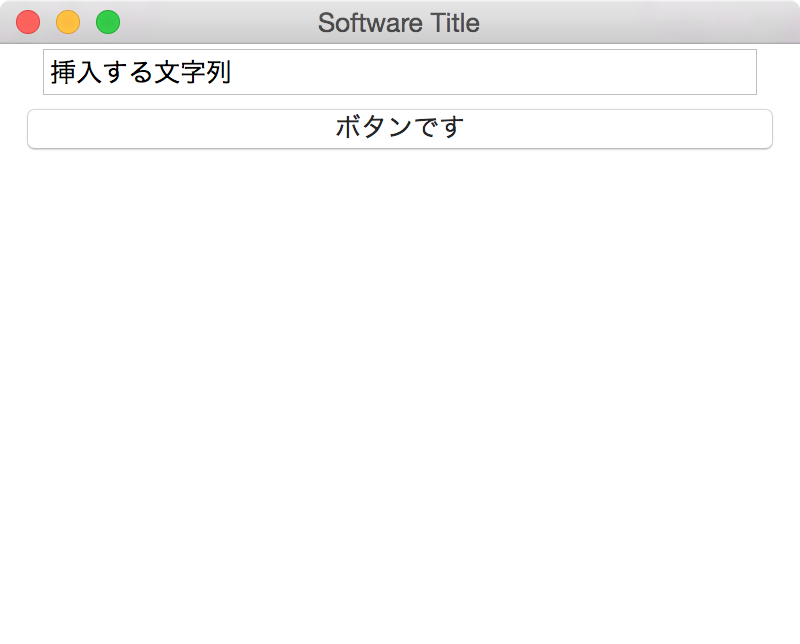
How to enter characters from the beginning
To enter characters from the beginning with Entry Use ʻinsert (Tkinter.END," string to add ")`. This will insert an "additional string" on the last line. You can insert a character string anywhere, but I won't explain it here. For details, please see this site
#!/usr/bin/env python
# -*- coding: utf8 -*-
import sys
import Tkinter


root = Tkinter.Tk()
root.title(u"Software Title")
root.geometry("400x300")

#entry
EditBox = Tkinter.Entry()
EditBox.insert(Tkinter.END,"Character string to insert")
EditBox.pack()

root.mainloop()
Entry size
You can also specify the size of the Entry.
It can be determined by Tkinter.Entry (width = size).
#!/usr/bin/env python
# -*- coding: utf8 -*-
import sys
import Tkinter


root = Tkinter.Tk()
root.title(u"Software Title")
root.geometry("400x300")

#entry
EditBox = Tkinter.Entry(width=50)
EditBox.insert(Tkinter.END,"Character string to insert")
EditBox.pack()

root.mainloop()
 I tried to make it bigger.
Get the contents of Entry
Use .get () to get the contents of the Entry.
#!/usr/bin/env python
# -*- coding: utf8 -*-
import sys
import Tkinter


root = Tkinter.Tk()
root.title(u"Software Title")
root.geometry("400x300")

#entry
EditBox = Tkinter.Entry(width=50)
EditBox.insert(Tkinter.END,"Character string to insert")
EditBox.pack()

#Here, the content of Entry is entered in value
value = EditBox.get()

root.mainloop()
Delete the contents of Entry
It can be specified as ʻEditBox.delete (0, Tkinter.END). (.delete(0, Tkinter.END)`)
You can delete it from any place, but I will omit it here.
For details, please see this site
#!/usr/bin/env python
# -*- coding: utf8 -*-
import sys
import Tkinter


root = Tkinter.Tk()
root.title(u"Software Title")
root.geometry("400x300")

#entry
EditBox = Tkinter.Entry(width=50)
EditBox.insert(Tkinter.END,"Character string to insert")
EditBox.pack()

#Delete the contents of the entry
EditBox.delete(0, Tkinter.END)

root.mainloop()
Since I added a character to the Entry and erased it as it is, it means that nothing was written in the first place. I will give an example that is a little easier to understand in the next "button" item.
* Button
Buttons can be created with "Button".
#!/usr/bin/env python
# -*- coding: utf8 -*-
import sys
import Tkinter


root = Tkinter.Tk()
root.title(u"Software Title")
root.geometry("400x300")

#button
Button = Tkinter.Button(text=u'It's a button')
Button.pack()

root.mainloop()

.Button (text = u'character to display on the button')
Specify the width of the button
It can be specified by width = width.
#!/usr/bin/env python
# -*- coding: utf8 -*-
import sys
import Tkinter


root = Tkinter.Tk()
root.title(u"Software Title")
root.geometry("400x300")

#button
Button = Tkinter.Button(text=u'It's a button', width=50)
Button.pack()

root.mainloop()

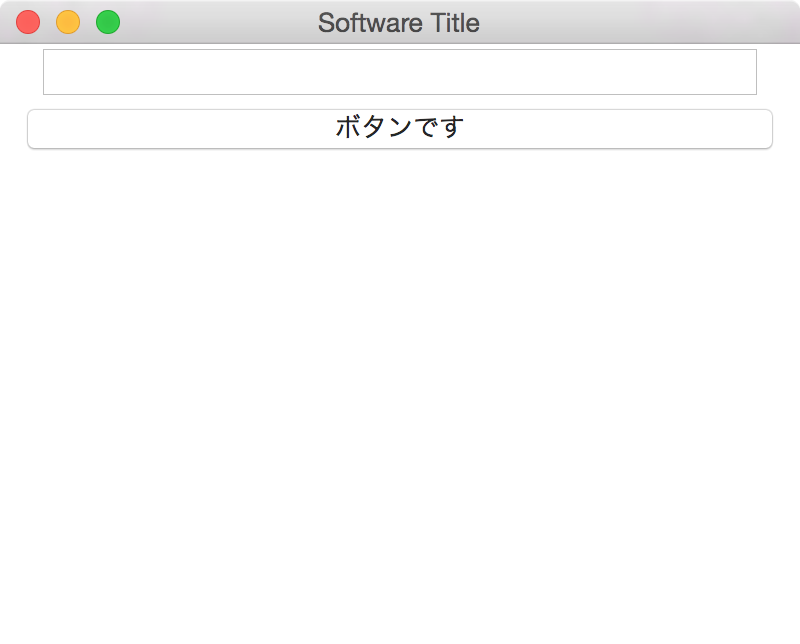
When you press the button, some processing is performed
Buttons basically form actions in functions (def :). Let's create something that deletes the contents of the previous Entry by pressing a button.
#!/usr/bin/env python
# -*- coding: utf8 -*-
import sys
import Tkinter


root = Tkinter.Tk()
root.title(u"Software Title")
root.geometry("400x300")

#
#Called here when the button is pressed
#
def DeleteEntryValue(event):
  #Delete the contents of the entry
  EditBox.delete(0, Tkinter.END)


#entry
EditBox = Tkinter.Entry(width=50)
EditBox.insert(Tkinter.END,"Character string to insert")
EditBox.pack()

#button
Button = Tkinter.Button(text=u'It's a button', width=50)
Button.bind("<Button-1>",DeleteEntryValue)
#Left click (<Button-1>), Bind to call the DeleteEntryValue function
Button.pack()

root.mainloop()
.bind ("<Button-1>", DeleteEntryValue) is
.bind ("click processing number", function or action to call)
It is configured as follows.
This will call the specified function when the button is clicked.
Click "<Button-1> "
" <Button-2> " is a wheel click
Right click on " <Button-3> "
is.
There are other events besides clicks, but I won't cover them here. Please refer to this site for details
When you press the ↓ button, the characters disappear
Of course place
Entry and Button too. You can specify it with .place (x = hoge, y = hoge) instead of .pack ().
#!/usr/bin/env python
# -*- coding: utf8 -*-
import sys
import Tkinter


root = Tkinter.Tk()
root.title(u"Software Title")
root.geometry("400x300")

#
#Called here when the button is pressed
#
def DeleteEntryValue(event):
  #Delete the contents of the entry
  EditBox.delete(0, Tkinter.END)


#entry
EditBox = Tkinter.Entry(width=30)
EditBox.insert(Tkinter.END,"Character string to insert")
EditBox.place(x=5, y=10)


#button
Button = Tkinter.Button(text=u'It's a button', width=25)
Button.bind("<Button-1>",DeleteEntryValue)
Button.place(x=105, y=60)

root.mainloop()

* CheckBox
This was quite annoying. So, I would like to divide it into small pieces one by one. In Tkinter, it seems that it is called Checkbutton instead of CheckBox.
Create a CheckBox
Use .Checkbutton ().
#!/usr/bin/env python
# -*- coding: utf8 -*-
import sys
import Tkinter


root = Tkinter.Tk()
root.title(u"Software Title")
root.geometry("400x300")

CheckBox = Tkinter.Checkbutton()
CheckBox.pack()

root.mainloop()

Give the CheckBox an item name
Make it like CheckBox = Tkinter.Checkbutton (text = u" item name ").
#!/usr/bin/env python
# -*- coding: utf8 -*-
import sys
import Tkinter


root = Tkinter.Tk()
root.title(u"Software Title")
root.geometry("400x300")

CheckBox1 = Tkinter.Checkbutton(text=u"Item 1")
CheckBox1.pack()

CheckBox2 = Tkinter.Checkbutton(text=u"Item 2")
CheckBox2.pack()

CheckBox3 = Tkinter.Checkbutton(text=u"Item 3")
CheckBox3.pack()

root.mainloop()

Have Checked and Unchecked values from the beginning
From here is the demon gate.
You must always use BooleanVar () to have each checkbox have the "checked" and "unchecked" values by default.
BooleanVar () is a special type that can store only two choices, "True" or "False".
#!/usr/bin/env python
# -*- coding: utf8 -*-
import sys
import Tkinter


root = Tkinter.Tk()
root.title(u"Software Title")
root.geometry("400x300")

#
#Initial value of each item of check box
#
Val1 = Tkinter.BooleanVar()
Val2 = Tkinter.BooleanVar()
Val3 = Tkinter.BooleanVar()

Val1.set(False)
Val2.set(True)
Val3.set(False)

CheckBox1 = Tkinter.Checkbutton(text=u"Item 1", variable=Val1)
CheckBox1.pack()

CheckBox2 = Tkinter.Checkbutton(text=u"Item 2", variable=Val2)
CheckBox2.pack()

CheckBox3 = Tkinter.Checkbutton(text=u"Item 3", variable=Val3)
CheckBox3.pack()

root.mainloop()
By storing ** BooleanVar value ** with True or False in variable
You can specify whether to check or not.
One thing to note here is that if you do variable = True, you will get a ** bug **.
You must always enter BooleanVar type data.

Get if the CheckBox is checked
Use .get ().
In the above example, Val1 indicates whether CheckBox1 is checked or not.
if Val1.get() == True:
Processing when checked
else:
Processing when not checked
You can get it like this.
sample
#!/usr/bin/env python
# -*- coding: utf8 -*-
import sys
import Tkinter
import tkMessageBox


root = Tkinter.Tk()
root.title(u"Software Title")
root.geometry("400x300")


#
#Get the check status of a checkbox
#
def check(event):
  global Val1
  global Val2
  global Val3

  text = ""

  if Val1.get() == True:
    text += "Item 1 is checked\n"
  else:
    text += "Item 1 is unchecked\n"

  if Val2.get() == True:
    text += "Item 2 is checked\n"
  else:
    text += "Item 2 is unchecked\n"

  if Val3.get() == True:
    text += "Item 3 is checked\n"
  else:
    text += "Item 3 is unchecked\n"

  tkMessageBox.showinfo('info',text)


#
#Initial value of each item of check box
#
Val1 = Tkinter.BooleanVar()
Val2 = Tkinter.BooleanVar()
Val3 = Tkinter.BooleanVar()

Val1.set(False)
Val2.set(True)
Val3.set(False)

CheckBox1 = Tkinter.Checkbutton(text=u"Item 1", variable=Val1)
CheckBox1.pack()

CheckBox2 = Tkinter.Checkbutton(text=u"Item 2", variable=Val2)
CheckBox2.pack()

CheckBox3 = Tkinter.Checkbutton(text=u"Item 3", variable=Val3)
CheckBox3.pack()


button1 = Tkinter.Button(root, text=u'Get check',width=30)
button1.bind("<Button-1>",check)
button1.pack()

root.mainloop()

↓ If you press the button in this situation

The check status is acquired.
This dialog message uses what is called "tkMessageBox".
import tkMessageBox
Is added,
tkMessageBox.showinfo ('title name','content')
It can be displayed with.
That's it for this time.
Recommended Posts