Follow the steps below.
I would appreciate it if you could let me know if there are any mistakes in terms or recognition.
First of all, rewrite subjectAltName on line 253 of openssl.cnf to the private address of the instance.
[ec2-user@ip-xxx-xxx-xxx-xxx ~]$ sudoedit /etc/pki/tls/openssl.cnf
The following is what was displayed with cat after rewriting.
[ec2-user@ip-xxx-xxx-xxx-xxx ~]$ cat -n /etc/pki/tls/openssl.cnf | head -n 255 | tail -n 5
   251
   252  # Include email address in subject alt name: another PKIX recommendation
   253  subjectAltName=IP:xxx.xxx.xxx.xxx
   254  # Copy issuer details
   255  # issuerAltName=issuer:copy
After that, create the following directories.
[ec2-user@ip-xxx-xxx-xxx-xxx ~]$ mkdir certs
Create the above certificate (domain.crt) and private key (domain.key) in the above directory.
You will be prompted to enter your passphrase.
#### **`You will be prompted for a second time. Enter the same value.`**
```verifying - enter pem pass phrase

 This passphrase will no longer be used.
[ec2-user@ip-xxx-xxx-xxx-xxx ~]$ openssl req -newkey rsa:2048 -keyout certs/domain.key -x509 -days 365 -out certs/domain.crt Generating a 2048 bit RSA private key ........................................................................................+++ ........+++ writing new private key to 'certs/domain.key' Enter PEM pass phrase: Verifying - Enter PEM pass phrase:
The following are all blank and press enter.
Country Name (2 letter code) [XX]: State or Province Name (full name) []: Locality Name (eg, city) [Default City]: Organization Name (eg, company) [Default Company Ltd]: Organizational Unit Name (eg, section) []: Common Name (eg, your name or your server's hostname) []: Email Address []:
 In the following, go to the certs directory and delete the passphrase.
 If you do not do this, docker will fail to start with the following error: ``` msg =" tls: failed to parse private key "``` `

#### **`Now enter the passphrase.`**
```enter pass phrase for domain.key
[ec2-user@ip-xxx-xxx-xxx-xxx certs]$ openssl rsa -in domain.key -out new.key Enter pass phrase for domain.key: writing RSA key
Copy the certificate.
[ec2-user@ip-xxx-xxx-xxx-xxx certs]$ sudo cp certs/domain.crt /etc/pki/ca-trust/source/anchors/xxx.xxx.xxx.xxx.crt
Reboot.
[ec2-user@ip-xxx-xxx-xxx-xxx ~]$ sudo update-ca-trust enable [ec2-user@ip-xxx-xxx-xxx-xxx ~]$ sudo update-ca-trust [ec2-user@ip-xxx-xxx-xxx-xxx ~]$ sudo service docker restart
 Create a password.
 Enter the user name and password in username and password, respectively.
[ec2-user@ip-xxx-xxx-xxx-xxx ~]$ docker run --entrypoint htpasswd registry:2.6.2 -Bbn username password > auth/htpasswd
Start the container for the private registry.
[ec2-user@ip-xxx-xxx-xxx-xxx ~]$ docker run -d -p 5000:5000
--restart=always
--name registry
-v pwd/auth:/auth
-v pwd/certs:/certs
-e "REGISTRY_AUTH=htpasswd"
-e "REGISTRY_AUTH_HTPASSWD_REALM=Registry Realm"
-e "REGISTRY_AUTH_HTPASSWD_PATH=/auth/htpasswd"
-e "REGISTRY_HTTP_TLS_CERTIFICATE=/certs/domain.crt"
-e "REGISTRY_HTTP_TLS_KEY=/certs/new.key"
registry:2.6.2
Make sure you can log in.
[ec2-user@ip-xxx-xxx-xxx-xxx certs]$ docker login https://xxx.xxx.xxx.xxx:5000 Username: testuser Password: WARNING! Your password will be stored unencrypted in /home/ec2-user/.docker/config.json. Configure a credential helper to remove this warning. See https://docs.docker.com/engine/reference/commandline/login/#credentials-store
Login Succeeded
## Step 2 Start ALB

 Log in using aws-cli.
 The parts with the following access key XXX and secret access key YYY are
 You can check by clicking IAM → user → click authentication information.
[ec2-user@ip-xxx-xxx-xxx-xxx certs]$ aws configure AWS Access Key ID [None]: XXX AWS Secret Access Key [None]: YYY Default region name [None]: ap-northeast-1 Default output format [None]: json
 Go to the certs directory and upload your certificate to IAM.
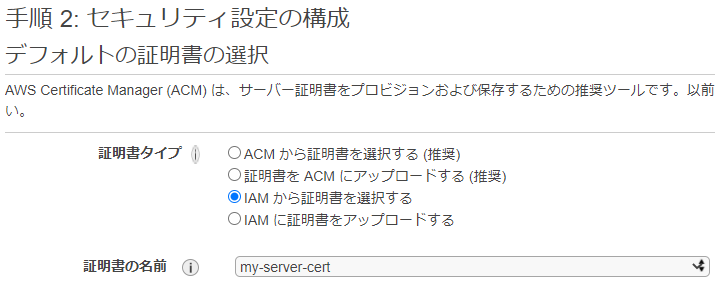
 my-secret-sert will be the name of the certificate.
[ec2-user@ip-xxx-xxx-xxx-xxx certs]$ aws iam upload-server-certificate --server-certificate-name my-server-cert
--certificate-body file://domain.crt --private-key file://new.key
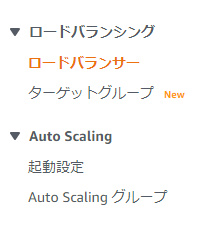
ALB requires two subnets in your VPC. Once you've created them, go to the EC2 console screen and click on your load balancer.

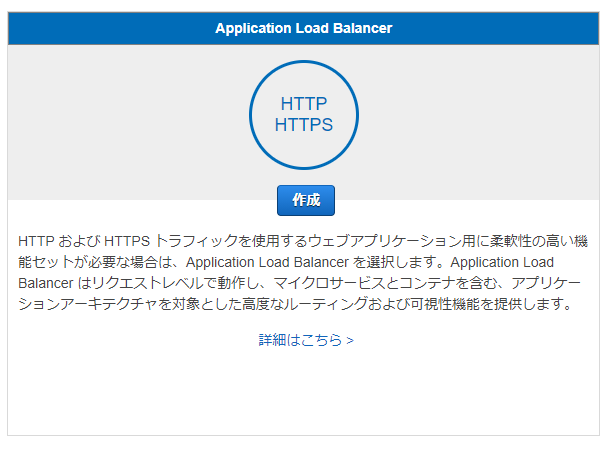
Select ALB.

Select HTTPS.

In the VPC selection, select the VPC and subnet created earlier.
In the default certificate selection, select the uploaded certificate.

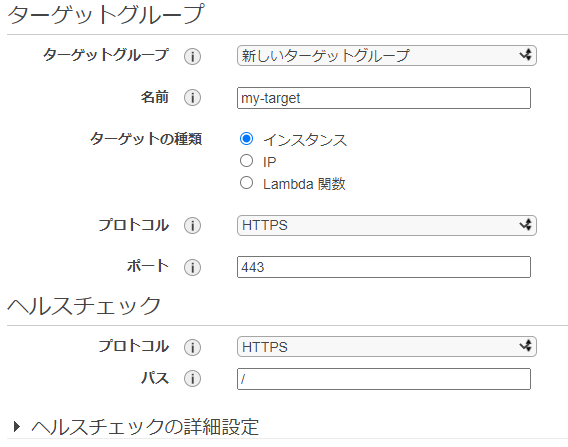
Set the routing as follows.

Registering a target allows you to register EC2 in the selected subnet with the target group.
Check if it was created normally by the following message.

## Reference article
--Creating a server certificate with OpenSSL
https://rfs.jp/server/setting/ssl-openssl.html
--The story of uploading an SSL certificate to ELB while struggling
https://www.simpline.co.jp/tech/%E5%9B%9B%E8%8B%A6%E5%85%AB%E8%8B%A6%E3%81%97%E3%81%AA%E3%81%8C%E3%82%89elb%E3%81%ABssl%E8%A8%BC%E6%98%8E%E6%9B%B8%E3%82%92%E3%82%A2%E3%83%83%E3%83%97%E3%83%AD%E3%83%BC%E3%83%89%E3%81%97%E3%81%9F/
Recommended Posts