[PYTHON] Let's do Raspberry Pi?
00 Introduction
- This article is the 7th day article of Kinki University Advent Calendar 2019.
- Basically written for college students.
- This time, I will write on the assumption that I will use Raspberry Pi Zero W, which is cheap and suitable for trying, but you can do it with other Raspberry Pi by the same procedure.
- I rushed into them while being carried by a classmate who loves JavaScript. Comment
By the way, have you heard of Raspberry Pi </ b>? Well, there is.
"I don't know the electronic circuit ..."
I think there are quite a lot of people who haven't done it for some reason. Well, ~~ If you spend your usual Christmas alone ~~, why don't you give it a try? Of course, I think it's an ant even after waiting for the Raspberry Pi 4.
01 buy
You are really lucky there. Because it's easy to use Kintetsu from Nagase Station, which is the closest to a kinky university, to Nihonbashi, so I'm heading to Nihonbashi right away.

Silicon House, Digit, Sengoku Densho, and Marutsu Parts are almost in stock, so it's easy to buy a set of cables for beginners. maybe ... We recommend the cheaper Raspberry Pi Zero W (solder required) </ b> or Raspberry Pi Zero WH (pinned) </ b> for a trial.
If you can't go to buy it, I think you should buy it at Intanetsu. Raspberry Pi Shop by KSY SWITCHSCIENCE
I realized that I had lost the Raspberry Pi since I was writing this, so I hurriedly searched for it. I was wrestling with the garbage room for an hour. Clean it up.
02 First thing to do
There are various articles written about this area, so I will write it easily. If you google, you will get a lot of hits.
Format SD card
Preparation before burning the OS. Formats other than FAT16 and FAT32 need to be supported in a slightly different way from the normal format. Please format by referring to the following site. [FabShop [step-02] format of microSD card used for raspberry-pi](https://www.fabshop.jp/ [step-02] format of microsd card used for raspberry-pi /)
Burn the OS on the Raspberry Pi you bought
This time we will burn Raspbian, which is commonly used for Raspberry Pi.
"Is the installed one that came with the starter set useless?"
Is useless. The Raspbian that comes with what's usually a starter kit is surprisingly old. Also, I don't have much capacity, so I recommend buying a new SD for a few hundred yen. Something like this. (It's not Affi!) Amazon-Team microSDHC card 16GB
Raspberry Pi does not recognize at worst that it is incompatible with SD card. Check if the SD card can be used before buying. (There are generally reviews.)
~~ Maybe ~~ There is no problem if you choose the newest one.
Download the ZIP from the following site, unzip it, and insert it into the SD.
RaspberryPi.org

When you reach this point, put the burned SD on the Raspberry Pin and start it. Let's insuko Raspbian when it starts.
Pin local IP
- In the terminal, do ʻifconfig` to find out the address of RaspberryPin.
- Edit with
sudo nano /etc/dhcpcd.conf.
/etc/dhcpcd.conf
interface wlan0
static ip_address=192.168.xxx.xxx
static routers=192.168.yyy.yyy
static domain_name_servers=192.168.zzz.zzz
ip_address is the IP address you want to set routers is the IP address of the router domain_name_servers sets the IP address of the DNS server.
sudo service dhcpcd reload(you should be able to do it without it, try it if you can't)sudo rebootreboot- Check the reflection of the settings with ʻifconfig`
By the way, if you do this with ssh, it will stop at 3-4 (naturally), but for the time being, try sshing again with the set IP address.
ssh settings
sudo touch / boot / ssh- Reboot and get an alert, but click "OK" and select "Settings" → "Raspberry Pi Settings" at the top of the screen.
- Set SSH to "Enabled" in "Interface".
That's it.
If you do ssh [email protected] on your MacBook terminal,
You will be prompted for a password, so enter the default password raspberry.
You can change the default username pi and password raspberry later.
After making changes, enter ssh [email protected] and enter PASSWORD.
03 Link with VScode
I don't like nano or vi for a long time, so I will make it possible to edit directly on Raspberry Pi with VS code.
Use SSH FS, which allows you to ssh and edit your workspace in VScode. https://marketplace.visualstudio.com/items?itemName=Kelvin.vscode-sshfs
To use it, just enter the set IP address and ssh password as per the site.
Then select Connect as Workspace folder and

Waiting to connect,

It looks like this. When a file moves, such as when creating or deleting a file, it needs to be reloaded one by one.
04 GPIO pin control
~~ I don't have time to write because of the supermarket that drives me to a part-time job even if I have a cold, so I have already written the control of the GPIO pin.
Use the RPI.GPIO package to control GPIO pins in Python.
import RPi.GPIO as GPIO
Give it any name you like with as.
There are two ways to express GPIO numbers: GPIO pin numbers and board pin numbers.
GPIO.setmode(GPIO.BCM)#GPIO number specification
GPIO.setmode(GPIO.BOARD)#Board pin number specification
Please choose the one that is easy for you to do. This time I chose the GPIO number.
Then set whether the pin is an input or an output. The pin I want to control is pin 17, so
GPIO.setup(17, GPIO.IN)#input
GPIO.setup(17, GPIO.OUT)#output
For output, the voltage from the Raspberry Pi can be set to 0 and 1 at 3.3V.
GPIO.output(17, 1)#Output 3.Set to 3V
This will output 3.3V to pin 17. To set the output to 0V
GPIO.output(17, 0)#Set the output to 0V
Turn off the GPIO pin setting when the program finishes.
GPIO.cleanup()
05L Chika
Based on these, I will introduce an example.
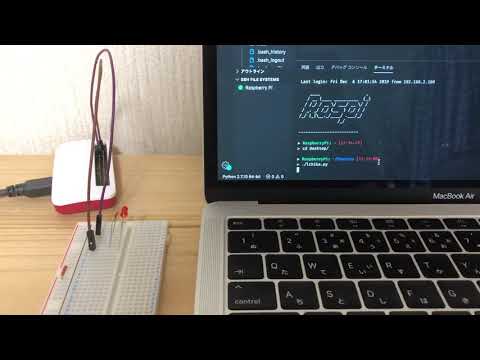
There are Hello, World-like things in the world of electronic work. That is L Chika.
It's not fun, it's just that the LED is flickering, so some people skip it, but I wonder if I can do it once and lose it. It is unexpectedly interesting to try it for the first time that my program is output as light instead of terminal.
"I can't find that LED ... I should have bought it in Akizuki ????"
~after 2h~
"there were!" I really searched for it, so please praise it. Clean it up.
lchika.py
#!/usr/bin/python
# coding: utf-8

import RPi.GPIO as GPIO
import time

GPIO.setmode(GPIO.BCM)#GPIO number specification

GPIO.setup(17, GPIO.OUT)#output

for i in range(10):
    GPIO.output(17, 1)#Output 3.Set to 3V
    time.sleep(0.5)
    GPIO.output(17, 0)#Set the output to 0V
    time.sleep(0.5)

GPIO.cleanup()#Reset GPIO pin settings
Write and save.
$ ./lchika.py
When executed with, the LED will blink 10 times. (The first big Raspi AA messed with .bash_profile. It should be easy to understand when sshing!)
Please see the result by jumping to youtube with the image link below.
By the way, you can do it with iTerminal (of course).

at the end
Isn't this hands-on? .. .. Please forgive me on the 7th day of ad-care with this article. .. .. Forgive me. .. .. I'm not satisfied with it, so I'll set 2 regardless of ad-care. Now that I've done the basic control of the GPIO pins, I'd like to play with some interesting tools for the Raspberry Pi next time.
Recommended Posts