[Python] I made a LINE Bot that detects faces and performs mosaic processing.
I want a LINE Bot that can detect the face reflected in the background and perform mosaic processing! So I made a bot with Python that allows you to freely select the face to be mosaicked.
This time, I implemented it using Flask, line-bot-sdk, heroku, OpenCV, Pillow, etc.
If you have any problems or improvements, please comment!
Operating environment
Flask==1.1.2
gunicorn==20.0.4
line-bot-sdk==1.16.0
matplotlib==3.3.2
numpy==1.18.5
opencv-python-headless==4.2.0.32
Pillow==7.2.0

python-3.8.5
What not to write in this article
・ Create LINE Bot channel ・ Deploy to heroku
The procedure is very easy to understand in the following article, so please refer to it. I made a LINE BOT with Python + Heroku --Qiita
This is an article about Echolalia LINE Bot, but most LINE Bot will be completed if you change the source code and deploy with the same procedure. If you are new to making LINE bots in Python, you should try making a parrot return bot once to see if it works properly. If you get stuck in an error when "reflecting changes" in the above article, this site -be-a-git-repository /) may be helpful.
What I made
When you send an image, it will detect your face, index it, and list it. Let's try the photo of the personnel affairs of the Suga Cabinet <source here>.

If you specify an index, only the specified face will be returned with a mosaic.
Let's put a mosaic on Minister of the Environment Koizumi.


You can also apply a mosaic to faces other than the specified face.
Let's mosaic the ministers other than Prime Minister Suga.

 You can apply a mosaic to any face in this way.
Please use the QR code below to add friends to this LINE Bot.

I pushed the source code to GitHub, so you can download it from the URL below. GitHub - Kitsuya0828/face_mosaic_linebot: A LINE Bot which recognizes faces on the picture and blur any of them you like
Source code description
Face detection and list display of multiple faces
Prepare the path of the image to be read and the path of the save destination.
src :Image path to load
desc :Destination path
The face is finally detected. That said, all you have to do is pass the cascade file to the OpenCV cascade classifier and specify the grayscaled image.
#Specifying the path of the cascade file (classifier of feature trained data)
cascade_file = './cascade/haarcascade_frontalface_alt2.xml'

#Image loading
image = cv2.imread(str(src))
#Convert to grayscale
image_gs = cv2.cvtColor(image,cv2.COLOR_BGR2GRAY)

#Reading the feature amount file for face recognition
cascade = cv2.CascadeClassifier(cascade_file)
#Face recognition
face_list = cascade.detectMultiScale(image_gs,
                                     scaleFactor=1.1,
                                     minNeighbors=1,
                                     minSize=(20,20))  #Ignore ranges below 20x20 pixels. To prevent the background from being mistaken for a face
The list `face_list``` now contains the coordinates of the detected face. Next, cut out the face image based on the coordinates of the face detection, and display the list using matplotlib. Since it is arranged so that it becomes a square image as a whole, the remaining part will be filled with a blank image ( white.jpg ``).
length = len(face_list)
#Arrange pm x pm sheets in tiles
pm = 1
while pm**2 < length:
    pm += 1

#Display a list of images in tiles
fig, ax = plt.subplots(pm, pm, figsize=(10, 10))
fig.subplots_adjust(hspace=0, wspace=0)

for k in range(pm**2):
    i = k // pm  #Vertical
    j = k % pm  #side
    ax[i, j].xaxis.set_major_locator(plt.NullLocator())
    ax[i, j].yaxis.set_major_locator(plt.NullLocator())
    if k < length:
        x,y,w,h = face_list[k]
        #Cut out a face using array access
        #The image type is an array of Numpy(numpy.ndarray).. Easy to use
        face_img = image[y:y+h,x:x+w]
        face_img = np.asarray(face_img)
        face_img = cv2.resize(face_img, (300, 300), cv2.INTER_LANCZOS4)
        face_img = cv2.cvtColor(face_img, cv2.COLOR_BGR2RGB)
        ax[i, j].text(30, 60, str(pm*i+j), fontsize=30, color='red')
        ax[i, j].imshow(face_img)
    else:
        img = cv2.imread('./white.jpg')
        img = np.asarray(img)
        img = cv2.resize(img, (300, 300), cv2.INTER_LANCZOS4)
        img = cv2.cvtColor(img, cv2.COLOR_BGR2RGB)
        ax[i, j].imshow(img)

plt.savefig(desc)
If face detection is performed multiple times, the order of the faces that are output will be different each time, and the face that the user did not expect will be mosaicked. Therefore, it is necessary to save the coordinates detected the first time in the text file (specified by `` `face_coordinates_path```) distinguished by the user ID in order.
#Save face coordinate text file
with open(face_coordinates_path, "w", encoding='utf-8') as f:
    for i in range(len(face_list)):
        f.write(" ".join([str(x) for x in face_list[i]]) + "\n")
Mosaic processing
Have the following items ready.
src :Image path to load
desc :Destination path
numberslist :List of numbers entered by the user
face_list :  detect_and_List of face coordinates recognized by lineup
Now, let's apply a mosaic using OpenCV. If it matches the face number entered by the user, the mosaic process will be executed.
for i,f in enumerate(face_list):
    x,y,w,h = f
    if i not in numberslist:
        continue
    #Reduce the cropped image at the specified magnification
    face_img = image[y:y+h,x:x+w]
    face_img = cv2.resize(face_img, (min(10,w//10),min(10,h//10)))
    #Restore the reduced image to its original size
    #Specify how to resize with the argument interpolation (cv).INTER_LINEAR has inconspicuous mosaic corners)
    face_img = cv2.resize(face_img,(w,h),interpolation=cv2.INTER_AREA)
    #Paste to the original image
    image[y:y+h,x:x+w] = face_img

image = cv2.cvtColor(image, cv2.COLOR_BGR2RGB)
im = Image.fromarray(image)
im.save(desc)
Send image
When sending an image message with LINE Bot, you must prepare the URL of both the original image and the preview image.
main_image_path = MAIN_IMAGE_PATH.format(user_id)
preview_image_path = PREVIEW_IMAGE_PATH.format(user_id)
The basic method of sending images is as follows.
#Send image
image_message = ImageSendMessage(original_content_url=f"https://<My application name>.herokuapp.com/{main_image_path}",
                                 preview_image_url=f"https://<My application name>.herokuapp.com/{preview_image_path}",)
Whole source code
.
│  Aptfile
│  detect_and_lineup.py
│  main.py
│  mosaic.py
│  Procfile
│  requirements.txt
│  runtime.txt
│  white.jpg
│
├─cascade
│      haarcascade_frontalface_alt2.xml
│
└─static
    └─images
            Hoge
main.py
import os
from pathlib import Path
from typing import List
from flask import Flask, abort, request
from linebot import LineBotApi, WebhookHandler
from linebot.exceptions import InvalidSignatureError
from linebot.models import (ImageMessage, ImageSendMessage, MessageEvent, TextMessage, TextSendMessage)
from detect_and_lineup import detect_and_lineup
from mosaic import mosaic
app = Flask(__name__,static_url_path="/static")
YOUR_CHANNEL_ACCESS_TOKEN = os.environ["YOUR_CHANNEL_ACCESS_TOKEN"]
YOUR_CHANNEL_SECRET = os.environ["YOUR_CHANNEL_SECRET"]
line_bot_api = LineBotApi(YOUR_CHANNEL_ACCESS_TOKEN)
handler = WebhookHandler(YOUR_CHANNEL_SECRET)
SRC_IMAGE_PATH = "static/images/{}.jpg "
MAIN_IMAGE_PATH = "static/images/{}_main.jpg "
PREVIEW_IMAGE_PATH = "static/images/{}_preview.jpg "
FACE_COORDINATES_PATH = "{}.txt"
@app.route("/")
def hello_world():
return "hello world!"
@app.route("/callback", methods=["POST"])
def callback():
# get X-Line-Signature header value
signature = request.headers["X-Line-Signature"]
# get request body as text
body = request.get_data(as_text=True)
app.logger.info("Request body: " + body)
# handle webhook body
try:
handler.handle(body, signature)
except InvalidSignatureError:
abort(400)
return "OK"
@handler.add(MessageEvent, message=TextMessage)
def handle_message(event):
profile = line_bot_api.get_profile(event.source.user_id)
user_id = profile.user_id
if event.message.text == 'Review':
line_bot_api.reply_message(
event.reply_token, messages=[TextSendMessage(text="<Review site URL>")]
)
else:
src_image_path = Path(SRC_IMAGE_PATH.format(user_id)).absolute()
main_image_path = MAIN_IMAGE_PATH.format(user_id*2)
preview_image_path = PREVIEW_IMAGE_PATH.format(user_id*2)
face_coordinates_path = FACE_COORDINATES_PATH.format(user_id)
numberslist = list(map(int,str(event.message.text).split()))
with open(face_coordinates_path) as f:
face_list = [list(map(int,s.strip().split())) for s in f.readlines()]
mosaic(src=src_image_path, desc=Path(main_image_path).absolute(),numberslist=numberslist,face_list=face_list)
mosaic(src=src_image_path, desc=Path(preview_image_path).absolute(),numberslist=numberslist,face_list=face_list)
image_message = ImageSendMessage(
original_content_url=f"https://<My application name>.herokuapp.com/{main_image_path}",
preview_image_url=f"https://<My application name>.herokuapp.com/{preview_image_path}",
)
app.logger.info(f"https://<My application name>.herokuapp.com/{main_image_path}")
line_bot_api.reply_message(
event.reply_token, messages=[image_message,TextSendMessage(text="I'm sorry if you don't like it")]
)
src_image_path.unlink()
@handler.add(MessageEvent, message=ImageMessage)
def handle_image(event):
message_id = event.message.id
profile = line_bot_api.get_profile(event.source.user_id)
user_id = profile.user_id
src_image_path = Path(SRC_IMAGE_PATH.format(user_id)).absolute()
main_image_path = MAIN_IMAGE_PATH.format(user_id)
preview_image_path = PREVIEW_IMAGE_PATH.format(user_id)
face_coordinates_path = FACE_COORDINATES_PATH.format(user_id)
#Save image
save_image(message_id, src_image_path)
try:
face_list = detect_and_lineup(src=src_image_path, desc=Path(main_image_path).absolute())
detect_and_lineup(src=src_image_path, desc=Path(preview_image_path).absolute())
#Send image
image_message = ImageSendMessage(
original_content_url=f"https://<My application name>.herokuapp.com/{main_image_path}",
preview_image_url=f"https://<My application name>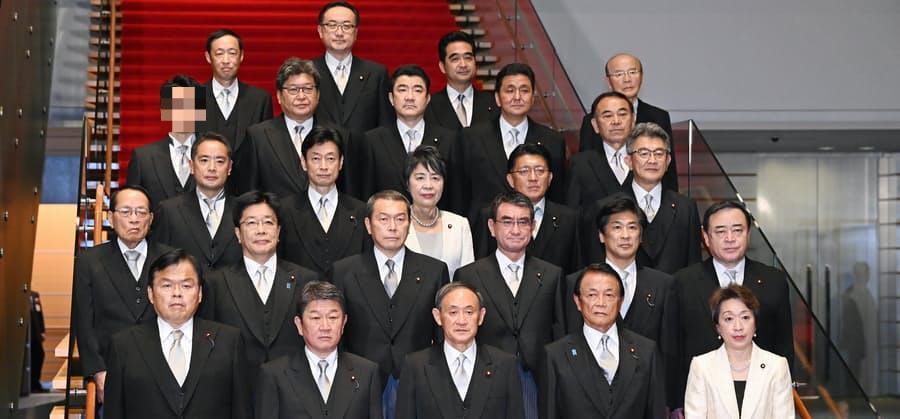
.herokuapp.com/{preview_image_path}",
)
app.logger.info(f"https://alvinface2.herokuapp.com/{main_image_path}")
line_bot_api.reply_message(event.reply_token, messages=[image_message, TextSendMessage(text="Can you enter the number of the face you want to mosaic, separated by half-width spaces?\n Example) I want to apply a mosaic to the 1st and 3rd faces\n ☞ Enter "1 3"\n\n'-1'You can also specify the number of the face you want to keep by prefixing it with.\n Example) I want to apply a mosaic to faces other than No. 0 and No. 2.\n☞「-Enter 1 0 2 "")])
#Save face coordinate text file
with open(face_coordinates_path, "w", encoding='utf-8') as f:
for i in range(len(face_list)):
f.write(" ".join([str(x) for x in face_list[i]]) + "\n")
except Exception:
line_bot_api.reply_message(
event.reply_token, TextSendMessage(text='I couldn't find a recognizable face')
)
def public_attr(obj) -> List[str]:
return [x for x in obj.__dir__() if not x.startswith("_")]
def save_image(message_id: str, save_path: str) -> None:
"""Save"""
message_content = line_bot_api.get_message_content(message_id)
with open(save_path, "wb") as f:
for chunk in message_content.iter_content():
f.write(chunk)
if __name__ == "__main__":
port = int(os.environ.get("PORT", 5000))
app.run(host="0.0.0.0", port=port)
detect_and_lineup.py
import numpy as np
from matplotlib import pyplot as plt
from PIL import Image, ImageDraw, ImageFont
import cv2

def detect_and_lineup(src: str, desc: str) -> None:
    """Find and list faces
    :params src:
Image path to load
    :params desc:
Destination path
    """

    #Specifying the path of the cascade file (classifier of feature trained data)
    cascade_file = './cascade/haarcascade_frontalface_alt2.xml'

    #Image loading
    image = cv2.imread(str(src))
    #Convert to grayscale
    image_gs = cv2.cvtColor(image,cv2.COLOR_BGR2GRAY)

    #Reading the feature amount file for face recognition
    cascade = cv2.CascadeClassifier(cascade_file)
    #Face recognition
    face_list = cascade.detectMultiScale(image_gs,
                                        scaleFactor=1.1,
                                        minNeighbors=1,
                                        minSize=(20,20))  #Ignore ranges below 20x20 pixels. To prevent the background from being mistaken for a face

    length = len(face_list)
    #Arrange pm x pm sheets in tiles
    pm = 1
    while pm**2 < length:
        pm += 1

    #Display a list of images in tiles
    fig, ax = plt.subplots(pm, pm, figsize=(10, 10))
    fig.subplots_adjust(hspace=0, wspace=0)

    for k in range(pm**2):
        i = k // pm  #Vertical
        j = k % pm  #side
        ax[i, j].xaxis.set_major_locator(plt.NullLocator())
        ax[i, j].yaxis.set_major_locator(plt.NullLocator())
        if k < length:
            x,y,w,h = face_list[k]
            #Cut out a face using array access
            #The image type is an array of Numpy(numpy.ndarray).. Easy to use
            face_img = image[y:y+h,x:x+w]
            face_img = np.asarray(face_img)
            face_img = cv2.resize(face_img, (300, 300), cv2.INTER_LANCZOS4)
            face_img = cv2.cvtColor(face_img, cv2.COLOR_BGR2RGB)
            ax[i, j].text(30, 60, str(pm*i+j), fontsize=30, color='red')
            ax[i, j].imshow(face_img)
        else:
            img = cv2.imread('./white.jpg')
            img = np.asarray(img)
            img = cv2.resize(img, (300, 300), cv2.INTER_LANCZOS4)
            img = cv2.cvtColor(img, cv2.COLOR_BGR2RGB)
            ax[i, j].imshow(img)

    plt.savefig(desc)
    return face_list
mosaic.py
import numpy as np
from matplotlib import pyplot as plt
from PIL import Image, ImageDraw, ImageFont
import cv2

def mosaic(src: str, desc: str, numberslist=[], face_list=[]) -> None:
    """
    :params src:
Image path to load
    :params desc:
Destination path
    :numberslist:
List of numbers entered by the user
    :face_list:
        detect_and_List of face coordinates recognized by lineup
    """

    #Image loading
    image = cv2.imread(str(src))

    #When the user specifies the number of the face they want to keep
    new_numberslist = []
    if numberslist[0] == -1:
        for num in range(len(face_list)):
            if num not in numberslist:
                new_numberslist.append(num)
    numberslist = new_numberslist

    for i,f in enumerate(face_list):
        x,y,w,h = f
        if i not in numberslist:
            continue
        #Reduce the cropped image at the specified magnification
        face_img = image[y:y+h,x:x+w]
        face_img = cv2.resize(face_img, (min(10,w//10),min(10,h//10)))
        #Restore the reduced image to its original size
        #Specify how to resize with the argument interpolation (cv).INTER_LINEAR has inconspicuous mosaic corners)
        face_img = cv2.resize(face_img,(w,h),interpolation=cv2.INTER_AREA)
        #Paste to the original image
        image[y:y+h,x:x+w] = face_img

    image = cv2.cvtColor(image, cv2.COLOR_BGR2RGB)
    im = Image.fromarray(image)
    im.save(desc)
    return True
Where I stumbled
Heroku + OpenCV error
When I add opencv-python to requirements.txt and deploy it to Heroku even though the program was able to run in the local environment
ImportError: libSM.so.6: cannot open shared object file: No such file or directory
I get an error like this. I was able to resolve the error by doing two things:
① Add buildpacks (Heroku) and Aptfile
Add https://github.com/heroku/heroku-buildpack-apt to Heroku's buildpacks and add the Aptfile to your project folder. ..
Aptfile
libsm6
libxrender1
libfontconfig1
libice6
There is no problem if you execute it according to the following article. Using OpenCV on heroku [Python3] --Qiita
② Use opencv-python-headless
opencv-python-headless==4.2.0.32
I found a person who has the same problem on the following site and was able to solve it. https://stackoverflow.com/questions/49469764/how-to-use-opencv-with-heroku/51004957
Summary
I was most annoyed by the incompatibility between Heroku and OpenCV, but I managed to make it. Why don't you create a LINE Bot that you think would be useful if you have any ideas? Have a good programming life.
References
☟ It's really easy to understand how to make a LINE Bot using Python. I made a LINE BOT with Python + Heroku --Qiita
☟ The method of saving and sending images was very helpful. [Python] I made a LINE Bot that dates photos --Qiita
Recommended Posts