[PYTHON] I tried to build a super-resolution method / ESPCN
Overview
This time, I have created an ESPCN (efficient sub-pixel convolutional neural network), which is one of the super-resolution methods, so I will post it as a summary. Click here for the original paper → [Real-Time Single Image and Video Super-Resolution Using an Efficient Sub-Pixel Convolutional Neural Network](https://www.cv-foundation.org/openaccess/content_cvpr_2016/html/Shi_Real-Time_Single_Image_CVPR_2016_paper. html)
table of contents
1.First of all 2. What is ESPCN? 3. PC environment 4. Code description 5. At the end
1.First of all
Super-resolution is a technology that improves the resolution of low-resolution images and moving images, and ESPCN is a method proposed in 2016. (By the way, SRCNN, which is mentioned as the first deep learning method, was in 2014) SRCNN was a method to improve the resolution by combining it with the existing enlargement method such as bicubic method, but in this ESPCN, the enlargement phase is introduced in the deep learning model, and it can be enlarged at any magnification. I will. This time, I built this method with python, so I would like to introduce the code. The full code is also posted on GitHub, so please check there. https://github.com/nekononekomori/espcn_keras
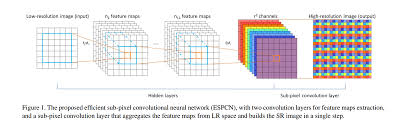
2. What is ESPCN?
ESPCN is a method to improve the resolution by introducing Subpixel Convolution (Pixel shuffle) into the deep learning model. Since the main thing is to post the code, I will omit the detailed explanation, but I will post the site that explains ESPCN. https://buildersbox.corp-sansan.com/entry/2019/03/20/110000 https://qiita.com/oki_uta_aiota/items/74c056718e69627859c0 https://qiita.com/jiny2001/items/e2175b52013bf655d617
3. PC environment
cpu : intel corei7 8th Gen gpu : NVIDIA GeForce RTX 1080ti os : ubuntu 20.04
4. Code description
As you can see from GitHub, it mainly consists of three codes. ・ Datacreate.py → Data set generation program ・ Model.py → ESPCN program ・ Main.py → Execution program I have created a function with datacreate.py and model.py and executed it with main.py.
Description of datacreate.py
datacreate.py
import cv2
import os
import random
import glob
import numpy as np
import tensorflow as tf

#A program that cuts out an arbitrary number of frames
def save_frame(path,        #The path of the file that contains the data
               data_number, #Number of photos to cut from one image
               cut_height,  #Storage size(Vertical)(Low image quality)
               cut_width,   #Storage size(side)(Low image quality)
               mag,         #Magnification
               ext='jpg'):

    #Generate a list of datasets
    low_data_list = []
    high_data_list = []

    path = path + "/*"
    files = glob.glob(path)

    for img in files:
        img = cv2.imread(img, cv2.IMREAD_GRAYSCALE)
        H, W = img.shape

        cut_height_mag = cut_height * mag
        cut_width_mag = cut_width * mag

        if cut_height_mag > H or cut_width_mag > W:
            return

        for q in range(data_number):
            ram_h = random.randint(0, H - cut_height_mag)
            ram_w = random.randint(0, W - cut_width_mag)

            cut_img = img[ram_h : ram_h + cut_height_mag, ram_w: ram_w + cut_width_mag]

            #Shrinks after blurring with Usian filter
            img1 = cv2.GaussianBlur(img, (5, 5), 0)
            img2 = img1[ram_h : ram_h + cut_height_mag, ram_w: ram_w + cut_width_mag]
            img3 = cv2.resize(img2, (cut_height, cut_width))

            high_data_list.append(cut_img)
            low_data_list.append(img3)

    #numpy → tensor +Normalization
    low_data_list = tf.convert_to_tensor(low_data_list, np.float32)
    high_data_list = tf.convert_to_tensor(high_data_list, np.float32)
    low_data_list /= 255
    high_data_list /= 255

    return low_data_list, high_data_list
This will be the program that will generate the dataset.
def save_frame(path,        #The path of the file that contains the data
               data_number, #Number of photos to cut from one image
               cut_height,  #Storage size(Vertical)(Low resolution)
               cut_width,   #Storage size(side)(Low resolution)
               mag,         #Magnification
               ext='jpg'):
Here is the definition of the function. As I wrote in the comment out, path is the path of the folder. (For example, if you have a photo in a folder named file, type "./file".) data_number cuts out multiple photos and turns the data. cut_height and cut_wedth are low resolution image sizes. The final output result will be the value multiplied by the magnification mag. If (cut_height = 300, cut_width = 300, mag = 300, The result is an image with a size of 900 * 900. )
    path = path + "/*"
    files = glob.glob(path)
This is a list of all the photos in the file.
for img in files:
        img = cv2.imread(img, cv2.IMREAD_GRAYSCALE)
        H, W = img.shape

        cut_height_mag = cut_height * mag
        cut_width_mag = cut_width * mag

        if cut_height_mag > H or cut_width_mag > W:
            return

        for q in range(data_number):
            ram_h = random.randint(0, H - cut_height_mag)
            ram_w = random.randint(0, W - cut_width_mag)

            cut_img = img[ram_h : ram_h + cut_height_mag, ram_w: ram_w + cut_width_mag]

            #Shrink after blurring with Gaussian filter
            img1 = cv2.GaussianBlur(img, (5, 5), 0)
            img2 = img1[ram_h : ram_h + cut_height_mag, ram_w: ram_w + cut_width_mag]
            img3 = cv2.resize(img2, (cut_height, cut_width))

            high_data_list.append(cut_img)
            low_data_list.append(img3)
Here, I take out the photos listed earlier one by one and cut out as many as the number of data_number. I'm using random.randint because I want to randomly cut the location. Then, it is blurred with a Gaussian filter to generate a low resolution image. Finally, I add it to the list with append.
    #numpy → tensor +Normalization
    low_data_list = tf.convert_to_tensor(low_data_list, np.float32)
    high_data_list = tf.convert_to_tensor(high_data_list, np.float32)
    low_data_list /= 255
    high_data_list /= 255

    return low_data_list, high_data_list
Here, keras and tensorflow need to convert to tensor instead of numpy array, so conversion is done. At the same time, normalization is also done here.
Finally, the function ends with a list containing low-resolution images and a list containing high-resolution images.
Description of main.py
main.py
import tensorflow as tf
from tensorflow.python.keras.models import Model
from tensorflow.python.keras.layers import Conv2D, Input, Lambda

def ESPCN(upsampling_scale):
    input_shape = Input((None, None, 1))

    conv2d_0 = Conv2D(filters = 64,
                        kernel_size = (5, 5),
                        padding = "same",
                        activation = "relu",
                        )(input_shape)
    conv2d_1 = Conv2D(filters = 32,
                        kernel_size = (3, 3),
                        padding = "same",
                        activation = "relu",
                        )(conv2d_0)
    conv2d_2 = Conv2D(filters = upsampling_scale ** 2,
                        kernel_size = (3, 3),
                        padding = "same",
                        )(conv2d_1)

    pixel_shuffle = Lambda(lambda z: tf.nn.depth_to_space(z, upsampling_scale))(conv2d_2)

    model = Model(inputs = input_shape, outputs = [pixel_shuffle])

    model.summary()

    return model
As expected, it's short.
By the way, when I look at the ESPCN paper, I write that it has such a structure.
 Click here for details on the Convolution layer → keras documentation
pixel_shuffle is not installed as standard in keras, so I replaced it with lambda.
lambbda represents an expansion because you can incorporate any expression into your model.
lambda documentation → https://keras.io/ja/layers/core/#lambda
tensorflow documentation → https://www.tensorflow.org/api_docs/python/tf/nn/depth_to_space
Click here for details on the Convolution layer → keras documentation
pixel_shuffle is not installed as standard in keras, so I replaced it with lambda.
lambbda represents an expansion because you can incorporate any expression into your model.
lambda documentation → https://keras.io/ja/layers/core/#lambda
tensorflow documentation → https://www.tensorflow.org/api_docs/python/tf/nn/depth_to_space
There seem to be various ways to handle the pixel shuffle here.
Description of model.py
model.py
import model
import data_create
import argparse
import os
import cv2

import numpy as np
import tensorflow as tf

if __name__ == "__main__":

    def psnr(y_true, y_pred):
        return tf.image.psnr(y_true, y_pred, 1, name=None)

    train_height = 17
    train_width = 17
    test_height = 200
    test_width = 200

    mag = 3.0
    cut_traindata_num = 10
    cut_testdata_num = 1

    train_file_path = "../photo_data/DIV2K_train_HR" #Folder with photos
    test_file_path = "../photo_data/DIV2K_valid_HR" #Folder with photos

    BATSH_SIZE = 256
    EPOCHS = 1000
    opt = tf.keras.optimizers.Adam(learning_rate=0.0001)

    parser = argparse.ArgumentParser()
    parser.add_argument('--mode', type=str, default='espcn', help='espcn, evaluate')

    args = parser.parse_args()

    if args.mode == "espcn":
        train_x, train_y = data_create.save_frame(train_file_path,   #Path of the image to be cropped
                                                cut_traindata_num,  #Number of datasets generated
                                                train_height, #Storage size
                                                train_width,
                                                mag)   #magnification

        model = model.ESPCN(mag)
        model.compile(loss = "mean_squared_error",
                        optimizer = opt,
                        metrics = [psnr])
#https://keras.io/ja/getting-started/faq/
        model.fit(train_x,
                    train_y,
                    epochs = EPOCHS)

        model.save("espcn_model.h5")

    elif args.mode == "evaluate":
        path = "espcn_model"
        exp = ".h5"
        new_model = tf.keras.models.load_model(path + exp, custom_objects={'psnr':psnr})

        new_model.summary()

        test_x, test_y = data_create.save_frame(test_file_path,   #Path of the image to be cropped
                                                cut_testdata_num,  #Number of datasets generated
                                                test_height, #Storage size
                                                test_width,
                                                mag)   #magnification
        print(len(test_x))
        pred = new_model.predict(test_x)
        path = "resurt_" + path
        os.makedirs(path, exist_ok = True)
        path = path + "/"

        for i in range(10):
            ps = psnr(tf.reshape(test_y[i], [test_height, test_width, 1]), pred[i])
            print("psnr:{}".format(ps))

            before_res = tf.keras.preprocessing.image.array_to_img(tf.reshape(test_x[i], [int(test_height / mag), int(test_width / mag), 1]))
            change_res = tf.keras.preprocessing.image.array_to_img(tf.reshape(test_y[i], [test_height, test_width, 1]))
            y_pred = tf.keras.preprocessing.image.array_to_img(pred[i])

            before_res.save(path + "low_" + str(i) + ".jpg ")
            change_res.save(path + "high_" + str(i) + ".jpg ")
            y_pred.save(path + "pred_" + str(i) + ".jpg ")

    else:
        raise Exception("Unknow --mode")
The main is quite long, but my impression is that if I can shorten it, I can do more. Below, I will explain the contents.
import model
import data_create
import argparse
import os
import cv2

import numpy as np
import tensorflow as tf
Here we are loading a function or another file in the same directory. datacreate.py, model.py and main.py should be in the same directory.
    def psnr(y_true, y_pred):
        return tf.image.psnr(y_true, y_pred, 1, name=None)
This time, I used psnr as a criterion for judging the quality of the generated image, so that is the definition. psnr is called the peak signal-to-noise ratio, and in simple terms it is like calculating the difference between the pixel values of the images you want to compare. I will omit the detailed explanation here, but this article is relatively detailed, and multiple evaluation methods are described.
    train_height = 17
    train_width = 17
    test_height = 200
    test_width = 200

    mag = 3.0
    cut_traindata_num = 10
    cut_testdata_num = 1

    train_file_path = "../photo_data/DIV2K_train_HR" #Folder with photos
    test_file_path = "../photo_data/DIV2K_valid_HR" #Folder with photos

    BATSH_SIZE = 256
    EPOCHS = 1000
    opt = tf.keras.optimizers.Adam(learning_rate=0.0001)
Here, the value used this time is set. If you are looking at github separately as config.py, it's fine, but since it is not a large-scale program, it is summarized.
As for the size of the training data, 17 * 17, which is the value divided by the mag, was adopted because the paper stated that the train data was 51 * 51. The test is just oversized for easy viewing. __ The result is three times as large as this. __ The number of data is 10 times the number of images contained in the file. (If 800 sheets, the number of data is 8,000)
This time, I used DIV2K Dataset, which is often used for super-resolution, for the data. Since the quality of the data is good, it is said that a certain amount of accuracy can be obtained with a small amount of data.
    parser = argparse.ArgumentParser()
    parser.add_argument('--mode', type=str, default='espcn', help='espcn, evaluate')

    args = parser.parse_args()
I wanted to separate the learning and evaluation of the model here, so I made it like this so that I can select it with --mode. I will not explain in detail, so I will post the official python documentation. https://docs.python.org/ja/3/library/argparse.html
  if args.mode == "espcn":
        train_x, train_y = data_create.save_frame(train_file_path,   #Path of the image to be cropped
                                                cut_traindata_num,  #Number of datasets generated
                                                train_height, #Storage size
                                                train_width,
                                                mag)   #magnification

        model = model.ESPCN(mag)
        model.compile(loss = "mean_squared_error",
                        optimizer = opt,
                        metrics = [psnr])
#https://keras.io/ja/getting-started/faq/
        model.fit(train_x,
                    train_y,
                    epochs = EPOCHS)

        model.save("espcn_model.h5")
I am learning here. If you select srcnn (the method will be described later), this program will work.
In data_create.save_frame, the function called save_frame of data_create.py is read and made available. Now that the data is in train_x and train_y, load the model in the same way and compile and fit.
See keras documentation for more information on compile and more. We use the same papers as the papers.
Finally, save the model and you're done.
    elif args.mode == "evaluate":
        path = "espcn_model"
        exp = ".h5"
        new_model = tf.keras.models.load_model(path + exp, custom_objects={'psnr':psnr})

        new_model.summary()

        test_x, test_y = data_create.save_frame(test_file_path,   #Path of the image to be cropped
                                                cut_testdata_num,  #Number of datasets generated
                                                test_height, #Storage size
                                                test_width,
                                                mag)   #magnification
        print(len(test_x))
        pred = new_model.predict(test_x)
        path = "resurt_" + path
        os.makedirs(path, exist_ok = True)
        path = path + "/"

        for i in range(10):
            ps = psnr(tf.reshape(test_y[i], [test_height, test_width, 1]), pred[i])
            print("psnr:{}".format(ps))

            before_res = tf.keras.preprocessing.image.array_to_img(tf.reshape(test_x[i], [int(test_height / mag), int(test_width / mag), 1]))
            change_res = tf.keras.preprocessing.image.array_to_img(tf.reshape(test_y[i], [test_height, test_width, 1]))
            y_pred = tf.keras.preprocessing.image.array_to_img(pred[i])

            before_res.save(path + "low_" + str(i) + ".jpg ")
            change_res.save(path + "high_" + str(i) + ".jpg ")
            y_pred.save(path + "pred_" + str(i) + ".jpg ")

    else:
        raise Exception("Unknow --mode")
It is finally the explanation of the last. First, load the model you saved earlier so that you can use psnr. Next, generate a dataset for test and generate an image with predict.
I wanted to know the psnr value on the spot, so I calculated it. I wanted to save the image, so I converted it from a tensor to a numpy array, saved it, and finally it's done!
The resolution has been increased firmly like this.

5. At the end
This time I tried to build ESPCN. I'm worried about which paper to implement next. We are always looking forward to your requests and questions. Thank you for reading.
Recommended Posts