[LINUX] Building a distributed environment with the Raspberry PI series (Part 2: PiServer analysis and alternative system design)
Introduction
- Construction of distributed environment with Raspberry PI series (Part 1: Summary of availability of diskless client by model)
- Building a distributed environment with Raspberry PI series (Part 2: Analysis of PiServer and design of alternative system)
- Building a distributed environment with Raspberry PI series (Part 3: Installing and setting dnsmasq)
- Building a distributed environment with Raspberry PI series (Part 4: Build NFS server and import OS for clients)
- Building a distributed environment with the Raspberry PI series (Part 5: Customizing the Raspberry PI OS for cluster nodes (1))
- Building a distributed environment with Raspberry PI series (Part 6: Customization of Raspberry PI OS for cluster nodes (2))
- Building a distributed environment with Raspberry PI series (7: tftp route setting and startup test for each Raspberry Pi)
This article is a continuation of Part 1. Raspberry PI As many people make trial and error toward becoming a diskless client, the content is about the software, PiServer, which is always a hit, and the construction of an alternative system. If you are facing the problem that your Raspberry Pi is not recognized by PiServer, please see Part 1.
Introducing PiServer
Official announcement is here (English). If you use a PC with Raspberry PI Desktop installed, you can make Raspberry Pi 3B or later diskless.
Since the Raspberry Pi was originally made for educational purposes, students used a large number of discless Raspberry Pis in the classroom. It seems that the teacher was created assuming an environment where the same screen is viewed on a PC.
So let's touch the Raspberry PI Desktop
--The kernel is Debian on x86_64. --glibc is i386 (why ???) ――It's exactly the same desktop environment as Raspberry Pi --There is an item called "PiServer Settings" in the "Settings" menu. I guess this is PiServer.
Check the functions and implementation method of PiServer
- 1. Discovery of Raspeye Client
- Receive the DHCP broadcast from Raspberry Pi and register the MAC address as a management target. The DHCP function of dnsmasq is hooking the received request. Prepare a tftp route dedicated to the registered MAC address (symbolize to the boot directory of the managed OS)
- 2. Import OS image for client Realized with
- bash script. I have copied the contents of the image file to my local disk and added an entry to / etc / exports. By the way, I deleted unnecessary files for the diskless client and rewritten the locale relation to the same value as the machine running Raspberry PI Desktop. It's also a sneak rewrite of / etc / fstab, which is supposed to mount the local disk
- 3. tftp server function It is realized by
- dnsmaq. I'm tinkering with the dnsmasq config file from the GUI
- 4. DNS cache server / ddns function It is realized by
- dnsmasq. If you already have another DNS server, or if you don't need this feature because you just want to be able to manage it in / etc / hosts, you need to specify the port number as 0 in the /etc/dnsmasq.conf file >
- 5. DHCP server function Realized with
- dnsmasq. If another DHCP server already exists, it also functions as Proxy DHCP, returning only the address of the tftp server to the client to download the files needed at boot time.
- 6. NFS server function
- Use the NFS server (ver3) built into the kernel from the beginning. Provides a root file system for clients. Even diskless clients may want to store their data, so they also provide a writable shared folder to mount during the boot process once the root filesystem has been mounted.
- 7. Change client OS
- Manage which OS image is given to the registered Raspberry Pi. Just rewriting the tftp route for each MAC address with a symbolic link
- 8. User account management on Raspberry Pi
- I haven't confirmed it in detail because there is no merit to use it, but it seems that it is realized by OpeLDAP
- 9. Change the managed client OS image I'm just running chroot using the
- qemu-arm-static command. Since glibc is the i386 version, the qemu-aarch64-static command is not installed, so it is not possible to manage the 64-bit version distribution.
Do You Really Need a Raspberry PI Desktop Environment?
When I checked the source published in GitHub piserver repository, I found the C ++ source of the management GUI and various bash scripts. The GUI part could be compiled and executed on the x86_64 version of ArchLinux, so it turned out that there was no need to use Raspberry PI Desktop. What's more, once you port the bash script published in the PiServer repository, all the remaining functions can be realized with just dnsmasq + OpenLDAP + qemu-user-static.
--I don't need a GUI that just rewrites the dnsmasq configuration file. --PiServer is shit (final decision) after all.
How to build a PiServer alternative system
Just the other day, the official Raspberry announced that Raspberry PI OS will be 64-bit, and we will manage the 64-bit distribution. If you can't PiServer, you need to give up. So let's think about a method to build an alternative system.
Prerequisites: General diskless client behavior (IPv4 PXE boot)
What the client + server is doing with PXE boot (sequence)
(Reference: https://japan.zdnet.com/article/20089685/)
- Clients that do not have an IP on the disk will throw a broadcast to try to get the IP from the DHCP server
- The DHCP server determines whether the requester is a registered diskless client based on the client's MAC address, etc.
- If it is determined that it is not a diskless client, it will be terminated by giving an IP etc. If it is determined that it is a registered diskless client, the DHCP server will give an IP to the requesting client and then tftp to visit next. Tell me the IP of the server and the DHCP server's role is over.
- A client given its own IP accesses the taught tftp server and downloads the kernel and related files required for booting. When all the files required for startup have been downloaded, the role of the tftp server is over.
- The file downloaded from tftp should always contain the location of the NFS server that provides the root file system and the name of the shared directory, so the client mounts the specified shared directory as the root file system read-only. Try.
- The root file system mount is complete and the actual OS boot starts.
Infrastructure servers required to realize PXE boot
Therefore, in order to realize the above procedure, it is necessary to prepare at least the following environment, and a server with these three functions is sometimes called a "PXE server".
- DHCP server
- tftp server
- File server such as NFS
Originally, diskless clients are usually used for applications where many users use the same environment, such as terminals for students in educational settings and terminals for data entry business.
- DNS server (automatic registration of client host name)
- In-house authentication server such as LDAP / NIS
- Gateway / Firewall
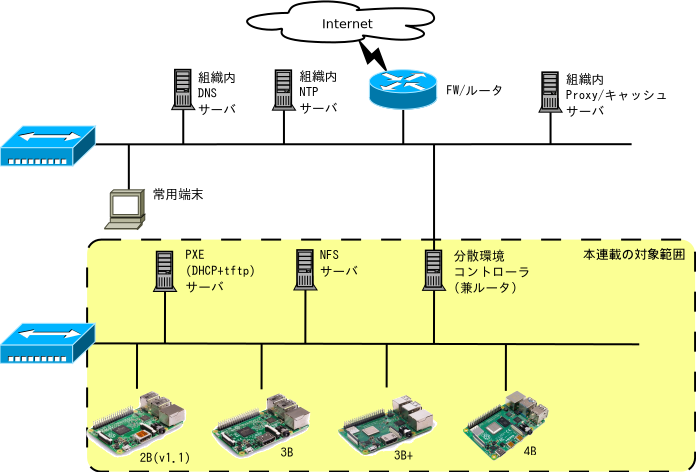
However, since the final purpose of this article is to build a personal distributed processing environment, the contents related to the following three servers will not be described. By the way, DNS will be necessary if the number of clients exceeds 100, but if the number of clients is less than 10, name resolution by the / etc / hosts file is sufficient, and this file can be shared on the NFS server. You don't need it. By the way, in a distributed environment that only you use, you don't need an authentication server, and you don't need it because you can share the / etc / passwd file.
Realization method 1: Build tftp / DHCP / DNS collectively with dnsmasq, software specialized for building PXE servers.
Building a DHCP, tftp, or DNS server with individual software such as dhcpd, atftpd, or bind is cumbersome and time consuming. That's where the software dnsmasq, which is also used by PiServer, comes into play. Originally, this software started development as a DNS cache server, but it is no exaggeration to say that it is a software specialized for building a PXE server because it has incorporated the functions of the tftp server and DHCP server before I knew it. Let's do it. Naturally, I will use this software. However, do not use DNS, which is the original purpose.
From now on, the x86_64 machine running dnsmasq will be referred to as the "PXE server".
Realization 2: The NFS server function should be separated from the PXE server.
In PiServer, all the functions were packed in order to sell "complete with one PC", but considering safety, it is better to separate the NFS server function into another machine. This is because if the PXE server doubles as an NFS server, the following can happen:
- When I restart / shut down the PXE server, the root file system of the running Raspberry Pi disappears. To avoid this, you need to shut down all Raspberry Pi before restarting the PXE server.
- More dire when a disk failure occurs on the PXE server.
If you already have a file server that supports NFS, it will be a more robust system because it will be redundant with RAID, GlusterFS, etc. There is no problem if the boot related files distributed by tftp are also NFS mounted from the PXE server. However, I think it is better to use a machine with fast disk access.
Hereafter, a machine with NFS function will be referred to as an "NFS server".
[^ Reason]: If you have an existing file server, it will be redundant with RAID, GlusterFS, etc.
Realization 3: Import from the OS installation image file to the NFS server
You can do this manually. However, it may be possible to automate it by modifying the bash script for OS import published on GitHub of PiServer.
Realization 4: armhf / aarch64 emulator required to update the client OS
Diskless clients mount the root file system read-only, so you cannot update the OS from the client side. You will need to update the OS on the PXE or NFS server side. However, the environment you are trying to build this time should be an ARM on the client side and an x86_64 machine on the server side. That's where you need an emulator.
This method is also implemented in PiServer, but using the emulator qemu (user mode static), binfmt support, and chroot, you can easily control the OS distributed to clients. You can read more about it here [http://blog.kmckk.com/archives/2342452.html).
For Debian, you just need to install the qemu-user-static package, and for ArchLinux, you need to compile it yourself with AUR.
Realization 5: Client MAC address management
If you have 10 or less Raspberry Pis, it's not a big deal to check them individually by the method described in My previous article.
Realization method 6: DNS / user management function
Since it is a group of clients that only I use, I do not need to manage it, so I will omit it.
--User management of / etc / passwd + / etc / shadow with NFS share --Dnqmasq's DHCP function resolves + / etc / hosts, which allocates a fixed IP to each Raspberry Pi, with an NFS share
All will be solved by doing.
Final form
The author decides to build such an environment. The PXE server, NFS server, and controller may be combined into one unit, or the subnets may not be separated.
So that's it for this time. Next time I would like to actually install and configure dnsmasq on an x86_64 Linux machine.