Python Application: Data Handling Part 3: Data Format
Protocol Buffers
What are Protocol Buffers?
Data is processed by defining a Message Type in advance. Message Type is like a class with no methods. This time, I will introduce how to define Message Type using the language proto2. The flow of data processing is as follows.
Define Message Type with 1, proto2 2, Compile the file in which Message Type is defined 3, write data in Python
Define Message Type ①
First, let's define the Message Type. This time, let's define a Message Type to represent the family structure. We will give each person information on "name", "age", and "relationship". See the source code below.
//Semicolon at the end of each line(;)I will put on.

syntax = "proto2";
/*Top syntax= "proto2";Is like a signal to use proto2.
Currently there is also proto3, but this time we will use proto2.*/

message Person{
/*
It defines a Person to represent the information of each member of the family.
message is like a Python class.
*/

    //Comment 1:Only one line

    /*
comment
Part 2:Used when there are multiple lines
    */


    required string name = 1; //Full name
    /*
string name indicates that a string will be assigned to name. This pair is called a field.
Sideways= 1;It has become. This one is called a tag.

Tags are used when outputting data in binary format
It is a mark to distinguish which data is which.
    */
    required int32 age = 2; //age
    /*
The field tags in the same nest must be different.
It is also advisable to specify a number between 1 and 15 to save memory.
    */

    enum Relationship{
        FATHER = 0; //father
        MOTHER = 1; //mother
        SON = 2; //son
        DAUGHTER = 3; //Daughter
        GRANDFATHER = 4; //grandfather
        GRANDMOTHER = 5; //grandmother
    }

    required Relationship relationship = 4; //relationship
}
In proto2, it is necessary to add required to the required item (it is abolished in proto3) Please note.
Define Message Type ②
syntax = "proto2";

message Person{

    required string name = 1; //Full name
    required int32 age = 2; //age

    enum Relationship{
    //Define new types with enum Relationship
    /*There are FATHER and MOTHER in the enum
The type defined in the enum takes the value of one of these.

       Relationship relationship = 4;Defined in
relationship is
It can be FATHER, MOTHER, SUM, DAUGHTER, GRANDFATHER, GRANDMOTHER.
     */
        FATHER = 0; //father
        MOTHER = 1; //mother
        SON = 2; //son
        DAUGHTER = 3; //Daughter
        GRANDFATHER = 4; //grandfather
        GRANDMOTHER = 5; //grandmother
    }

    required Relationship relationship = 4; //relationship
    /*
    Relationship relationship = 4;Although it is
Please note that this 4 is a tag and does not refer to GRAND FATHER.

All the numbers that appear in the definition of Relationship are also tags.
Note that the tags inside the enum start at 0.
   */
}
Relationship relationship = 4;
Please note that this 4 is a tag and does not refer to GRAND FATHER. Also, all the numbers that appear in the definition of Relationship are tags. Note that the tags inside the enum start at 0.
Define Message Type ③
Finally, define the Family. Repeat should have a list-like image. In other words, it means that 0 or more Person type data can be entered.
syntax = "proto2";

message Person{

    required string name = 1; //Full name
    required int32 age = 2; //age

    enum Relationship{
        FATHER = 0; //father
        MOTHER = 1; //mother
        SON = 2; //son
        DAUGHTER = 3; //Daughter
        GRANDFATHER = 4; //grandfather
        GRANDMOTHER = 5; //grandmother
    }

   required Relationship relationship = 4; //relationship
}

message Family{
    repeated Person person = 1;
}
This completes the definition of Family. To handle this in Python you need to rewrite it in Python. This is done with the following command:
%%bash
protoc --python_out={Path to the directory to save the compiled file(Relative path to the file to compile)} {The path of the file to compile}

This time, family is directly under the data directory.It is assumed that there is a file called proto. Execute the following command.
%%bash
protoc --python_out=./ ./4080_data_handling_data/family.proto

Then family_pb2.You will have a file called py. Please be careful not to edit this file(If you accidentally edit and save it, re-execute the above command.)。
%% bash is called a magic command for executing commands on Jupyter Notebook. Not required except for Jupyter Notebook.
(If you want to run it in the local environment of Windows, please use protoc.exe --python_out = ./ ./4080_data_handling_data / family.proto.)
Write data in Python
I will write the data in Python.
import sys
sys.path.append('./4080_data_handling_data')

family_pb2 = __import__('family_pb2')

#Instance of Family type data
family = family_pb2.Family()

family_name = ["Bob", "Mary", "James", "Lisa", "David", "Maria"]
family_age = [34, 29, 5, 3, 67, 66]

# family_rel = [i for i in range(6)]May be

family_rel = [family_pb2.Person.FATHER, family_pb2.Person.MOTHER, family_pb2.Person.SON,
              family_pb2.Person.DAUGHTER, family_pb2.Person.GRANDFATHER, family_pb2.Person.GRANDMOTHER]

for i in range(6):

    #repeated is like an array
    #Add a new element
    person = family.person.add()

    #Substitute name, age, relationship
    person.name = family_name[i]
    person.age = family_age[i]
    person.relationship = family_rel[i]

print(family)
First, declare an instance of type Family with family = family_pb2.Family (). The Family had a repeated Person person. This is like a list If you want to add an element, write something like family.person.add (). Substitution to the one defined by enum substitutes the element name or tag of enum
hdf5
hdf5 is the data format used by keras. For example, if you want to save the trained model, it will be output in hdf5 format. A big feature of hdf5 is that the hierarchical structure can be completed in one file.
For example, create a directory called cooking. Create directories called Japanese, Western, and Chinese In addition, each method is to make grilled dishes, simmered dishes, etc.
Create a hierarchical directory like a tree.
Creating a file in hdf5 format
When handling hdf5 format data in Python, a library called h5py and Pandas are used. Let's actually create the data and save it in a file. Let's take the population of prefecture A as an example.
import h5py
import numpy as np
import os

np.random.seed(0)

#Consider the cities X, Y, and Z of prefecture A
#Suppose that X city has 1 to 3 chome, Y city has 1 to 5 chome, and Z city has only 1 chome.

#Definition of the population of each city
population_of_X = np.random.randint(50, high=200, size=3)
population_of_Y = np.random.randint(50, high=200, size=5)
population_of_Z = np.random.randint(50, high=200, size=1)

#List the population
population = [population_of_X, population_of_Y, population_of_Z]

#Delete the file if it already exists
if os.path.isfile('./4080_data_handling_data/population.hdf5'):
    os.remove('./4080_data_handling_data/population.hdf5')

#Open file
hdf_file = h5py.File('./4080_data_handling_data/population.hdf5')

# 'A'Create a group named(Meaning of prefecture A)
prefecture = hdf_file.create_group('A')

for i in range(3):
    #For example A/X/1 is an image of 1-chome, X city, A prefecture
    #Image of putting data in a file named 1 in directory X in directory A
    for j in range(len(population[i])):
        city = hdf_file.create_dataset('A/' + ['X', 'Y', 'Z'][i] + '/' + str(j + 1), data=population[i][j])

#writing
hdf_file.flush()

#close
hdf_file.close()
Reading hdf5 format
Try reading the file. Element access is the same image as a list.
import pandas as pd
import h5py
import numpy as np

#The path of the file you want to open
path = './4080_data_handling_data/population.hdf5'

#Open file
# 'r'Means read mode
population_data = h5py.File(path, 'r')

for prefecture in population_data.keys():
    for city in population_data[prefecture].keys():
        for i in population_data[prefecture][city].keys():
            print(prefecture + 'Prefecture' + city + 'city' + i + 'Chome: ',
                  int(population_data[prefecture][city][i].value))

#close
population_data.close()
TFRecord
About TF Record
TFRecord is the data format used by TensorFlow. The reason why TFRecord is recommended is to save the data in this format once. This is because the cost of machine learning may be lower.
Also, TFRecord is implemented in proto3. Here, we will look at the process of converting the data to TFRecord format and outputting it to a file.
Convert the image to TFRecord format and output it to an external file ①
I will show you how to read an image and convert it to TFRecord format. Here, we will handle the preparation before writing to the file.
import numpy as np
import tensorflow as tf
from PIL import Image

#Load image
image = Image.open('./4080_data_handling_data/hdf5_explain.png')

#Definition of data to export
# tf.train.Use a class called Example
# tf.train.Of the class called Features"Cohesive"
#Each tf.train.Feature element is bytes
#This time image, label, height,Adopt width as data
my_Example = tf.train.Example(features=tf.train.Features(feature={
    'image': tf.train.Feature(bytes_list=tf.train.BytesList(value=[image.tobytes()])),
    'label': tf.train.Feature(bytes_list=tf.train.BytesList(value=[np.ndarray([1000]).tobytes()])),
    'height': tf.train.Feature(bytes_list=tf.train.BytesList(value=[np.ndarray([image.height]).tobytes()])),
    'width': tf.train.Feature(bytes_list=tf.train.BytesList(value=[np.ndarray([image.width]).tobytes()])),
}))
It's a bit complicated, but let's take a look at the definition of my_Example.
tf.train.BytesList This is a class. By setting value = [hoge], an instance with hoge as data is created. Note that hoge is bytes. This time the hoge is
- image.tobytes()
- np.ndarray([1000]).tobytes()
- np.ndarray([image.height]).tobytes()
- np.ndarray([image.width]).tobytes()
There are four.
Instantiate the tf.train.Feature class
Assign a key to each instance of tf.train.Features Create an instance of dict. The key this time is
- image
- label
- height
- width
There are four. Using the dict generated from these four tf.train.Features Create an instance of tf.train.Features.
Create an instance of tf.train.Example
Generated from an instance of the tf.train.Feature class
This instance is my_Example, which is used to write to a file.
You can use three types of writing formats: int64, float, and bytes. This time, bytes are used as per the source code.
The explanation of the four tf.train.Features image is the image itself label is a mark of the image and is an arbitrary number (1000 this time) height and width are the height and width of the image, respectively.
Here, we will incorporate the elements that we are trying to find. For example, in this case, there is only one image, so there is not much need for a label. However, it may become necessary as the number of images increases. It may be better to include other information such as the name of the image. If the image is enough, the image alone is fine.

Convert the image to TFRecord format and output it to an external file ②
Then write the generated instance of the tf.train.Example class to a file
import numpy as np
import tensorflow as tf
from PIL import Image

#Load image
image = Image.open('./4080_data_handling_data/hdf5_explain.png')

#Definition of data to export
# tf.train.Use a class called Example
# tf.train.Of the class called Features"Cohesive"
#Each tf.train.Feature element is bytes
#This time image, label, height,Adopt width as data
my_Example = tf.train.Example(features=tf.train.Features(feature={
    'image': tf.train.Feature(bytes_list=tf.train.BytesList(value=[image.tobytes()])),
    'label': tf.train.Feature(bytes_list=tf.train.BytesList(value=[np.ndarray([1000]).tobytes()])),
    'height': tf.train.Feature(bytes_list=tf.train.BytesList(value=[np.ndarray([image.height]).tobytes()])),
    'width': tf.train.Feature(bytes_list=tf.train.BytesList(value=[np.ndarray([image.width]).tobytes()])),
}))


#Create a TFRecordWriter object to write a TFRecoder format file
fp = tf.python_io.TFRecordWriter('./4080_data_handling_data/sample.tfrecord')

#Serialize and write Example object
fp.write(my_Example.SerializePartialToString())

#close
fp.close()
fp = tf.python_io.TFRecordWriter ('./4080_data_handling_data/sample.tfrecord') Think of it for TFRecord in open ('./4080_data_handling_data / sample.tfrecord','w').
fp.write() #This will actually write to the file.
SerializePartialToString() #Now you need to convert it to a byte string and pass it as an argument.
fp.close() #This closes the file and you're done.
Handle variable length data
Next, I will introduce how to handle variable length data. Variable length is a list whose length can be changed literally.
The Python list is basically variable length Some can only contain a predetermined amount of data, and such data is called fixed length.
①tf.train.Example is a fixed length.
②tf.train.Generate variable length data using a class called SequenceExample.
```
```python
import numpy as np
import tensorflow as tf
from PIL import Image
#Instance generation
my_Example = tf.train.SequenceExample()
#Data string
greeting = ["Hello", ", ", "World", "!!"]
fruits = ["apple", "banana", "grape"]
for item in {"greeting": greeting, "fruits": fruits}.items():
for word in item[1]:
# my_Feature in Example_of lists, feature_As a key to list"word"Add element with
words_list = my_Example.feature_lists.feature_list[item[0]].feature.add()
# word_bytes in list_Reference to value in list
new_word = words_list.bytes_list.value
# utf-Encode to 8 and add elements
new_word.append(word.encode('utf-8'))
print(my_Example)
```
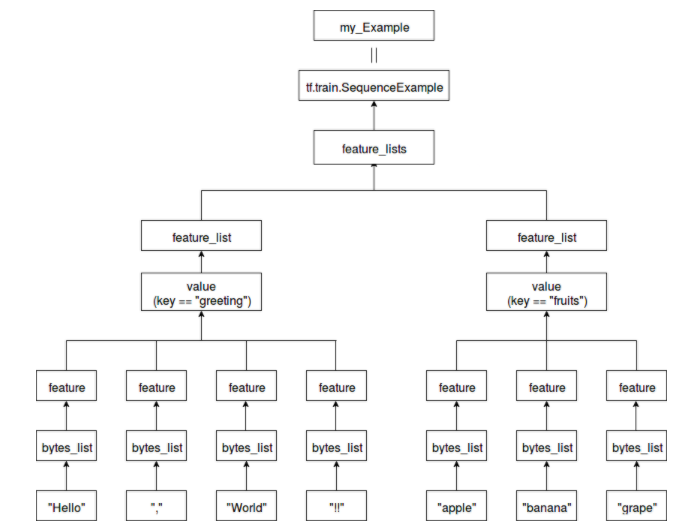
"Hello", "!!", and "apple" are part of bytes_list.
You can also add multiple elements to bytes_list.
For feature, specify one of bytes_list, float_list, or int64_list.
This time, bytes_list is specified.
The feature_list is a collection of features.
feature_lists has a string as a key and feature_list as a value.
"Greeting" as the key for "Hello, World !!"
"Fruits" is specified as the key for "apple, banana, grape".
A class with feature_lists that summarizes these is tf.train.SequenceExample
my_Example is that instance.
Recommended Posts