[PYTHON] 100 image processing knocks !! (021-030) I want to take a break ...
1.First of all
Practice this to improve the technical capabilities of image preprocessing 100 knocks for image processing !! I will do it with Colaboratory so that it is easy to get started. We will work to complete the goal in two weeks. I will explain it carefully. Please ask a question! 001 --010 is the link on the right Knock 100 image processing !! (001 --010) Carefully and carefully 011 --020 is the link on the right 100 knocks on image processing !! (011 --020) Early game
2. Preparation
Introduced libraries etc. as follows.
python
#Import library
from google.colab import drive
import numpy as np
import matplotlib.pyplot as plt
import cv2
from google.colab.patches import cv2_imshow

#Loading images
img = cv2.imread('Image path/imori.jpg')
img_noise = cv2.imread('Image path/imori_noise.jpg')
img_dark = cv2.imread('Image path/imori_dark.jpg')
img_gamma = cv2.imread('Image path/imori_gamma.jpg')
#Grayscale image
gray = cv2.cvtColor(img, cv2.COLOR_BGR2GRAY)
gray_noise = cv2.cvtColor(img_noise, cv2.COLOR_BGR2GRAY)
gray_dark = cv2.cvtColor(img_dark, cv2.COLOR_BGR2GRAY)
#For image storage
OUT_DIR = 'Output destination path/OUTPUT/'
3. Explanation
Q.21. Histogram normalization
Implement histogram normalization. It can be seen that the histogram has a bias. For example, if there are many pixels close to 0, the image will be dark overall, and if there are many pixels close to 255, the image will be bright. Locally biased histograms are expressed as having a narrow dynamic range. Therefore, in order to make the image easier for the human eye to see, it is necessary to perform processing such as normalizing or flattening the histogram. This histogram normalization is called gray-scale transformation, and when converting an image with a pixel value of [c, d] to the range of [a, b], it can be realized by the following equation. This time, imori_dark.jpg is converted to the range of [0, 255] respectively.
A21
def hist_normalization(img, a=0, b=255):
    """
Histogram normalization
    params
    ----------------------------
    param1: numpy.ndarray format image
    param2:Minimum histogram range
    param3:Maximum histogram range

    returns
    ----------------------------
    numpy.ndarray format image
    """
	#histogram(rgb)Maximum / minimum value of
    c = img.min()     # 60
    d = img.max()    # 141

    #copy
    out = img.copy()

	#Normalization
    out = (b - a) / (d - c) * (out - c) + a
    out[out < a] = a
    out[out > b] = b
    out = out.astype(np.uint8)
    return out

#Get image height, width and color
H, W, C = img_dark.shape

#Histogram normalization
out = hist_normalization(img_dark)

#Show histogram
plt.hist(out.ravel(), bins=255, rwidth=0.8, range=(0, 255))
plt.savefig("img21.png ")
plt.show()
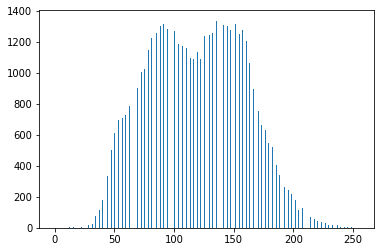 
The image is also pretty clear.

The image is also pretty clear.
Reference: Histogram # 2: Histogram flattening
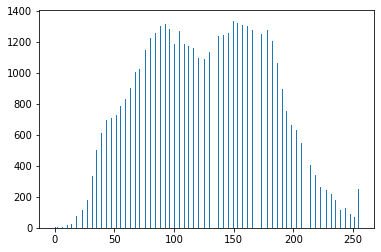
Q.22. Histogram operation
Operate so that the mean value of the histogram is m0 = 128 and the standard deviation is s0 = 52. This is an operation that changes the histogram flat rather than changing the dynamic range of the histogram. To change the histogram of the mean value m and standard deviation s to the mean value m0 and standard deviation s0, convert by the following equation.
A22
def hist_mani(img, m0=128, s0=52):
    """
The mean value of the histogram is m0=128, standard deviation s0=Operate to be 52

    params
    --------------------------------------
    param1: numpy.ndarray format image
    param2:Average value
    param3:standard deviation

    returns
    --------------------------------------
    numpy.ndarray format image
    """
    #Average value
    m = np.mean(img)
    #standard deviation
    s = np.std(img)

    #Copy of image
    out = img.copy()

    #Calculate according to the formula
    out = s0 / s * (out - m) + m0
    out[out < 0] = 0
    out[out > 255] = 255
    out = out.astype(np.uint8)

    return out

#Manipulate the histogram
out = hist_mani(img_dark)

#Save the result
cv2.imwrite(OUT_DIR + 'ans22_1.jpg', out)
#Display image
cv2_imshow(out)
cv2.waitKey(0)
cv2.destroyAllWindows()

#Show histogram
plt.hist(out.ravel(), bins=255, rwidth=0.8, range=(0, 255))
plt.savefig("img22_2.png ")
plt.show()

Reference: Histogram # 2: Histogram flattening
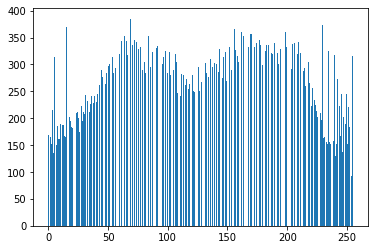
Q.23. Histogram flattening
Implement histogram flattening. Histogram flattening is an operation of changing the histogram flat, and is an operation of balancing the histogram values without requiring the above-mentioned average value and standard deviation. This is defined by the following equation. However, S ... the total number of pixel values, Zmax ... the maximum value of pixel values, h (z) ... the frequency of density z

A23
def hist_equal(img, z_max=255):
    """
Histogram flattening

    params
    --------------------------------------
    param1: numpy.ndarray format image
    param2:Maximum pixel value

    returns
    --------------------------------------
    numpy.ndarray format image
    """

    #Get image height, width and color
    H, W, C = img.shape
    #Total number of pixel values(Image height x image width x number of colors)
    S = H * W * C * 1.     # 49152.0
    #Copy of image
    out = img.copy()

    #Concentration frequency
    sum_h = 0.

    #Image density 0~Each frequency up to 255
    for i in range(256):
        #Where the concentrations match
        ind = np.where(img==i)
        #Concentration frequency
        sum_h += len(img[ind])
        #Balance histogram values(Refer to the formula)
        z_prime = z_max / S * sum_h
        out[ind] = z_prime

    out = out.astype(np.uint8)

    return out

#Manipulate the histogram
out = hist_equal(img)

#Save the result
cv2.imwrite(OUT_DIR + 'ans23_1.jpg', out)
#Display image
cv2_imshow(out)
cv2.waitKey(0)
cv2.destroyAllWindows()

#Show histogram
plt.hist(out.ravel(), bins=255, rwidth=0.8, range=(0, 255))
plt.savefig("img23_2.png ")
plt.show()

Reference: Histogram # 2: Histogram flattening
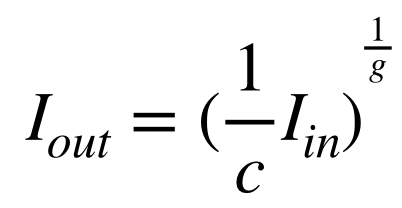
Q.24. Gamma correction
Perform gamma correction (c = 1, g = 2.2) on imori_gamma.jpg. Gamma correction is correction when pixel values are non-linearly converted via a medium such as a camera. If the image is displayed as it is on a display or the like, the screen becomes dark. Therefore, the purpose of gamma correction is to display an image excluding the characteristics of the display by increasing the RGB value in advance. Non-linear transformation is said to occur by the following equation. However, x is normalized to [0,1]. c ... constant, g ... gamma characteristic (usually 2.2)
Therefore, gamma correction is performed by the following equation.
A24
def gamma_correction(img, c=1, g=2.2):
    """
Gamma correction: How to adjust the brightness of an image

    params
    --------------------------------------
    param1: numpy.ndarray format image
    param2:constant
    param3:Gamma characteristics

    returns
    --------------------------------------
    numpy.ndarray format image
    """

    #Copy of image
    out = img.copy().astype(np.float)
    #Divide by 255(Convert to Iin)
    out /= 255.
    #Gamma correction formula
    out = (1/c * out) ** (1/g)

    #Multiply 255
    out *= 255
    out = out.astype(np.uint8)

    return out

#Gamma correction
out = gamma_correction(img_gamma)

#Save the result
cv2.imwrite(OUT_DIR + 'ans24.jpg', out)
#Display image
cv2_imshow(out)
cv2.waitKey(0)
cv2.destroyAllWindows()
Reference: Try Python!
Q.25. Nearest neighbor interpolation
Enlarge the image 1.5 times by nearest neighbor interpolation. Nearest Neighbor is a method that uses the pixels in the nearest neighbor as they are when enlarging the image. It is simple and the processing speed is fast, but the image quality deteriorates significantly. Interpolated by the following equation. I'... image after enlargement, I ... image before enlargement, a ... magnification, [] ... rounding
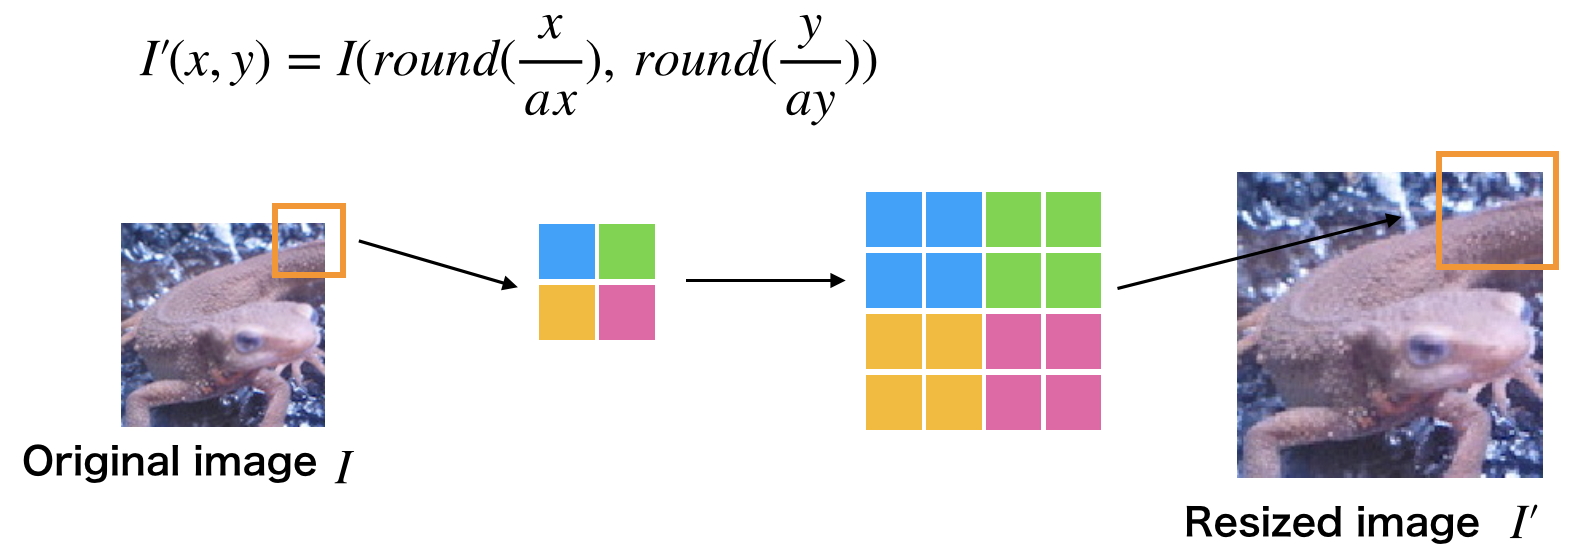
A25
"""
Nearest neighbor interpolation
cv2.resize(src, dsize[, interpolation])
src input image
Image size after changing dsize
interpolation Interpolation method(Nearest neighbor interpolation is cv2.INTER_NEAREST)
"""
#Nearest neighbor interpolation
#Image size after change: img.shape>>>(Height, width, color)
out = cv2.resize(
    img, (int(img.shape[1]*1.5), int(img.shape[0]*1.5)), interpolation=cv2.INTER_NEAREST)

#Save the result
cv2.imwrite(OUT_DIR + 'ans25.jpg', out)
#Display image
cv2_imshow(out)
cv2.waitKey(0)
cv2.destroyAllWindows()
Reference: [[Python / OpenCV] Enlargement / reduction of image (nearest neighbor interpolation method, bilinear interpolation method, bicubic interpolation method)](https://algorithm.joho.info/programming/python/opencv-resize-nearest- interpolation-py /)
Q.26. Bi-linear interpolation
Enlarge the image 1.5 times with Bi-linear interpolation. Bi-linear interpolation is a method of complementing the surrounding four pixels by weighting them according to the distance. The larger the amount of calculation, the longer the processing time, but the deterioration of image quality can be suppressed.
A26
"""
Bilinear interpolation method (Bi-linear interpolation) is an interpolation method that uses the four surrounding pixels.
cv2.resize(src, dsize[, interpolation])
src input image
Image size after changing dsize
interpolation Interpolation method(Cv2 for bilinear interpolation.INTER_LINEAR)
"""
#Bilinear interpolation method
#Image size after change: img.shape>>>(Height, width, color)
out = cv2.resize(
    img, (int(img.shape[1]*1.5), int(img.shape[0]*1.5)), interpolation=cv2.INTER_LINEAR)

#Save the result
cv2.imwrite(OUT_DIR + 'ans26.jpg', out)
#Display image
cv2_imshow(out)
cv2.waitKey(0)
cv2.destroyAllWindows()

Reference: [[Python / OpenCV] Enlargement / reduction of image (nearest neighbor interpolation method, bilinear interpolation method, bicubic interpolation method)](https://algorithm.joho.info/programming/python/opencv-resize-nearest- interpolation-py /)
Q.27. Bi-cubic interpolation
Enlarge the image 1.5 times with Bi-cubic interpolation. Bi-cubic interpolation is an extension of Bi-linear interpolation, and interpolation is performed from the surrounding 16 pixels.
A27
"""
The bicubic interpolation method uses the pixel values of 16 surrounding pixels.
cv2.resize(src, dsize[, interpolation])
src input image
Image size after changing dsize
interpolation Interpolation method(Cv2 for bicubic interpolation.INTER_CUBIC)
"""
#Bicubic interpolation
#Image size after change: img.shape>>>(Height, width, color)
out = cv2.resize(
    img, (int(img.shape[1]*1.5), int(img.shape[0]*1.5)), interpolation=cv2.INTER_CUBIC)

#Save the result
cv2.imwrite(OUT_DIR + 'ans27.jpg', out)
#Display image
cv2_imshow(out)
cv2.waitKey(0)
cv2.destroyAllWindows()

Reference: [[Python / OpenCV] Enlargement / reduction of image (nearest neighbor interpolation method, bilinear interpolation method, bicubic interpolation method)](https://algorithm.joho.info/programming/python/opencv-resize-nearest- interpolation-py /)
Q.28. Affine transformation (translation)
Use the affine transformation to translate the image by +30 in the x direction and -30 in the y direction. Affine transformation is an operation that transforms an image using a 3x3 matrix.
A28
"""
Affine transformation
cv2.warpAffine(src, M, dsize[, dst[, flags[, borderMode[, borderValue]]]])
Original image (NumPy array ndarray) as the first argument,
2 x 3 transformation matrix (NumPy array ndarray) as the second argument,
Specify the size (tuple) of the output image in the third argument.
"""
#Get image height, width and color
H, W, C = img.shape
#Translation[[1,0,Amount of movement in the lateral direction],[0,1,Amount of movement in the vertical direction]]2x3 matrix
M = np.float64([[1, 0, 30], [0,1,-30]])
#Affine transformation
out = cv2.warpAffine(img, M, (W, H))

#Save the result
cv2.imwrite(OUT_DIR + 'ans28.jpg', out)
#Display image
cv2_imshow(out)
cv2.waitKey(0)
cv2.destroyAllWindows()
Reference: [Python / OpenCV] Rotate image with affine transformation
Q.29. Affine transformation (scaling)
Use the affine transformation to (1) resize 1.3 times in the x direction and 0.8 times in the y direction. Also, in addition to the conditions (2) and (1), realize parallel movement by +30 in the x direction and -30 in the y direction at the same time.
A29
def affine_expand(img, ratio_x, ratio_y):
    """
Enlarge with affine transformation

    params
    -------------------------------
    param1: numpy.ndarray format image
    param2:Ratio in x direction
    param3:Ratio in the y direction

    returns
    -------------------------------
    numpy.ndarray format image
    """
    #Image height and width
    H, W = img.shape[:2]
    #xy coordinates np.float32 type
    src = np.array([[0.0, 0.0],[0.0, 1.0],[1.0, 0.0]], np.float32)
    # x,y Multiply each ratio
    dest = src.copy()
    dest[:,0] *= ratio_x
    dest[:,1] *= ratio_y
    """
Generate transformation matrix of affine transformation: cv2.getAffineTransform(src, dest)
    src:Coordinates of 3 points before conversion
    dest:Specify the coordinates of the three points after conversion with the NumPy array ndarray
    """
    affine = cv2.getAffineTransform(src, dest)
    """
Affine transformation
    cv2.warpAffine(src, M, dsize[, dst[, flags[, borderMode[, borderValue]]]])
Original image (NumPy array ndarray) as the first argument,
2 x 3 transformation matrix (NumPy array ndarray) as the second argument,
Specify the size (tuple) of the output image in the third argument.
    INTER_LANCZOS4 – Lanczos interpolation using the neighborhood area of 8 × 8
    """
    return cv2.warpAffine(img, affine, (int(W*ratio_x), int(H*ratio_y)), cv2.INTER_LANCZOS4) #Interpolation method can also be specified


#Enlarge with affine transformation
out = affine_expand(img, 1.3, 0.8)
#Translation[[1,0,Amount of movement in the lateral direction],[0,1,Amount of movement in the vertical direction]]2x3 matrix
H, W = out.shape[:2]
M = np.float64([[1, 0, 30], [0,1,-30]])
out2 = cv2.warpAffine(out, M, (W, H))

#Save the result
cv2.imwrite(OUT_DIR + 'ans29_1.jpg', out)
cv2.imwrite(OUT_DIR + 'ans29_2.jpg', out2)

#Display image
cv2_imshow(out)
cv2_imshow(out2)
cv2.waitKey(0)
cv2.destroyAllWindows()
Reference: Completely understand affine transformation
Q.30. Affine conversion (rotation)
(1) Rotate 30 degrees counterclockwise using affine transformation. (2) Use the affine transformation to fix the center coordinates of the image rotated 30 degrees counterclockwise, and create the image so that there are as few black areas as possible. (However, if you perform a simple affine transformation, the image will be cut off, so you need to be creative.)
A30
def affin_rotate(img, x, y, theta, scale):
    """
Rotate with affine transformation

    params
    -------------------------------
    param1: numpy.ndarray format image
    param2:X coordinate of the axis of rotation
    param3:Y coordinate of the axis of rotation
    param4:Angle of rotation
    param5:Rotation angle / magnification

    returns
    -------------------------------
    numpy.ndarray format image
    """

    """
Affine transformation representing two-dimensional rotation
    cv2.getRotationMatrix2D(center, angle, scale)
    center:Coordinates that are the origin of rotation
    angle:Angle of rotation (degrees, not radians)
    scale:Enlargement / reduction magnification.
    """
    #Calculation of rotation transformation matrix
    R = cv2.getRotationMatrix2D((x, y), theta, scale)
    """
Affine transformation
    cv2.warpAffine(src, M, dsize[, dst[, flags[, borderMode[, borderValue]]]])
Original image (NumPy array ndarray) as the first argument,
2 x 3 transformation matrix (NumPy array ndarray) as the second argument,
Specify the size (tuple) of the output image in the third argument.
    cv2.INTER_CUBIC:Bicubic
    """
    #Affine transformation
    dst = cv2.warpAffine(img, R, gray.shape,
                        flags=cv2.INTER_CUBIC)

    return dst

#Image center coordinates
oy, ox = int(img.shape[0]/2), int(img.shape[1]/2)

#Rotate 30 degrees counterclockwise
out1 = affin_rotate(img, 0, 0, 30, 1)
#Fixed center coordinates with an image rotated 30 degrees counterclockwise
out2 = affin_rotate(img, ox, oy, 30, 1)

#Save the result
cv2.imwrite(OUT_DIR + 'ans30_1.jpg', out1)
cv2.imwrite(OUT_DIR + 'ans31_2.jpg', out2)

#Display image
cv2_imshow(out1)
cv2_imshow(out2)
cv2.waitKey(0)
cv2.destroyAllWindows()
Reference: Geometric transformation with Python, OpenCV (affine transformation, projective transformation, etc.) Reference: [Python / OpenCV] Rotate image with affine transformation
Impressions
It feels like the level is gradually rising. Try to implement in OpenCV as much as possible.
Recommended Posts