[PYTHON] Save the output of GAN one by one ~ With the implementation of GAN by PyTorch ~
While dealing with GAN in my graduation research, it became necessary to save the images generated by GAN one by one.
However, even if you look it up, all the articles that implement GAN have output like this ...
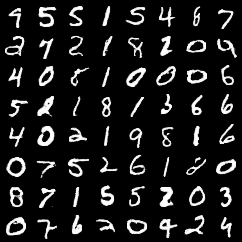
Instead of outputting multiple sheets at once, these are output one by one. I will also write it as a memorandum.
Purpose
Implement GAN & save GAN generated images one by one
GAN GAN (Generative Adversarial Network): The Generative Adversarial Network is a generative model proposed by Ian J. Goodfellow. Generative Adversarial Nets
The basic structure of GAN looks like this
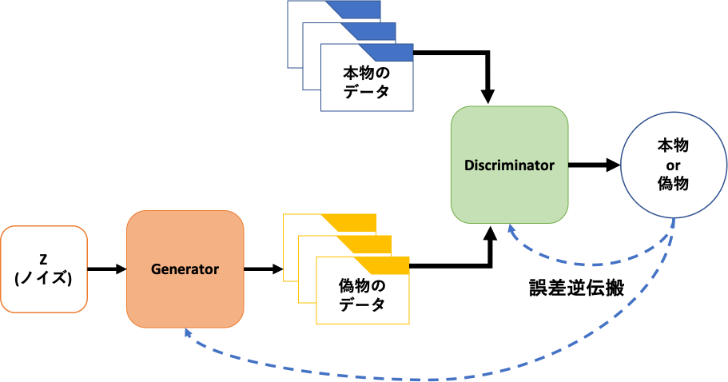
We have two networks, and we will proceed with learning while competing with each other. __Generator: Generator __ Generates an image that can deceive __Discriminator: Discriminator __, and Discriminator determines whether it is a real image or a fake image. Various things such as DCGAN that made GAN famous and StyleGAN that produces amazingly realistic images. The architecture is proposed.
Implementation of GAN
Now let's move on to the implementation of GAN. This time, we will implement DCGAN. The code used as a reference for implementation is here
Execution environment
Google Colaboratory
import & create directory
import argparse
import os
import numpy as np

import torchvision.transforms as transforms
from torchvision.utils import save_image

from torch.utils.data import DataLoader
from torchvision import datasets

import torch.nn as nn
import torch

os.makedirs("./images", exist_ok=True)
Import the required modules. This time we will implement it with PyTorch. Also create a directory to save the output image of GAN. Since ʻexist_ok = True`, if the directory already exists, it will be passed through.
Command line argument & default value setting
Allows you to specify values such as epoch number and batch size on the command line. At the same time, set the default value. I think the article here is easy to understand about the number of epochs and batch size.
parser = argparse.ArgumentParser()
parser.add_argument("--n_epochs", type=int, default=200, help="number of epochs of training")
parser.add_argument("--batch_size", type=int, default=64, help="size of the batches")
parser.add_argument("--lr", type=float, default=0.0002, help="adam: learning rate")
parser.add_argument("--b1", type=float, default=0.5, help="adam: decay of first order momentum of gradient")
parser.add_argument("--b2", type=float, default=0.999, help="adam: decay of first order momentum of gradient")
parser.add_argument("--n_cpu", type=int, default=8, help="number of cpu threads to use during batch generation")
parser.add_argument("--latent_dim", type=int, default=100, help="dimensionality of the latent space")
parser.add_argument("--img_size", type=int, default=32, help="size of each image dimension")
parser.add_argument("--channels", type=int, default=1, help="number of image channels")
parser.add_argument("--sample_interval", type=int, default=400, help="interval between image sampling")
opt = parser.parse_args()
print(opt)
If you can use the command line, you can leave it as it is, but if you implement it with Google Colaboratory, the following error will occur.
usage: ipykernel_launcher.py [-h] [--n_epochs N_EPOCHS]
                             [--batch_size BATCH_SIZE] [--lr LR] [--b1 B1]
                             [--b2 B2] [--n_cpu N_CPU]
                             [--latent_dim LATENT_DIM] [--img_size IMG_SIZE]
                             [--channels CHANNELS]
                             [--sample_interval SAMPLE_INTERVAL]
ipykernel_launcher.py: error: unrecognized arguments: -f /root/.local/share/jupyter/runtime/kernel-ecf689bc-740f-4dea-8913-e0d8ac0b1761.json
An exception has occurred, use %tb to see the full traceback.

SystemExit: 2
/usr/local/lib/python3.6/dist-packages/IPython/core/interactiveshell.py:2890: UserWarning: To exit: use 'exit', 'quit', or Ctrl-D.
  warn("To exit: use 'exit', 'quit', or Ctrl-D.", stacklevel=1)
In Google Colab, if you give the line ʻopt = parser.parse_args ()as ʻopt = parser.parse_args (args = []), it will pass.
CUDA settings and weight initialization
cuda = True if torch.cuda.is_available() else False


def weights_init_normal(m):
    classname = m.__class__.__name__
    if classname.find("Conv") != -1:
        torch.nn.init.normal_(m.weight.data, 0.0, 0.02)
    elif classname.find("BatchNorm2d") != -1:
        torch.nn.init.normal_(m.weight.data, 1.0, 0.02)
        torch.nn.init.constant_(m.bias.data, 0.0)
If you do not use GPU, it will take a considerable amount of time to learn, so make it possible to use CUDA (GPU). Don't forget to change the runtime setting to GPU in Google Colab.
Generator Generator: Defines the generator network.
class Generator(nn.Module):
    def __init__(self):
        super(Generator, self).__init__()

        self.init_size = opt.img_size // 4
        self.l1 = nn.Sequential(nn.Linear(opt.latent_dim, 128 * self.init_size ** 2))

        self.conv_blocks = nn.Sequential(
            nn.BatchNorm2d(128),
            nn.Upsample(scale_factor=2),
            nn.Conv2d(128, 128, 3, stride=1, padding=1),
            nn.BatchNorm2d(128, 0.8),
            nn.LeakyReLU(0.2, inplace=True),
            nn.Upsample(scale_factor=2),
            nn.Conv2d(128, 64, 3, stride=1, padding=1),
            nn.BatchNorm2d(64, 0.8),
            nn.LeakyReLU(0.2, inplace=True),
            nn.Conv2d(64, opt.channels, 3, stride=1, padding=1),
            nn.Tanh(),
        )

    def forward(self, z):
        out = self.l1(z)
        out = out.view(out.shape[0], 128, self.init_size, self.init_size)
        img = self.conv_blocks(out)
        return img
Discriminator Discriminator: Defines a network of discriminators.
class Discriminator(nn.Module):
    def __init__(self):
        super(Discriminator, self).__init__()

        def discriminator_block(in_filters, out_filters, bn=True):
            block = [nn.Conv2d(in_filters, out_filters, 3, 2, 1), nn.LeakyReLU(0.2, inplace=True), nn.Dropout2d(0.25)]
            if bn:
                block.append(nn.BatchNorm2d(out_filters, 0.8))
            return block

        self.model = nn.Sequential(
            *discriminator_block(opt.channels, 16, bn=False),
            *discriminator_block(16, 32),
            *discriminator_block(32, 64),
            *discriminator_block(64, 128),
        )

        # The height and width of downsampled image
        ds_size = opt.img_size // 2 ** 4
        self.adv_layer = nn.Sequential(nn.Linear(128 * ds_size ** 2, 1), nn.Sigmoid())

    def forward(self, img):
        out = self.model(img)
        out = out.view(out.shape[0], -1)
        validity = self.adv_layer(out)

        return validity
Loss function settings and network settings
# Loss function
adversarial_loss = torch.nn.BCELoss()

# Initialize generator and discriminator
generator = Generator()
discriminator = Discriminator()

if cuda:
    generator.cuda()
    discriminator.cuda()
    adversarial_loss.cuda()

# Initialize weights
generator.apply(weights_init_normal)
discriminator.apply(weights_init_normal)

# Optimizers
optimizer_G = torch.optim.Adam(generator.parameters(), lr=opt.lr, betas=(opt.b1, opt.b2))
optimizer_D = torch.optim.Adam(discriminator.parameters(), lr=opt.lr, betas=(opt.b1, opt.b2))

Tensor = torch.cuda.FloatTensor if cuda else torch.FloatTensor
Creating a DataLoader
We will create a DataLoader. This time, we will generate an image using the MNIST dataset. MNIST: Image dataset of handwritten numbers
# Configure data loader
os.makedirs("./data/mnist", exist_ok=True)
dataloader = torch.utils.data.DataLoader(
    datasets.MNIST("./data/mnist",train=True,download=True,
        transform=transforms.Compose([
            transforms.Resize(opt.img_size), transforms.ToTensor(), transforms.Normalize([0.5], [0.5])]
        ),
    ),batch_size=opt.batch_size,shuffle=True,
)
Training I'm going to train GAN.
# ----------
#  Training
# ----------

for epoch in range(opt.n_epochs):
    for i, (imgs, _) in enumerate(dataloader):

        # Adversarial ground truths
        valid = Tensor(imgs.shape[0], 1).fill_(1.0)
        fake = Tensor(imgs.shape[0], 1).fill_(0.0)

        # Configure input
        real_imgs = imgs.type(Tensor)

        # -----------------
        #  Train Generator
        # -----------------

        optimizer_G.zero_grad()

        # Sample noise as generator input
        z = Tensor(np.random.normal(0, 1, (imgs.shape[0], opt.latent_dim)))

        # Generate a batch of images
        gen_imgs = generator(z)

        # Loss measures generator's ability to fool the discriminator
        g_loss = adversarial_loss(discriminator(gen_imgs), valid)

        g_loss.backward()
        optimizer_G.step()

        # ---------------------
        #  Train Discriminator
        # ---------------------

        optimizer_D.zero_grad()

        # Measure discriminator's ability to classify real from generated samples
        real_loss = adversarial_loss(discriminator(real_imgs), valid)
        fake_loss = adversarial_loss(discriminator(gen_imgs.detach()), fake)
        d_loss = (real_loss + fake_loss) / 2

        d_loss.backward()
        optimizer_D.step()

        print(
            "[Epoch %d/%d] [Batch %d/%d] [D loss: %f] [G loss: %f]"
            % (epoch, opt.n_epochs, i, len(dataloader), d_loss.item(), g_loss.item())
        )

        batches_done = epoch * len(dataloader) + i
        if batches_done % opt.sample_interval == 0:
            save_image(gen_imgs.data[:25], "images/%d.png " % batches_done, nrow=5, normalize=True)
Execution result
Since the result is saved at regular intervals, we will look at the execution result as a GIF image.
The numbers are generated so that people can see them properly.
I want to save images one by one
I don't think there are many people like this, but I couldn't find them even after checking them, so I'll share them. It was in the Training part above
if batches_done % opt.sample_interval == 0:
    save_image(gen_imgs.data[:25], "images/%d.png " % batches_done, nrow=5, normalize=True)
If you change this part as follows, you can save one by one.
if batches_done % opt.sample_interval == 0:
     save_gen_img = gen_img[0]
     save_image(save_gen_imgs, "images/%d.png " % batches_done, normalize=True)
If you want to save multiple images one by one, you can use the for statement as well. Repeat the statement save_image. ~~ Training time will increase dramatically ~~
With this, we have achieved the original purpose of saving the output of GAN one by one.
Summary
This time, we implemented DCGAN with PyTorch and made it possible to save the output of GAN one by one, and confirmed that handwritten numbers were actually generated. Next, I will write about conditional GAN (cGAN), which can control the output of GAN. Similarly, cGAN will be able to save one image for each class.
Recommended Posts