[PYTHON] I came up with a way to create a 3D model from a photo Part 04 Polygon generation
Domo is Ksuke. In 04, when I came up with a method to create a 3D model from a photo, I will generate polygons. Click here for Part 3 https://qiita.com/Ksuke/items/8b7f2dc840126753b4e9
* Caution * </ b> This article only gives the end of what I came up with and tried, so it could end up with abrupt material or Bad End.
Try
Procedure </ b>
- Get the points at the boundary of the point cloud
- Get the points inside the boundary of the point cloud
- Polygon generation
~~ The code here and there is the one summarized at the end. ~~ There is only one source, but as usual, it is also posted at the end.
1. Get the points at the boundary of the point cloud
At the moment, the object is represented by a point cloud, but the points are also spread inside the object. Since we don't need the inner points, we will only extract the points at the boundary. To determine if each point is a boundary, count the number of points in the six adjacent directions (up, down, right, left, front and back) of each coordinate. The points where the number of adjacent points is not 0 are extracted as the boundary points.
Get points at the boundary of a point cloud
#A function that returns a point cloud at the boundary
def genBorderPointSpace(imgProjectSpace):

    #6 directions in space(Up, down, left, right, front and back)Create a map of the number of points around each point by performing processing equivalent to the addition filter of
    locationPointMap = np.stack([
        imgProjectSpace[2:,1:-1,1:-1],
        imgProjectSpace[:-2,1:-1,1:-1],
        imgProjectSpace[1:-1,2:,1:-1],
        imgProjectSpace[1:-1,:-2,1:-1],
        imgProjectSpace[1:-1,1:-1,2:],
        imgProjectSpace[1:-1,1:-1,:-2],
    ]).sum(axis=0,dtype=np.int8)

    #Restore the size of the space
    locationPointMap = np.insert(locationPointMap, (0,-1), 0, axis=0)
    locationPointMap = np.insert(locationPointMap, (0,-1), 0, axis=1)
    locationPointMap = np.insert(locationPointMap, (0,-1), 0, axis=2)

    #From the map of the number of surrounding points for each point, the number of surrounding points is neither 0 nor 6.(There are dots around and not surrounded by dots)Create a space with dots
    borderPointSpace = np.where((0<locationPointMap)&(locationPointMap<6)&(imgProjectSpace==1),1,0).astype(np.int8)

    #Returns a space that leaves points that are not surrounded by dots
    return borderPointSpace

#From the point cloud of the overlapped space, take out the points at the boundary that is in contact with the outside.
borderPointSpace = genBorderPointSpace(imgProjectSpace)

#Extract the coordinates of a point from space
borderCoords = binary2coords(borderPointSpace)
2. Get the points inside the boundary of the point cloud
It is enough to display the polygon only at the point of the boundary part, but for the convenience of automatic generation of the polygon later, the point inside the point of the boundary is also acquired.
Get points inside the boundary of a point cloud
#A function that returns a point cloud just inside the boundary
def genInsidePointSpace(imgProjectSpace,borderPointSpace):

    #Create a space that leaves points near the boundary(Do not leave the boundary part)
    nearBorderPointSpace = np.stack([
        borderPointSpace[2:,1:-1,1:-1],
        borderPointSpace[:-2,1:-1,1:-1],
        borderPointSpace[1:-1,2:,1:-1],
        borderPointSpace[1:-1,:-2,1:-1],
        borderPointSpace[1:-1,1:-1,2:],
        borderPointSpace[1:-1,1:-1,:-2],
        borderPointSpace[1:-1,1:-1,1:-1]*-6
    ]).sum(axis=0,dtype=np.int8)

    #Return size
    nearBorderPointSpace = np.insert(nearBorderPointSpace, (0,-1), 0, axis=0)
    nearBorderPointSpace = np.insert(nearBorderPointSpace, (0,-1), 0, axis=1)
    nearBorderPointSpace = np.insert(nearBorderPointSpace, (0,-1), 0, axis=2)

    #Create a space near the boundary, leaving the points inside the original point cloud
    insidePointSpace = np.where(((0<nearBorderPointSpace)&(imgProjectSpace==1)),1,0)

    return insidePointSpace


#From the point cloud of the overlapped space, take out the point just inside the boundary part
insidePointSpace = genInsidePointSpace(imgProjectSpace,borderPointSpace)

#Extract the coordinates of a point from space
insideCoords = binary2coords(insidePointSpace)
3. Polygon generation
After getting two types of points, it's time to generate polygons. It's harder to explain what this process is doing than other processes, so I'll explain it with a two-dimensional image (it took a lot of time here ...).
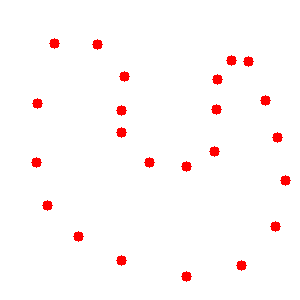
The purpose of this process is to reconfirm the point of the boundary of the object to determine the surface that surrounds the object. On a two-dimensional image, the line surrounding the area (Fig. 2) is determined from the point at the boundary of the object (Fig. 1).
 |
|---|
| Figure 1.Boundary points |
↓
 |
|---|
| Figure 2.The borderline you want in the end |
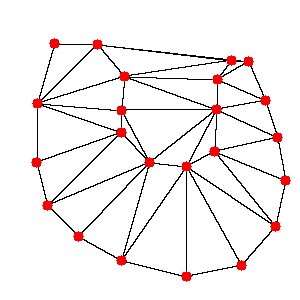
To do this, I used a method called Delaunay. This is to divide the area represented by dots by triangles. Figure 3 below shows the result of trying Delaunay as it is with the red dots in the image. As you can see, the line is drawn at the desired boundary, but the line is also drawn at other parts.
 |
|---|
| Figure 3.Triangulation result of points at the boundary |
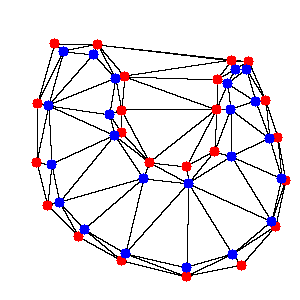
After worrying about the problem, I decided to perform Delaunay by adding the points inside the boundary part in addition to the points at the boundary part. A point inside the boundary is a point that is close to the point at the boundary and inside the area of the object. This is the added blue dot in Figure 4 below.
 |
|---|
| Figure 4.Boundary points and points inside the boundary |
What happens when Delaunay is done including the points inside this boundary is as shown in Fig. 5 below.
 |
|---|
| Figure 5.Triangulation result of the point at the boundary and the point inside the boundary |
At first glance, the red dots may seem a bit more complicated than when Delaunay was done, but in fact, this allows you to classify the divided triangles into three types. How to classify -A triangle consisting of only the points at the boundary (painted in light red) -A triangle consisting of only the points inside the boundary (painted in light blue) -A triangle composed of both the points at the boundary and the points inside the boundary (painted in light purple) It is like that. If you actually paint them separately, it will look like Figure 6.
 |
|---|
| Figure 6.Triangulation classification result |
If you look at the three types of triangles, you'll see that all the boundaries you want in the end are contained in the light purple triangle. Excluding the light purple triangles, the result is as shown in Fig. 7.
 |
|---|
| Figure 7.Triangle with border |
Now that the number of triangles has decreased so far, let's focus on the lines. Focusing on the lines, they can also be classified into three types. How to classify ・ Line connecting the points at the boundary (painted in light red) -A line connecting the points inside the boundary (painted in light blue) -A line connecting the points at the boundary and the points inside the boundary (painted in light purple) It is like that. If you actually paint them separately, it will look like Figure 8.
 |
|---|
| Figure 8.Line classification result |
If you come to this point, the rest is as you saw. The line painted in light red is exactly the boundary line you want in the end drawn in Fig. 2, isn't it? That's why it looks like Figure 9 except for the light red line.
 |
|---|
| Figure 9.Boundary line that could be obtained |
In this way, you can get the line surrounding it (or the face if it is a 3D point cloud) from the point cloud. Here is the implementation of this process for a 3D point cloud.
Polygon generation
#A function that determines the surface of a polygon from a set of coordinates
def genPolygon(borderCoords,insideCoords):

    #Combine two types of vertices(Corresponds to the processing in Figure 4)
    coords = np.concatenate([borderCoords,insideCoords])

    #Generate a map showing the type for each vertex(0 is border and 1 is inside)
    coordStat = np.zeros((len(coords)),dtype=np.uint8)
    coordStat[len(borderCoords):len(borderCoords)+len(insideCoords)] = 1

    #Generate a triangular pyramid group consisting of 4 points from the vertex group(Corresponds to the processing in Fig. 5)
    triPyramids = Delaunay(coords).simplices

    #Check how many inside vertices are included for each triangular pyramid(Corresponds to the processing in Fig. 6)
    triPyramidsStat = coordStat[triPyramids].sum(axis=1)

    #Of the triangular pyramids, those that include both the inside vertex and the border vertex are taken out and used as a valid triangular pyramid.(Corresponds to the processing in Figure 7)
    #(Here, the triangular pyramid in the margin space outside the object composed only of the border vertices and the triangular pyramid in the margin space inside the object composed only of the inside vertices are removed.)
    effectiveTriPyramids = triPyramids[np.where((triPyramidsStat!=0)&(triPyramidsStat!=4))[0]]

    #Candidates for object faces(3 index of vertices)List to put(Remove the excess later)
    faces = []

    #Extract a valid triangular pyramid surface as a candidate for the object's surface(Corresponds to the part focusing on the line in the explanation of the image of the article)
    for coordIndexs in effectiveTriPyramids:
        faces.append([coordIndexs[0],coordIndexs[1],coordIndexs[2]])
        faces.append([coordIndexs[0],coordIndexs[1],coordIndexs[3]])
        faces.append([coordIndexs[0],coordIndexs[2],coordIndexs[3]])
        faces.append([coordIndexs[1],coordIndexs[2],coordIndexs[3]])

    #Sort the index of vertices of object face candidates and remove duplicates
    faces = np.array(faces)
    faces.sort(axis=1)
    faces = np.unique(faces,axis=0)

    #Check how many inside vertices are included for each face(Corresponds to the processing in Fig. 8)
    faceStat = coordStat[faces].sum(axis=1)

    #Take out a face that does not contain any inside vertices(Corresponds to the processing in Figure 9)
    faces = faces[np.where(faceStat==0)]

    #Returns vertices and faces
    return borderCoords,faces


#Polygon from two types of coordinates(To be precise, the definition of the vertices that are polygons and the surface connecting the vertices.)Generate a
coords,faces = genPolygon(borderCoords,insideCoords)

#Changed the format to pass faces to blender
faces = [[face[0],face[1],face[2],face[0]] for face in faces]
Operation check
Finally, check if the code works fine.
1. All together
I've exhausted my efforts in polygon generation, so I'll summarize the movements. .. .. Run the code below in blender,
For dynamic 1
#Draw vertices and polygons
addObj(coords=coords,faces=faces,name = "porigon",offset=[-125,-50,-50])
addObj(coords=borderCoords,name = "borderCoords",offset=[-50,-85,-50])
addObj(coords=insideCoords,name = "insideCoords",offset=[-50,-15,-50])
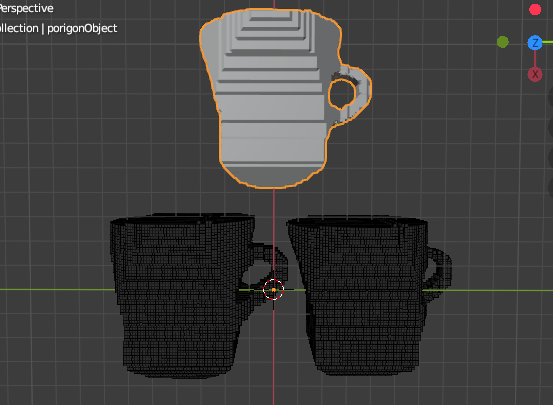
If an object like this is displayed, it is successful. If you look closely at the bottom two of the objects, the one on the right is a little smaller (because it's a point inside the boundary).
next?
Finally the polygons are displayed, but the number of polygons is insanely large ... So, we will reduce the number of polygons using the blender function.
2020/9/25 postscript Part 5 has been released. https://qiita.com/Ksuke/items/6595323e79892acf9a7a
Code summary
If you add it after the previous code, it should work.
Function
Code summary(Function)
#A function that returns a point cloud at the boundary
def genBorderPointSpace(imgProjectSpace):

    #6 directions in space(Up, down, left, right, front and back)Create a map of the number of points around each point by performing processing equivalent to the addition filter of
    locationPointMap = np.stack([
        imgProjectSpace[2:,1:-1,1:-1],
        imgProjectSpace[:-2,1:-1,1:-1],
        imgProjectSpace[1:-1,2:,1:-1],
        imgProjectSpace[1:-1,:-2,1:-1],
        imgProjectSpace[1:-1,1:-1,2:],
        imgProjectSpace[1:-1,1:-1,:-2],
    ]).sum(axis=0,dtype=np.int8)

    #Restore the size of the space
    locationPointMap = np.insert(locationPointMap, (0,-1), 0, axis=0)
    locationPointMap = np.insert(locationPointMap, (0,-1), 0, axis=1)
    locationPointMap = np.insert(locationPointMap, (0,-1), 0, axis=2)

    #From the map of the number of surrounding points for each point, the number of surrounding points is neither 0 nor 6.(There are dots around and not surrounded by dots)Create a space with dots
    borderPointSpace = np.where((0<locationPointMap)&(locationPointMap<6)&(imgProjectSpace==1),1,0).astype(np.int8)

    #Returns a space that leaves points that are not surrounded by dots
    return borderPointSpace

#A function that returns a point cloud just inside the boundary
def genInsidePointSpace(imgProjectSpace,borderPointSpace):

    #Create a space that leaves points near the boundary(Do not leave the boundary part)
    nearBorderPointSpace = np.stack([
        borderPointSpace[2:,1:-1,1:-1],
        borderPointSpace[:-2,1:-1,1:-1],
        borderPointSpace[1:-1,2:,1:-1],
        borderPointSpace[1:-1,:-2,1:-1],
        borderPointSpace[1:-1,1:-1,2:],
        borderPointSpace[1:-1,1:-1,:-2],
        borderPointSpace[1:-1,1:-1,1:-1]*-6
    ]).sum(axis=0,dtype=np.int8)

    #Return size
    nearBorderPointSpace = np.insert(nearBorderPointSpace, (0,-1), 0, axis=0)
    nearBorderPointSpace = np.insert(nearBorderPointSpace, (0,-1), 0, axis=1)
    nearBorderPointSpace = np.insert(nearBorderPointSpace, (0,-1), 0, axis=2)

    #Create a space near the boundary, leaving the points inside the original point cloud
    insidePointSpace = np.where(((0<nearBorderPointSpace)&(imgProjectSpace==1)),1,0)

    return insidePointSpace

    #A function that determines the surface of a polygon from a set of coordinates
def genPolygon(borderCoords,insideCoords):

    #Combine two types of vertices(Corresponds to the processing in Figure 4)
    coords = np.concatenate([borderCoords,insideCoords])

    #Generate a map showing the type for each vertex(0 is border and 1 is inside)
    coordStat = np.zeros((len(coords)),dtype=np.uint8)
    coordStat[len(borderCoords):len(borderCoords)+len(insideCoords)] = 1

    #Generate a triangular pyramid group consisting of 4 points from the vertex group(Corresponds to the processing in Fig. 5)
    triPyramids = Delaunay(coords).simplices

    #Check how many inside vertices are included for each triangular pyramid(Corresponds to the processing in Fig. 6)
    triPyramidsStat = coordStat[triPyramids].sum(axis=1)

    #Of the triangular pyramids, those that include both the inside vertex and the border vertex are taken out and used as a valid triangular pyramid.(Corresponds to the processing in Figure 7)
    #(Here, the triangular pyramid in the margin space outside the object composed only of the border vertices and the triangular pyramid in the margin space inside the object composed only of the inside vertices are removed.)
    effectiveTriPyramids = triPyramids[np.where((triPyramidsStat!=0)&(triPyramidsStat!=4))[0]]

    #Candidates for object faces(3 index of vertices)List to put(Remove the excess later)
    faces = []

    #Extract a valid triangular pyramid surface as a candidate for the object's surface(Corresponds to the part focusing on the line in the explanation of the image of the article)
    for coordIndexs in effectiveTriPyramids:
        faces.append([coordIndexs[0],coordIndexs[1],coordIndexs[2]])
        faces.append([coordIndexs[0],coordIndexs[1],coordIndexs[3]])
        faces.append([coordIndexs[0],coordIndexs[2],coordIndexs[3]])
        faces.append([coordIndexs[1],coordIndexs[2],coordIndexs[3]])

    #Sort the index of vertices of object face candidates and remove duplicates
    faces = np.array(faces)
    faces.sort(axis=1)
    faces = np.unique(faces,axis=0)

    #Check how many inside vertices are included for each face(Corresponds to the processing in Fig. 8)
    faceStat = coordStat[faces].sum(axis=1)

    #Take out a face that does not contain any inside vertices(Corresponds to the processing in Figure 9)
    faces = faces[np.where(faceStat==0)]

    #Returns vertices and faces
    return borderCoords,faces
Execution code
Code summary(Execution code)
#From the point cloud of the overlapped space, take out the points at the boundary that is in contact with the outside.
borderPointSpace = genBorderPointSpace(imgProjectSpace)

#From the point cloud of the overlapped space, take out the point just inside the boundary part
insidePointSpace = genInsidePointSpace(imgProjectSpace,borderPointSpace)

#Extract the coordinates of a point from space
borderCoords = binary2coords(borderPointSpace)
insideCoords = binary2coords(insidePointSpace)

#Polygon from two types of coordinates(To be precise, the definition of the vertices that are polygons and the surface connecting the vertices.)Generate a
coords,faces = genPolygon(borderCoords,insideCoords)

#Changed the format to pass faces to blender
faces = [[face[0],face[1],face[2],face[0]] for face in faces]

print("step04:porigon generate success\n")

#For confirmation display below(It has nothing to do with the main flow, so it will probably disappear in the next round)


#Draw vertices
addObj(coords=coords,faces=faces,name = "porigon",offset=[-125,-50,-50])
addObj(coords=borderCoords,name = "borderCoords",offset=[-50,-85,-50])
addObj(coords=insideCoords,name = "insideCoords",offset=[-50,-15,-50])
Recommended Posts