[PYTHON] Until pix2 pix-tensorflow is run on GCML
Record the steps to get pix2pix-tensorflow, which is a TensorFlow implementation of pix2pix, to work with Google Cloud Machine Learning (GCML).
Replace file I / O with tf.gfile
Since GCML inputs and outputs files to Cloud Storage, replace Python's own file I / O related methods with tf.gfile.
diff --git a/pix2pix.py b/pix2pix.py
index 20ba819..3d1b1c2 100644
--- a/pix2pix.py
+++ b/pix2pix.py
@@ -13,6 +13,11 @@ import collections
 import math
 import time

+os.path.exists = tf.gfile.Exists
+glob.glob = tf.gfile.Glob
+os.makedirs = tf.gfile.MakeDirs
+open = tf.gfile.Open
+
 parser = argparse.ArgumentParser()
 parser.add_argument("--input_dir", help="path to folder containing images")
 parser.add_argument("--mode", required=True, choices=["train", "test", "export"
])
I've spared the trouble of rewriting the method in the editor and replaced the existing method with the equivalent of tf.gfile.
important point
There is no problem with the target code this time, but when opening a new file with tf.gfile.Open, if you try to create it with mode ='a', it will fail (confirmed in 1.0.1). In that case, it is necessary to set mode ='w'.
Packaging
Create subdirectory
Create a subdirectory called task and move the main code to it. We also need a "\ __ init__.py" file as a way of packaging, so create it.
$ mkdir task
$ touch task/__init__.py #Empty file is fine
$ mv pix2pix.py task/
important point
If it is not complete with a single code, it will need to be modified to take into account namespace changes associated with packaging. If pix2pix.py refers to model.py, you need to replace the "import model" part in pix2pix.py with "from task import model". This time, the process is completed with pix2pix.py alone, so there is no need to do so.
Create setup.py
Create the setup.py file needed for packaging.
setup.py
# -*- coding: utf-8 -*-
#
from setuptools import setup

if __name__ == '__main__':
    setup(name='task',
          packages=['task'])
Local operation test
Check locally to see if the modified results work correctly. Suppose the dataset has already been downloaded.
$ gcloud ml-engine local train --module-name=task.pix2pix \
 --package-path=task/ -- \
 --mode train --output_dir /path/to/trained_facades \
 --input_dir /path/to/facades/train --max_epochs 200 \
 --which_direction BtoA'
aspect_ratio = 1.0
batch_size = 1
beta1 = 0.5
checkpoint = None
display_freq = 0
flip = True
gan_weight = 1.0
input_dir = /path/to/facades/train
l1_weight = 100.0
lab_colorization = False
lr = 0.0002
max_epochs = 200
max_steps = None
mode = train
ndf = 64
ngf = 64
output_dir = /path/to/trained_facades
output_filetype = png
progress_freq = 50
save_freq = 5000
scale_size = 286
seed = 1398609485
summary_freq = 100
trace_freq = 0
which_direction = BtoA
examples count = 400
parameter_count = 57183616
progress  epoch 1  step 50  image/sec 0.3  remaining 4224m
discrim_loss 0.573411
gen_loss_GAN 0.376408
gen_loss_L1 0.146523
If the output of the progress is output, it can be considered that it is working well.
Throw a job on the cloud
All you have to do is submit the actual job. Suppose your bucket and training data are already on Cloud Storage.
$ gcloud ml-engine jobs submit training pix2pix_1 \
 --module-name=task.pix2pix \
 --staging-bucket gs://your-bucket \
 --region us-central1 \
 --scale-tier BASIC_GPU \ #Use GPU instance
 --package-path=task/ -- \
 --mode train --output_dir gs://your-bucket/output \
 --input_dir gs://your-bucket/facades/train \
--max_epochs 200 --which_direction BtoA
Job [pix2pix_1] submitted successfully.
Your job is still active. You may view the status of your job with the command

  $ gcloud ml-engine jobs describe pix2pix_1

or continue streaming the logs with the command

  $ gcloud ml-engine jobs stream-logs pix2pix_1
jobId: pix2pix_1
state: QUEUED
Check the log
As you can see in the output above, you can view the log by running the glowed command. Let's wait until it's finished.
$ gcloud ml-engine jobs stream-logs pix2pix_1
(Omission)
INFO    2017-05-18 18:11:39 +0900       master-replica-0                progress
  epoch 25  step 200  image/sec 4.7  remaining 248m
INFO    2017-05-18 18:11:39 +0900       master-replica-0                discrim_
loss 0.648207
INFO    2017-05-18 18:11:39 +0900       master-replica-0                gen_loss
_GAN 2.13424
INFO    2017-05-18 18:11:39 +0900       master-replica-0                gen_loss_L1 0.318083
INFO    2017-05-18 18:11:39 +0900       master-replica-0                progress  epoch 25  step 250  image/sec 4.7  remaining 247m
Copy the result locally
Copies the results stored on Cloud Storage locally.
$ cd /your/data/path
$ gsutil cp -r gs://your-bucket/output .
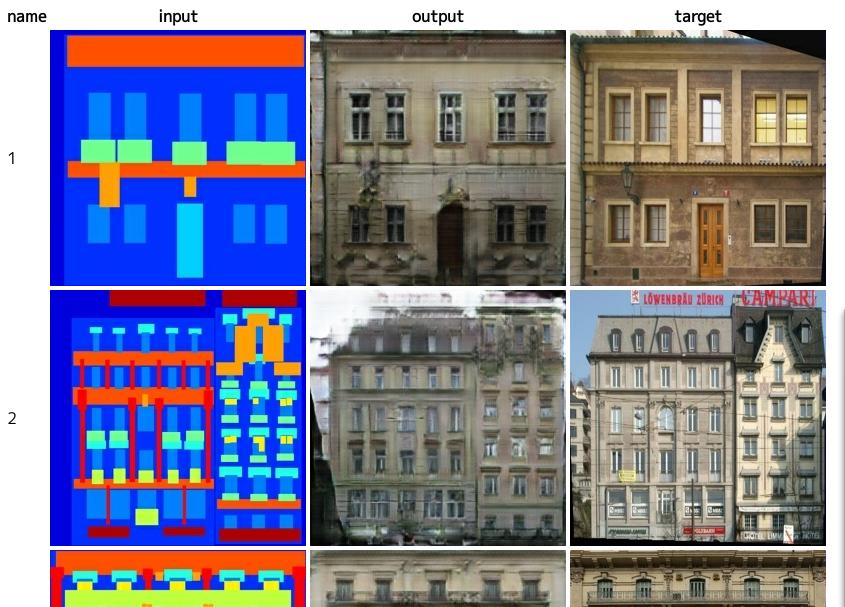
Evaluation
Process the evaluation data to see the results.
$ python task/pix2pix.py --mode test \
 --checkpoint /your/data/path/output \
--input_dir /path/to/facades/val \
 --output_dir /your/data/path/test
$ firefox /your/data/path/test/index.html
Source code
https://github.com/knok/pix2pix-tensorflow (gcml branch tree / gcml)))
About resources
This process took about 5 hours to train. The payment is about 800 yen. This time, the content was very small, 400 sheets of data, but with other datasets, such as edges2shoes, there are about 50,000 images, so the cost is expected to be more than 10 times higher.
from now on
The code based on this time is written according to the method, so parallel execution in GCML is possible with few modifications. I will write about how to do it.