Deep Learning Workstation conversion plan for high-spec Linux desktop with eGPU (eGPU setup)
I made my own high-spec Linux desktop in the article "I made a high-spec Linux desktop with Intel NUC + SSD 2TB + DRAM 32GB" When I introduced [Future issues](https://qiita.com/y-vectorfield/items/2fcbc669a43fe0d0cb15#%E4%BB%8A%E5%BE%8C%E3%81%AE%E6%94%B9 % E8% 89% AF% E4% BA% 88% E5% AE% 9A% E8% A6% 81% E4% BA% 88% E7% AE% 97% E3% 81% A8% E3% 81% AE% E7 I wrote that I would like to take on the challenge of creating a GPU machine using eGPU by taking advantage of the fact that it supports Thunderbolt 3 as% 9B% B8% E8% AB% 87). We were able to organize a budget from various lucks, so we have all the necessary parts. In this article, I would like to set up the eGPU as the first step of the plan for deep learning workstations of high-spec Linux desktops using the eGPU.
What is eGPU in the first place?
External GPU, that is, an external GPU. Originally developed for laptops with only a GPU with a built-in CPU, it improves graphics performance by connecting a higher performance GPU to a machine that lacks graphics performance using a high-speed communication standard interface. Is the purpose. Recently, the Apple Store sells an eGPU unit (with built-in AMD Radeon) for MacBook, and you can improve the graphics performance by connecting to a compatible MacBook. This time, I would like to connect an eGPU on a desktop and a Linux machine to make it a workstation for deep learning. The interface used to connect is Thunderbolt 3.
Advantages and disadvantages of eGPU
The advantages and disadvantages of eGPU are described below.
- merit
- You can boot the GPU only when you need it (ideal for applications where you don't always need a GPU)
- PC can be miniaturized and does not take up space (thank you for living in a small Kanto condominium)
- Low power consumption can be realized (from merit 1)
- You can make your own with a low budget (220,000 including the PC itself should be a fairly low budget with the specifications of this PC)
- Demerit
- Thunderbolt 3 is slower than PCI Express x16, so communication speed with GPU is slower → Performance drops to about 70-80% of PCI Express x16 connection (Reference)
- Cumbersome setup
The eGPU used this time
The eGPU used this time is a device that incorporates the GPU originally sold as a video card into a kit that converts the video card into an eGPU. The cost of eGPU is as follows.
| Types of parts | Model number | Maker | price | Remarks |
|---|---|---|---|---|
| Video card | NVIDIA Geforce RTX 2080 SUPER GALAKURO GAMING |
Expert-oriented | ¥74,800. | NTT-Purchase at X Store |
| eGPU conversion kit | Razer Core X RC21-01310100-R3J1 |
Razer | ¥36,080. | Purchased by mail order at PC Studio |
Total: ¥ 110,880. Total with PC: ¥ 218,065. (When payPay is considered: ¥ 173,604.)
GPU to use: NVIDA Geforce RTX 2080 SUPER
GPU purchased NVIDIA's Geforce RTX 2080 SUPER (expert-oriented) because its use as a workstation for deep learning is the most important goal of construction. Originally I was planning to buy 2070 SUPER, which is two ranks lower, but since it was on sale at the NTT-X Store, I bought the GPU on impulse.
 (NTT-X Store sales page as of February 18, 2020)
It is the third ranked GPU from the top (after TITAN RTX, RTX 2080 Ti) in the Geforce series sold by NVIDIA as a general-purpose GPU. ~~ Honestly, using the 80 series in an environment where full performance is not obtained with Thunderbolt 3 connection may be the worst in terms of cost performance. .. .. ~~
EGPU conversion kit to use: Razer Core X
It is a kit to convert a video card to eGPU. I found it when I was wondering which manufacturer's kit to buy for building an eGPU that connects to the barebone Intel NUC that I used to build my own PC [the site](https://nucfan.com/choose-egpu-for- It was introduced in intel-nuc /). Isn't it a product that is well-balanced in terms of price, performance, and reliability of the distributor? (The author's personal opinion) However, all domestic mail-order sites are sold out, and more and more sites are equipped with a USB port or LAN port that is one rank higher and sell only models that are 20,000 yen higher. I finally found it on the mail order of the personal computer studio and purchased it. There is a cheap kit made in China, but if you make a mistake and destroy the 2080 SUPER, it will not be fashionable, so I bought a product sold by a graphic manufacturer even if it is a little expensive.
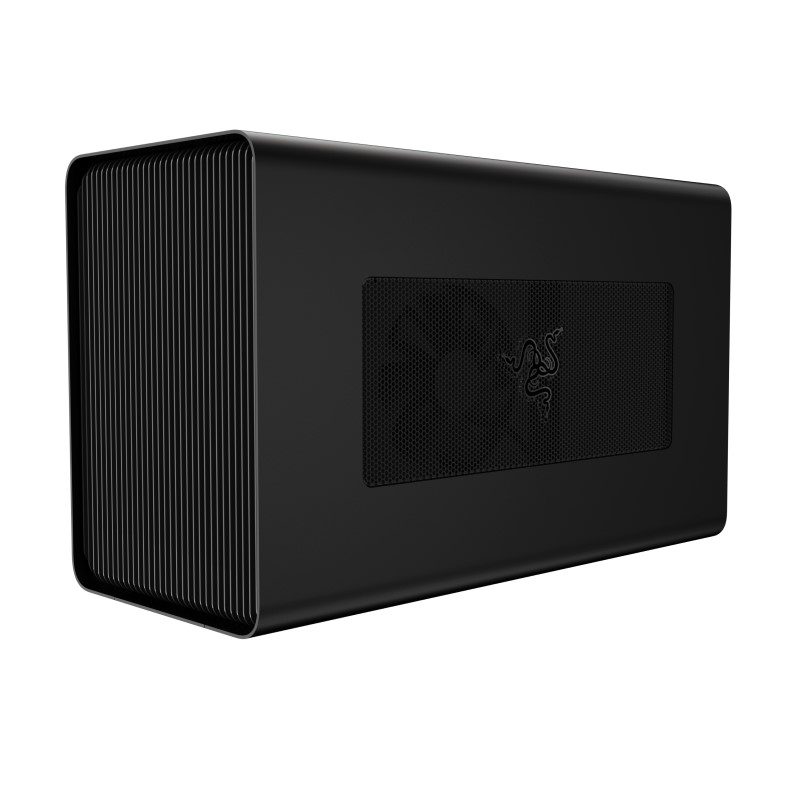
I was honestly stunned when I saw the actual product that was sent to me. The end result is that the eGPU is much larger than the PC itself. : scream:
eGPU setup
The actual setup procedure is described below. It's easy to describe, but until I figured out how to build it, it was the history of struggle: scream_cat :. (Driver installation process, etc.)
eGPU assembly
Dock the Geforce RTX 2080 SUPER (hereinafter RTX 2080SP) to Razer Core X (hereinafter Core X) and convert it to eGPU. Installation is not difficult because you just open the lid of Core X, install RTX 2080SP in the internal PCI slot and connect the power cord (8pin, 6pin), but because the main body size is a few minutes large, workability is poor or the slot It can be difficult to check if it is in. Once assembled, do not connect to the PC at this point. After that, I will describe how to set up to install the CUDA Toolkit and run the eGPU with the NVIDIA driver. However, setting up with a rare configuration with too few documents is not straightforward, and it is a method found by Trial & Error after performing recovery and driver reinstallation many times. : dancer :: dancer_tone :: dancer_tone2 :: dancer_tone3 :: dancer_tone4 :: dancer_tone5:
: innocent: How to set up an eGPU as of March 2020. : warning: It is supposed to be set up as a Linux-only machine.
BIOS update
I did a lot of research for the setup and noticed that the BIOS version of the Intel NUC 8i7BEH used for my own PC was old (0064) and the latest version was 0077. Apparently 0064 seems to be the version before the RTX series was sold, so I decided to update it.
Disable secure boot
The Intel NUC used for this construction is a UEFI compatible model, and secure boot may be enabled. In that case, please disable Secure Boot first and then set up. To set up with Secure Boot enabled, you need to register the key. At this stage, there is no guarantee that the eGPU will work properly, so it is disabled, but if you deepen your understanding of secure boot and UEFI in the future, I would like to try the setup when secure boot is enabled.
: warning: If you perform the above operation, dual boot with Windows cannot be realized. : scream:
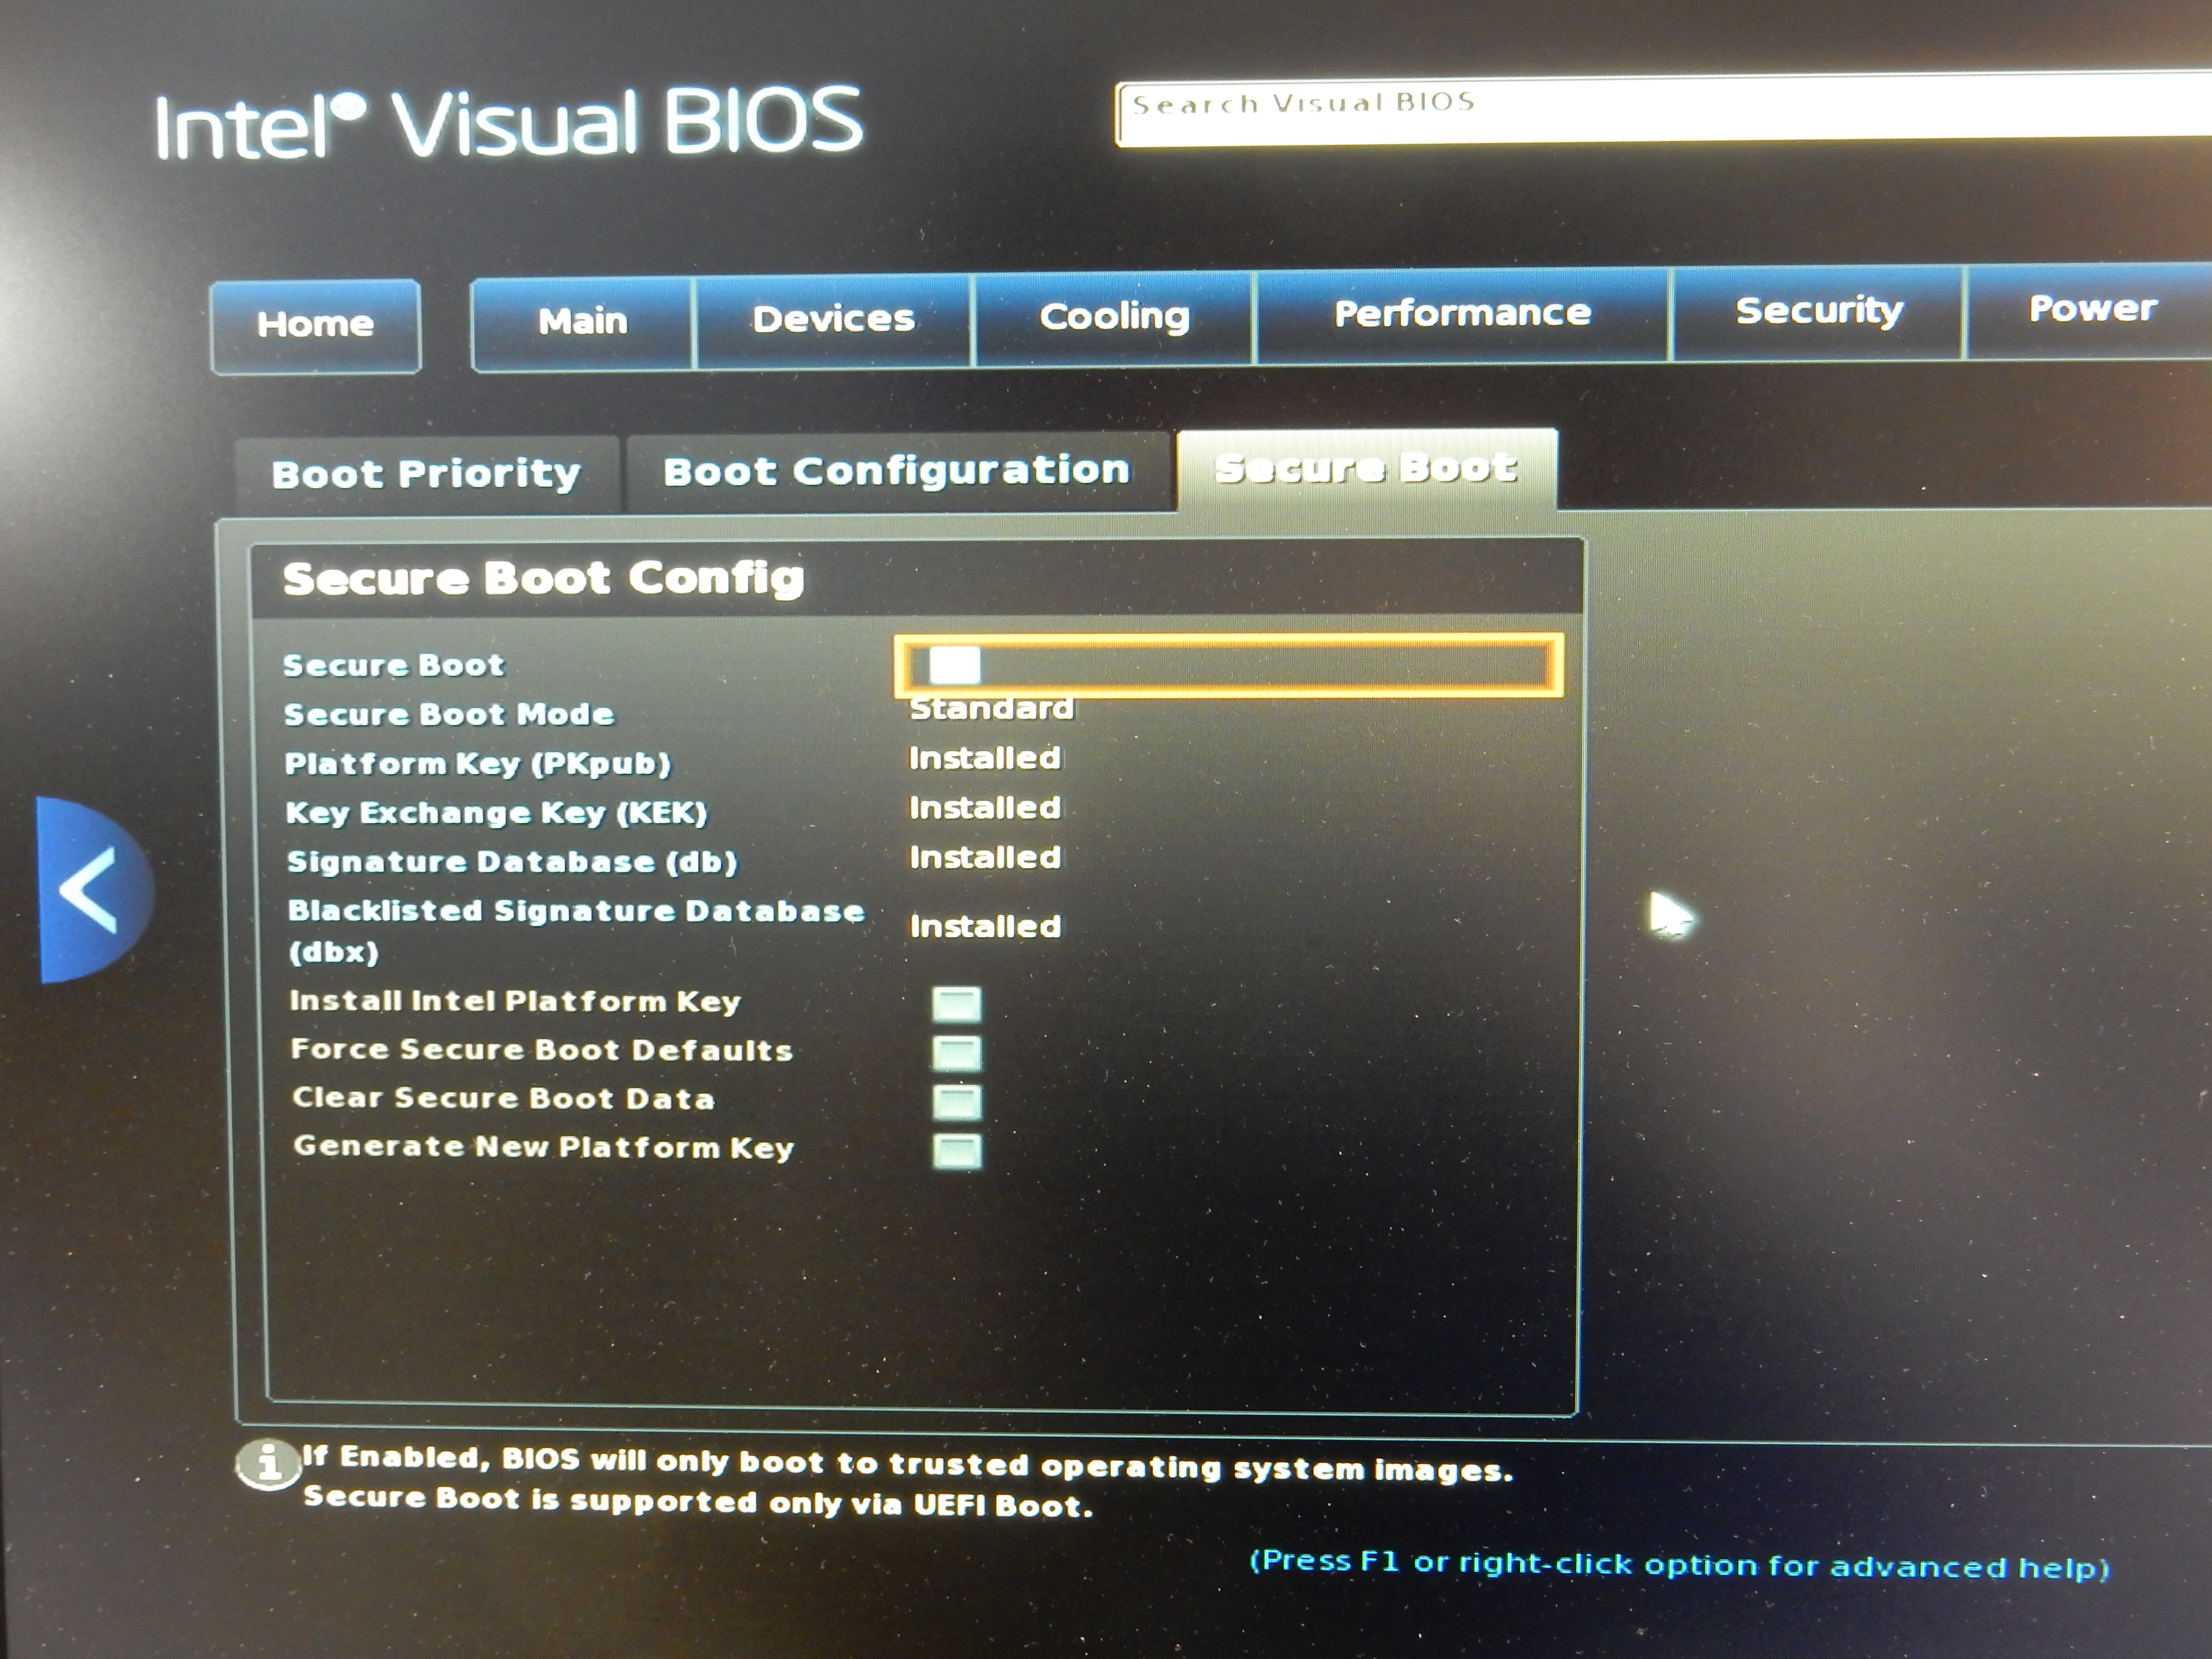
- To enter the BIOS of Intel NUC, press the F2 key repeatedly at startup.
- Uncheck
Boot / Secure Boot / Secure Booton the BIOS screen to disable it.
Allow UEFI to load third bar
Install the NVIDIA driver called NVIDIA driver to operate RTX2080SP. If you do not set the BIOS to allow UEFI to load third-party drivers, UEFI will not load the NVIDIA driver and you will not be able to use the RTX 2080SP.
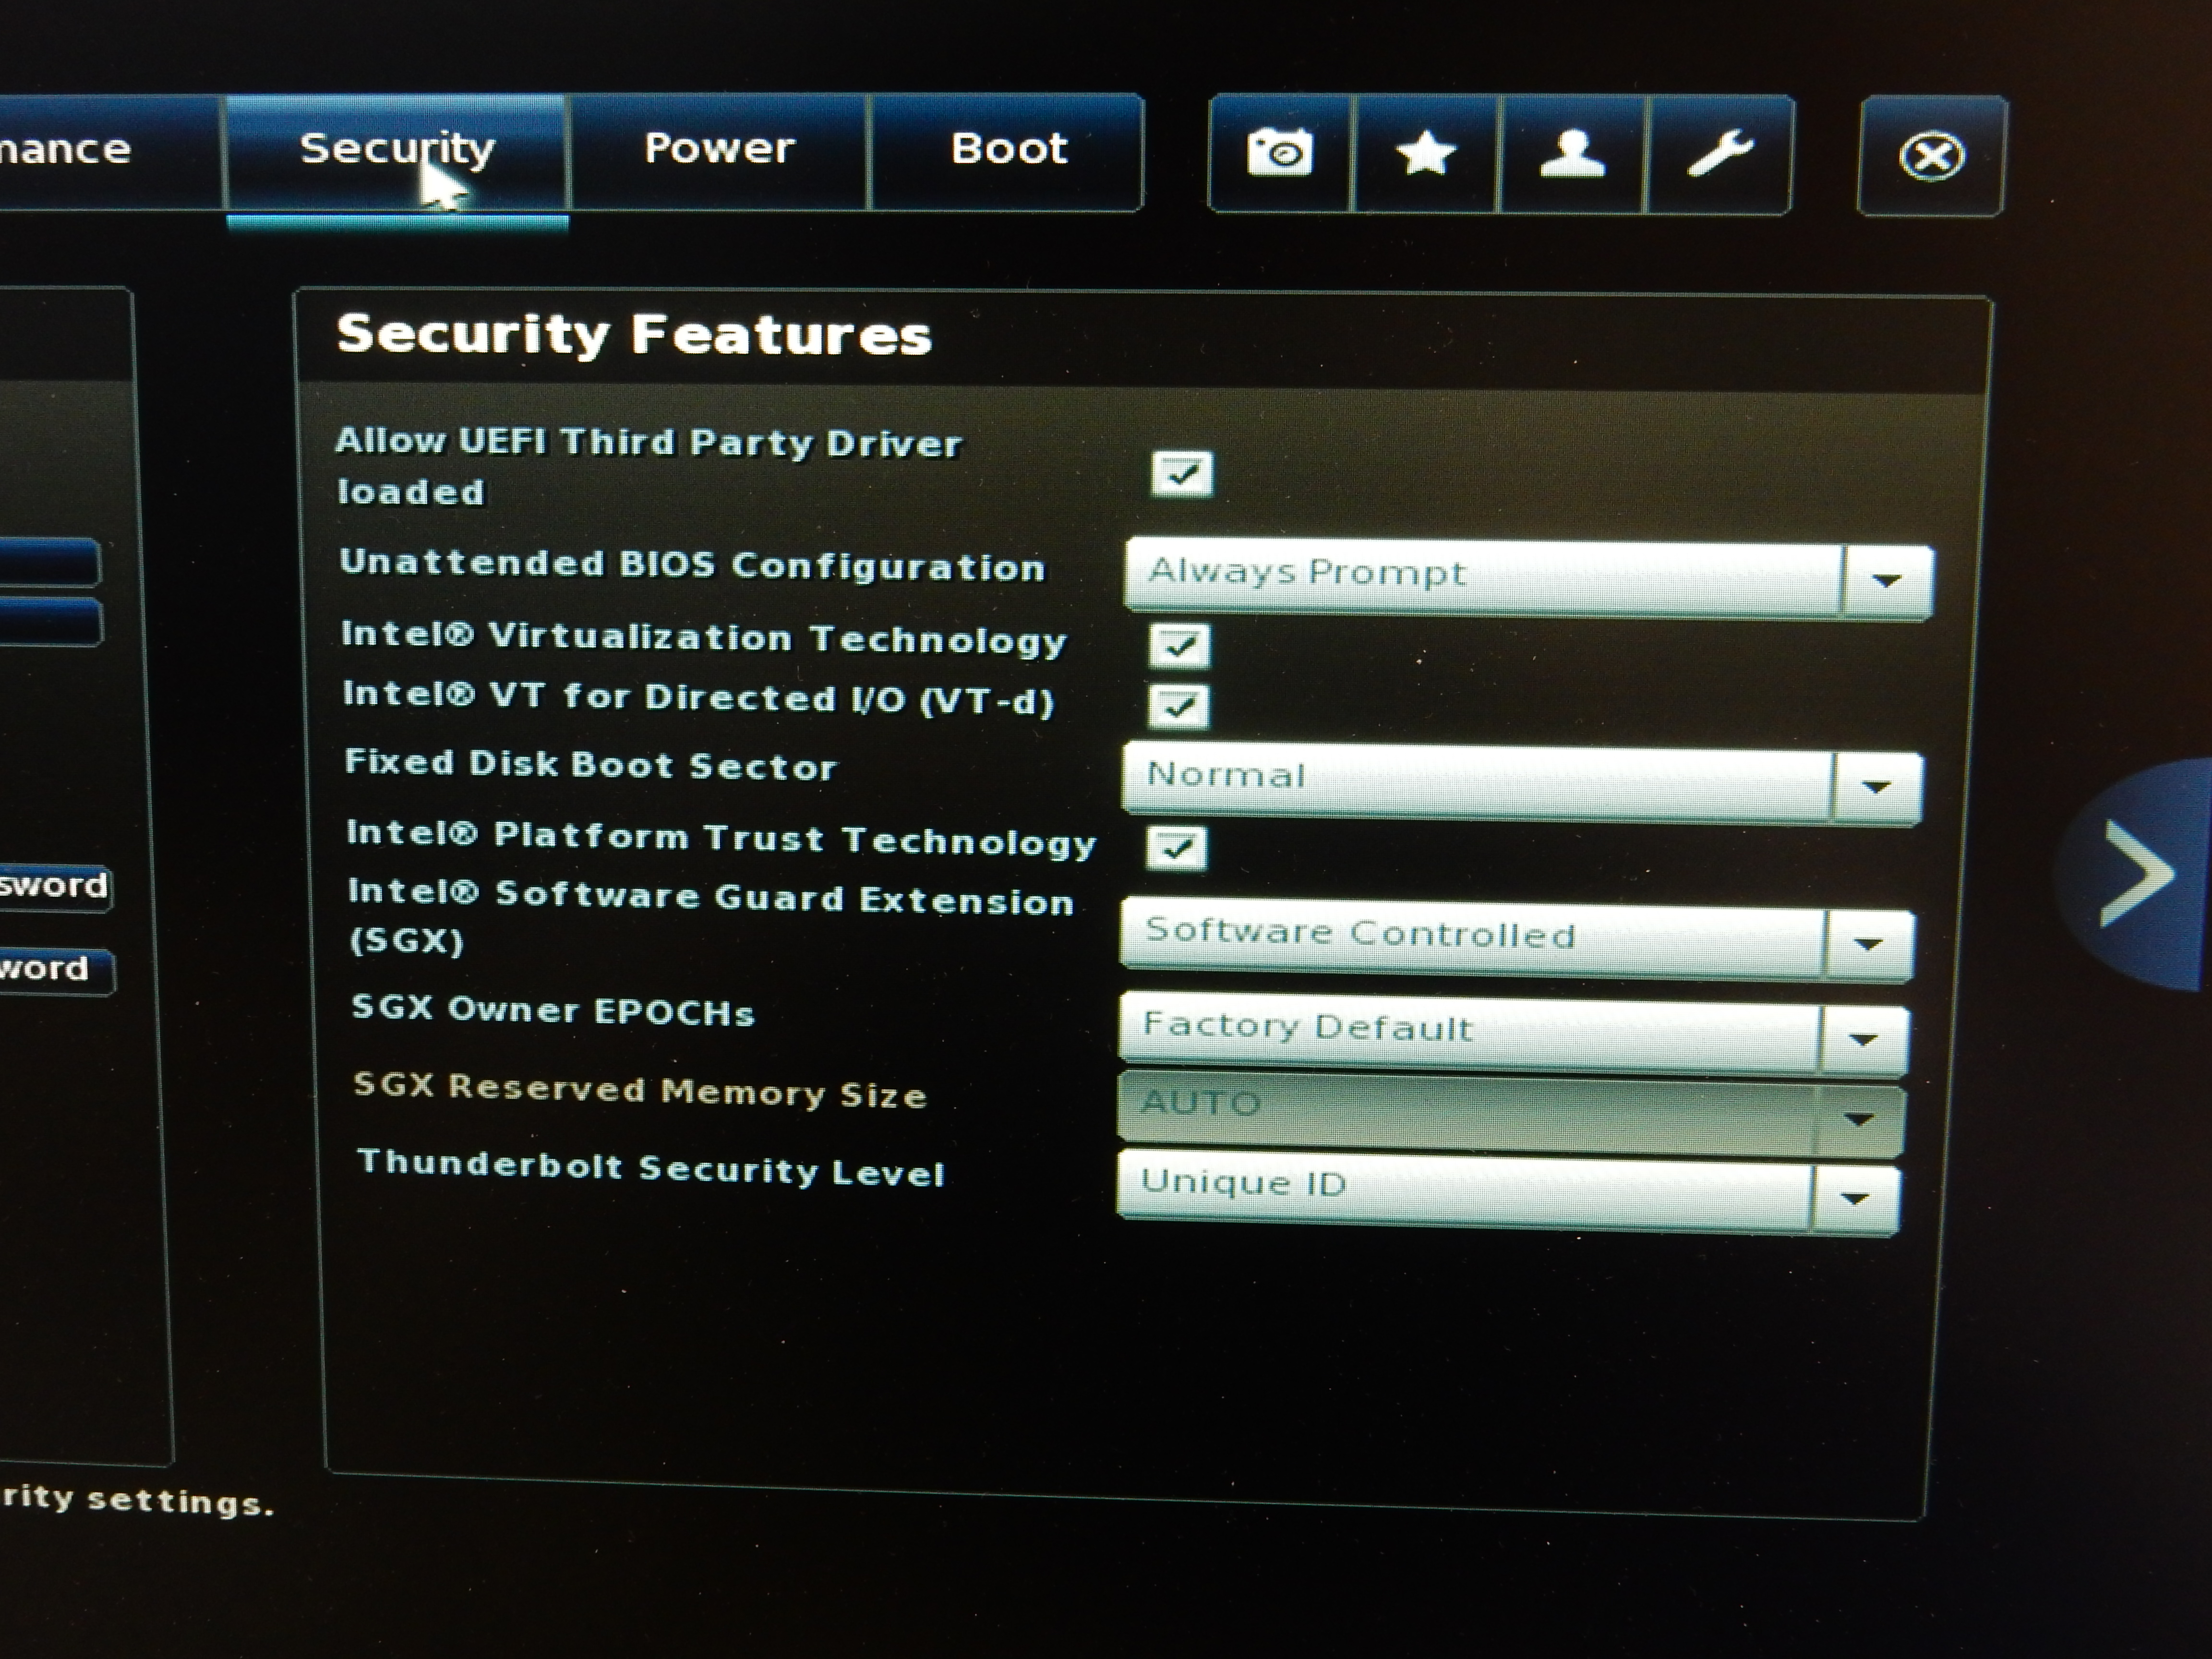
- Check
Seurity / Security Features / Allow UEFI Third Party Driver loadedon the BIOS screen to enable it.
OpenSSH Server setup (if you have two or more PCs)
If you have two or more PCs, it is convenient to be able to log in to the PC to be set up with SSH. Install OpenSSH Server so that you can log in with SSH. (Since the OS may not be the latest version, we will also implement ʻapt upgrade`)
sudo apt install -y openssh-server
I think that the environment you select will differ depending on your preference and environment, such as the method of logging in without a password using a key file and the method of logging in with a password. Please refer to the articles on the net for each setting method.
eGPU connection and Thunderbolt 3 authentication
Connect the eGPU to your PC. When you start your PC, the fan will spin with a roaring sound. This is not a malfunction, but an operation that occurs because the main functions such as fan control are not working because the authentication of the Thuderbolt 3 device has not been completed. If the GUI is enabled (for Desktop version), a screen asking for password authentication will be displayed. Enter the password to stop the explosion. This method cannot be used when using the CLI, so we will describe how to authenticate even in the CLI environment.
Checking the uuid of a Thunderbolt 3 device
Use the boltctl command to find out the uuid of a Thunderbolt 3 device (Core X in this article). The following display will appear. Make a note of the uuid.
$ boltctl
 ● Razer Core X
   ├─ type:          peripheral
   ├─ name:          Core X
   ├─ vendor:        Razer
   ├─ uuid:          <Unique uuid>
   ├─ status:        connected
   │  ├─ domain:     domain0
   │  └─ authflags:  none
   ├─ connected:     <Date and time of connection>
   └─ stored:        no
Perform authentication
Authenticate with the following command. You will be prompted to enter the password, so enter the user password and you are done.
sudo boltctl authorize <Uuid>
When the authentication is completed, the explosion will stop.
If you execute boltctl after authentication, the following will be displayed.
$ boltctl
 ● Razer Core X
   ├─ type:          peripheral
   ├─ name:          Core X
   ├─ vendor:        Razer
   ├─ uuid:          <Unique uuid>
   ├─ status:        authorized
   │  ├─ domain:     domain0
   │  └─ authflags:  none
   ├─ authorized:    <Date and time when authentication was completed>
   ├─ connected:     <Date and time of connection>
   └─ stored:        no
The authentication information will not be saved as it is, and the authentication information will be lost when shutting down (return of the explosion). Therefore, set it to authenticate automatically.
boltcl enroll --policy auto <Uuid>
Execution result
● Razer Core X
   ├─ type:          peripheral
   ├─ name:          Core X
   ├─ vendor:        Razer
   ├─ uuid:          <Unique uuid>
   ├─ dbus path:     /org/freedesktop/bolt/devices/<Unique uuid>
   ├─ status:        authorized
   │  ├─ domain:     domain0
   │  ├─ parent:     c7010000-0090-8d18-a3c2-b11ccc631023
   │  ├─ syspath:    /sys/devices/pci0000:00/0000:00:1c.4/0000:02:00.0/0000:03:00.0/0000:04:00.0/domain0/0-0/0-1
   │  └─ authflags:  none
   ├─ authorized:    <Date and time of authentication>
   ├─ connected:     <Date and time of connection>
   └─ stored:        <Date and time when the credentials were saved>
      ├─ policy:     auto
      └─ key:        no
● Razer Core X
├─ type: peripheral
├─ name: Core X
├─ vendor: Razer
├─ uuid: <Unique uuid>
├─ dbus path: /org/freedesktop/bolt/devices/<Unique uuid>
├─ status: authorized
│ ├─ domain: domain0
│ ├─ parent: c7010000-0090-8d18-a3c2-b11ccc631023
│ ├─ syspath: /sys/devices/pci0000:00/0000:00:1c.4/0000:02:00.0/0000:03:00.0/0000:04:00.0/domain0/0-0/0-1
│ └─ authflags: none
├─ authorized: <Date and time of authentication>
├─ connected: <Date and time of connection>
└─ stored: <Date and time when the credentials were saved>
├─ policy: auto
└─ key: no
- Reference
https://www.mankier.com/1/boltctl
http://manpages.ubuntu.com/manpages/cosmic/man1/boltctl.1.html
Nouveau driver stopped
When you connect an NVIDIA video card to Linux, the OSS version driver Nouveau driver, which is implemented by reverse engineering the NVIDIA driver, is enabled. To check, execute the following command.
lsmod | grep nouveau
If enabled, the nouveau item is displayed. Execute the following command to disable it.
sudo sh -c "echo 'blacklist nouveau' > /etc/modprobe.d/blacklist-nouveau.conf"
sudo sh -c "echo 'options nouveau modeset=0' >> /etc/modprobe.d/blacklist-nouveau.conf"
sudo update-initramfs -u
sudo reboot
NVIDIA driver setup
Add the repository to Ubuntu apt and install the driver. The method of installing from the NVIDA official script could not be executed well with the configuration (eGPU configuration) tried in this article.
sudo add-apt-repository ppa:graphics-drivers/ppa
sudo apt update
ubuntu-drivers devices
When you run ubuntu-drivers devices, the following display will appear. (Display differs depending on the execution environment)
vendor   : NVIDIA Corporation
driver   : nvidia-driver-440 - third-party free recommended
driver   : nvidia-driver-435 - distro non-free
driver   : xserver-xorg-video-nouveau - distro free builtin
vendor : NVIDIA Corporation
driver : nvidia-driver-440 - third-party free recommended
driver : nvidia-driver-435 - distro non-free
driver : xserver-xorg-video-nouveau - distro free builtin
During installation, install the version with recommended.
sudo apt install nvidia-driver-xxx
sudo reboot
After rebooting, check the GPU status with the `nvidia-smi` command.
+-----------------------------------------------------------------------------+
| NVIDIA-SMI 440.64       Driver Version: 440.64       CUDA Version: 10.2     |
|-------------------------------+----------------------+----------------------+
| GPU  Name        Persistence-M| Bus-Id        Disp.A | Volatile Uncorr. ECC |
| Fan  Temp  Perf  Pwr:Usage/Cap|         Memory-Usage | GPU-Util  Compute M. |
|===============================+======================+======================|
|   0  GeForce RTX 208...  Off  | 00000000:07:00.0 Off |                  N/A |
|  0%   38C    P8    16W / 250W |      0MiB /  7982MiB |      0%      Default |
+-------------------------------+----------------------+----------------------+

+-----------------------------------------------------------------------------+
| Processes:                                                       GPU Memory |
|  GPU       PID   Type   Process name                             Usage      |
|=============================================================================|
|  No running processes found                                                 |
+-----------------------------------------------------------------------------+
+-----------------------------------------------------------------------------+
| NVIDIA-SMI 440.64 Driver Version: 440.64 CUDA Version: 10.2 |
|-------------------------------+----------------------+----------------------+
| GPU Name Persistence-M| Bus-Id Disp.A | Volatile Uncorr. ECC |
| Fan Temp Perf Pwr:Usage/Cap| Memory-Usage | GPU-Util Compute M. |
|===============================+======================+======================|
| 0 GeForce RTX 208... Off | 00000000:07:00.0 Off | N/A |
| 0% 38C P8 16W / 250W | 0MiB / 7982MiB | 0% Default |
+-------------------------------+----------------------+----------------------+
+-----------------------------------------------------------------------------+
| Processes: GPU Memory |
| GPU PID Type Process name Usage |
|=============================================================================|
| No running processes found |
+-----------------------------------------------------------------------------+
eGPU Switcher setup (X-Window System running on eGPU)
When I set up the eGPU, the X-Window System got stuck (that is, the GUI didn't start) and I did a lot of work, but it didn't improve at all. Take a rest. I was wondering if all the investment so far is due to blisters: scream :, but a community that promotes the spread of eGPU has been launched, and that community Solution is posted on the page. Was there. Overseas, this kind of community is starting up really quickly. This time around, I really wanted to improve my English and be able to participate actively. Also, by setting up the eGPU Switcher, you can also use the video output terminal on the motherboard, so you can turn the eGPU on and off as needed.
sudo add-apt-repository ppa:hertg/egpu-switcher
sudo apt update
sudo apt install -y egpu-switcher
sudo egpu-switcher setup
sudo reboot
After that, perform the displayed options (GPU selection, etc.) and restart to start the X-Window System on the eGPU. After rebooting, connect the cable to the output port on the video card side and the GUI will appear on the display. (Recommended connection before booting)
Example of setup process of egpu-switcher
Found 2 possible GPUs...

  1: NVIDIA Corporation Device 1e81 (rev a1) (7:0:0)
  2: Intel Corporation Device 3ea5 (rev 01) (0:2:0)

Would you like to define a specific INTERNAL GPU? [y/N]: y
Choose your preferred INTERNAL GPU [1-2]: 2
Choose your preferred EXTERNAL GPU [1-2]: 1

[info] Saved new configuration to /etc/egpu-switcher/egpu-switcher.conf
[info] Automatically detecting if egpu is connected...
[info] EGPU is connected.
[info] Create symlink /etc/X11/xorg.conf -> /etc/X11/xorg.conf.egpu
Created symlink /etc/systemd/system/multi-user.target.wants/egpu.service → /etc/systemd/system/egpu.service.
[success] Done... Setup finished
Found 2 possible GPUs...
1: NVIDIA Corporation Device 1e81 (rev a1) (7:0:0)
2: Intel Corporation Device 3ea5 (rev 01) (0:2:0)
Would you like to define a specific INTERNAL GPU? [y/N]: y
Choose your preferred INTERNAL GPU [1-2]: 2
Choose your preferred EXTERNAL GPU [1-2]: 1
[info] Saved new configuration to /etc/egpu-switcher/egpu-switcher.conf
[info] Automatically detecting if egpu is connected...
[info] EGPU is connected.
[info] Create symlink /etc/X11/xorg.conf -> /etc/X11/xorg.conf.egpu
Created symlink /etc/systemd/system/multi-user.target.wants/egpu.service → /etc/systemd/system/egpu.service.
[success] Done... Setup finished
Display example of `nvidia-smi` after reboot
$ nvidia-smi
Sun Mar 15 17:37:20 2020
+-----------------------------------------------------------------------------+
| NVIDIA-SMI 440.64       Driver Version: 440.64       CUDA Version: 10.2     |
|-------------------------------+----------------------+----------------------+
| GPU  Name        Persistence-M| Bus-Id        Disp.A | Volatile Uncorr. ECC |
| Fan  Temp  Perf  Pwr:Usage/Cap|         Memory-Usage | GPU-Util  Compute M. |
|===============================+======================+======================|
|   0  GeForce RTX 208...  Off  | 00000000:07:00.0  On |                  N/A |
|  0%   30C    P8    17W / 250W |    240MiB /  7973MiB |      0%      Default |
+-------------------------------+----------------------+----------------------+

+-----------------------------------------------------------------------------+
| Processes:                                                       GPU Memory |
|  GPU       PID   Type   Process name                             Usage      |
|=============================================================================|
|    0      1324      G   /usr/lib/xorg/Xorg                            18MiB |
|    0      1446      G   /usr/bin/gnome-shell                          49MiB |
|    0      1627      G   /usr/lib/xorg/Xorg                            96MiB |
|    0      1772      G   /usr/bin/gnome-shell                          72MiB |
+-----------------------------------------------------------------------------+
$ nvidia-smi
Sun Mar 15 17:37:20 2020
+-----------------------------------------------------------------------------+
| NVIDIA-SMI 440.64 Driver Version: 440.64 CUDA Version: 10.2 |
|-------------------------------+----------------------+----------------------+
| GPU Name Persistence-M| Bus-Id Disp.A | Volatile Uncorr. ECC |
| Fan Temp Perf Pwr:Usage/Cap| Memory-Usage | GPU-Util Compute M. |
|===============================+======================+======================|
| 0 GeForce RTX 208... Off | 00000000:07:00.0 On | N/A |
| 0% 30C P8 17W / 250W | 240MiB / 7973MiB | 0% Default |
+-------------------------------+----------------------+----------------------+
+-----------------------------------------------------------------------------+
| Processes: GPU Memory |
| GPU PID Type Process name Usage |
|=============================================================================|
| 0 1324 G /usr/lib/xorg/Xorg 18MiB |
| 0 1446 G /usr/bin/gnome-shell 49MiB |
| 0 1627 G /usr/lib/xorg/Xorg 96MiB |
| 0 1772 G /usr/bin/gnome-shell 72MiB |
+-----------------------------------------------------------------------------+
Install CUDA Toolkit
You can install it with the following command.
sudo apt install -y nvidia-cuda-*
sudo reboot
I found that the CUDA 9.1 Toolkit was installed when I installed it this way. I want to install the latest CUDA Toolkit here, so it is finally posted here NVIDIA official site Install by the method.
wget https://developer.download.nvidia.com/compute/cuda/repos/ubuntu1804/x86_64/cuda-ubuntu1804.pin
sudo mv cuda-ubuntu1804.pin /etc/apt/preferences.d/cuda-repository-pin-600
wget http://developer.download.nvidia.com/compute/cuda/10.2/Prod/local_installers/cuda-repo-ubuntu1804-10-2-local-10.2.89-440.33.01_1.0-1_amd64.deb
sudo dpkg -i cuda-repo-ubuntu1804-10-2-local-10.2.89-440.33.01_1.0-1_amd64.deb
sudo apt-key add /var/cuda-repo-10-2-local-10.2.89-440.33.01/7fa2af80.pub
sudo apt update
sudo apt -y install cuda
After installation, register the following PATH in .bashrc.
export cuda_version=$(/usr/local/cuda/bin/nvcc -V | grep "Cuda compilation" | awk '{print $5}' | awk '{sub(",.*","");print $1;}')
export PATH=/usr/local/cuda-${cuda_version}/bin:$PATH
export CPATH=/usr/local/cuda-${cuda_version}/include:$CPATH
export LIBRARY_PATH=/usr/local/cuda-${cuda_version}/lib64:$LIBRARY_PATH
- 2020/3/16 postscript: Changed so that PATH can be passed even if the version of CUDA changes
CUDA operation check
After rebooting, build and run the following test source with nvcc.
hello.cu
#include <stdio.h>

__global__ void helloFromGPU()
{
    printf("Hello World from GPU\n");
}

int main(void)
{
    printf("Hello World from CPU\n");

    helloFromGPU <<<1, 10>>>();
    cudaDeviceReset();
    return 0;
}
If the following is displayed, the setup is successful.
Build and run
$ nvcc hello.cu
$ ./a.out
Hello World from CPU
Hello World from GPU
Hello World from GPU
Hello World from GPU
Hello World from GPU
Hello World from GPU
Hello World from GPU
Hello World from GPU
Hello World from GPU
Hello World from GPU
Hello World from GPU
Latest architecture compatible version(2020/3 Currently)
$ nvcc -arc sm_75 hello.cu
$ ./a.out
Hello World from CPU
Hello World from GPU
Hello World from GPU
Hello World from GPU
Hello World from GPU
Hello World from GPU
Hello World from GPU
Hello World from GPU
Hello World from GPU
Hello World from GPU
Hello World from GPU
Reference: https://developer.nvidia.com/cuda-gpus
Postscript: Confirmation by lspci
After the setup is complete, use the lspci command to check the status. At this time, the GPU name may not be reflected correctly. In that case, run the ʻupdate-pciids` command and the name will be reflected correctly.
Reference: https://www.nemotos.net/?p=3176
$ lspci | grep -i nvidia
07:00.0 VGA compatible controller: NVIDIA Corporation Device 1e81 (rev a1)
07:00.1 Audio device: NVIDIA Corporation Device 10f8 (rev a1)
07:00.2 USB controller: NVIDIA Corporation Device 1ad8 (rev a1)
07:00.3 Serial bus controller [0c80]: NVIDIA Corporation Device 1ad9 (rev a1)
$ sudo update-pciids
Downloaded daily snapshot dated 2020-03-07 03:15:01
$ lspci | grep -i nvidia
07:00.0 VGA compatible controller: NVIDIA Corporation TU104 [GeForce RTX 2080 SUPER](rev a1)
07:00.1 Audio device: NVIDIA Corporation TU104 HD Audio Controller (rev a1)
07:00.2 USB controller: NVIDIA Corporation TU104 USB 3.1 Host Controller (rev a1)
07:00.3 Serial bus controller [0c80]: NVIDIA Corporation TU104 USB Type-C UCSI Controller (rev a1)
2020/4/12 postscript Installation of cuDNN
I will add how to install the library cuDNN for high-speed calculation of Deep Neural Network.
Log in to the installer download page
Go to the Download Page (https://developer.nvidia.com/rdp/form/cudnn-download-survey). Membership registration is required to download. When downloading for the first time, click Join now to register as a member.

After completing the membership registration, click Login to log in to the download page. ʻI Agree To the Terms of the cuDNN Software License Agreement`. A list of downloadable cuDNNs will be displayed, so download the version of cuDNN that matches your OS and the version of CUDA you have installed.

Explained using cuDNN Library for Linux as an example
The following is an example of cuDNN v7.6.5 (November 18th, 2019), for CUDA 10.2. Click the cuDNN Library for Linux link to start downloading the tar file.

Move to the directory where the source is stored and unpack the tar file.
tar xvf cudnn-10.2-linux-x64-v7.6.5.32.tgz
A directory called cuda is created, and files are expanded in it.
cuda/
├── NVIDIA_SLA_cuDNN_Support.txt
├── include
│   └── cudnn.h
└── lib64
    ├── libcudnn.so -> libcudnn.so.7
    ├── libcudnn.so.7 -> libcudnn.so.7.6.5
    ├── libcudnn.so.7.6.5
    └── libcudnn_static.a
Storage of source files
/ usr / local / cuda-Store cudnn.h in the ʻinclude directory in the <CUDA_VERSION>directory, and store the source files incuda / lib64 in the lib64` directory. This completes the installation of cuDNN.
- Reference: Install CUDA Toolkit 9.0 and CuDNN on Ubuntu 18.04
- Reference: Other cuDNN installation methods
Summary
We built an eGPU using Razer Core X and NVIDIA Geforce RTX 2080 SUPER, connected it to a Linux machine, and set up various things. This time, it was a construction work that experienced both the strength and weakness of OSS. In the future, I would like to make full use of this Workstation by building the Jupyter Lab server with Docker and building the environment of K8S.
Reference [My memorandum-something-](https://orebibou.com/2016/02/linuxunix%E3%81%A7%E6%96%87%E5%AD%97%E5%88%97%E3% 81% 8B% E3% 82% 89% E7% 89% B9% E5% AE% 9A% E9% 83% A8% E5% 88% 86% E5% 8F% B3% E3% 81% 8B% E3% 82% 89% E3% 83% BB% E5% B7% A6% E3% 81% 8B% E3% 82% 89% E4% BD% 95% E5% 80% 8B% E3% 80% 81% E3% 80% 87 / # i-6)
Recommended Posts