[PYTHON] Portable SSD expansion swap setting for Raspberry Pi OS 64bit β version
 The photo above is the added SSD. It is unstable because it has a little heat, but it is placed on the fan. The USB3 port of the Raspberry Pi 4B has only the power supply capacity of the specifications, and the Raspberry Pi itself can not supply any more power, so when adding it, connect it with a USB3 hub with a DC adapter as shown in the photo on the right. With the Raspberry Pi, which has a limited power supply, if you add a high-speed but power-intensive SSD, it will be a little messy as you can see in the picture. It seems that it can be configured a little more neatly if it is divided into DESKTOP and SERVER that save power and space instead of mobile assuming SIM. However, one of the great attractions of the Raspberry Pi is that it is expensive but has the same usability as Wi-Fi and has SIM option options. I'm sorry that I got a little messy from the beginning to the text, but I will explain this trial below.
First, I installed the 64-bit beta version of Raspberry Pi OS, which can use a memory area exceeding 4G. And the theme of this time is ① Add a portable SSD to Raspberry Pi 4B 8G. (2) Change swap from the default SD card to the added portable SSD. I tried these two points.
As a result, the swap function of the main memory of Raspberry Pi OS 64bit beta version worked normally on the added portable SSD. Although it was a beta version, I got the impression that it was quite complete. I'm only trying to swap the main memory, so I don't know the other parts. Furthermore, since it is a 64-bit beta version, the menu was not yet complete in GUI operation. Therefore, the hurdle was a little high, but this trial is mostly set from the command line.
64bit β version OS installation
The 64-bit beta version is a beta version. Damage caused by defects will not be compensated, so if you try it yourself, please agree to the disclaimer and proceed. The 64-bit beta version of the Raspberry Pi OS is not on the regular Software download page. For 64-bit beta version, read the notes on the forum page at the following URL and follow the link on the page. https://www.raspberrypi.org/forums/viewtopic.php?f=117&t=275370 Go to the download page below and https://downloads.raspberrypi.org/raspios_arm64/images/ On the download page, click the link text below to download the zip file. raspios_arm64-2020-08-24 When you unzip the zip file, the following img file will be generated.
2020-08-20-raspios-buster-arm64.img
 (As of 2021 JAN11, it is the latest version of 64-bit beta version)
 This img file is the img file to write to the SD card with Etcher or Raspberry Pi Imager. The installation operation after this is the same as before. When using ssh, put an empty ssh file, add the hdmi monitor setting to config.txt, insert the SD card into the Raspberry Pi and turn on the power. I made additional settings after startup.


# Pretreatment of SSD expansion swap
 Shut down the Raspberry Pi once, connect a commercially available NTFS-formatted SSD to the Raspberry Pi, and turn on the power to automatically recognize the SSD. If you check with df,/dev/sda1 of USB connection is automatically mounted in/media/pi/XXXX (XXXX: SSD volume name). When using it as an SSD for data storage, it can be used on the Raspberry Pi as it is in this NTFS format. There was no problem even if I didn't make any changes.

 However, if you use an additional SSD as a swap of the main memory of Raspberry Pi OS like this time, there will be a problem. When used as swap, it must be in ext4 format. Before that, pre-process. First, cancel the automatic mount of/dev/sda1. (At this time, the SSD disappears from the screen, but the Raspberry Pi OS continues to recognize the hardware of the connected SSD)

#### **`~ $ sudo umount /dev/sda1`**
```pi@raspberrypi

 Stops swap running on the dphys-swapfile file.

#### **`~ $ sudo dphys-swapfile swapoff`**
```pi@raspberrypi


#### **`~ $ sudo dphys-swapfile uninstall`**
```pi@raspberrypi


# Ext4 format SSD
 The data on the SSD will be completely erased, so save the data separately. This time I will format it using fdisk. (Except for the SD card, monitor, keyboard, mouse, LAN, power supply C type, and SSD added this time, please remove them in advance. It would be difficult to format and erase another one.)
 First, check the added SSD.

#### **`~ $ df`**
```pi@raspberrypi


#### **`/dev/sda1 .... .... .... /media/pi/XXXXXX`**
There is sda1 in/dev/sda. sda is one piece of hardware-SSD. sda1 is the first partition in it. There is a UUID indicated by XXXXXX for each partition. This time, the entire SSD is one partition, so only sda1.
- For SSDs with separate partitions, there are sda1, sda2 ...
- If a separate USB memory etc. is connected,/dev/sdb1 will also appear. In this case, shut down the Raspberry Pi main unit, remove all but the added SSD, and restart the Raspberry Pi main unit. In the following, one hardware called/dev/sda-initializes the entire SSD, then creates a partition and formats it with ext4.
Initialize
~ $ sudo sgdisk -Z /dev/sda
## Partition
 Start fdisk.

#### **`~ $ sudo fdisk /dev/sda`**
```pi@raspberrypi

 Command (m for help): waits for input, so press'm'and Enter key to see the Command list. The'p'and Enter keys haven't changed, but you can see the current state of the SSD. Make sure this SSD is correct.

#### **` p↓`**
```command (m for help)

 Type'n'and press Enter to start partitioning. Only the Enter key follows.

#### **` n↓`**
```command (m for help)


#### **` ↓`**
```select (default p)


#### **` ↓`**
```partition number (1-4, default 1)


#### **`First sector ....: ↓`**
Last sector ....: ↓
#### **` w↓`**
```command (m for help)

 Finally, type'w'and press Enter to write the settings and exit fdisk.

## ext4 format
 Format sda1 which is partition 1 with ext4.

#### **`~ $ sudo mkfs.ext4 /dev/sda1`**
```pi@raspberrypi

 Make sure the SSD is ext4 formatted. The UUID is also recognized.

#### **`~ $ sudo blkid /dev/sda1`**
```pi@raspberrypi


#### **`/dev/sda1: UUID="XXXXXXXXX" TYPE="ext4" PARTUUID="....."`**
mount to/media/pi
Since the permissions have already been set for/media/pi at the mount destination, do not change it with sudo chmod 777/media/pi. Mount the ext4 formatted partition/dev/sda1 to/media/pi.
~ $ sudo mount /dev/sda1 /media/pi
 Make sure the SSD is mounted in/media/pi.

#### **`~ $ lsblk`**
```pi@raspberrypi


#### **`sda1  ....... /media/pi`**
It is mounted in/media/pi. But there is still no/UUID after/media/pi. Reboot the Raspberry Pi itself.
After restarting, the swap that was automatically reset due to the restart will be stopped again.
~ $ sudo dphys-swapfile swapoff
#### **`~ $ sudo dphys-swapfile uninstall`**
```pi@raspberrypi

 Let's check with lsblk. This time the UUID has been added.

#### **`~ $ lsblk`**
```pi@raspberrypi


#### **`sda1  ....... /media/pi/XXXXXX`**
Let's check the mount in another way.
~ $ mount | grep sda
#### **`/dev/sda1 on /media/pi/XXXXXX type ext4 (......)`**
Set SSD to swap
Set swap to the/media/pi/XXXXX partition mounted above. Open the dphys-swapfile file located in the/etc folder with the Linux Text editor mousepad.
~ $ sudo mousepad /etc/dphys-swapfile
Comment out the 100MB swap CONF_SWAPSIZE = 100 that was set on the SD card in the opened dphys-swapfile file. Then add the following 3 lines. The new CONF_SWAPSIZE is 210000. It is 210GB. CONF_SWAPFILE specifies a swap file for the/media/pi/XXXXX partition. (There is no swap file yet, but it will be generated automatically when you start swap.) For the XXXXXXXX part, enter the UUID confirmed above. The UUID input part XXXXXXX is a little long and difficult. CONF_MAXSWAP does not enter a number. It will be unlimited.
```#conf_swapsize=100```
```conf_swapsize=210000```
```conf_swapfile=/media/pi/xxxxxxxxxxx/swap```
```conf_maxswap=```
Save and exit the mousepad.
# Swap operation check
Start swap.
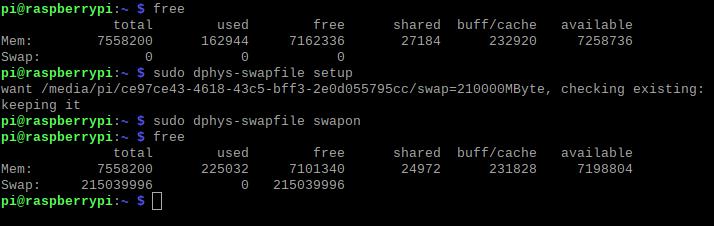
#### **`~ $ sudo dphys-swapfile setup`**
```pi@raspberrypi
#### **`~ $ sudo dphys-swapfile swapon`**
```pi@raspberrypi
#### **`~ $ free`**
```pi@raspberrypi
A 210GB Swap is appearing. Now restart the Raspberry Pi itself.

After restarting, check with free. Swap is 0.
If you move swap to other than the SD card, it seems that swap does not start automatically when the Raspberry Pi main unit starts. In this state, only the main memory of the main unit is 8G. Start swap manually. A 210GB Swap will appear.
#### **`~ $ sudo dphys-swapfile setup`**
```pi@raspberrypi
#### **`~ $ sudo dphys-swapfile swapon`**
```pi@raspberrypi
#### **`~ $ free`**
```pi@raspberrypi
Next, let's see if this manually started 210GB swap works. Transfer the 750MB BMP image file to/home/pi on the Raspberry Pi via ssh using WinSCP. BMP image files are opened one after another every few seconds on the Raspberry Pi itself. Since there is 8G of main memory, it will open up to about 10 in about 2 seconds. It's fast. However, it will take 25 seconds after the number of opened image files exceeds 10. The LED on the SSD will start blinking. It took 25 seconds to open one, but I opened 40 image files. The figure below was confirmed with free.
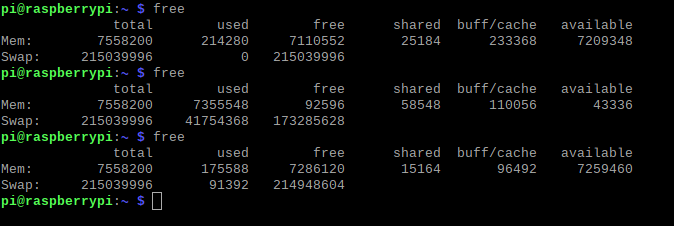
I'm using about 41GB of swap. Only about 92MB of free main memory remains. You can see that every time you open a 750MB BMP image file, swap occurs in swap. It takes 25 seconds for every 760MB as an effective speed. The bottom is after closing all the image files. The free main memory has recovered to about 7.2G. However, about 91MB remains in swap. Files that are considered infrequently used. However, when I restart the Raspberry Pi itself, swap becomes 0 again.
As mentioned above, I was able to operate the Raspberry Pi 4B by setting the swap of the main memory to the portable ssd that was added to USB.
However, the effective speed of swapping out from the main memory to the ext4 format SSD added to USB3 was only about 30MB/S. If you use the UHS-I30 SD card, you can get the same effective speed of 30MB/S even if you swap out to the default SD card. On the other hand, the effective speed of copy and paste of NTFS formatted SSD as purchased is about 50MB/S. Separately, if you connect this NTFS formatted SSD to the USB of your PC and copy and paste it, the effective speed will be around 300MB/S. The ext4 formatted SSD can be used as a swap area on the Raspberry Pi OS, but it turned out that the ext4 format slows down on the Raspberry Pi OS.
The 64-bit OS can use more than 4GB of memory space and is very useful for encoding large image files and videos. The shortest way for a PC is to add a large amount of main memory. However, when processing large image files, it often swaps out even beyond this large amount of main memory. At this time, the SSD swap with an effective speed of around 400MB/S is very comfortable.
However, the Raspberry Pi is not supposed to be used for this purpose, and since it is a single-board computer, it is not possible to add main memory. So I thought about adding swap to SSD this time. However, the effective speed was around 30MB/S. The SSD this time has a speed of about 280MB/S for both reading and writing when measured using hdparm on Raspberry Pi OS, but I do not know the reason why the effective speed of swap was so slow. The setting may have been wrong.
From this result, SSD and SD card were almost the same speed as swap on Raspberry Pi 4B. Therefore, considering the high difficulty of introducing swap with SSD like this time, at present, 30MB/S guaranteed SD card with default SD card slot is rather recommended as swap of Raspberry Pi. In addition, we can expect the option of adding a UHS-II card slot to the Raspberry Pi body in the next model. On the other hand, when considering data storage DISK with DESKTOP and SERVER, SSD formatted with NTFS is automatically recognized by Raspberry Pi, a speed of about 50MB/S is secured, and from the safety of data storage, and It is also excellent in terms of cost performance. As a data storage disk, I connect an NTFS format SSD and use it as it is. The memory is only 8G main memory, and swap is used with 0 setting. If you have 8G of main memory, you usually don't need swap at all. The SD card is likely to last a long time as a boot-only card. The 30MB/S guaranteed SD card was a bit expensive, but it boots fast. And if there is a time to run swap, the two lines sudo dphys-swapfile setup and sudo dphys-swapfile swapon will always run a 210GB SSD swap.
Thank you for watching until the end.
Recommended Posts