[PYTHON] Implement APIs at explosive speed using Django REST Framework
: christums_tree: This article is Day 14 of "Python Part 2" Advent Calendar 2015.
I was wondering what to write, but I would like to write about the REST Framework, which has been the most beneficial of the Python-related technologies I learned this year.
: golf: Introduction
Creating an API is quite troublesome
First, let's touch on the difficulty of creating an API. I think that there are many people who have actually made it, but unlike Web pages, WebAPI can be developed by focusing only on logic, so it is easy to develop if it is easy to develop. There is no need to worry about the design or usage environment, or to make full use of multiple languages such as HTML and Javascript. Just receive the response correctly and return the response appropriately.
That said, there are many troublesome things when you actually make it. For example, checking if the entered value is correct, filtering the result by multiple conditions, dividing the number of items to be returned, and so on. Also, the more models you have, the more APIs you simply have to create. It takes a lot of effort to make these one by one.
Use the Django REST Framework
That's where the Django REST Framework, the subject of this issue, comes into play. By creating it together with Django's own functions, you can create APIs at explosive speed from nothing. And the good news is that it comes with a web console to try out the API. With the API, you have to complete and enter the correct parameters yourself, so it's a hassle to check the operation, but with the Django REST Framework, you don't have to worry about that. I have no choice but to utilize this.
: beginner: What is a RESTful API?
To take full advantage of the Django REST Framework, you need to know about RESTful APIs. Since it is not the main subject, I will not write it in detail, but I will briefly review it.
WebAPI ≠ RESTful It is a misconception that all APIs exchanged over HTTP / HTTPS are RESTful. RESTful is like a design rule for creating an API, and by creating an API according to this, you can create a simple and clear API.
One-to-one API with the model
The feature of RESTful API is that you create an API so that it is connected to the model on a one-to-one basis. It is RESTful to query the list of resources in one model and add / update / delete each one, instead of fetching the whole result that you want to refer to this model even with one API call. It is an image. It is not suitable for mobile applications such as wanting to get information with a small number of requests or operating multiple models by pasting transactions, but it is very handled because the rules are clear and the independence of each API is high. It's easy.
GET, POST, PUT, DELETE These are four HTTP methods that can be said to be representative of RESTful. Looking at an example API for a blog entry
GET /entries- Get a list of entries
POST /entries- Add an entry
GET /entries/$entry_id- Get a specific entry
PUT /entries/$entry_id- Replace a specific entry
DELETE /entries/$entry_id- Delete a specific entry
Design the API endpoint in the following way.
The difference between POST and PUT seems to be different depending on whether it is an operation for a specific resource or not. When posting a new article, the entry_id has not been assigned yet, so POST is assigned to / entries, and the entry_id is assigned to updates after the article is created, so it is like operating with PUT.
: cat: Let's make it for the time being
Now let's use the Django REST Framework.
What to make
I gave an example of a blog, so let's create an API that operates Entry of the blog as an example. I would like to introduce a relation model, so I will consider a model that represents the owner of the Entry called User.
Confirmation environment
- OS: OS X(El Capitan)
- Python:
Python 3.5 - Django: 1.9
- django-filter: 0.11.0
- djangorestframework: 3.3.1
This time I'm checking the operation with Python3. I don't use any specific grammar, and the Django REST Framework also supports Python 2.7, so I think it will work with Python 2, but support will end in 2020, and 2015 is about to end. , I think it's better to actively switch to Python3.
Project setup
__Installation of required libraries __
pip install django
pip install djangorestframework
pip install django-filter
__ Creating a project app __
# django_rest_framework_Let's create a project with the name test
django-admin startproject django_rest_framework_test
cd django_rest_framework_test/

python manage.py startapp blog

#Directory structure check
.
└── django_rest_framework_test
    ├── blog
    │   ├── __init__.py
    │   ├── admin.py
    │   ├── apps.py
    │   ├── migrations
    │   ├── models.py
    │   ├── tests.py
    │   └── views.py
    ├── django_rest_framework_test
    │   ├── __init__.py
    │   ├── settings.py
    │   ├── urls.py
    │   └── wsgi.py
    └── manage.py
__ Model definition __
blog/models.py
from django.db import models


class User(models.Model):
    name = models.CharField(max_length=32)
    mail = models.EmailField()


class Entry(models.Model):
    STATUS_DRAFT = "draft"
    STATUS_PUBLIC = "public"
    STATUS_SET = (
            (STATUS_DRAFT, "draft"),
            (STATUS_PUBLIC, "Now open"),
    )
    title = models.CharField(max_length=128)
    body = models.TextField()
    created_at = models.DateTimeField(auto_now_add=True)
    updated_at = models.DateTimeField(auto_now=True)
    status = models.CharField(choices=STATUS_SET, default=STATUS_DRAFT, max_length=8)
    author = models.ForeignKey(User, related_name='entries', on_delete=models.CASCADE)
For the time being, define Model in this way. If you actually make a blog, there are some restrictions, but this time I will just make an API and try it, so I will leave it at this level.
We define User, which has only a name and email address, and Entry, which represents a blog post. From Entry, the Foreign Key refers to ʻUser` as the information of the person who wrote the blog. In the case of Django, it is convenient because you can also backreference by just adding related_name.
__ Database construction __ Once the Model is created, build the database. This time I will use SQlite3 which does not require preparation.
django_rest_framework_test/settings.py
…
#Add blog
INSTALLED_APPS = [
    'django.contrib.admin',
    'django.contrib.auth',
    'django.contrib.contenttypes',
    'django.contrib.sessions',
    'django.contrib.messages',
    'django.contrib.staticfiles',
    'blog',
]
…
Register the blog app you just created in Django's settings and hit the following command.
#Create a migration file
python manage.py makemigrations
#Reflect in DB based on migration file
python manage.py migrate
This will create a database file called db.sqlite3 in the same hierarchy as manage.py, and a table according to the blog model will be created automatically. This feature is really useful because you can prepare a database without writing any SQL. When replacing with MySQL or Postgres for production, you can handle it by changing only the settings.
__ Operation check __ Let's check the operation easily before incorporating the REST API.
#Create user for admin
python manage.py createsuperuser
   Username (leave blank to use 'kimihiro_n'): dev
   Email address:
   Password:
   Password (again):
   Superuser created successfully.

#Start development server
python manage.py runserver
http://localhost:8000/admin You can enter the Django administration screen with.

This admin screen allows you to work with your Django model on the web. However, you can see that there are no ʻEntry and ʻUser created earlier. (It's confusing, but AUTHENTICATION AND AUTHORIZATION Users are for managing Django logins.)
To add your own model here, you need to add a little to the source.
blog/admin.py
from django.contrib import admin

from .models import User, Entry


@admin.register(User)
class UserAdmin(admin.ModelAdmin):
    pass

@admin.register(Entry)
class Entry(admin.ModelAdmin):
    pass
Open admin.py in the blog and rewrite it as above. You can customize the display of Admin in detail, but it will be long, so I will omit it.

python manage.py runserver
If you execute again and open it in the browser, the model defined earlier will appear. (If the DEBUG flag is True, you don't have to rerun runserver for every source change)

You can create and edit Entry here. It is convenient to make some Entry to try the list API later.
Incorporate Django REST Framework
Well, it's been a long time, but so far it's the same as normal Django flow. From here, let's start building the REST API.
__Load REST Framework __
django_rest_framework_test/settings.py
INSTALLED_APPS = (
    ...
    'blog',
    'rest_framework',
)
Add rest_framework to INSTALLED_APPS in the configuration file. You can now call the REST Framework from Django.
To create a REST API, you need to define at least the following three.
- Serializer
- ViewSet
- URL pattern
Roughly speaking, Serializer is "to decide how to serialize (deserialize) Model", ViewSet is "to decide how to interpret API queries", and URL Pattern is " It's meant to teach Django URL patterns. " We will define each of these for the Model that we want to convert to API. It may seem like a hassle when you want to implement the minimum API, but by dividing it in this way, you can achieve high extensibility and good code visibility.
Serializer definition
blog/serializer.py
# coding: utf-8

from rest_framework import serializers

from .models import User, Entry


class UserSerializer(serializers.ModelSerializer):
    class Meta:
        model = User
        fields = ('name', 'mail')


class EntrySerializer(serializers.ModelSerializer):
    class Meta:
        model = Entry
        fields = ('title', 'body', 'created_at', 'status', 'author')
This is the minimum definition of Serializer. Create a Serializer corresponding to Model by inheriting serializers.ModelSerializer. What you give to fields is a tuple of field names that you want to output as API.
The ones listed in fileds are serialized and output with the default implementation. For example, EntrySerializer is trying to output the relation ʻauthor` field, but by default the id (= pk) of author is output. You can change these behaviors by customizing the Serializer (see below).
ViewSet definition
blog/views.py
# coding: utf-8

import django_filters
from rest_framework import viewsets, filters

from .models import User, Entry
from .serializer import UserSerializer, EntrySerializer


class UserViewSet(viewsets.ModelViewSet):
    queryset = User.objects.all()
    serializer_class = UserSerializer


class EntryViewSet(viewsets.ModelViewSet):
    queryset = Entry.objects.all()
    serializer_class = EntrySerializer
The ViewSet looks like this. Specify the Django Model query set in query set and the Serializer defined earlier in serializer_class. The query set can also be filtered in advance.
URL pattern definition
django_rest_framework_test/urls.py
# coding: utf-8

from django.conf.urls import url, include
from django.contrib import admin

from blog.urls import router as blog_router

urlpatterns = [
    url(r'^admin/', admin.site.urls),
    # blog.Include urls
    url(r'^api/', include(blog_router.urls)),
]
blog/urls.py
# coding: utf-8

from rest_framework import routers
from .views import UserViewSet, EntryViewSet


router = routers.DefaultRouter()
router.register(r'users', UserViewSet)
router.register(r'entries', EntryViewSet)
Finally, the definition of the URL pattern. We will register each model using a router.
With the above settings, / api / is the gateway to the REST API.
get /api/users/In the list of users,
get /api/entries/List of entries
You can access to. Of course, operations that specify POST or ID are also registered at the same time.
API operation check
Now that the REST API is ready to work, let's move it.
python manage.py runserver
Start the server with and try to access http: // localhost: 8000 / api /.
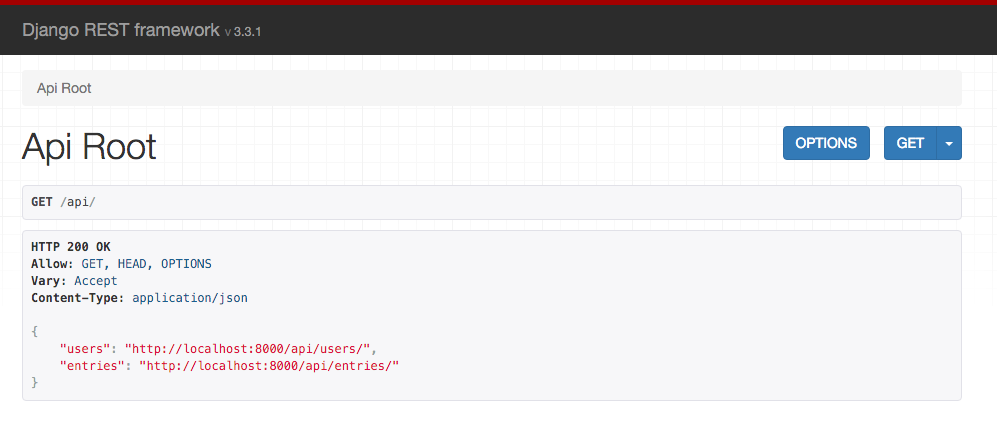
Then an API console like this will appear. By using the console, you can display JSON in an easy-to-read manner, and you don't have to prepare your own form to test the API, so let's take advantage of it.
By the way, if you hit something like curl http: // localhost: 8000 / api / with a command, it will be returned in JSON format instead of HTML on the console, so don't worry. You can also force JSON in your browser by adding ? Format = json.

If you go to http: // localhost: 8000 / api / entries /, it will look like this. This is an endpoint where you can get a list of entries. You can see that the data entered on the management screen earlier is displayed.
A form is also attached at the bottom of the screen, from which you can test the POST of a new entry. If you are using choices, you can select from the label with high readability, and if you are using the relation model, you can select from existing items, so it is not a hassle.
All of the Author's choices have been changed to "User Object", which can be identified by appropriately overwriting the __str__ of the UserModel.
blog/models.py
class User(models.Model):
    …
    def __repr__(self):
        #Display the primary key and name for easy viewing
        # ex) 1: Alice
        return "{}: {}".format(self.pk, self.name)

    __str__ = __repr__  # __str__Apply the same function to

If you go to http: // localhost: 8000 / api / entries / 1, it will look like this. This time it is a GET for individual elements, so one entry with pk = 1 will be displayed. In addition, the DELETE button is set in the upper right, the current value is set in the form, and the button is installed with PUT instead of POST. You can use this to delete or update Entry.
: rocket: customize API
The basic API implementation and usage is over, but in order to actually operate and use it, it is necessary to perform filtering and customization of the output format. This time, I will introduce some customization methods from among them. For customizations that I didn't post, see the official documentation. As it is highly expandable, it is a system that can respond to various demands.
Expand the relation model
If you look at the JSON of Entry in the previous implementation
{
   "title": "Hello, Django REST API!!",
   "body": "<script>alert(\"hello\");</script>",
   "created_at": "2015-12-09T05:59:46.200277Z",
   "status": "draft",
   "author": 1
}
Like, ʻauthorwas displayed with the ID of the User model. If you want to use the contents of the Entry and its User's name, first get the Entry, then look at the author's ID and request ``GET / api / users / 1``` again to get the user's name. I can't. This is inefficient in actual operation, isn't it? It is convenient to expand the contents of User to JSON when getting Entry.
{
   "title": "Hello, Django REST API!!",
   "body": "<script>alert(\"hello\");</script>",
   "created_at": "2015-12-09T05:59:46.200277Z",
   "status": "draft",
   "author": {
       "name": "Alice",
       "mail": "[email protected]"
   }
}
To be specific, This is easy to use even from the side that handles APIs.
To change the API response in this way, you only need to overwrite the author part with Serializer.
blog/serializer.py
…
class EntrySerializer(serializers.ModelSerializer):
    #Overwrite author serializer
    author = UserSerializer()

    class Meta:
        model = Entry
        fields = ('title', 'body', 'created_at', 'status', 'author')
You can handle it just by defining the author field in EntrySerializer and setting the UserSerializer you defined there. I like to add read_only, but it may be better not to overwrite from Entry because the API specification becomes complicated when POSTing and PUTing Entry. Also, it would be nicer to add ʻid` to the fields of UserSerializer.
http://www.django-rest-framework.org/api-guide/serializers/ In addition, by overwriting Serializer, you can change the display format and provide validation.
Pegination
Next, about pagement. With the implementation so far, it is a specification to fetch all Models and display them. There is no problem as long as the amount of data is small, but as the number of cases accumulates, the load and transfer amount will become terrible. Therefore, as is done on the Web page, limit the number of cases that can be acquired with one request so that the data for the next page can be acquired as needed.
django_rest_framework_test/settings.py
REST_FRAMEWORK = {
    'DEFAULT_PAGINATION_CLASS': 'rest_framework.pagination.LimitOffsetPagination',
    'PAGE_SIZE': 2
}
Until now, we haven't added any settings for Django REST, but you need to add special settings to use the pagetion.
Let's define a dictionary called REST_FRAMEWORK and add DEFAULT_PAGINATION_CLASS and PAGE_SIZE.
This alone allows the API to support the ʻoffset (start position) and limit` (upper limit of acquisitions at one time, default = PAGE_SIZE) parameters.
{
    "count": 4,
    "next": "http://localhost:8000/api/entries/?limit=2&offset=2",
    "previous": null,
    "results": [
        {
            "id": 1,
            "title": "Hello, Django REST Framework!!",
            "body": "Hello!",
            "created_at": "2015-12-12T11:55:22.310203Z",
            "status": "draft",
            "author": 1
        },
        {
            "id": 2,
            "title": "The Zen of Python",
            "body": "The Zen of Python, by Tim Peters\r\n\r\nBeautiful is better than ugly.\r\nExplicit is better than implicit.\r\nSimple is better than complex.\r\nComplex is better than complicated.\r\nFlat is better than nested.\r\nSparse is better than dense.\r\nReadability counts.\r\nSpecial cases aren't special enough to break the rules.\r\nAlthough practicality beats purity.\r\nErrors should never pass silently.\r\nUnless explicitly silenced.\r\nIn the face of ambiguity, refuse the temptation to guess.\r\nThere should be one-- and preferably only one --obvious way to do it.\r\nAlthough that way may not be obvious at first unless you're Dutch.\r\nNow is better than never.\r\nAlthough never is often better than *right* now.\r\nIf the implementation is hard to explain, it's a bad idea.\r\nIf the implementation is easy to explain, it may be a good idea.\r\nNamespaces are one honking great idea -- let's do more of those!",
            "created_at": "2015-12-12T11:56:32.854278Z",
            "status": "draft",
            "author": 2
        }
    ]
}
It is also convenient to know the URL of the previous and next requests with next, previous.
By the way, you can also use the request by page with a fixed limit and the cursor method that learns before and after starting from the object ID just by changing the setting.
http://www.django-rest-framework.org/api-guide/pagination/
filter
Finally, I will introduce the filter. It is for when you want to narrow down the entries with ʻauthor`.
django_rest_framework_test/settings.py
INSTALLED_APP = [
...
    'blog',
    'rest_framework',
    'django_filters',  #add to
]

#Postscript
REST_FRAMEWORK = {
    'DEFAULT_FILTER_BACKENDS': ['django_filters.rest_framework.DjangoFilterBackend'],
}
Add django_filters and DEFAULT_FILTER_BACKENDS to your config file. If you also want to use pagetion, please integrate the dictionary.
class EntryViewSet(viewsets.ModelViewSet):
    queryset = Entry.objects.all()
    serializer_class = EntrySerializer
    filter_fields = ('author', 'status')
Then add filter_fields to the ViewSet you want to filter. You can now filter ʻauthor and status`.
If you add ? Author = 1 after the API, you can only get articles written by User id = 1. Also, if you set ? Status = public, you can get only articles with public status.
http://www.django-rest-framework.org/api-guide/filtering/ You can also search or create your own specification method.
: white_flower: Summary
With the Django REST API, you can create a solid API with little effort. I think there isn't a framework that takes care of everything from the database to the output of the API. Since it is Django, it can be used for purposes such as creating pages other than API without problems. Please try using the Django REST API Framework. (And let's accumulate knowledge in Japanese!)
Actually, I wanted to touch on more detailed customization, but I was overwhelmed by time and rushed to the second half. There is a volume that I can write a few articles by serialization and filtering, so I would like to make an independent article someday to supplement it.
: octocat: source
https://github.com/pistatium/django_rest_framework_test I will put the source of the sample I made this time. Even if you don't understand the directory, please.
: book: Reference URL
- http://www.django-rest-framework.org/
- http://www.slideshare.net/unsolublesugar/res-tful
- http://qiita.com/KojiOhki/items/5be98eeae72dca2260bc
Tomorrow is @ satoshi03.
Recommended Posts