The temperature is automatically measured using Raspberry Pi 3 and automatically uploaded to the server (Docker python3 + bottle + MySQL) for viewing!
Introduction
My name is Ryosuke Kamei and I am an IT consultant based on the idea of "gentle IT"! My main work is from the upstream process of requirements analysis and requirement definition to development management, but I am developing a web system privately! As part of our friendly IT activities, we will introduce the goods and services programs created with "Raspberry Pi 3" (commonly known as Raspberry Pi), which has the philosophy of "providing inexpensive PCs that can be programmed for education"!
This time, I will introduce a sample of using Docker that applied for Razzpie Contest 2016! This is a sample that automatically measures the temperature every minute, registers it in the database (MySQL) on Docker, and allows you to browse the temperature with a browser!
The file is posted on Github, so if you are interested, please use it!
table of contents
- Purpose
- Preparation
- Environment construction
- Operation check
- At the end
1. Purpose
1-1. Proposal for building a web server using Docker
For those who like Raspberry Pi "I'm good at electronic work, but I'm not sure when it's published online ..." I think there are many people who say that.
It is possible to build a web server on the Raspberry Pi, but installing the application server, database server, etc. is troublesome, annoying, and even if I try, it doesn't work ... Is web server construction considered to be a high threshold?
In order to make it as easy as possible for anyone to build a web server, we will introduce an example of building a web server with less effort using the container technology Docker!
1-2. Challenges when building a server on Raspberry Pi
Since the OS of Raspberry Pi is Linux OS "Raspbian", Apache of the web server and MySQL of the database server can be installed, but there are also the following issues.
- I don't know what caused the problem.
- Complicated installation and configuration of web server and database
- It is difficult to redo the settings of the web server and database server.
-
I don't know what caused the problem. When doing electronic work, it is difficult to isolate the problem when a problem occurs because the system such as temperature acquisition and the mechanism such as the web server are built on the same machine.
-
Complicated installation and configuration of web server and database You can install Apache, a web server, MySQL, a database server, etc., but it takes time to install and configure. I'm sure some of you have experienced it, but if you don't take notes properly, you may not know the correct settings or you may be in a state of working.
-
It is difficult to redo the settings of the web server and database server. If you want to reconfigure your web server or database, you'll have to worry about what to do if it doesn't work to modify your existing environment.
1-3. Solved with Docker!
-
I don't know what caused the problem. Docker uses a technology called containers. Launch a "virtual OS" on the Raspberry Pi. The roles are clearly divided between the application container and the database container, and the OS of the Raspeye main unit specializes in communication with hardware such as temperature sensors, humidity sensors, and illuminance sensors. When a problem occurs, it will be easier to isolate the problem when searching for the cause!
-
Complicated installation and configuration of web server and database With Docker, you can use image files with difficult settings for free, from troublesome middleware installation! Image files range from official ones to finely customized ones, and can be used in combination to assemble a plastic model!
-
It is difficult to redo the settings of the web server and database server. Docker allows you to combine installations and settings into a single file. If you make a mistake in the settings, experiment in another environment based on that file. If it doesn't work, you can throw away the content and recall the well-made configuration file and try again. Docker can be parallelized (build the same environment anytime, anywhere) by using image files, so porting can be done smoothly!
1-4. Issues when using Docker with Raspberry Pi
Docker also has its challenges. Typical servers have x86_64 architecture, and most Docker Hub images are x86_64 architecture images. There are few images of Raspberry Pi's armv7l architecture, and there is still little information on Raspberry Pi + Docker.
This time, based on this situation, I will introduce an example of using Docker on Raspberry!
1-5. This sample
Fixed point observation of temperature, record in database, and browse on web server!
① Acquire with a digital temperature sensor on the Raspberry Pi body side
(2) The acquired temperature is registered in the database from the program through the API.
③ On the web browser, you can display the temperature registered in the database.
These are on my Github and can be built with relatively simple steps. This is one of the advantages of Docker.
Environment construction is explained in "3. Building environment"!
2. Preparation
If you don't have Docker and Git installed, see the article below. Install Docker and Git on RaspberryPi3
3. Environment construction
Immediately use Docker to build application containers, database containers, and data containers!
See the article below for details! Build a Python + bottle + MySQL environment with Docker on RaspberryPi3![Easy construction]
There is also a video version!
3-1. Construction procedure
Clone with git and download the file
$ git clone [email protected]:RyosukeKamei/rpi-python-bottle.git
- When asked for a password, enter the password used to create the rsa key.
Move to cloned folder
$ cd rpi-python-bottle
docker-Build and start data container and database container with compose
$ docker-compose up -d
- It took about 3 minutes in my environment.
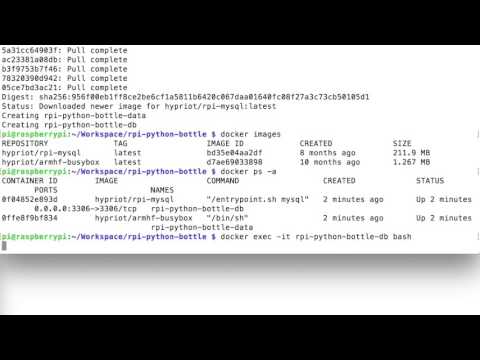
Check the image
$ docker images
Check the container
$ docker ps -a
Login to database container
$ docker exec -it rpi-python-bottle-db bash
Enter sample table and data
# mysql -u bottle -pbottle measurement < /docker-entrypoint-initdb.d/create_table.sql
- SQL is inputting sample table and data.
Log out database container
# (Contrl + p, Control + q)
- Please note that using exit will also stop the container.
Build application container
$ docker build -t hypriot/rpi-python .
- It took about an hour in my environment. Let's wait leisurely
Start the application container and log in
$ docker run --name rpi-python-bottle-app -it hypriot/rpi-python bash
Start the server
# /usr/local/bin/python3 /home/bottle/server.py
When you open it in a browser, it will be displayed as follows.

3-2. Folder structure
When you git clone, the folder structure will be as follows!

3-3. /app/server.py
Temperature data registered in the database and API for data registration.
@route('/list') Obtain the temperature data with the SQL SELECT statement and display it in a list.
@route('/input_temperature') Receives temperature data, generates and registers a SQL INSERT statement. Format example: http://172.17.0.4:8080/input_temperature?server_id=1&temperature=29&user_id=1
server_id: Server ID (fixed value in the sample, considering future extensibility) temperature: Temperature acquired by the temperature sensor user_id: User ID (fixed value in the sample, considering future extensibility)
Details are given in the comments starting with #.
/app/server.py
#bottle library
from bottle import route, run, request

#MySQL driver is mysql.connector
import mysql.connector

#Supplement
#Actually, if you put a template, the HTML will be beautiful.
#That area will come later ...

#The IP address of host is$ docker inspect {Database container name}Find out in
#MySQL users, passwords and databases are docker-compose.What was set in yml
# user     : MYSQL_USER
# password : MYSQL_PASSWORD
# database : MYSQL_DATABASE
connector = mysql.connector.connect (
            user     = 'bottle',
            password = 'bottle',
            host     = '172.17.0.3',
            database = 'measurement'
)


@route('/list')
def list():
    #Show temperature
    cursor = connector.cursor()
    cursor.execute("select `id`, `temperature`, `careted_at` from temperatures")

    disp  = "<table>"
    #header
    disp += "<tr><th>ID</th><th>temperature</th><th>Registration date</th></tr>"

    #List part
    for row in cursor.fetchall():
        disp += "<tr><td>" + str(row[0]) + "</td><td>" + str(row[1]) + "</td><td>" + str(row[2]) + "</td></tr>"

    disp += "</table>"

    cursor.close

    return "Get from DB"+disp

@route('/input_temperature')
def input_temperature():
    #Enter temperature
    cursor = connector.cursor()
    cursor.execute("INSERT INTO `temperatures` (`server_id`, `temperature`, `careted_at`, `careted_user`, `updated_at`, `updated_user`) VALUES (" + request.query.server_id + ", " + request.query.temperature + ", NOW(), " + request.query.user_id + ", NOW(), " + request.query.user_id + ")")

    #commit
    connector.commit();

    cursor.close

    return "OK"


#Close connector
connector.close

#Server startup
run(host='0.0.0.0', port=8080, debug=True, reloader=True)
3-4. digital_temperature_sensor_for_api.py Every minute, the temperature is obtained from the temperature sensor via I2C and the data registration API is accessed.
API value example http://172.17.0.4:8080/input_temperature?server_id=1&temperature=29&user_id=1
digital_temperature_sensor_for_api.py
#Preparation
# $ sudo apt-get install libi2c-dev
# $ sudo sh -c 'echo "options i2c_bcm2708 combined=1" >> /etc/modprobe.d/i2c.conf'

#Library to control GPIO
import wiringpi

#Timer library
import time

#Call the library required to read from the I2C device
import os
import struct

#URL access
import urllib.request

#Create an instance of I2C
wiringpi.wiringPiSetup()
i2c = wiringpi.I2C()

#I2C settings
#Specify the I2C address of the device to communicate
temperture_dev = i2c.setup(0x48)

#Get 16-bit temperature data
#Others Set to register 0x03
i2c.writeReg8(temperture_dev, 0x03, 0x80)

while True:
    #Read 2 bytes of temperature sensor
    temperture_data = struct.unpack('2B', os.read(temperture_dev, 2))

    #The value is divided into 2 bytes, so combine them into one.
    temperture = ( ( temperture_data[0] << 8 ) + temperture_data[1] )

    #Convert numbers for negative values
    if ( temperture_data[0] >= 0x80 ):
        temperture = temperture - 65536

    #Calculate the temperature by dividing the acquired value by 128
    temperture = temperture / 128

    #Temperature display
    print ( "temperature" , temperture , "C" )

    response = urllib.request.urlopen('http://172.17.0.4:8080/input_temperature?server_id=1&temperature=' + str(temperture) + '&user_id=1')
    data = response.read()

    print ( "Server response: ", data )

    #Every minute
    time.sleep(60)
3-5. /docker/mysql/my.cnf This is a Japanese file for MySQL. Since it is set dynamically, I will omit a deep explanation.
/docker/mysql/my.cnf
[mysqld]
innodb_strict_mode
innodb_file_format = Barracuda
innodb_file_per_table
innodb_large_prefix = 1
character-set-server=utf8mb4
skip-character-set-client-handshake
max_allowed_packet = 32m
skip-networking = 0

[client]
default-character-set=utf8mb4
3-6. docker-compose.yml Centrally manage database containers and data containers.
See the article below for details! Build a Python + bottle + MySQL environment with Docker on RaspberryPi3![Easy construction]
3-7. Dockerfile This is the application container configuration file.
See the article below for more details! Build a Python + bottle + MySQL environment with Docker on RaspberryPi3![Easy construction]
3-8. /initdb.d/create_table.sql SQL to register table definition and initial data for operation check. At build time, it is executed using commands.
sql:/initdb.d/create_table.sql
USE measurement;

CREATE TABLE `temperatures` (
  `id`           int(11) NOT NULL AUTO_INCREMENT,
  `server_id`    int(11) NOT NULL,
  `temperature`  int(11) NOT NULL,
  `careted_at`   datetime NOT NULL,
  `careted_user` int(11) NOT NULL,
  `updated_at`   datetime NOT NULL,
  `updated_user` int(11) NOT NULL,
  KEY `id` (`id`)
) ENGINE=InnoDB DEFAULT CHARSET=utf8;

INSERT INTO `temperatures`
  (`id`, `server_id`, `temperature`, `careted_at`, `careted_user`, `updated_at`, `updated_user`)
  VALUES
  (1, 1, 29, NOW(), 1, NOW(), 1);
3-9. README.md This is a README file automatically generated by Git. It has nothing to do with the operation. (It would be nice to write it a little more carefully ...)
3-10. /vim/python.vim When using vim in the application container, it has convenient settings for writing Python. This also automatically builds the application image when it is created.
3-11. Circuit diagram
4. Operation check
It is finally operation check.
4-1. Obtain the temperature with a digital temperature sensor on the Raspberry Pi body side
In Raspberry Pi, there is a file called "digital_temperature_sensor_for_api.py" in the folder created by git clone, so start it.
Get the temperature
$ cd {git cloned folder}/rpi-python-bottle
$ sudo python3 digital_temperature_sensor_for_api.py
The temperature is obtained as follows (the image has an argument, but it is ignored).
The acquired temperature is registered in the database from the program through the API.
4-2. The web browser displays the temperature registered in the database.
If you access "http://172.17.0.4:8080/list" with the Raspberry Pi browser, you can see the following display!
/vim/python.vim
setl expandtab
setl tabstop=4
setl shiftwidth=4
setl softtabstop=0
autocmd BufWritePre * :%s/\s\+$//ge
setlocal textwidth=80
5. At the end
I used a temperature sensor this time, but if you use an illuminance sensor that measures brightness and a humidity sensor that measures humidity, you can measure illuminance and humidity!
If you have a need to see the temperature, illuminance, and humidity from a remote location, you can do it! If there is anything else that seems to be useful, I would like to apply it!
site map
Raspberry Pi 3 setup
Install Raspberry Pi 3 → Wireless LAN → Japanese input / output → Operate from Mac
Build a Python + MySQL environment with Docker on Raspberry Pi 3!
Install Docker on RaspberryPi3 Build a Python + bottle + MySQL environment with Docker on RaspberryPi3![Easy construction] Build a Python + bottle + MySQL environment with Docker on RaspberryPi3![Trial and error]
Make an air conditioner integrated PC "airpi" with Raspberry Pi 3!
Make an air conditioner integrated PC "airpi" with Raspberry Pi 3!
Finally ... Make a radio control using python on Raspberry Pi 3!
Motor moves while pressing the button The motor moves while the magnet is brought closer The motor moves when the magnet is brought closer and stops automatically
Let's play with Raspberry Pi 3 (Raspberry Pi) and python Record of Raspberry Pi struggle
Programming with Node-RED programming with Raspberry Pi 3 and programming normally Light the LED with python on Raspberry Pi 3 (Hello World) Detect switch status on Raspberry Pi 3 Run a servo motor using python on Raspberry Pi 3 Control the motor with a motor driver using python on Raspberry Pi 3! Detect slide switch using python on Raspberry Pi 3! Detect magnet switch using python on Raspberry Pi 3! Detect temperature using python on Raspberry Pi 3! Sound the buzzer using python on Raspberry Pi 3! Detect analog signals with A / D converter using python on Raspberry Pi 3! Detect "brightness" using python on Raspberry Pi 3! Detect "temperature (using A / D converter)" using python on Raspberry Pi 3! Output to "7-segment LED" using python on Raspberry Pi 3! Use python on Raspberry Pi 3 to light the LED with switch control! Use python on Raspberry Pi 3 and turn on the LED when it gets dark!
Rules focused on test-driven development
Coding rules "Let's write gentle code" (FuelPHP) Naming convention "Friendly to yourself, team-friendly, and unseen members after 3 months"
Web application development with Docker + Python
Easy to develop environment construction (Docker + PHP)
PHP environment + Eclipse is linked to Apache using Docker Building FuelPHP development environment using Docker Create CRUD skeleton using initial settings of FuelPHP development environment using Docker and scaffold FuelPHP database migration
Recommended Posts