[PYTHON] Free SSL! Let's encrypt together at work or at home!
Introduction
If you want to support HTTPS in-house or at home, you have to pay for it, do the troublesome procedure, and update it once every few years, which is extremely troublesome.
Of course, I'm paying for it, so I can't freely use HTTPS, and I end up with an Oreore certificate, but that's why I put an "x" in the URL and importing the certificate to improve it is honestly troublesome.
After all, I'll do it with × attached, but wget can't be done properly, and it's said on the net that it's not secure, so what's the matter? !!
At that time, "Let's Encrypt" appeared with full satisfaction! The release was postponed several times due to various reasons, but this time it has finally become "Public Beta" and anyone can use it freely, so I will introduce it!
What is Lets Encrypt?

Official HP: https://letsencrypt.org/ Github:https://github.com/letsencrypt/letsencrypt
Lets Encrypt is a free certificate authority that anyone can use and automate!
Let’s Encrypt is a new Certificate Authority: It’s free, automated, and open.
I would like to introduce them in the following order.
- What is it like?
- Plugin
- Case study
- Precautions for use
- Actually use
- Deliverables
What is it like?
It looks like the following.
- let's encrypt client accesses an external server
- The original server accesses the domain specified by the client via HTTP (S).
- The WEB server at the access destination of the domain responds
- After confirming the response of the WEB server, send the certificate to the let's encrypt client.

Plugin
| Plugin | Auth | Inst |
|---|---|---|
| apache | Y | Y |
| standalone | Y | N |
| webroot | Y | N |
| manual | Y | N |
| nginx | Y | Y |
This time, we will use "standalone" and "webroot", which are relatively informative.
The following is a brief explanation.
| Plugin | Method |
|---|---|
| Stand Alone | Let to get the certificate'How to do it on a web server dedicated to s encrypt |
| Web Root | How to get a certificate on an existing web server |

Each plugin has its own purpose. I will explain that next.
In such a case, this Plugin!
As a prerequisite, ** domain acquisition is required! ** ** It cannot be used for servers that have not acquired a domain (local domain or IP). However, you can use a local domain as long as you have a domain with the same name.
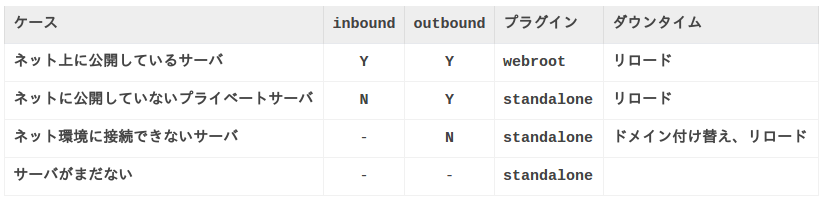
If it is a simple public server, webroot is fine, but I think that stand alone is effective for a slightly special environment. By the way, when it comes to which method is easier, webroot is often easier.
Precautions for use
- Certificate is valid for up to 90 days
- BETA version has up to 5 certificates in 7 days for one domain
- Wildcards cannot be used
- IP cannot be used
Actually use
The conclusion of what kind of command is required is as follows.
- stand alone on docker
console
$ sudo docker run -it --rm \
    --expose 80 \
    -p 80:80 \
    --name letsencrypt \
    -v "/etc/letsencrypt:/etc/letsencrypt" \
    -v "/var/lib/letsencrypt:/var/lib/letsencrypt" \
    quay.io/letsencrypt/letsencrypt:latest \
      certonly \
      --standalone \
      --standalone-supported-challenges http-01 \
      --register-unsafely-without-email \
      --renew-by-default \
      -d www.my-site.com \
      --agree-tos
If www.my-site.com can connect to the Docker you create, the certificate should have been created under / etc / letsencrypt after executing the above command.
In the current official Docker, only port 443 is open, so you need to Expose to accept communication on port 80.
- webroot
console
$ git clone https://github.com/letsencrypt/letsencrypt $HOME/letsencrypt
$ $HOME/letsencrypt/letsencrypt-auto --help
↑ Run only for the first time
console
$ $HOME/letsencrypt/letsencrypt-auto
    certonly \
    --webroot \
    --webroot-path /usr/share/nginx/html \
    --register-unsafely-without-email \
    --renew-by-default \
    -d www.my-site.com \
    --agree-tos
- Argument
List of arguments I know
| argument | Description |
|---|---|
| --standalone | Specifying a plug-in |
| --standalone-supported-challenges http-01 | Use HTTP during authentication challenge |
| --standalone-supported-challenges tls-sni-01 | Use HTTPS during authentication challenge |
| --webroot | Use webroot as a plugin |
| --webroot-path [document root] | Specify the document root of the Web server |
| --no-verify-ssl | Ignore certificate check |
| --tls-sni-01-port [port] | Specifying the port when using HTTPS with an authentication challenge |
| --http-01-port [port] | Port specification when using HTTP in an authentication challenge |
| --register-unsafely-without-email | Email registration omitted |
| --renew-by-default | Omission of confirmation when renewing the certificate |
| -d [domain] | Domain specification |
| --agree-tos | Omission of approval when issuing a certificate |
| --config-dir [dirctory] | Location of configuration files |
| --work-dir [directry] | Working directory location |
| --logs-dir [directry] | Log directory location |
| --staging | Reference information |
| --debug | Debug display |
| -vvvvvvv | Transcendental debug display |
Deliverables
The deliverables are the same for stand alone and webroot.
- What is created after obtaining the certificate (after executing it twice)
console
$ sudo tree /etc/letsencrypt/

/etc/letsencrypt/
|-- accounts
|   `-- acme-v01.api.letsencrypt.org
|       `-- directory
|           `-- samplehashsamplehash
|               |-- meta.json
|               |-- private_key.json
|               `-- regr.json
|-- archive
|   `-- www.my-site.com
|       |-- cert1.pem
|       |-- cert2.pem
|       |-- chain1.pem
|       |-- chain2.pem
|       |-- fullchain1.pem
|       |-- fullchain2.pem
|       |-- privkey1.pem
|       `-- privkey2.pem
|-- csr
|   |-- 0000_csr-letsencrypt.pem
|   `-- 0001_csr-letsencrypt.pem
|-- keys
|   |-- 0000_key-letsencrypt.pem
|   `-- 0001_key-letsencrypt.pem
|-- live
|   `-- www.my-site.com
|       |-- cert.pem -> ../../archive/www.my-site.com/cert2.pem
|       |-- chain.pem -> ../../archive/www.my-site.com/chain2.pem
|       |-- fullchain.pem -> ../../archive/www.my-site.com/fullchain2.pem
|       `-- privkey.pem -> ../../archive/www.my-site.com/privkey2.pem
`-- renewal
    `-- www.my-site.com.conf
For the web server, specify the symbolic link under live and use it. The last number of the file is incremented according to the number of executions. Since directories are separated for each domain under live, multiple can be managed The csr keys directory is not divided into domains, so it is sharedly incremented regardless of the domain.
- setting file
The first time it is executed, a configuration file is generated. From the second time onward, it will be executed after reading the configuration file using the domain name as the key. Therefore, it is not necessary to pass the one described in the configuration file as the second migration argument (I think).
- Some items must be given each time
Official HP # configuration-file
console
# This is an example of the kind of things you can do in a configuration file.
# All flags used by the client can be configured here. Run Let's Encrypt with
# "--help" to learn more about the available options.

# Use a 4096 bit RSA key instead of 2048
rsa-key-size = 4096

# Always use the staging/testing server
server = https://acme-staging.api.letsencrypt.org/directory

# Uncomment and update to register with the specified e-mail address
# email = [email protected]

# Uncomment and update to generate certificates for the specified
# domains.
# domains = example.com, www.example.com

# Uncomment to use a text interface instead of ncurses
# text = True

# Uncomment to use the standalone authenticator on port 443
# authenticator = standalone
# standalone-supported-challenges = tls-sni-01

# Uncomment to use the webroot authenticator. Replace webroot-path with the
# path to the public_html / webroot folder being served by your web server.
# authenticator = webroot
# webroot-path = /usr/share/nginx/html
- Certificate settings and placement
If you want to support HTTPS for Nginx, you can set it as follows!
bash:/etc/nginx/conf.d/example_ssl.conf
# HTTPS server

server {
    listen       443 ssl;
    server_name  localhost;

    ssl_certificate      /etc/letsencrypt/live/www.my-site.com/fullchain.pem; #add to
    ssl_certificate_key  /etc/letsencrypt/live/www.my-site.com/privkey.pem; #add to
#    ssl_certificate      /etc/nginx/cert.pem; #Comment out
#    ssl_certificate_key  /etc/nginx/cert.key; #Comment out

    ssl_session_cache shared:SSL:1m;
    ssl_session_timeout  5m;

    ssl_ciphers  HIGH:!aNULL:!MD5;
    ssl_prefer_server_ciphers   on;

    location / {
        root   /usr/share/nginx/html;
        index  index.html index.htm;
    }
}
Finally
That is all.
The impression is that it is easy to use and is designed with security in mind.
However, there are voices saying that it is not possible to type sudo on the host side when executing a command (let's encrypt cannot be trusted so much), and there are also corresponding ones.
diafygi/letsencrypt-nosudo
Let's Encrypt will do a lot of damage to the certificate industry. If you have a chance, please give it a try.