[PYTHON] Creating an HTTP Get box
Network usage from Pepper
In the tutorials so far, we mainly talk about communication with users in the same space, such as changing the behavior of Pepper based on the information from the sensor, and presenting information from Pepper to the user through voice, movement, tablet, etc. I have seen it. On the other hand, by using the network function of Pepper, it is possible for Pepper to send some information to the user, and for Pepper to change its behavior based on the information obtained from the network.
For example, in the standard box library that we have seen as a tutorial so far, there is a box in the E-mail, Network folder in the Communication folder that allows you to receive, send, and check for network connection. In addition, by utilizing the mechanism of Python Box, more various functions can be realized using Python scripts.
Here, we will take a concrete look at how to create a Python box and how to think about it, using the example of creating a box that ** acquires data from the entered URL and outputs the text obtained there **.
Creating an HTTP Get box
This time, the standard Python libraries urllib2 and HTMLParser Using library / htmlparser.html), consider creating the following box.

As a specification of HTTP Get box,
- Input onStart is a string type and receives the URL you want to read
- Perform HTTP GET processing in onStart
- If successful, output onStopped with the obtained content
- If it fails, output onFailed with an error message.
This time, as a sample, the output string of onStopped assumes a connection to a box like Say Text. In particular, we shall extract only the HTML <body> tags and below, remove all tags, and embed control instructions that wait 200 milliseconds for line breaks in the text.
In addition, the behavior of these operations can be adjusted by the following parameters.
| Parameter name | function | type | Range of values | Default value |
|---|---|---|---|---|
| Timeout | urllib2.Timeout value for urlopen(Seconds) | integer | 1~3600 | 30 |
| Start line | Which line of the obtained text is output from each line separated by a newline character(Start line=0) | integer | 0~10000 | 0 |
| Max lines | Maximum number of lines to output | integer | 1~10000 | 1 |
When actually creating a box, it may be more versatile to separate the HTTP Get box and the box that processes the obtained HTML string appropriately. In addition, the parameter settings are also decided as a sample, so please try to arrange them in consideration of usage situations.
####
(Note) HTTP Get Box About content that can be processed with In this example, considering the volume as a demo, assuming Qiita HTML as an example, simple HTML analysis using the standard library is implemented. In order to actually use an external service, it is often difficult to scrape such simple HTML, so it is necessary to consider using the API provided by the service. In this case, you need to implement the Python script part described below on your own. Please refer to the description of each service for how to access the API using Python.
Creating a python box
First, create an empty box to write your Python script. Create a new project and follow the steps below.
-
Right-click on the flow diagram and select ** [Create New Box]-[Python ...] **

-
Enter ** HTTP Get ** in the name
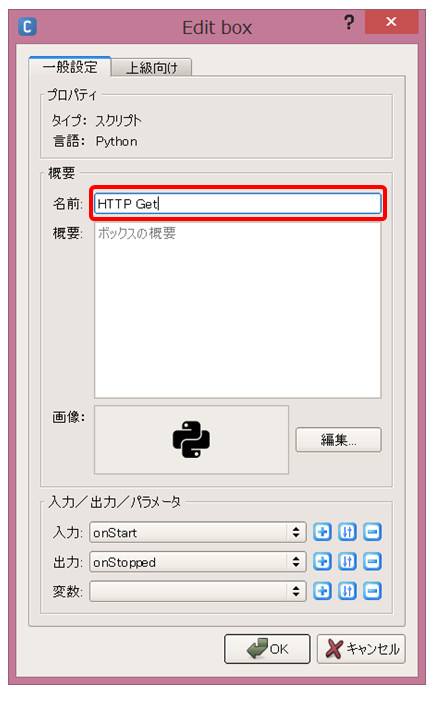
-
Change the onStart input type to a string. Input onStart ** Click the Settings button [A] ** and then click the ** Type drop-down list [B] **

Then, a list of types will appear. ** Select [String] ** and click the [OK] button.

- Delete the onStop input provided by default. Select ** [onStop] for input [A] ** and click ** Delete [-] button **

Then, the deletion confirmation dialog opens, so click the [Yes] button.

-
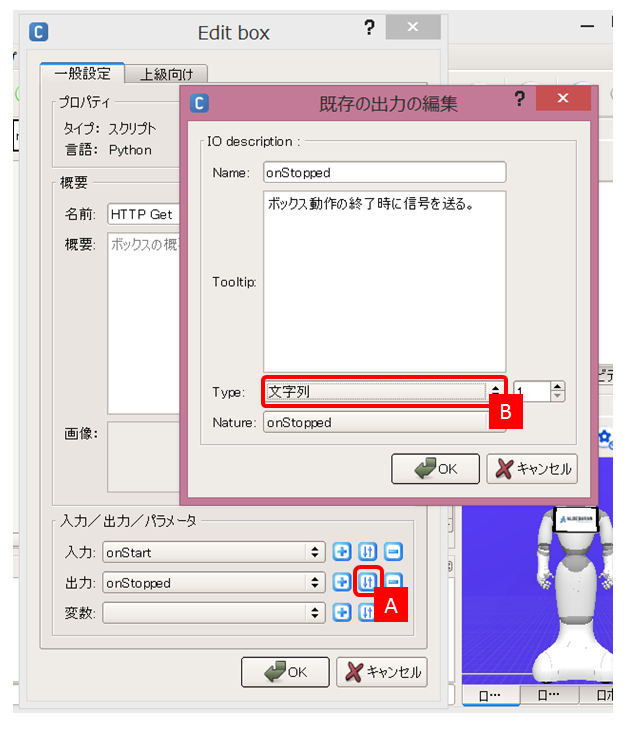
Change the onStopped output type to a string. Click the ** Settings button for output onStopped [A] **, select [String] from the ** Type drop-down list [B] **, and click the [OK] button.
-
Next, add onFailed to the output. Click the ** Add [+] button in the output **

The setting dialog will appear in the same way as when inputting onStart and output onStopped. Enter ** onFailed in Name [A] ** and change Type to ** [character string] [B] **.

- Add parameters. Click the ** Add [+] button for the variable [A] ** and enter ** Timeout for Name [B] **, change Type to ** [Integer] [C] **, the default value, A box for entering a range of values will appear. ** Enter the default value, minimum value, and maximum value [D] **, and click the [OK] button.

Click the [OK] button to add Timeout to the variable list.

-
Add Start line and Max lines in the same way as 7.
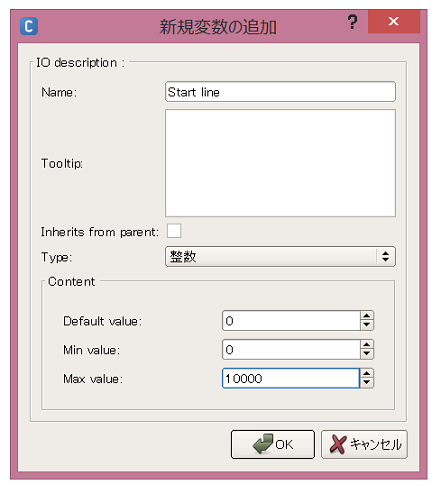

Make sure Timeout, Start line, Max lines are added to the list of variables

- This completes the box input / output and parameter preparation. Click the OK button to create a ** HTTP Get Box ** in the flow diagram

You now have an empty box. Then write the script in this box.
Python script writing
Double-click the HTTP Get box to open the script editor and paste the script below.
class MyClass(GeneratedClass):
    def __init__(self):
        GeneratedClass.__init__(self)

    def onLoad(self):
        #put initialization code here
        pass

    def onUnload(self):
        #put clean-up code here
        pass

    def onInput_onStart(self, url):
        from HTMLParser import HTMLParser
        import urllib2, contextlib

        class ContentParser(HTMLParser):
            def __init__(self):
                HTMLParser.__init__(self)
                self.inscript = False
                self.inbody = False
                self.text = ""

            def handle_starttag(self, tag, attrs):
                if tag == "body":
                    self.inbody = True
                if tag == "script":
                    self.inscript = True

            def handle_endtag(self, tag):
                if tag == "body":
                    self.inbody = False
                if tag == "script":
                    self.inscript = False

            def handle_data(self, data):
                if self.inbody and not self.inscript:
                    self.text = self.text + data

        try:
            timeout = int(self.getParameter("Timeout"))
            self.logger.info("Loading... %s" % url)
            with contextlib.closing(urllib2.urlopen(url, None, timeout)) as response:
                parser = ContentParser()
                parser.feed(response.read())
                parser.close()

                lines = [line for line in parser.text.splitlines() if len(line.strip()) > 0]
                startline = int(self.getParameter("Start line"))
                maxlines = int(self.getParameter("Max lines"))
                text = "\\pau=200\\".join(lines[startline:startline + maxlines])
                self.logger.info("Loaded: %s" % text)
                self.onStopped(text)
        except urllib2.URLError, message:
            self.logger.warn("Failed to open: %s, message=%s" % (url, message))
            self.onFailed(message)
The points of the code are as follows.
-
The processing for onStart input is defined by the ʻonInput_onStart (self, url) `method (Reference: [Python Box Concept # Input](http://qiita.com/Atelier-Akihabara/items/f6a05ca14be786f9a94c#] % E5% 85% A5% E5% 8A% 9B))
    def onInput_onStart(self, url):
        ...
        self.logger.info("Loading... %s" % url)
        ...
            with contextlib.closing(urllib2.urlopen(url, None, timeout)) as response:
The value entered in onStart (this time, a character string) is set in the argument url.
-
Parameters such as Timeout are obtained by calling the
self.getParametermethod (Reference: [Python Box Concept #Parameters](http://qiita.com/Atelier-Akihabara/items/f6a05ca14be786f9a94c#] % E3% 83% 91% E3% 83% A9% E3% 83% A1% E3% 83% BC% E3% 82% BF))timeout = int(self.getParameter("Timeout")) -
The resulting string is passed by calling the
                text = "\\pau=200\\".join(lines[startline:startline + maxlines])
                self.logger.info("Loaded: %s" % text)
                self.onStopped(text)
####
Operation check
As an operation check, ** Pepper Tutorial (1): SDK installation and application creation / execution is read aloud with gestures ** I will do that.
-
In addition to the HTTP Get box you created, place the following boxes in the standard box library.
- Data Edit > Text Edit
- Audio > Voice > Animated Say

####
- Like the Say box, the Animated Say box is in the form of a Localized Text box + Say Text box, so take out the Animated Say Text box that receives the character string from this.
-
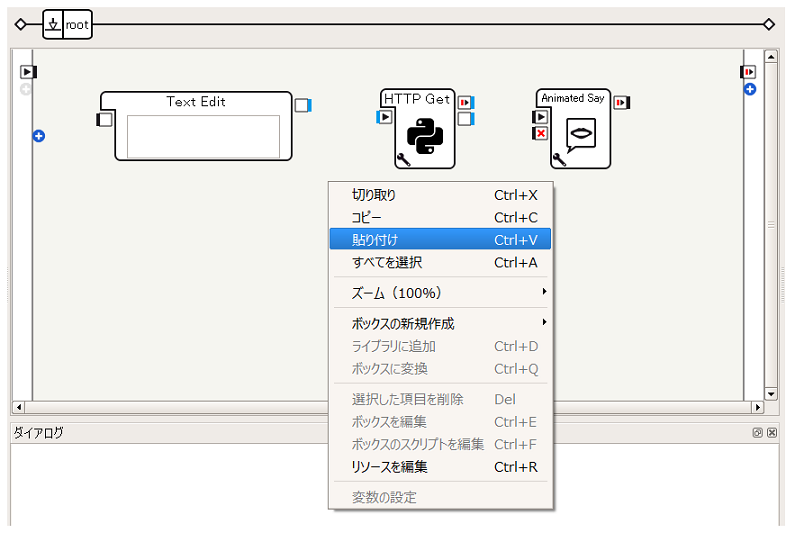
Double-click the Animated Say box to enter the Animated Say box. Right-click on the Animated Say Text box there (the name is displayed as [Animated Say], but you can see that it is [Animated Say Text] by hovering the mouse over it) and select ** [Cut]. **To do
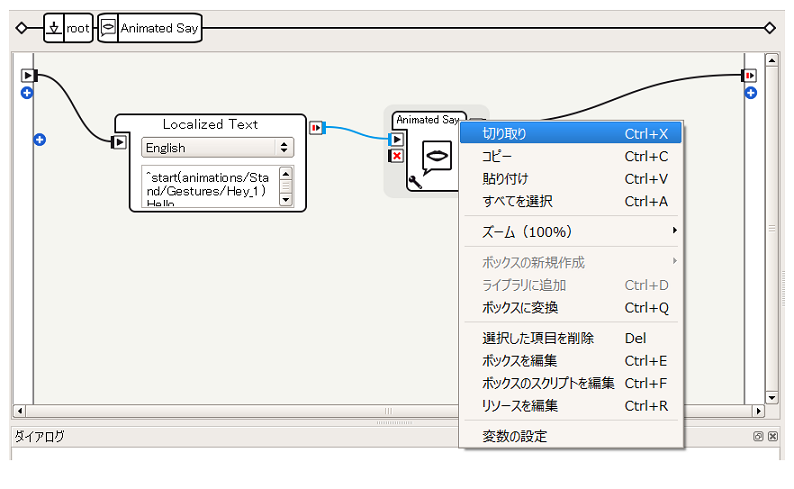 -
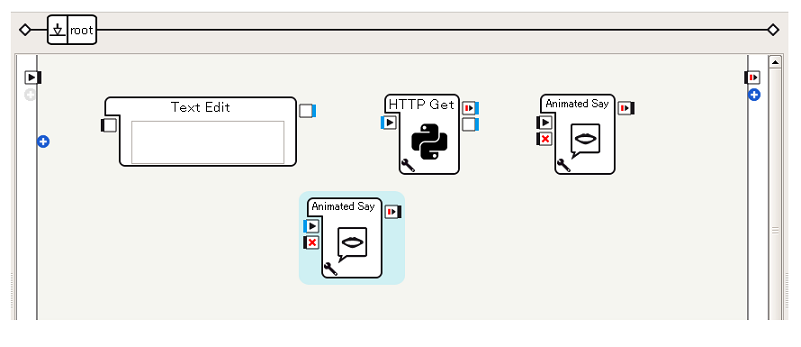
Go back to the root flow diagram and select ** Paste **
Confirm that the Animated Say Text box appears.
-
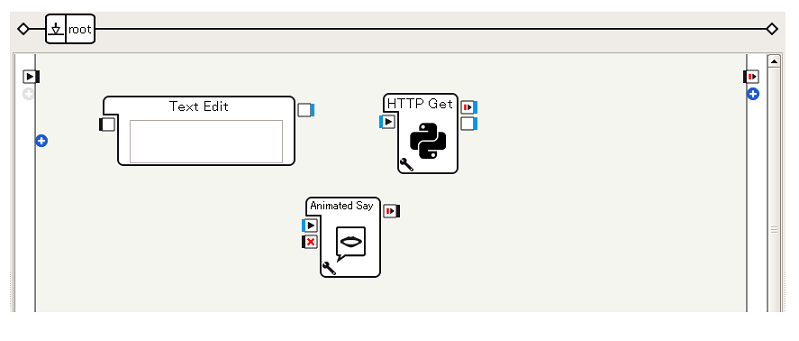
Delete the original Animated Say box as it is no longer needed
 -
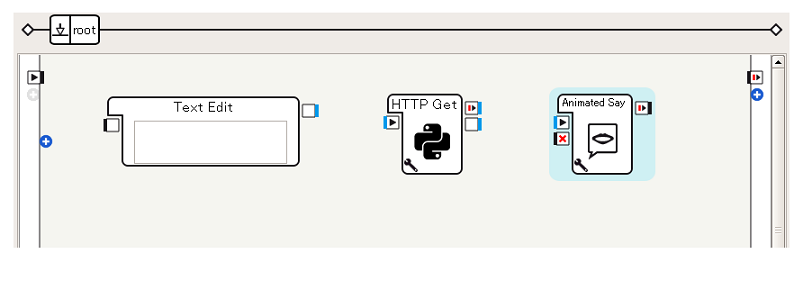
Adjust the position of the Animated Say Text box
-
Connect the boxes as follows

-
Paste ** http://qiita.com/Atelier-Akihabara/items/c5f57358a7b333eef397 into TextEdit **

-
Set the parameters as follows

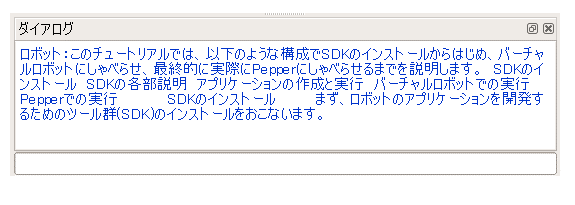
When you check the operation with the virtual robot, the text will be displayed in the dialog panel.
Also, when you play it on the actual Pepper machine, Pepper will talk about the contents of the tutorial while gesturing. (Click the link to play it.)
 (Playback time: 1 minute)
This time, we put a waiting time mechanically for line breaks, so there are some parts where the delimiter is not natural, but you can control it freely by setting the text tag appropriately.
In this way, you can get data from the network and reflect it in Pepper's behavior by using the Python box.
Recommended Posts