[Circle CI] Procedure for automatic deployment when pushing to GitHub
Until now, auto-deploy used "capistrano", but every time I modified the code, I did a local master merge and ran "bundle exec cap production deploy".
This time, I used circleCI and implemented it to automatically SSH to the server and deploy the code when the master is merged. Below, I will summarize the flow of implementation and the explanation of the clogged part!
- Development environment
- ruby : 2.5.1
- rails : 2.4.2.3
- circleCI : 2.1
- Docker is not used this time.
.circleci / config.yml settings
(1) First, set the config.yml used in circleCI locally. To set circleCI, create a folder called .circleci directly under the root of the relevant repository and use config.yml in it.
--Added the following to config.yml.
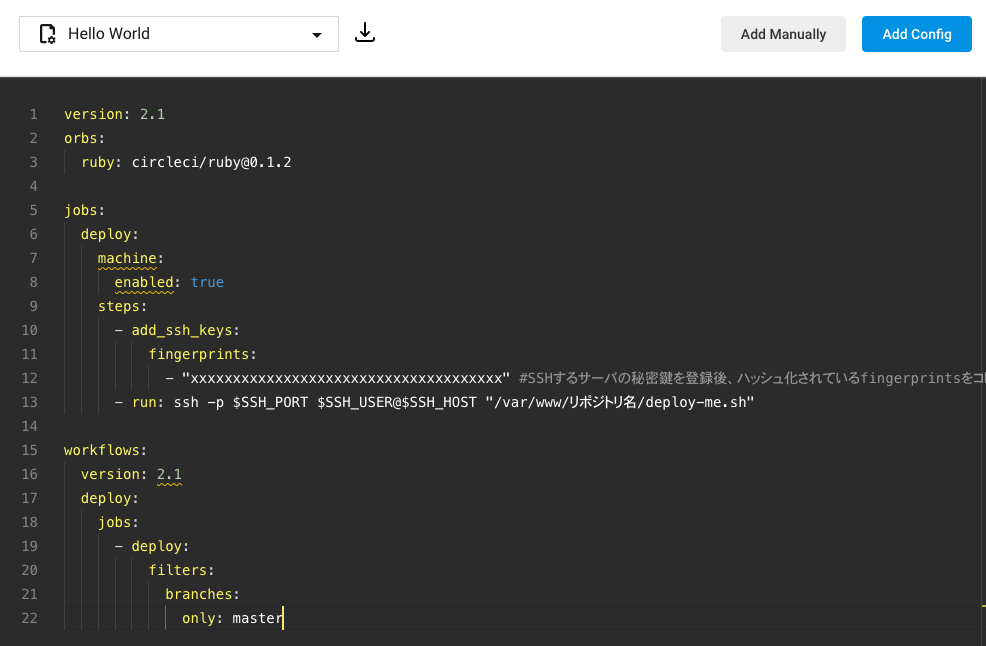
config.yml
version: 2.1
orbs:
  ruby: circleci/[email protected]

jobs:
  deploy:
    machine:
      enabled: true
    steps:
      - add_ssh_keys:
          fingerprints:
            - "xxxxxxxxxxxxxxxxxxxxxxxxxxxxxxxxxxxxx" #After registering the private key of the server to be SSHed, copy the hashed fingerprints.
      - run: ssh -p $SSH_PORT $SSH_USER@$SSH_HOST "/var/www/Repository name/deploy.sh"

workflows:
  version: 2.1
  deploy:
    jobs:
      - deploy:
          filters:
            branches:
              only: master
--After creating the "deploy.sh" file directly under the root, enter the following.
deploy.sh
#!/bin/bash

cd /var/www/Repository name/ && git pull
I will explain below. (1) The automatic deployment is set here, and it is automatically deployed when the master is merged. (2) Below "-add_ssh_keys:", when the HOST (IP address) and private key are registered, the fingerprints converted to hash will be copied. This allows you to register the private key of the server you want to SSH into. ③ With "-run: ssh -p ~", ssh with the set key + set environment variable and log in to the server. After that, it is set to git pull when pull request by "/var/www/rails/soup/deploy.sh". (4) workflows By the following settings, deployment is not executed except for the master branch.
Introduce cirecleCI / Add repository that you want to deploy automatically
① First, go to the circleCI website (https://circleci.com) and register a new account (sign up). If you have a GitHub account, you can link immediately and register for an account.
(2) After logging in, select "Add Projects" and add the repository of the application or site you want to automatically deploy this time. To add it, click "Set Up Project" in the relevant repository.
③ Copy and paste the config.yml set above and register it with "Add Manually". At this time, the private key has not been registered yet. I will register later.

④ Select "Start Building". We will add the target repositories this time. After adding, I think that an error has occurred because the private key and environment variables have not been set. I will add that information.
Registration of private key
① Click "Project Settings" at the top right of the dashboard "Pipelines".
② Select "SSH Keys". Since there is "Additional SSH Keys" at the bottom, we will register the local private key information here.
③ Click "ADD SSH Key". For "Host name", enter the IP address of the deployment destination.
④ In order to enter the private key in "Private Key *", enter the ".ssh" directory locally and use the ls key to confirm that the private key exists (id_rsa etc.). I will look at this with cat. Copy all the displayed information and paste it into "Private Key *". At this time, include all "----- BEGIN RSA PRIVATE KEY -----".
⑤ Press "Add SSH Key" and if it passes successfully, the setting is completed. If an error occurs, it is possible that the private key has not been registered in pem format, or that the private key information is in a new format and is not a target error. In my case I got the latter error.
I solved the error by referring to the following site. https://blog.adachin.me/archives/11554 Here's what I did after updating my private key to obsolete. https://qiita.com/akk_ayy/items/61215e89cfcf680d1c94
⑥ Finally, copy the hashed fingerprints and paste them into the relevant part of config.yml.
Setting environment variables
① Select "Environment Variables" under "Project Settings".
② Select "Add Variable". Register the port information, user name, and host name of the deployment destination.
- SSH_PORT
- SSH_USER
- SSH_HOST This completes the environment variable settings.
③ Make sure that you can SSH login with the contents set locally.
ssh -p port username@hostname-i ~/.ssh/Private key name
You can now log in
/var/www/Repository name/deploy.sh
If you hit this and run git pull, you're ready for automatic deployment!
Perform automatic deployment
Merge the test data with mastar and check if it can be automatically deployed. At this time, if circleCI is SUCCESS, it is a success! Thank you for your hard work!
Reference site https://blog.adachin.me/archives/10997 https://qiita.com/tatane616/items/8624e61473a9957d9a81 https://www.tweeeety.blog/entry/2018/02/09/195345
Recommended Posts