[LINUX] Probably anyone can create an AWS console screen and build a step server, RDS (master / slave) environment in a multi-AZ environment.
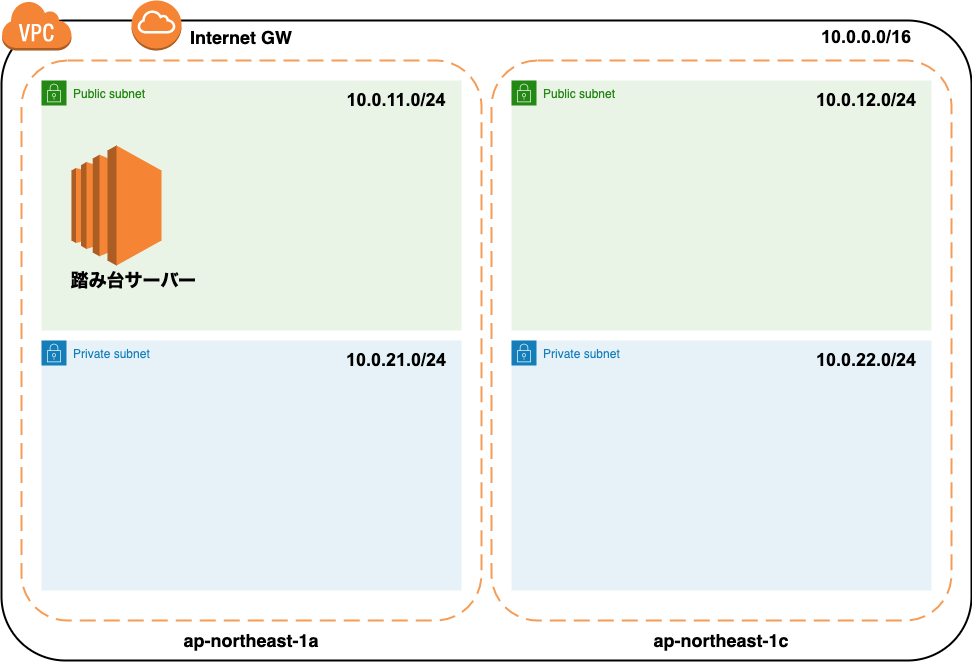
I will introduce in great detail how to create a general configuration of VPC, bastion server, RDS on AWS from the console screen as shown in the image below with screenshots.

Since it is intended for personal use, the bastion server is not made redundant. Generally, with this configuration, it costs about 6000 yen every month.
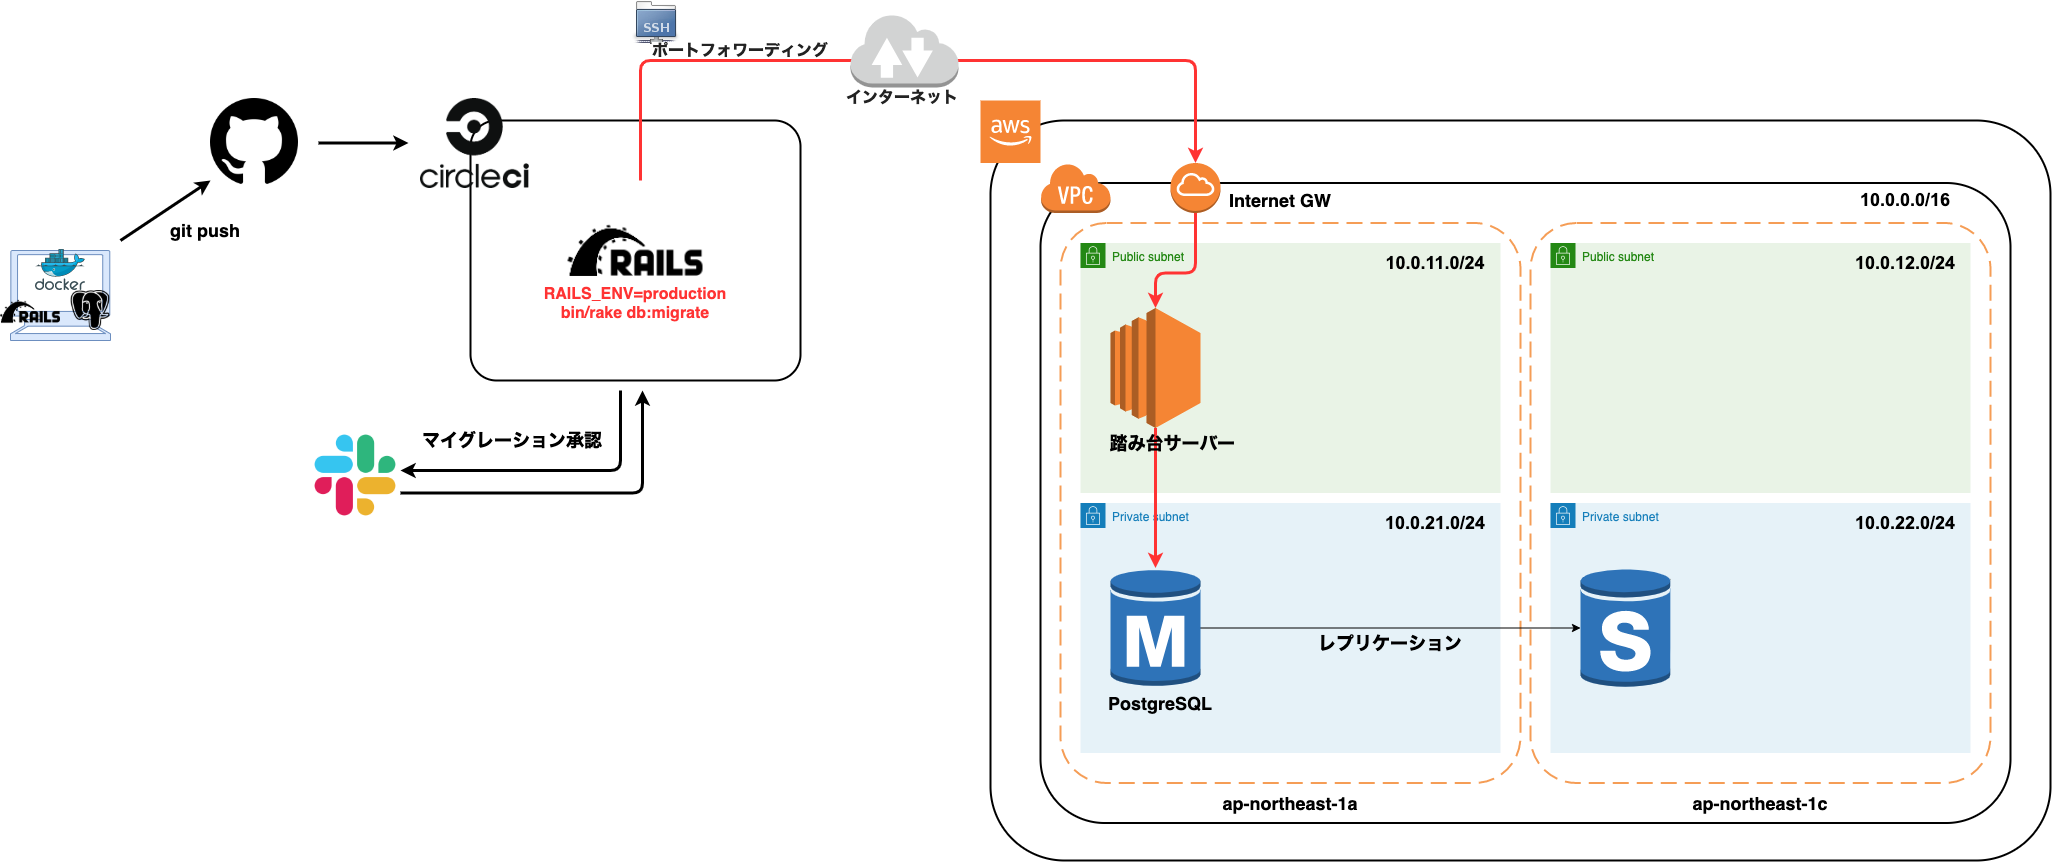
Also, you may be curious about the name you are using, but it would be helpful if you could pass it through. This configuration will be created in my DB migration system with Rails and AWS The actual big picture is below
Very helpful teaching materials
For building the AWS environment, I really referred to Udemy's "Learn from AWS basics to applications in 2 weeks while moving my hands". I can't take it now, so I released the author's blog post "A course that supports 0 → 1 of AWS learning" Learning from AWS basics to applications in 2 weeks while moving hands "on Udemy --log4ketancho](https: Please check //www.ketancho.net/entry/2018/09/03/074115)
VPC environment construction
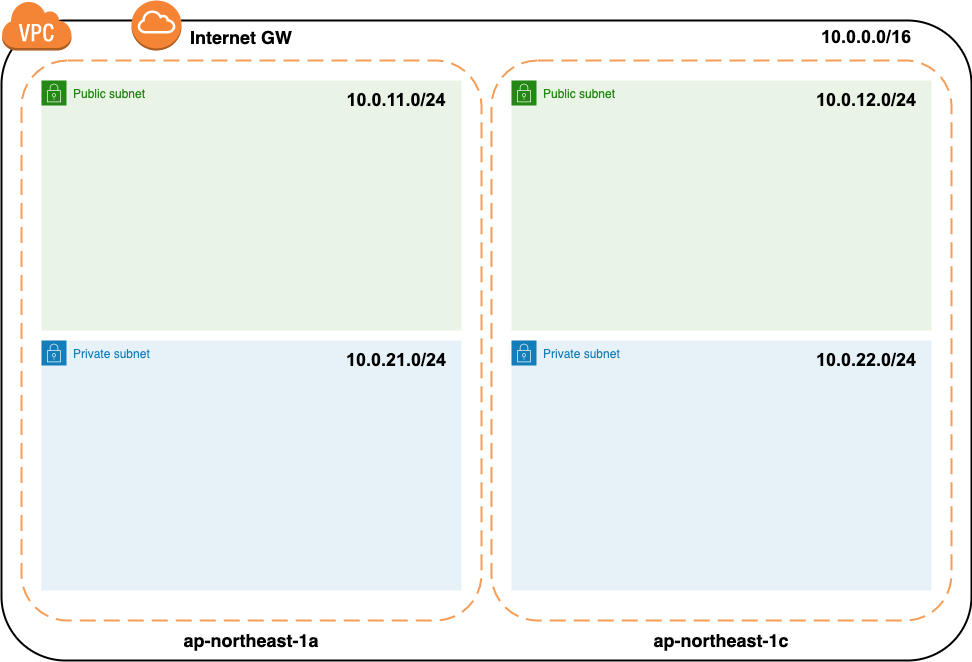
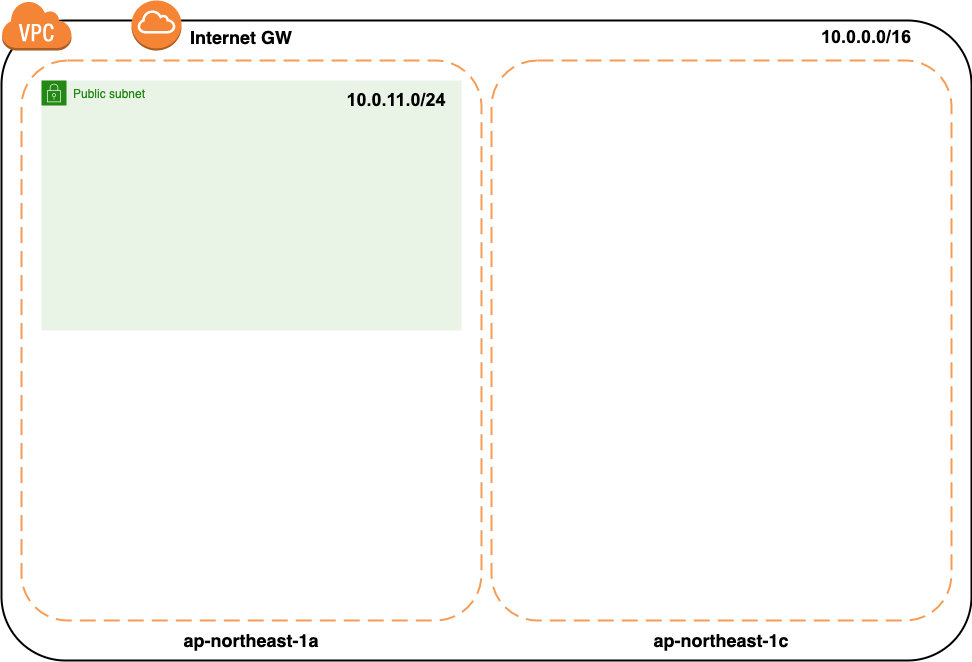
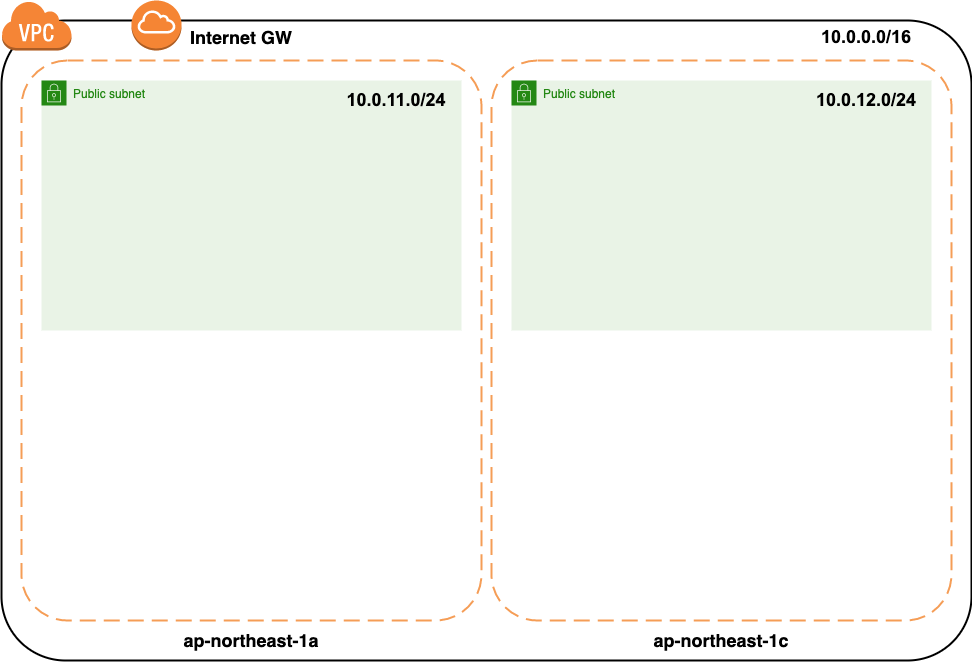
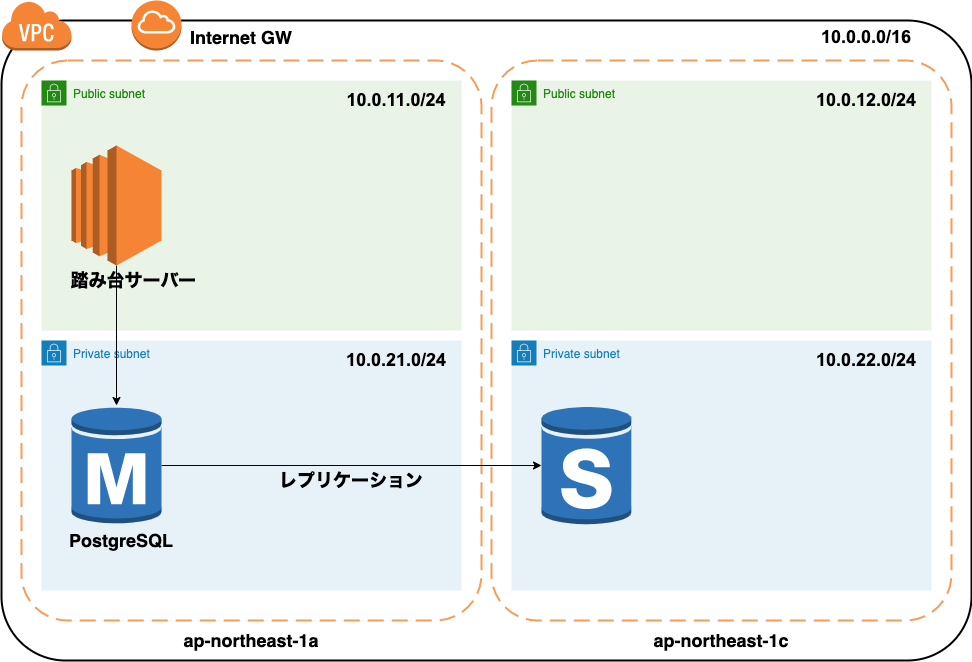
Build a VPC environment Create one public subnet and one private subnet in each availability zone of ap-northeast-1a and ap-northeast-1c.
Completion drawing
The final configuration will be as follows
Creating a VPC
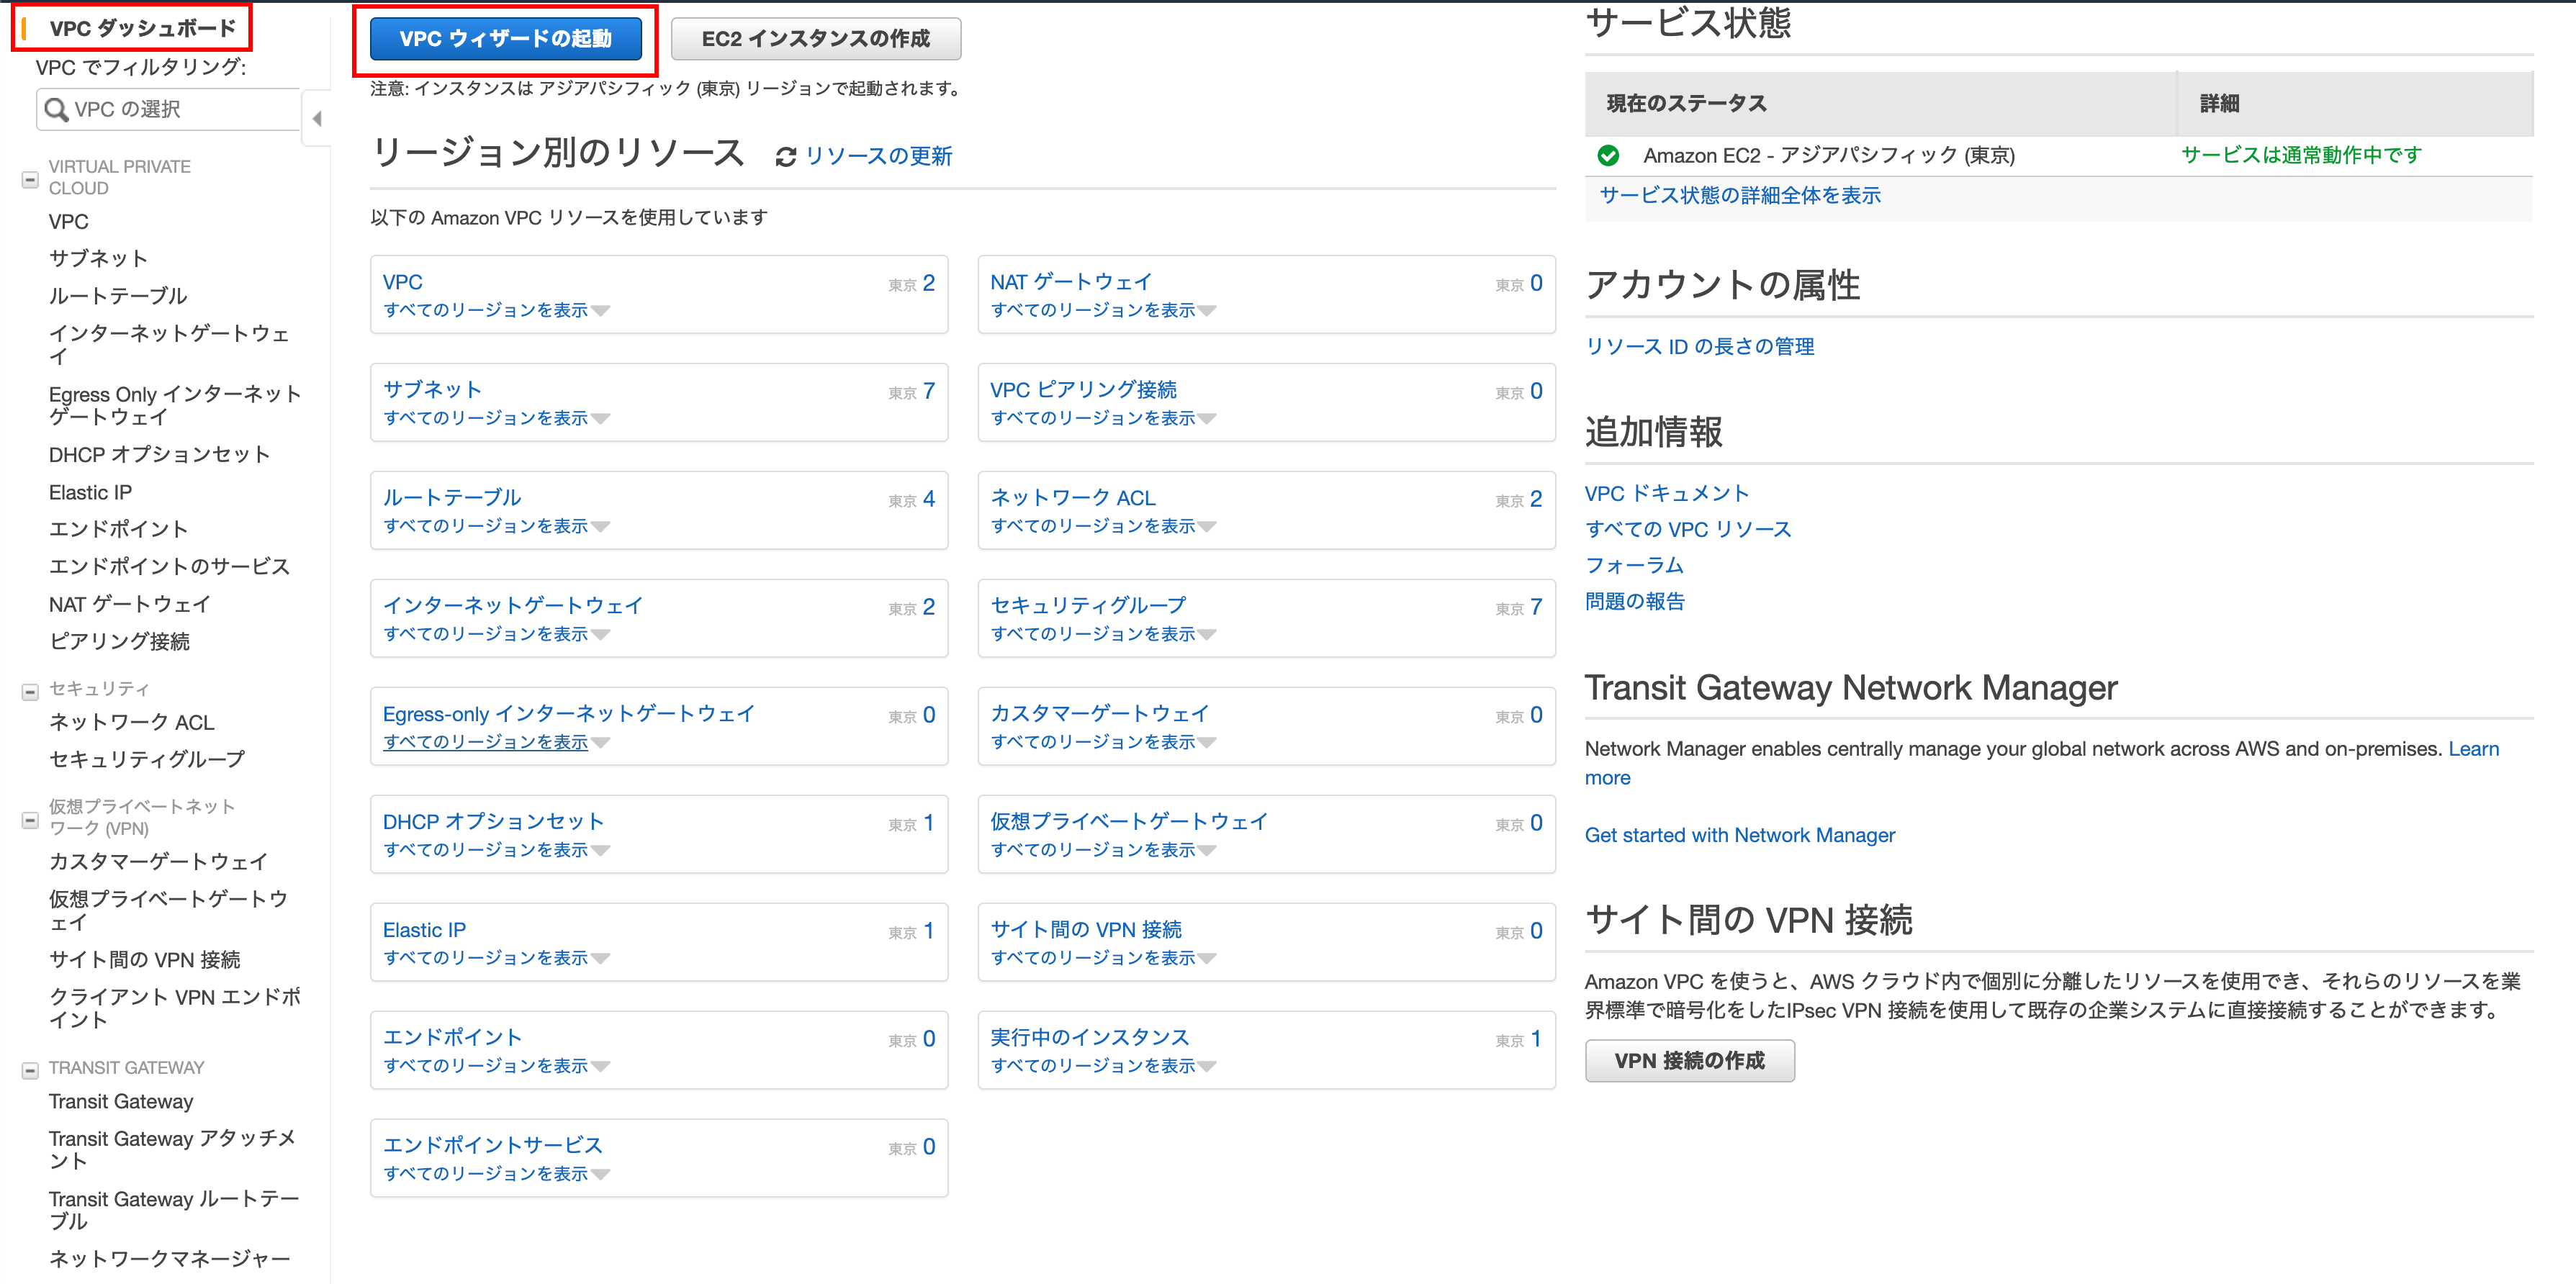
Use the VPC Wizard to create a VPC, public subnet, and Internet gateway
Open VPC Wizard
On the VPC Dashboard screen, click Launch VPC Wizard
Step 1: Select VPC settings
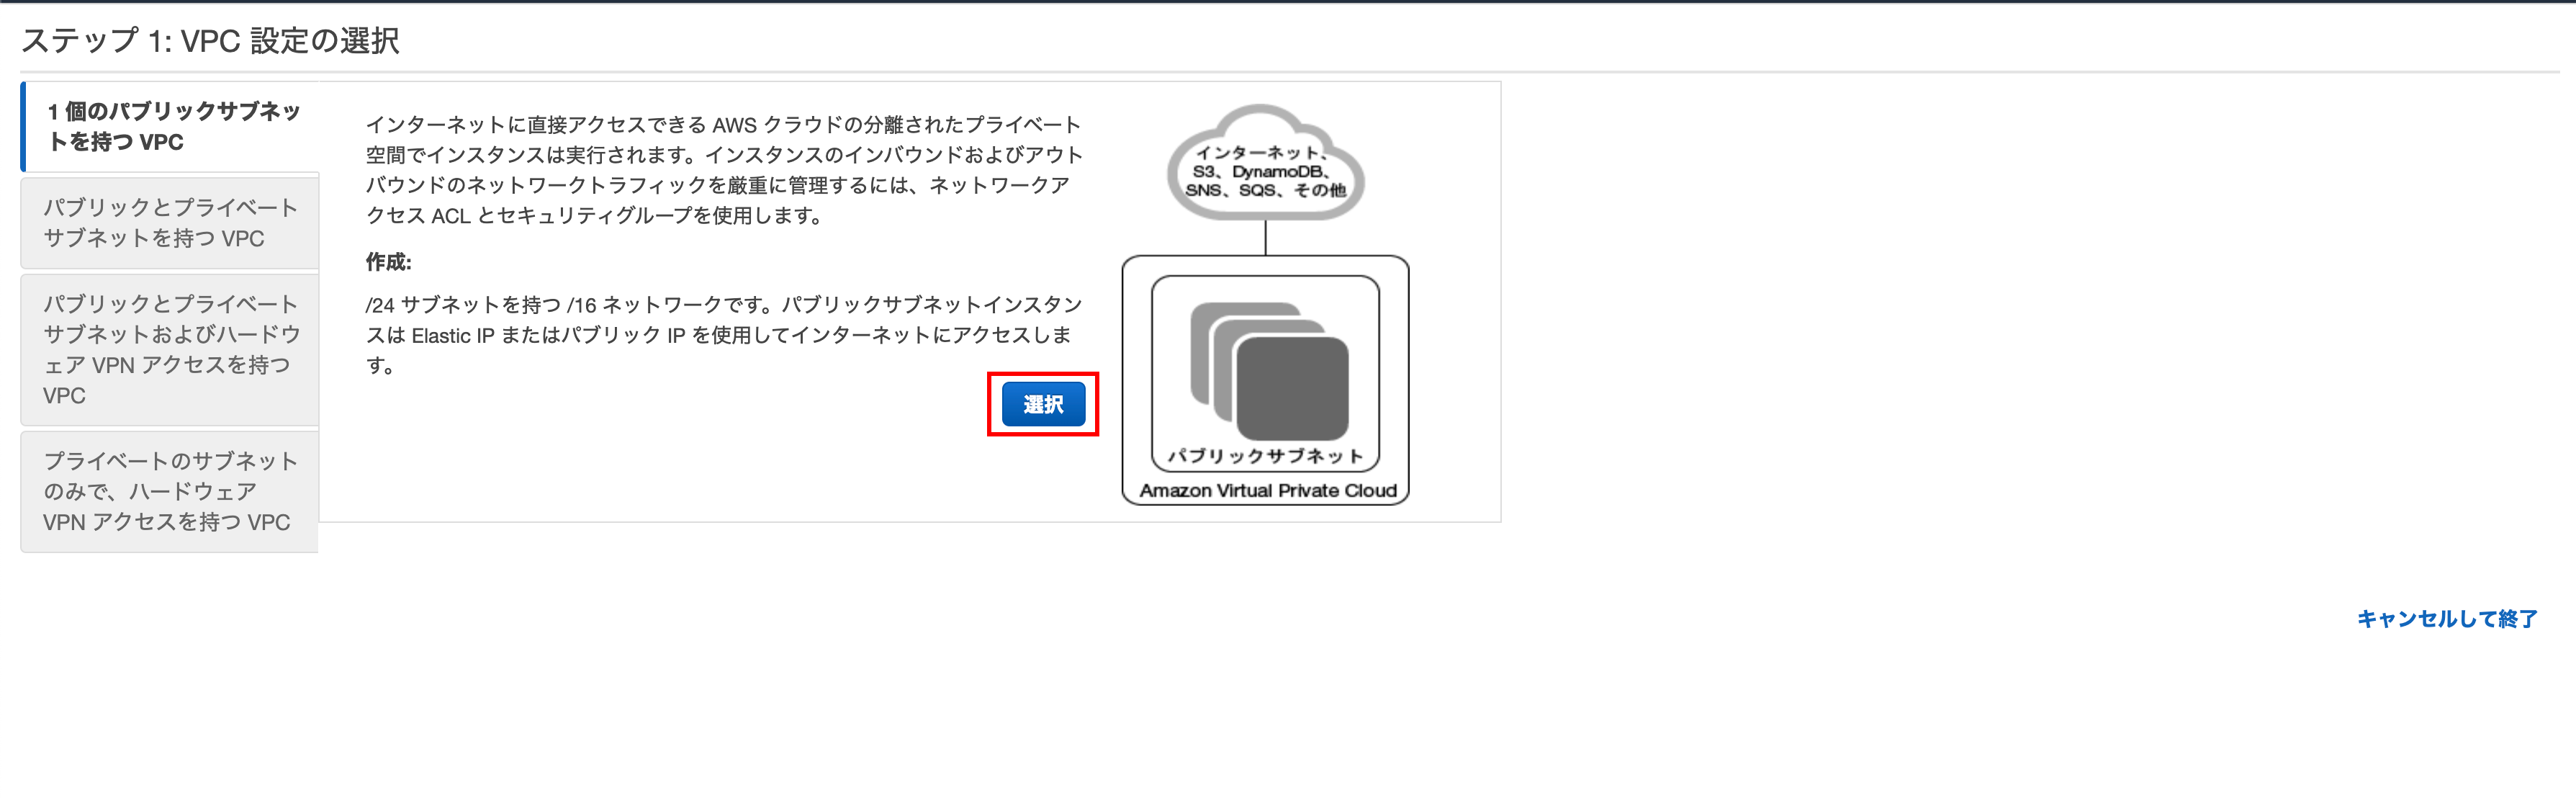
Click Select
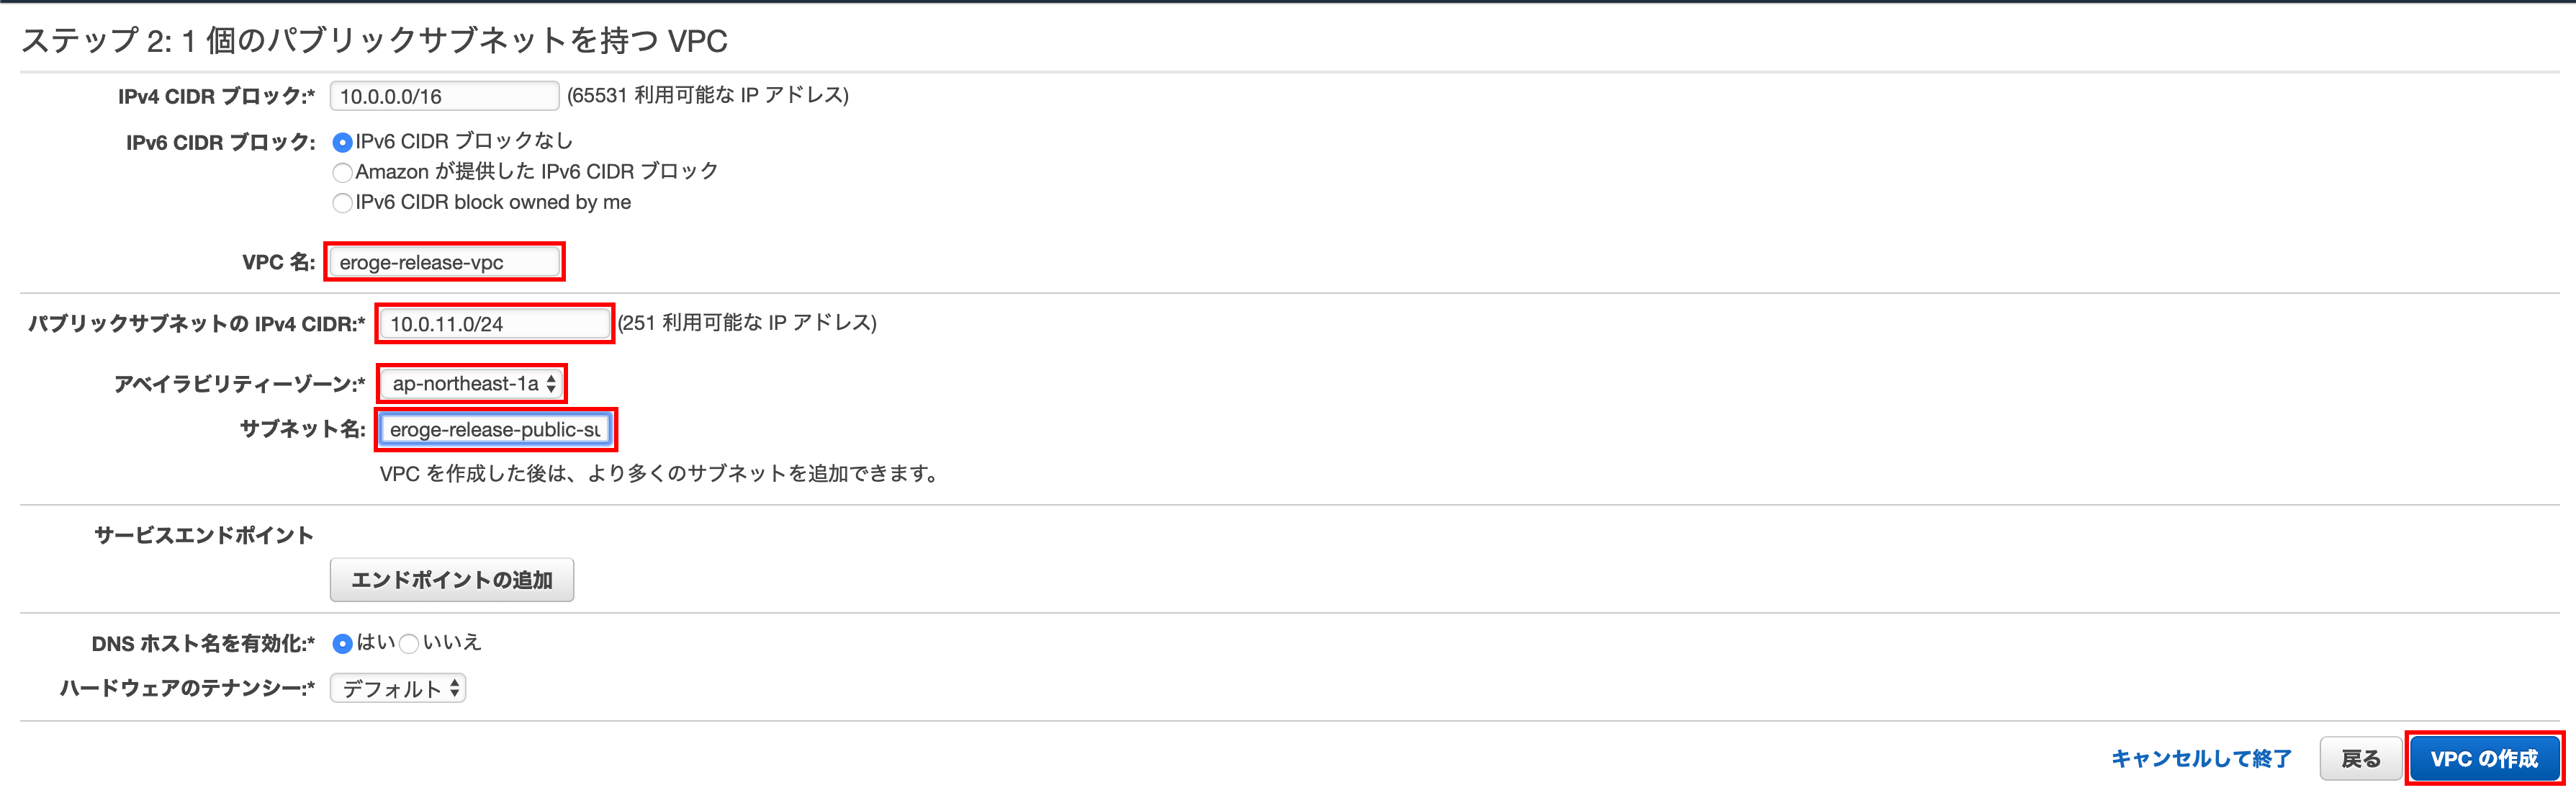
Step 2: VPC with 1 public subnet
Enter the VPC Name, Public Subnet IPv4 CIDR, Availability Zone, and Subnet Name and click Create VPC.
** Enter 10.0.11.0/24 for the Public Subnet IPv4 CIDR **
** Enter ʻap-northeast-1aforAvailability Zone** ** Enter any name forVPC name and subnet name` **
VPC created successfully
Click ʻOK`

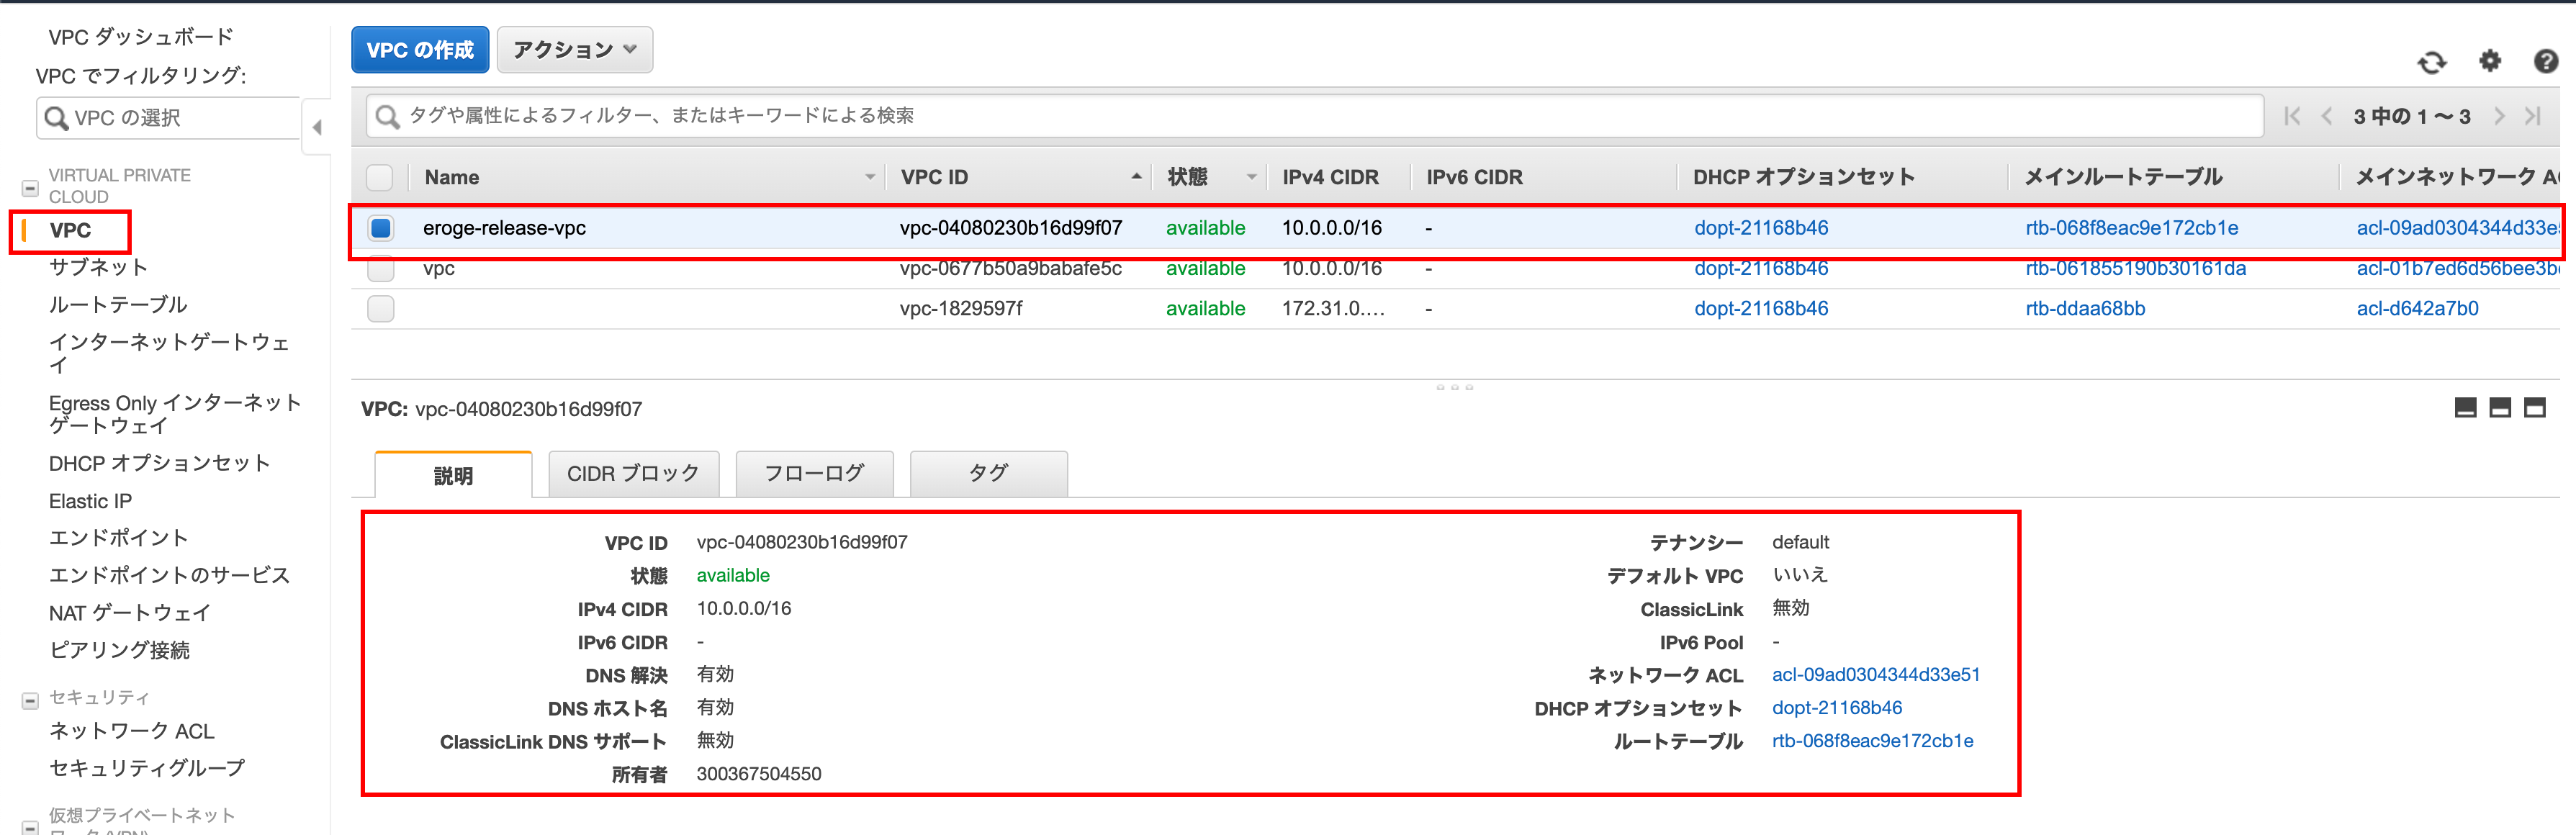
Check if the VPC was created
Make sure the VPC is created
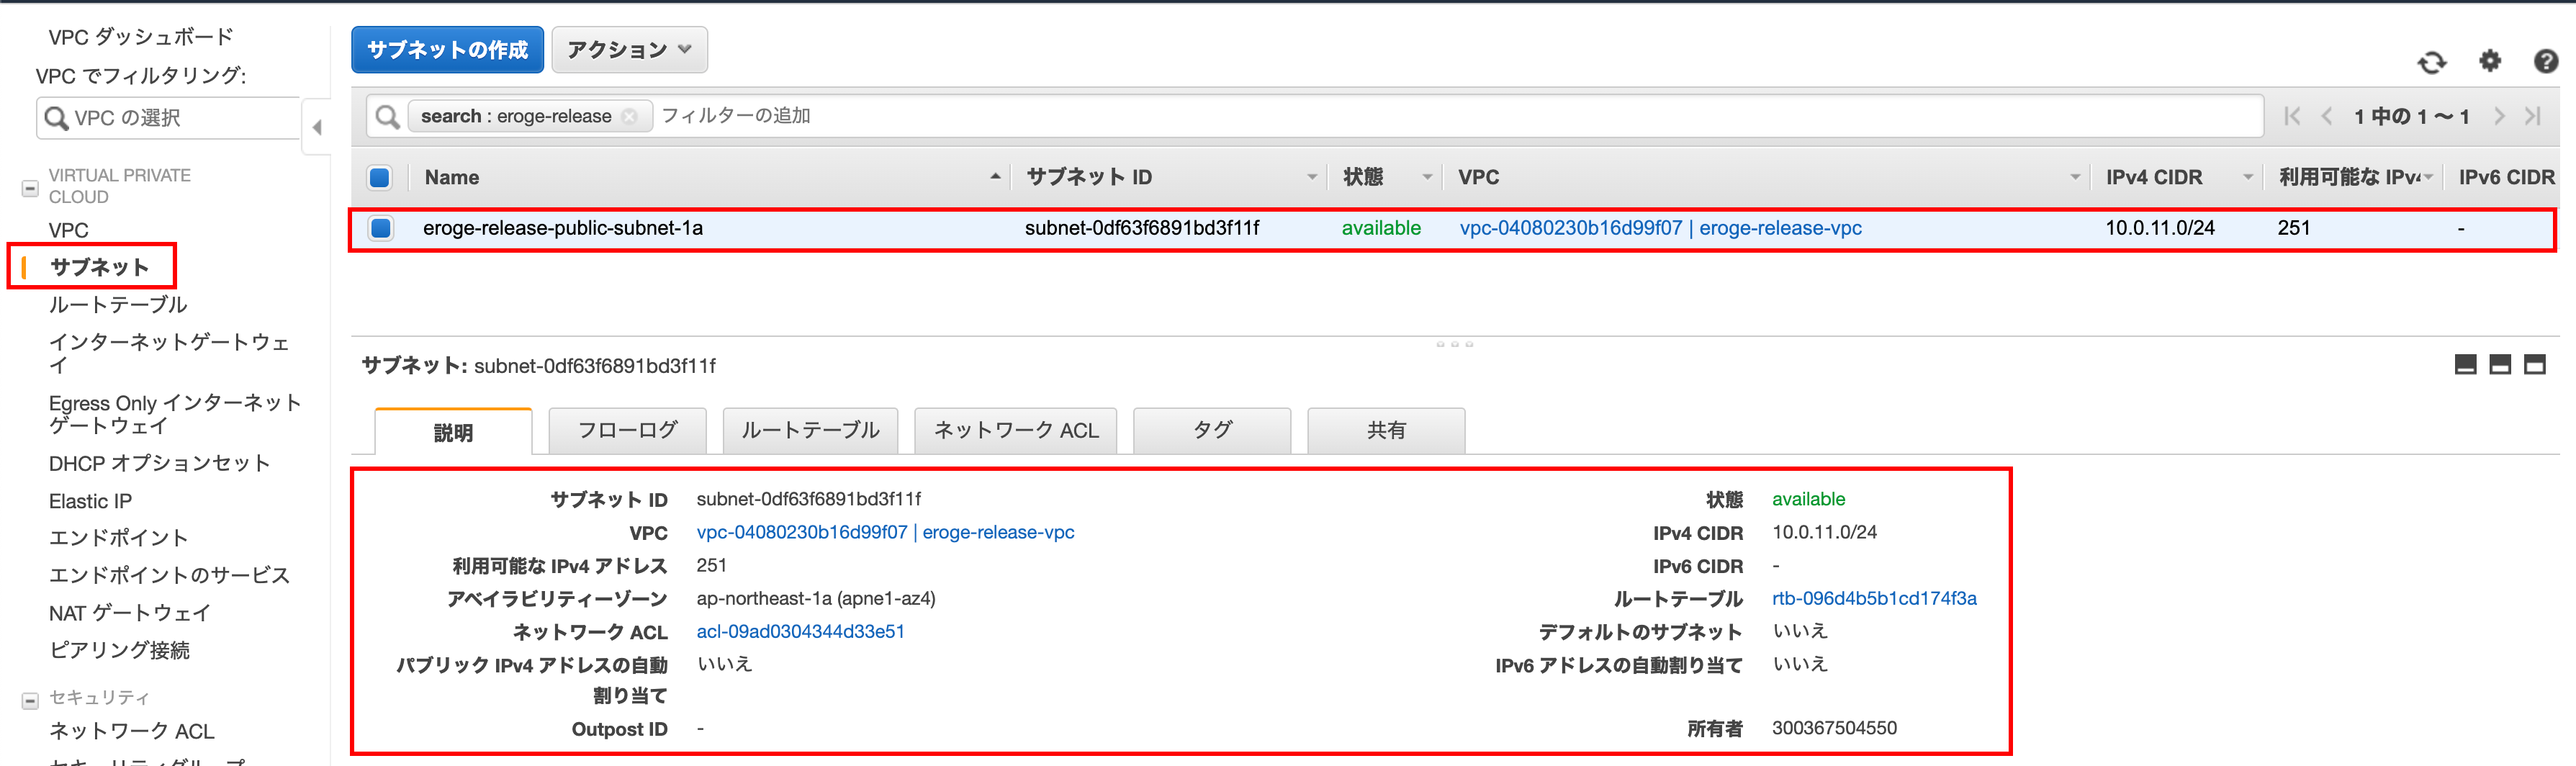
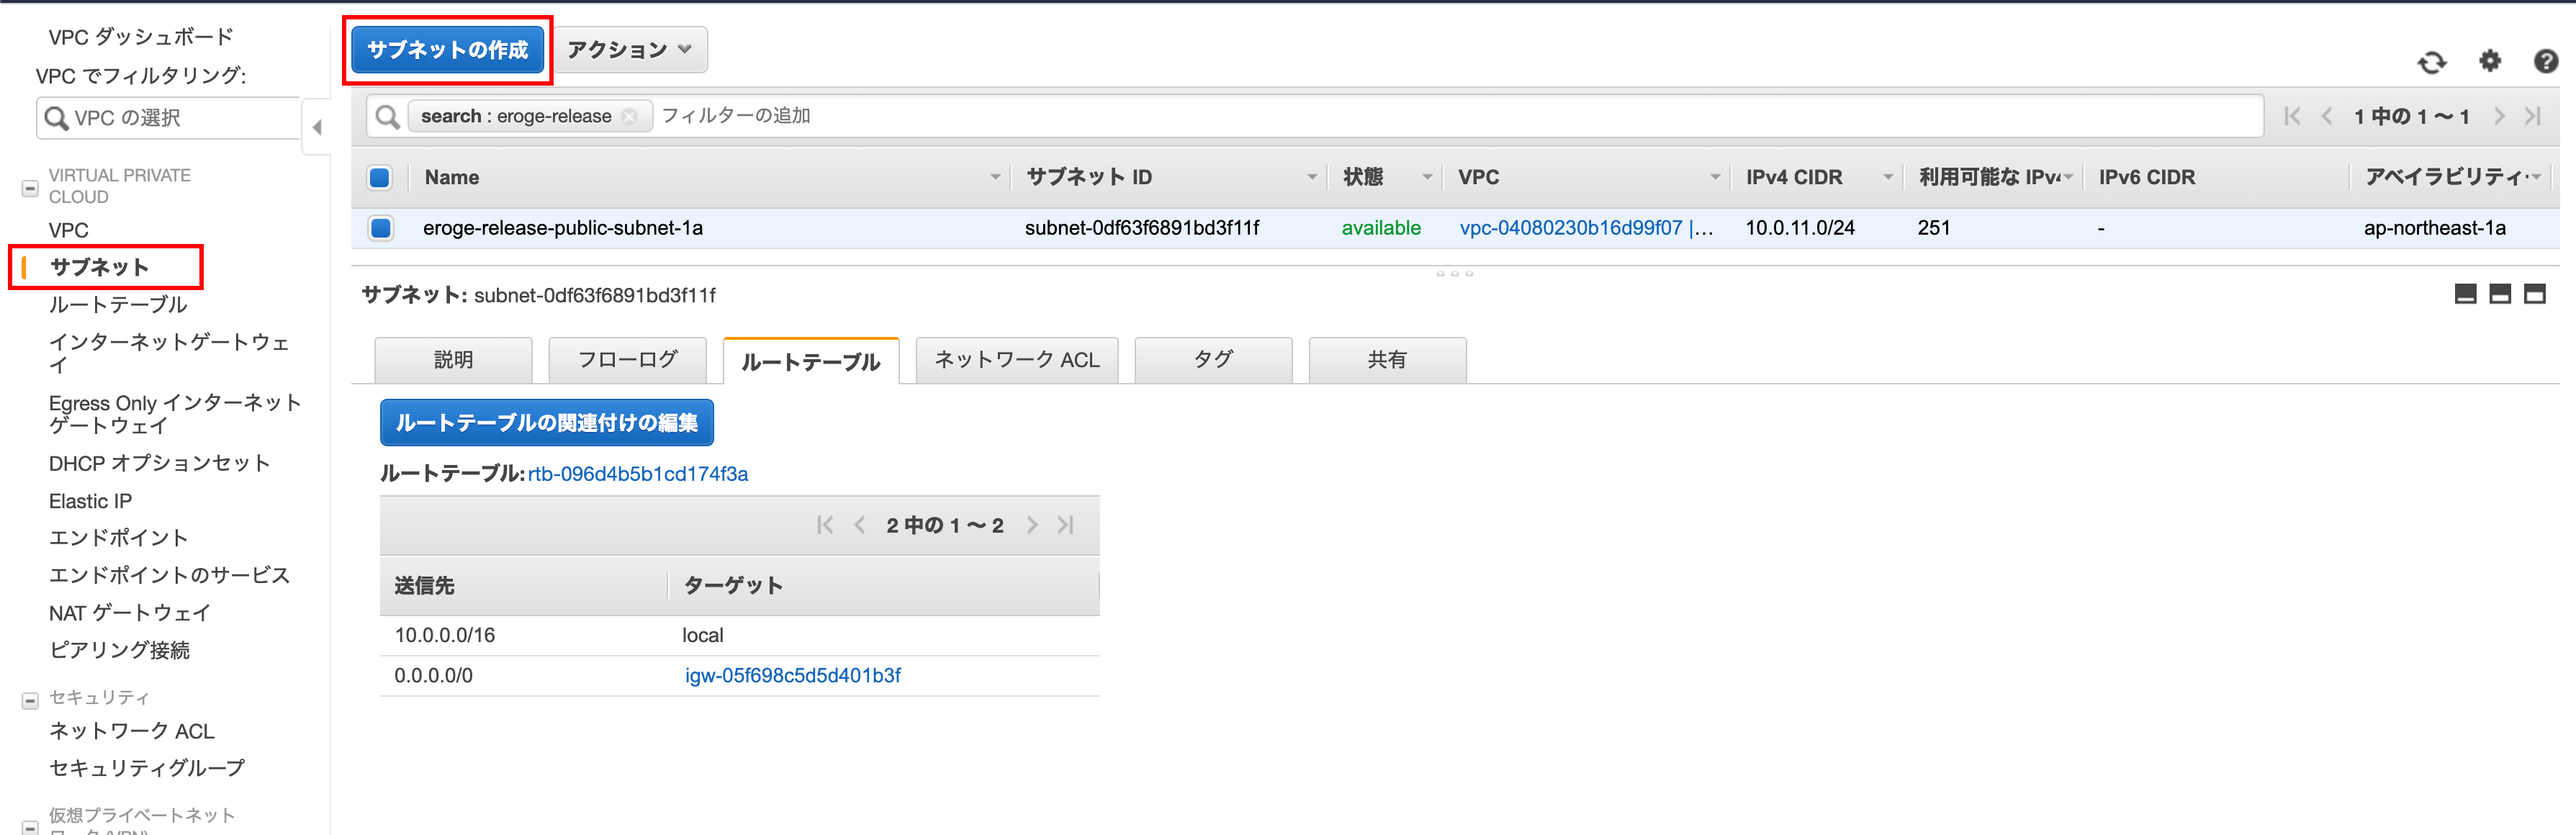
Check if a public subnet has been created
Make sure the public subnet has been created
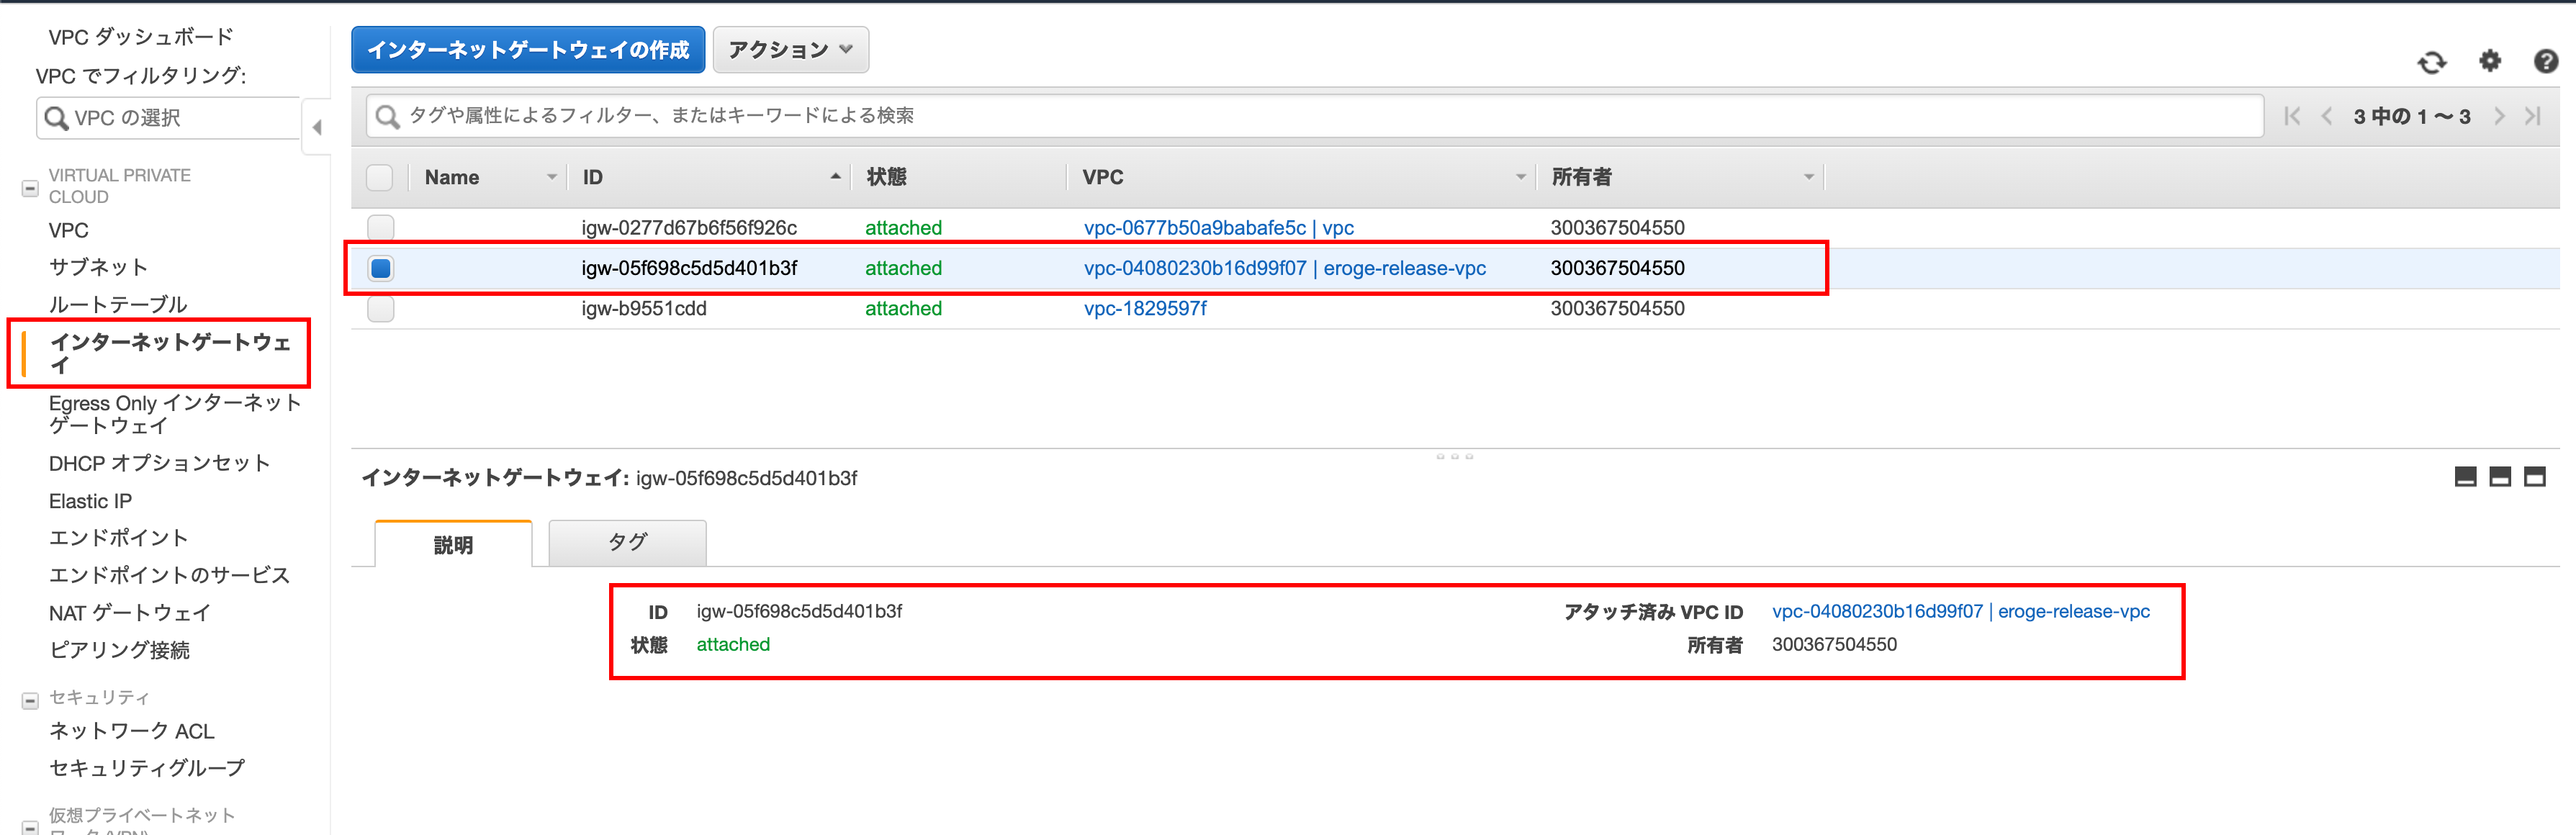
Make sure IGW (Internet Gateway) is set in the route table
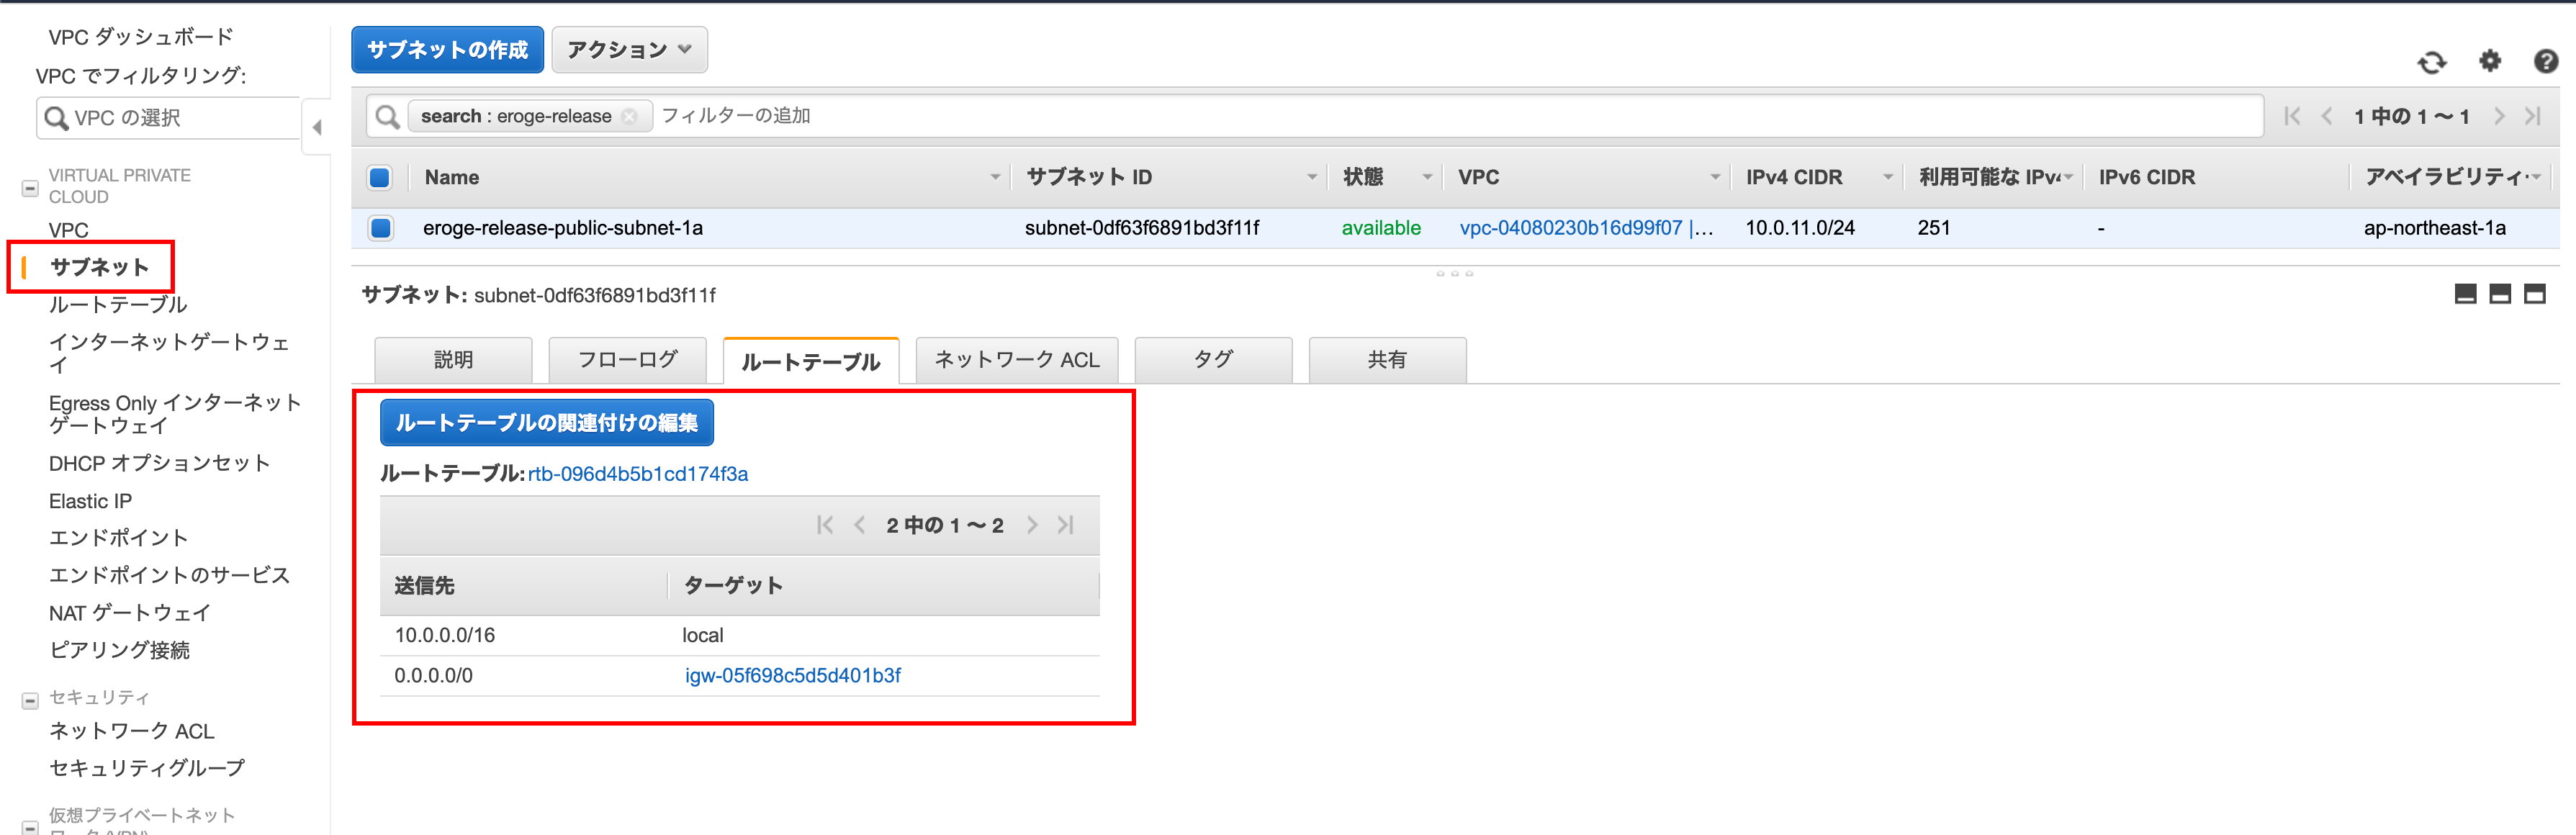
Check if IGW (Internet Gateway) has been created
Make sure the IGW (Internet Gateway) is created
After creating the VPC
With the above, the following state has been created
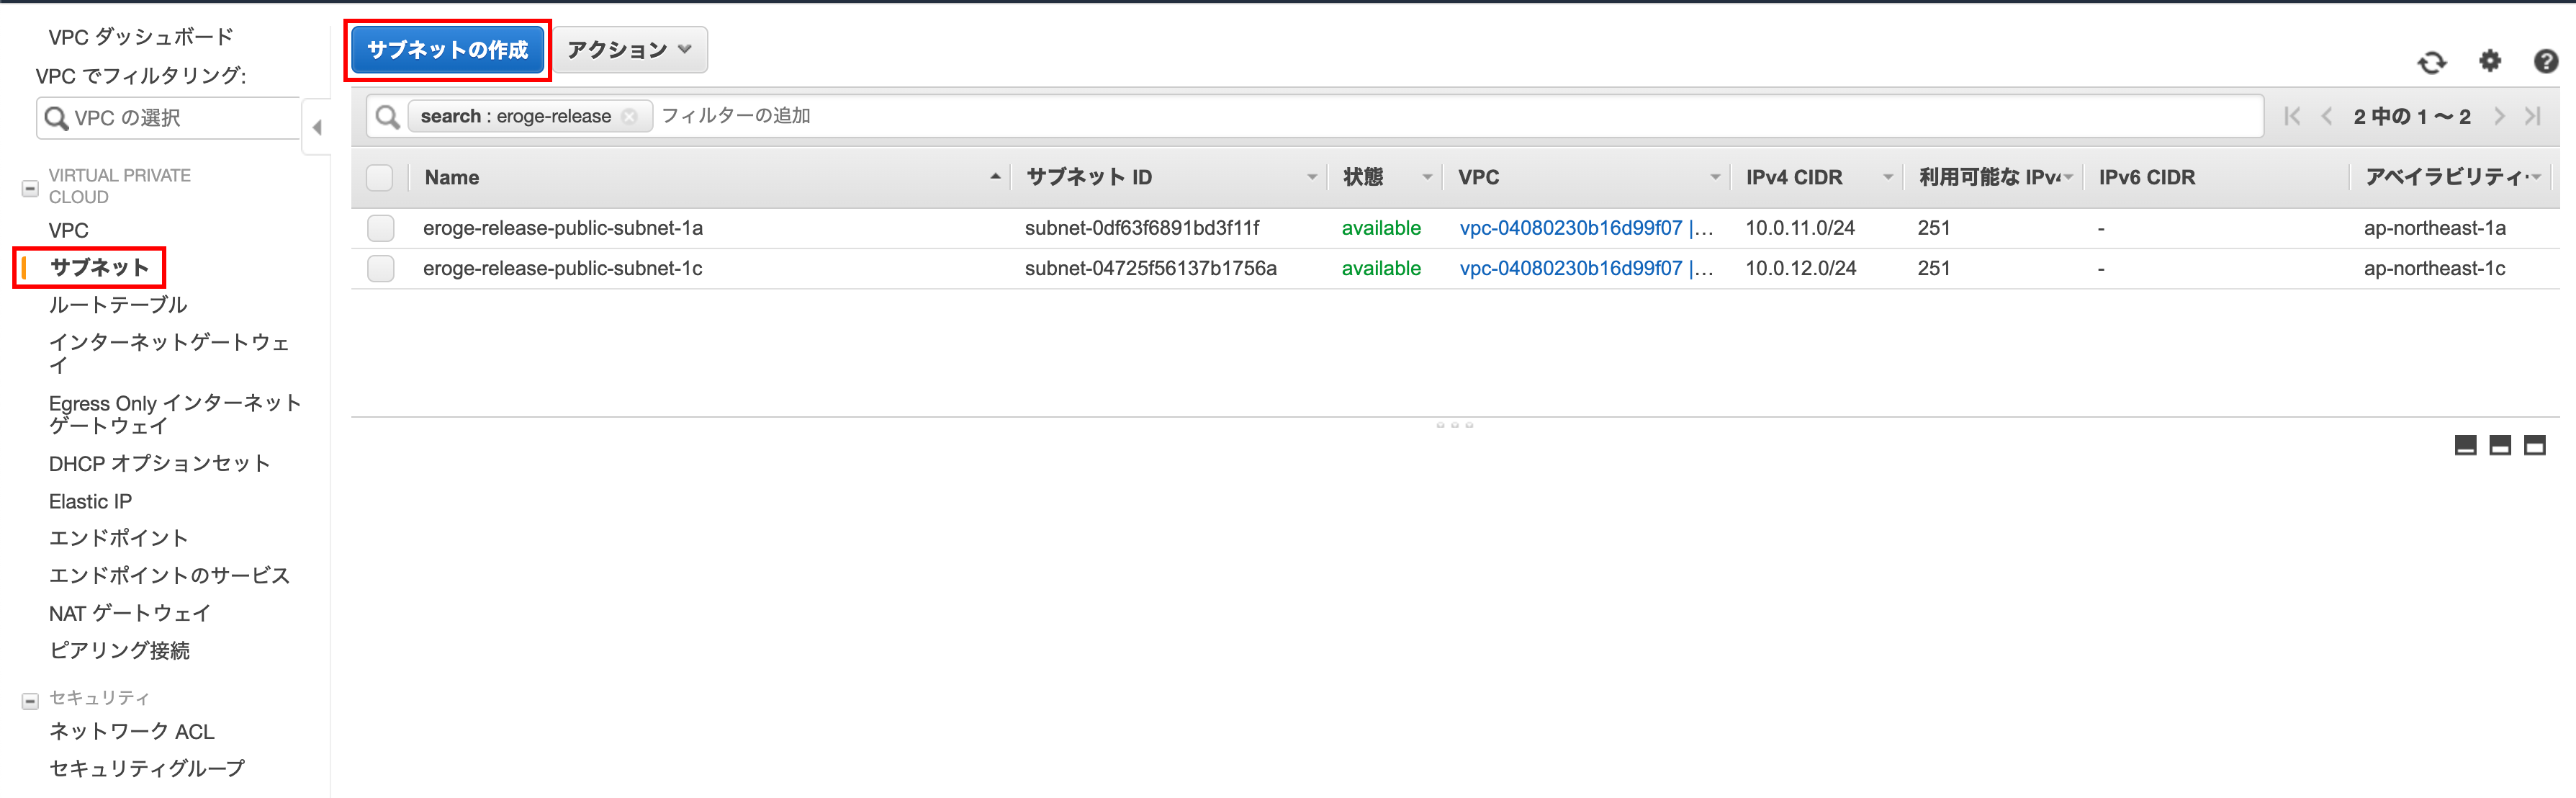
Create a public subnet
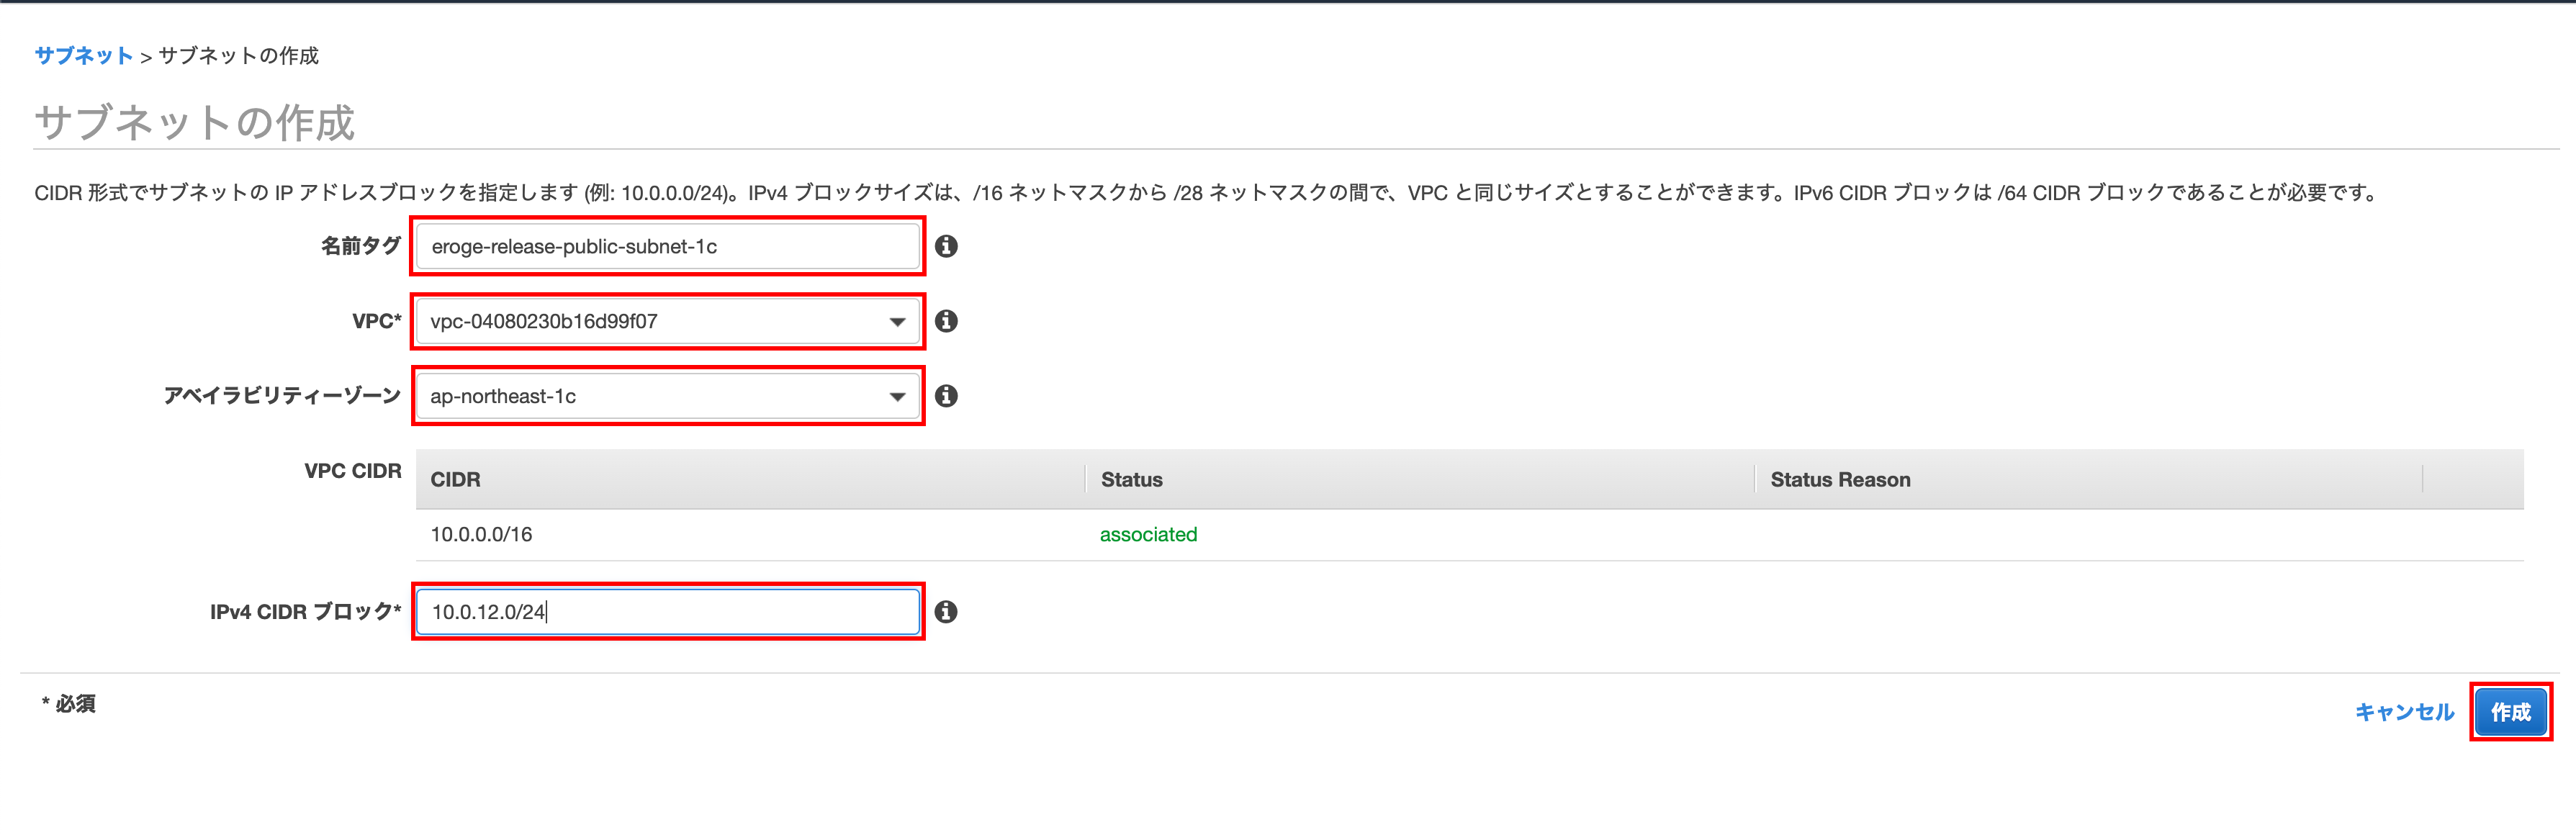
Since the public subnet was created in ʻap-northeast-1a in the Availability Zone, we will also create a public subnet in ʻap-northeast-1c.
Open the subnet creation screen
Click Create Subnet on the Subnet screen
Create subnet
Enter the name tag, VPC, availability zone, ʻIPv4 CIDR block and click Create`
** Select the created VPC for VPC **
** Enter ʻap-northeast-1cforAvailability Zone ** ** ʻEnter 10.0.12.0/24 for the IPv4 CIDR block **
Click Close

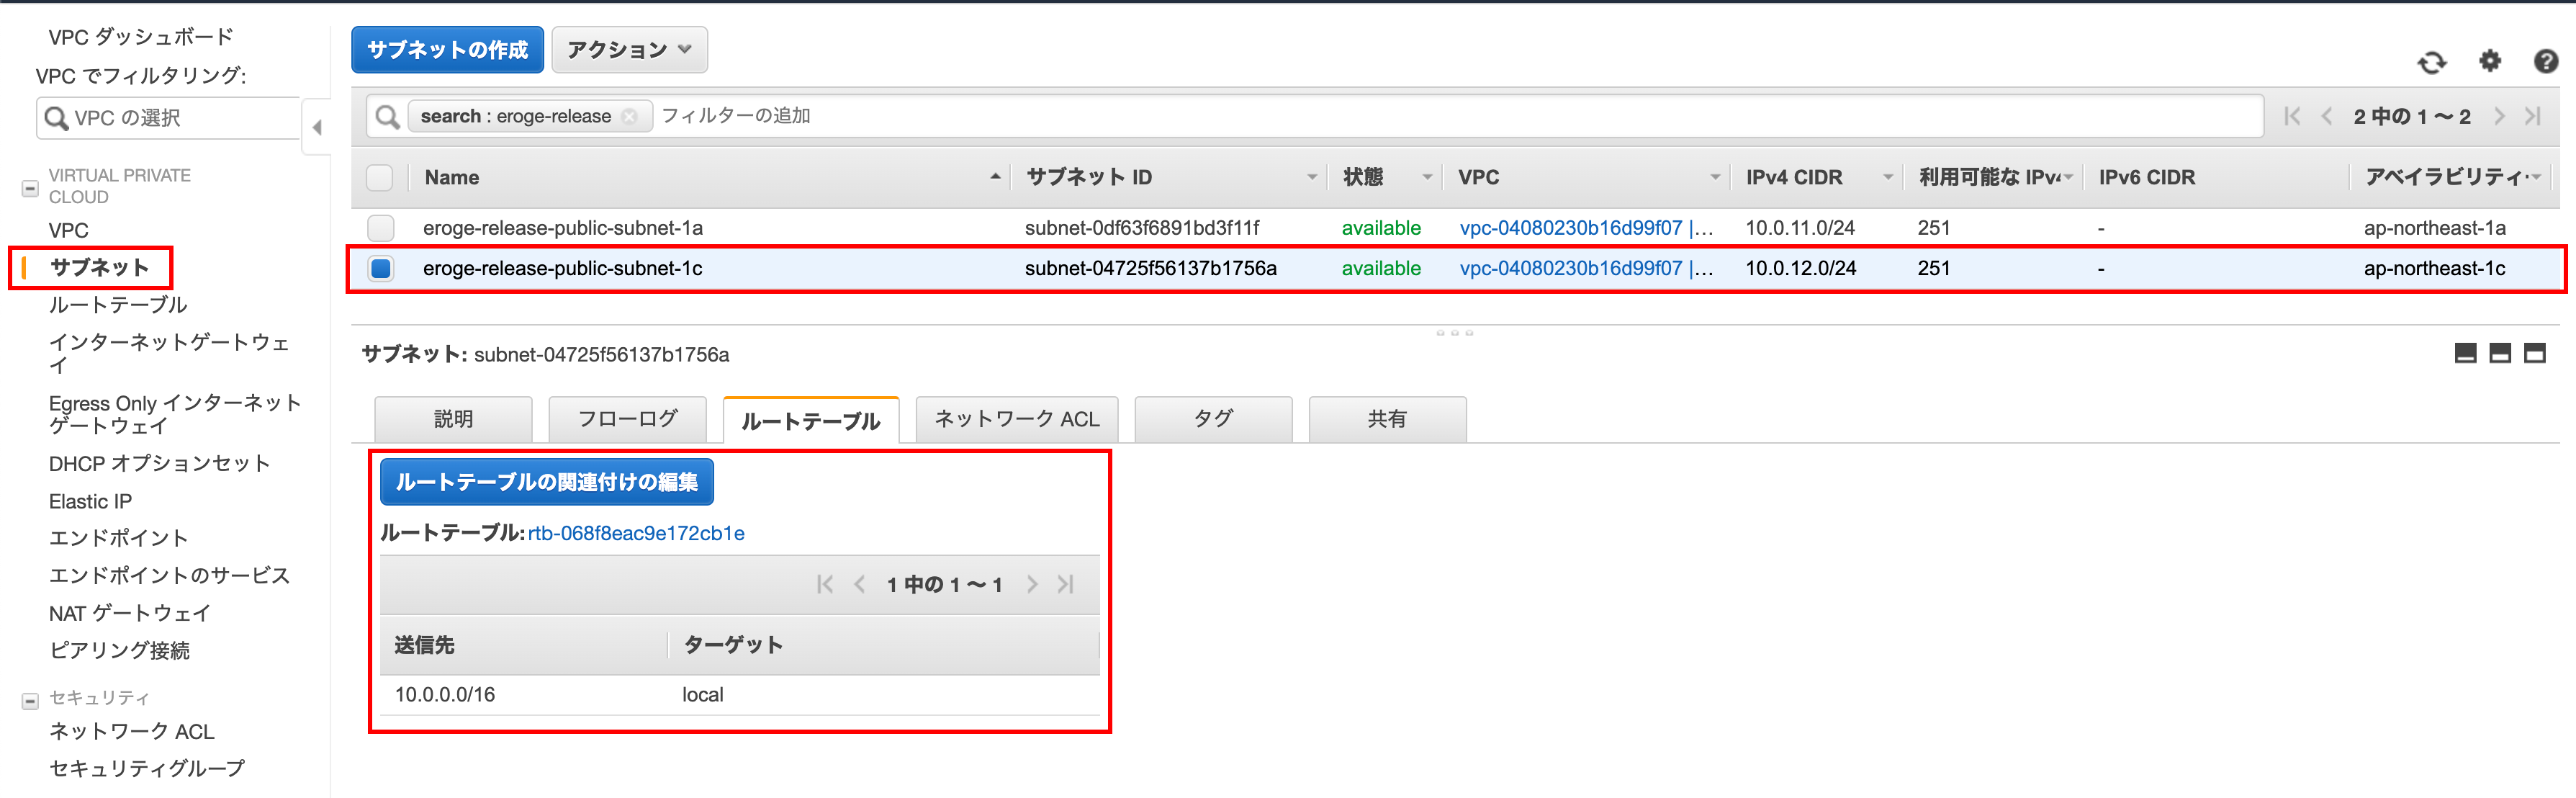
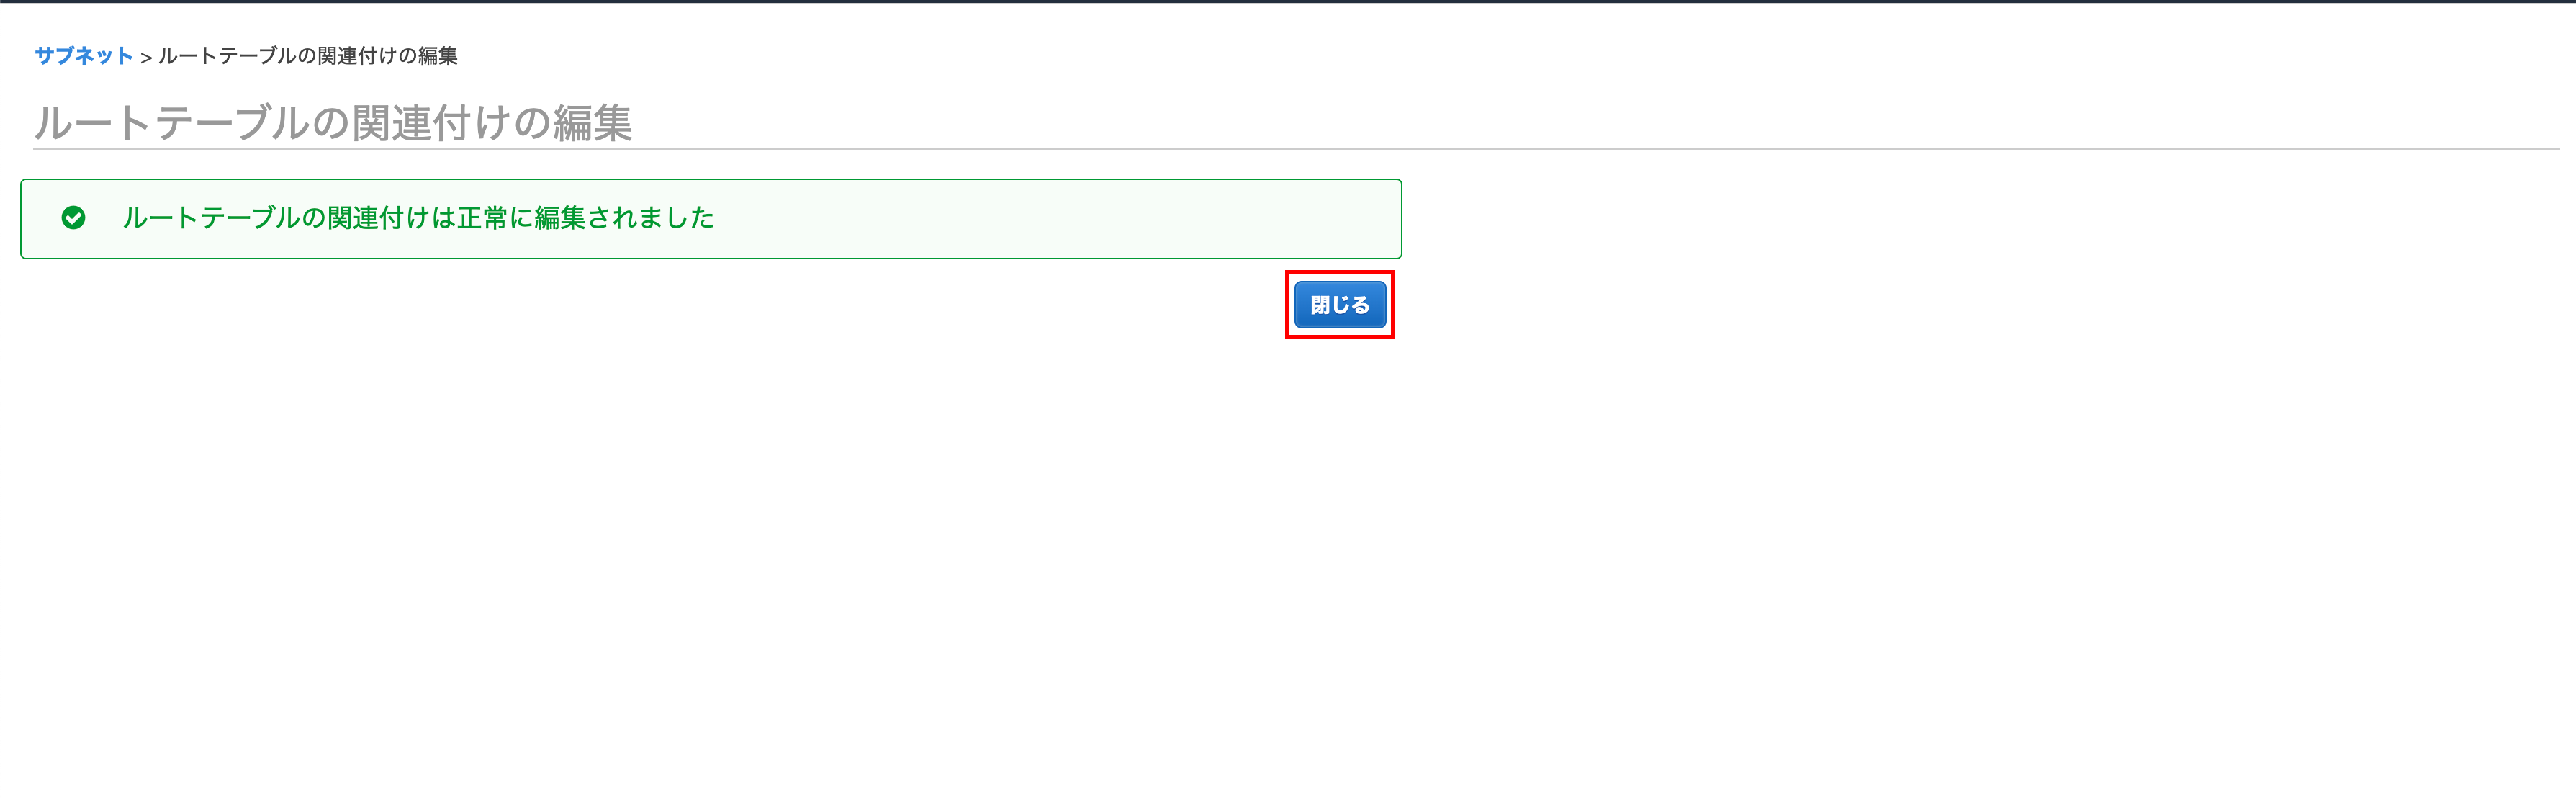
Open the edit screen of the route table association
Select the newly created ʻap-northeast-1c subnet Since ʻIGW (Internet gateway) is not set in the route table, this subnet cannot go out to the Internet at present, so it is a private subnet.
Set ʻIGW (Internet Gateway)in the route table ClickEdit Route Table Association`
Edit screen of route table association
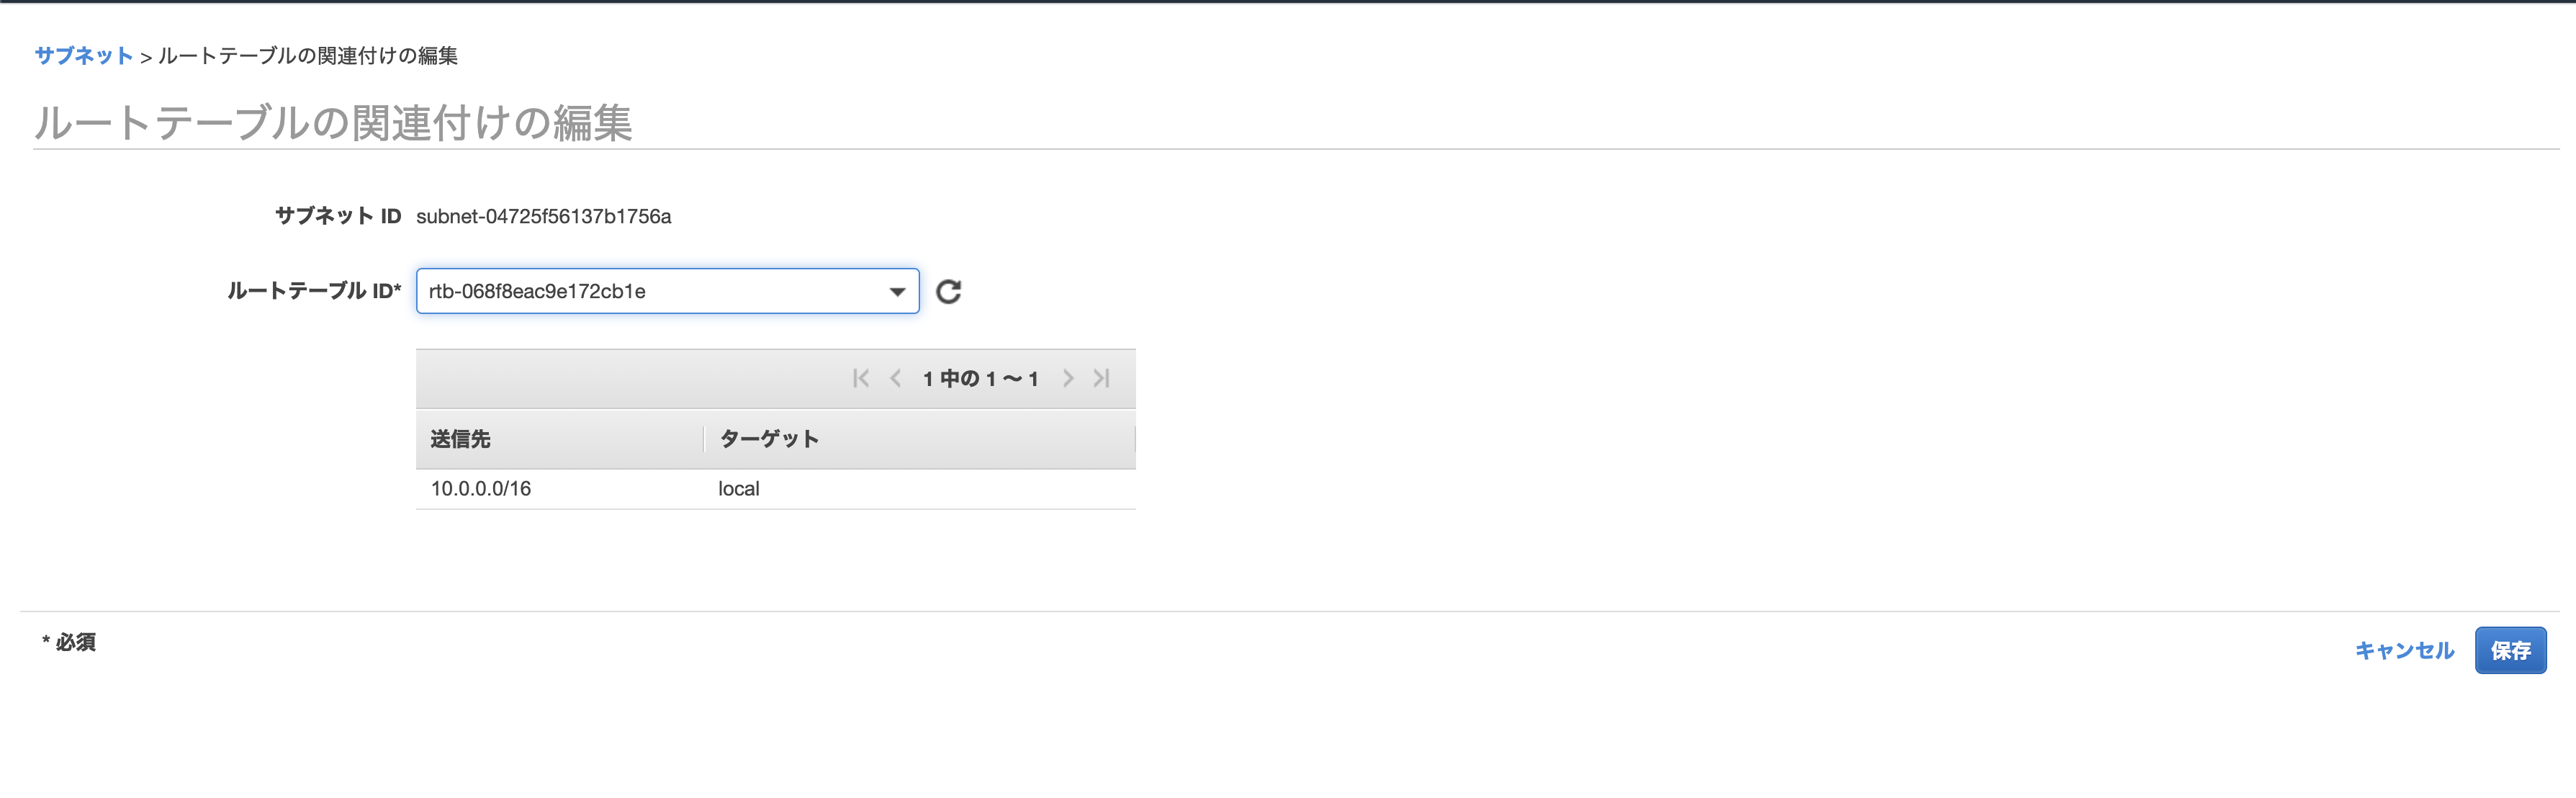
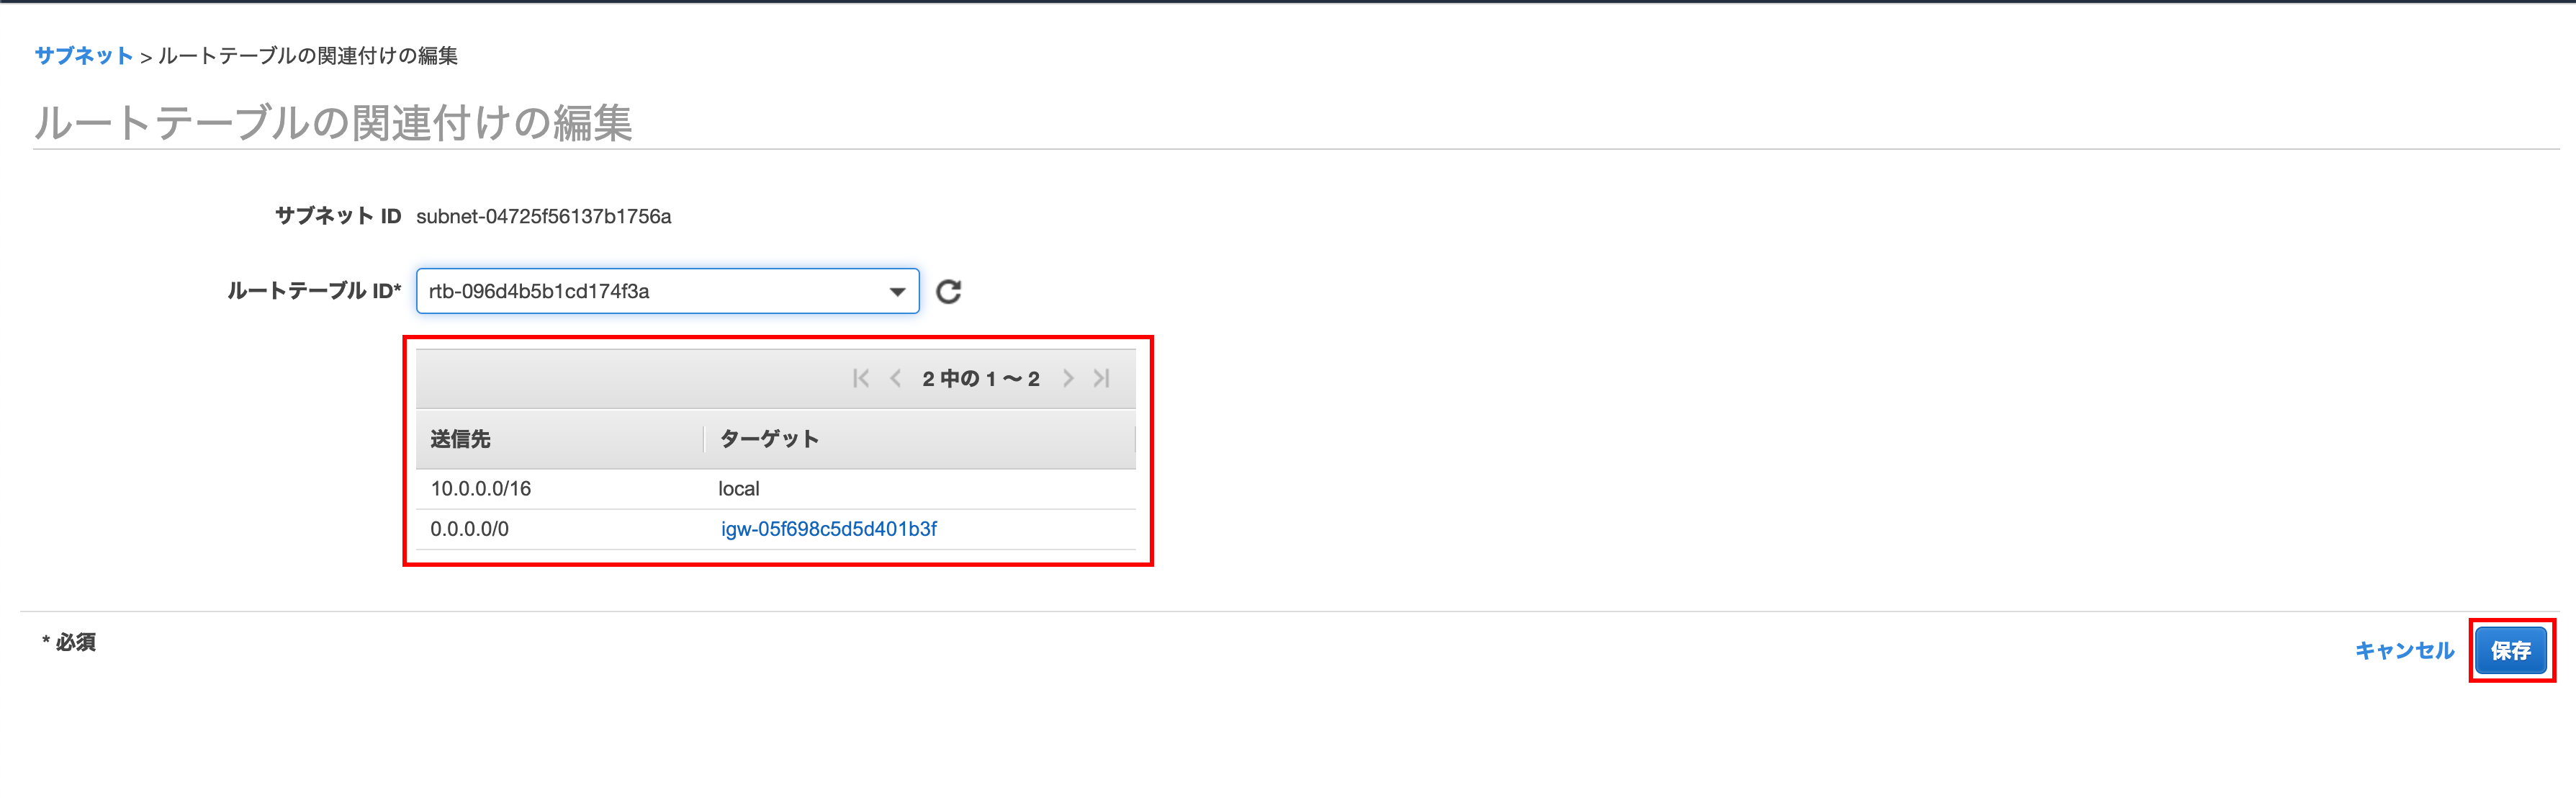
Change to the route table created earlier
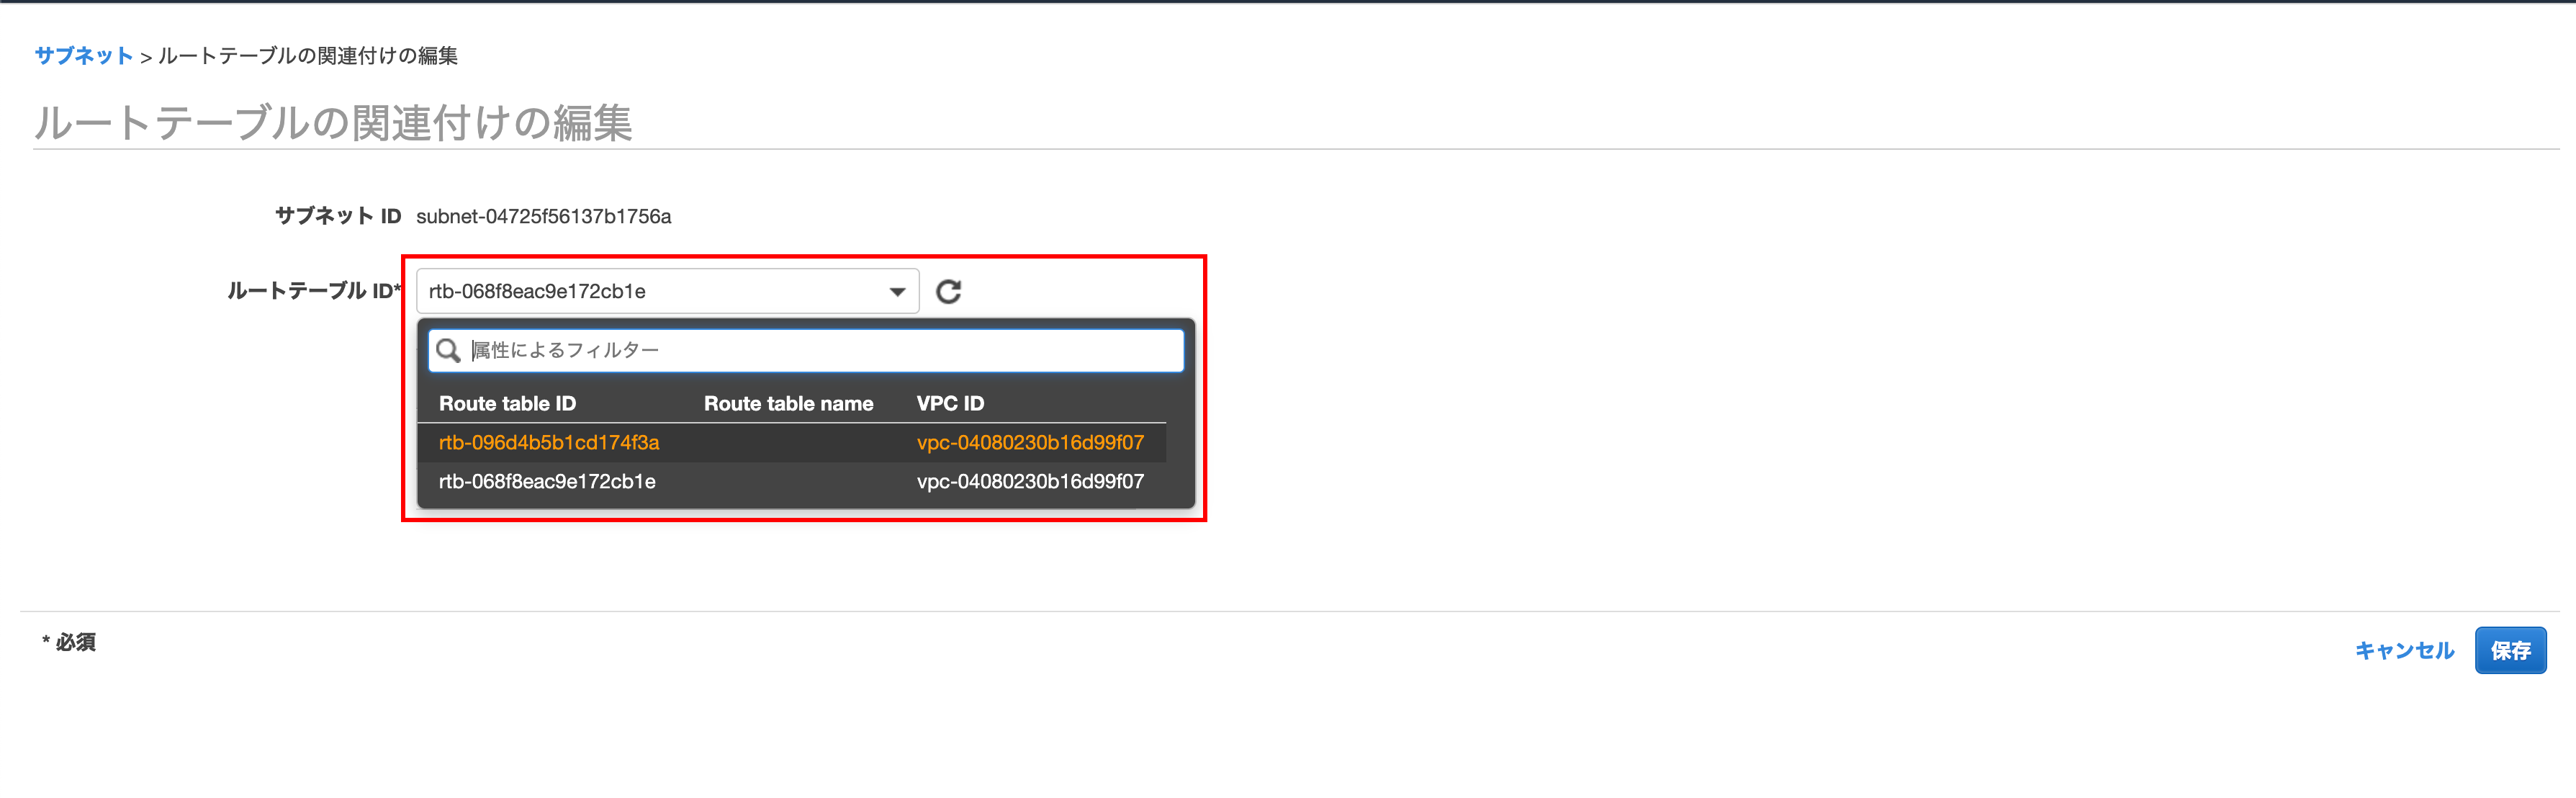
You can see that ʻIGW (Internet Gateway) has been added If you are satisfied, click Save`
Click Close
Check if IGW (Internet Gateway) is added
Make sure ʻIGW (Internet Gateway) `is added to the route table

After creating the public subnet
With the above, it has been created up to the following state
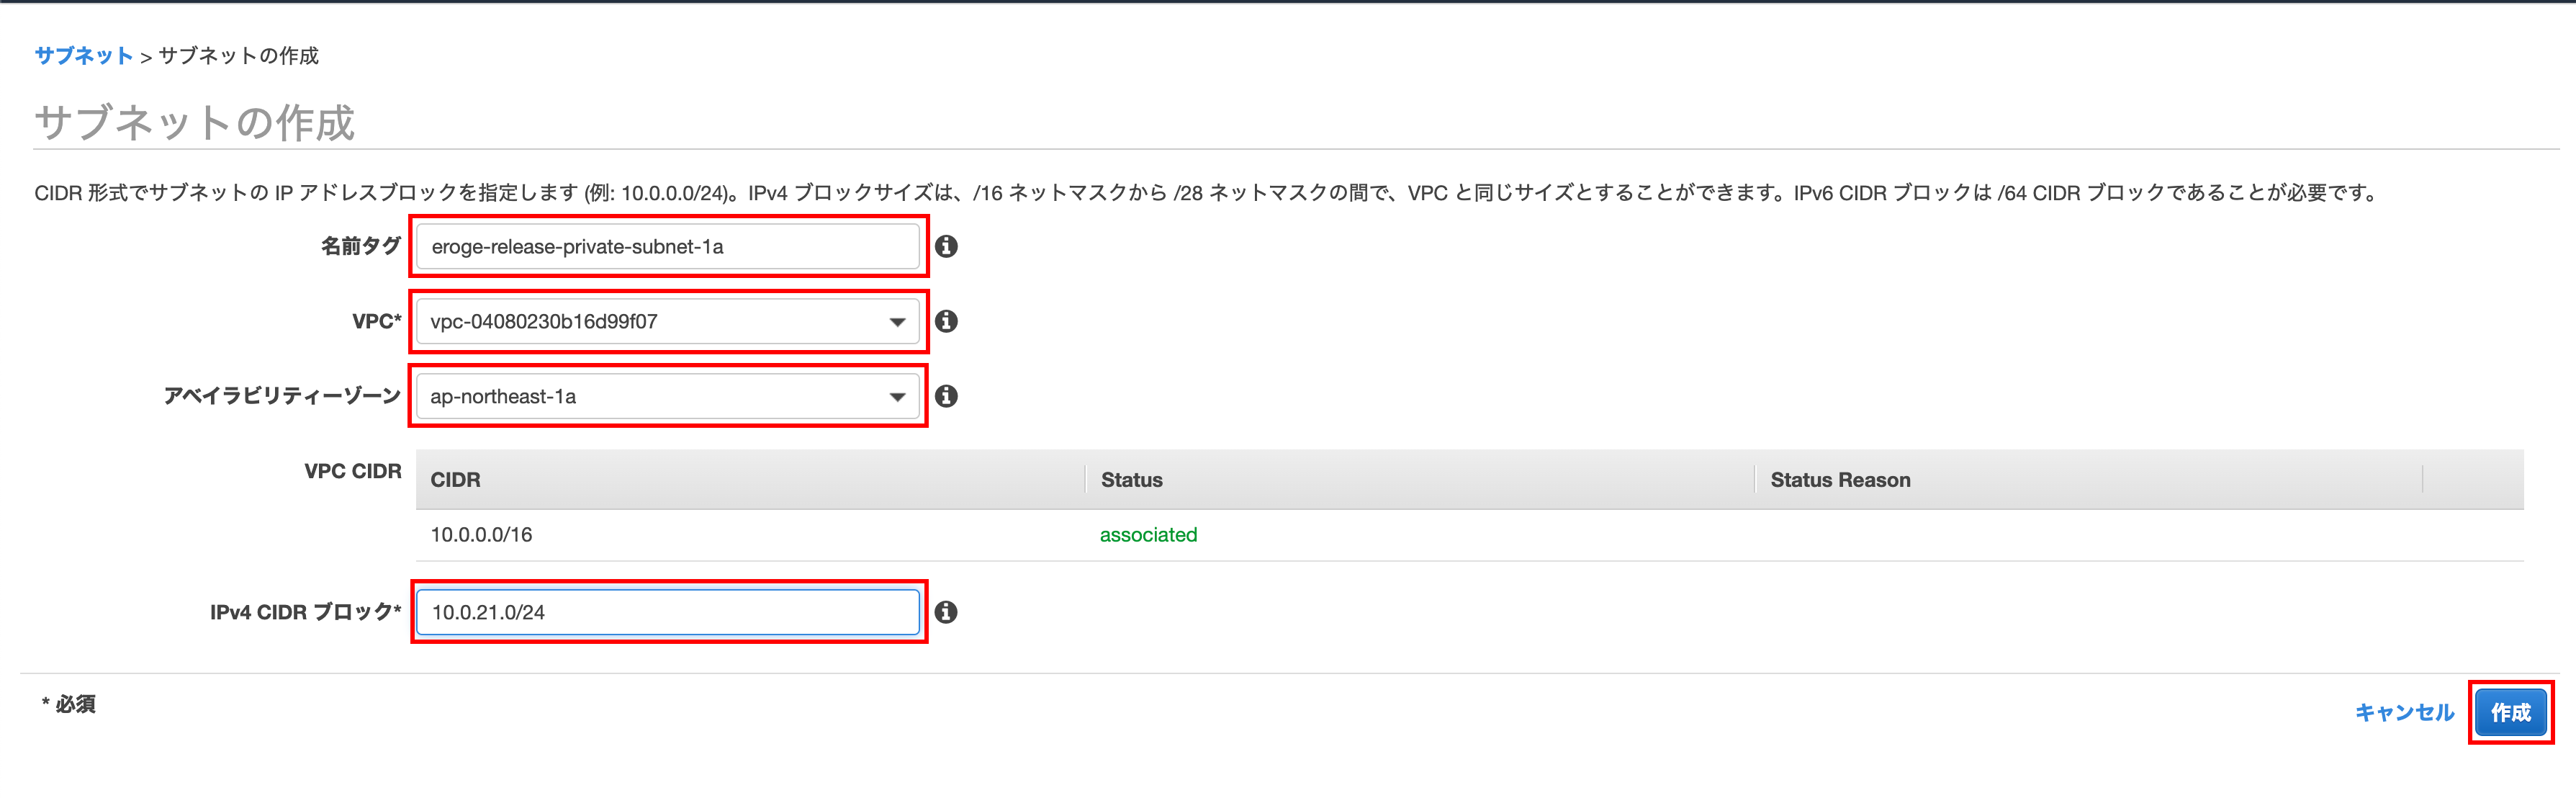
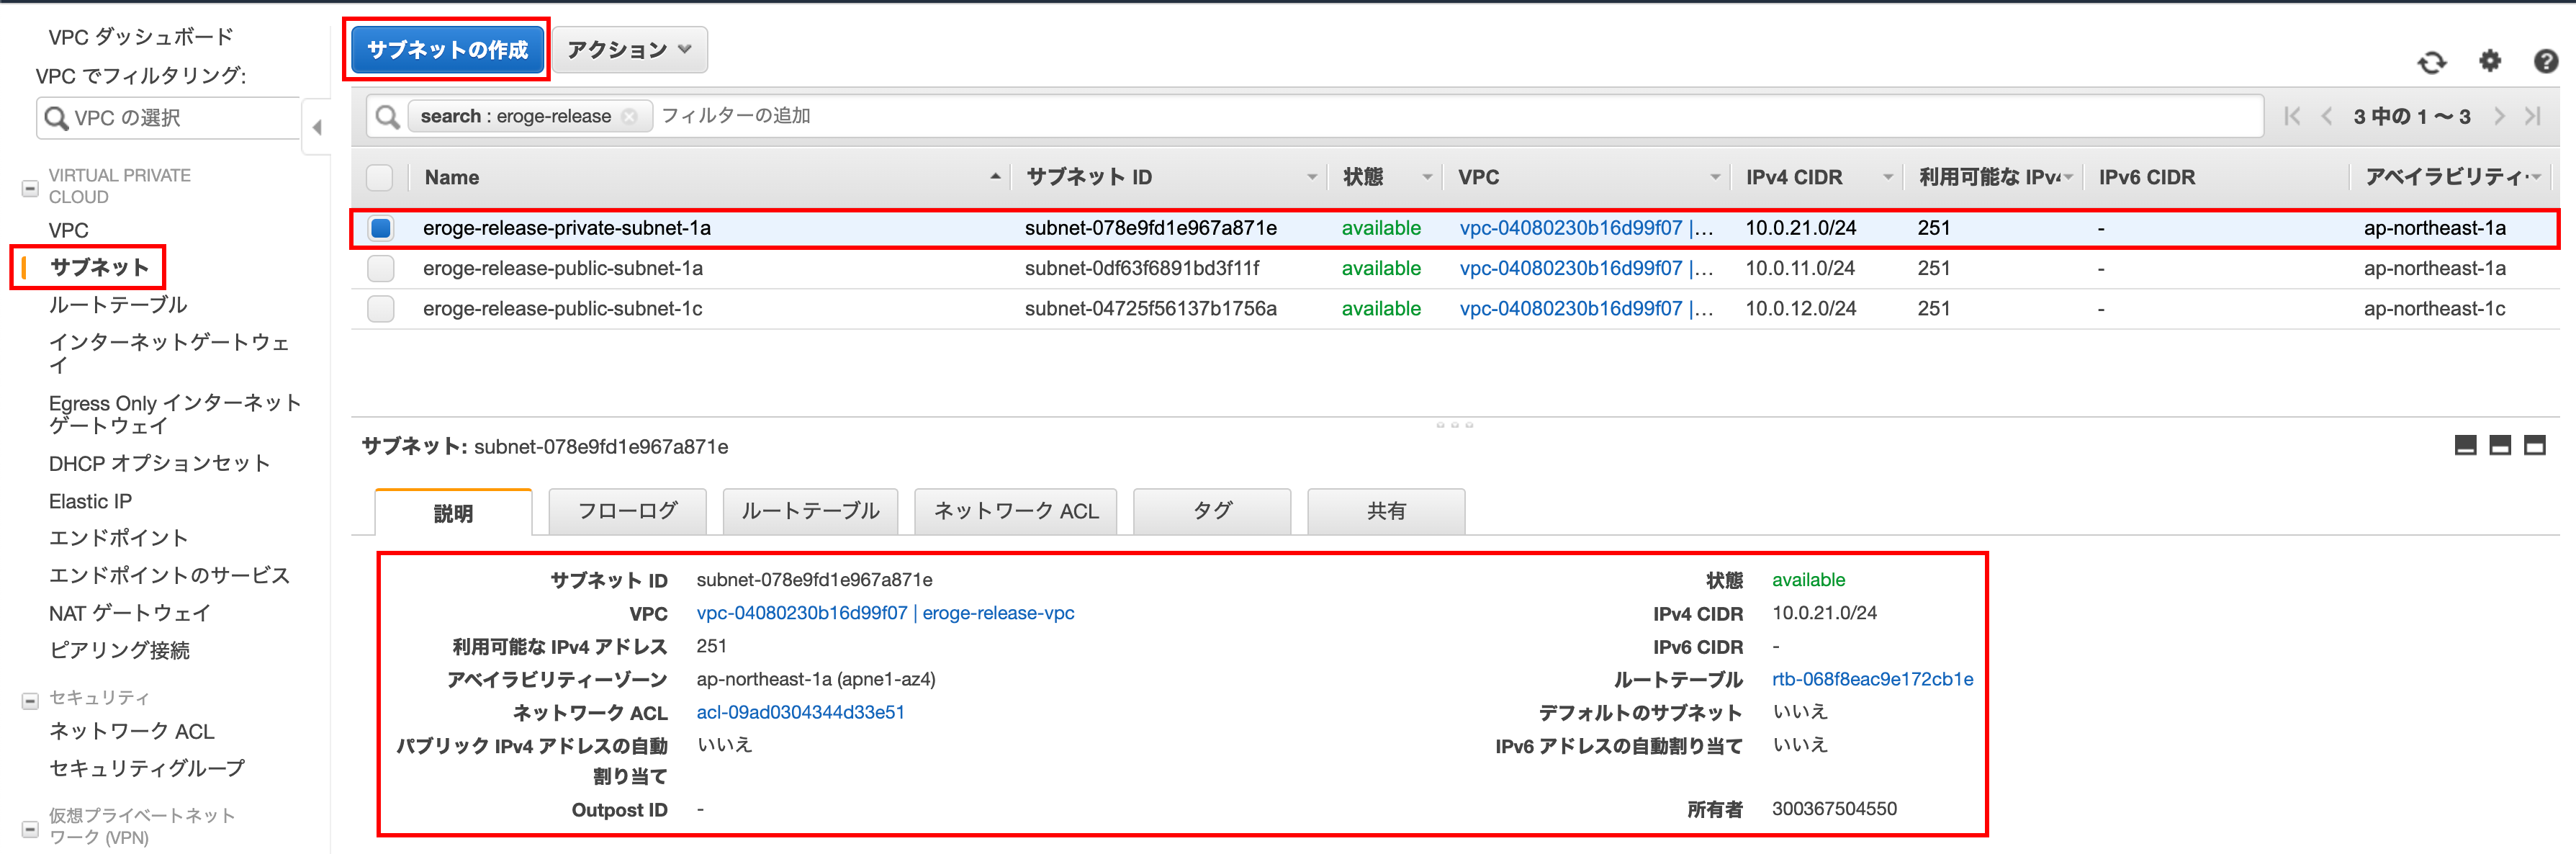
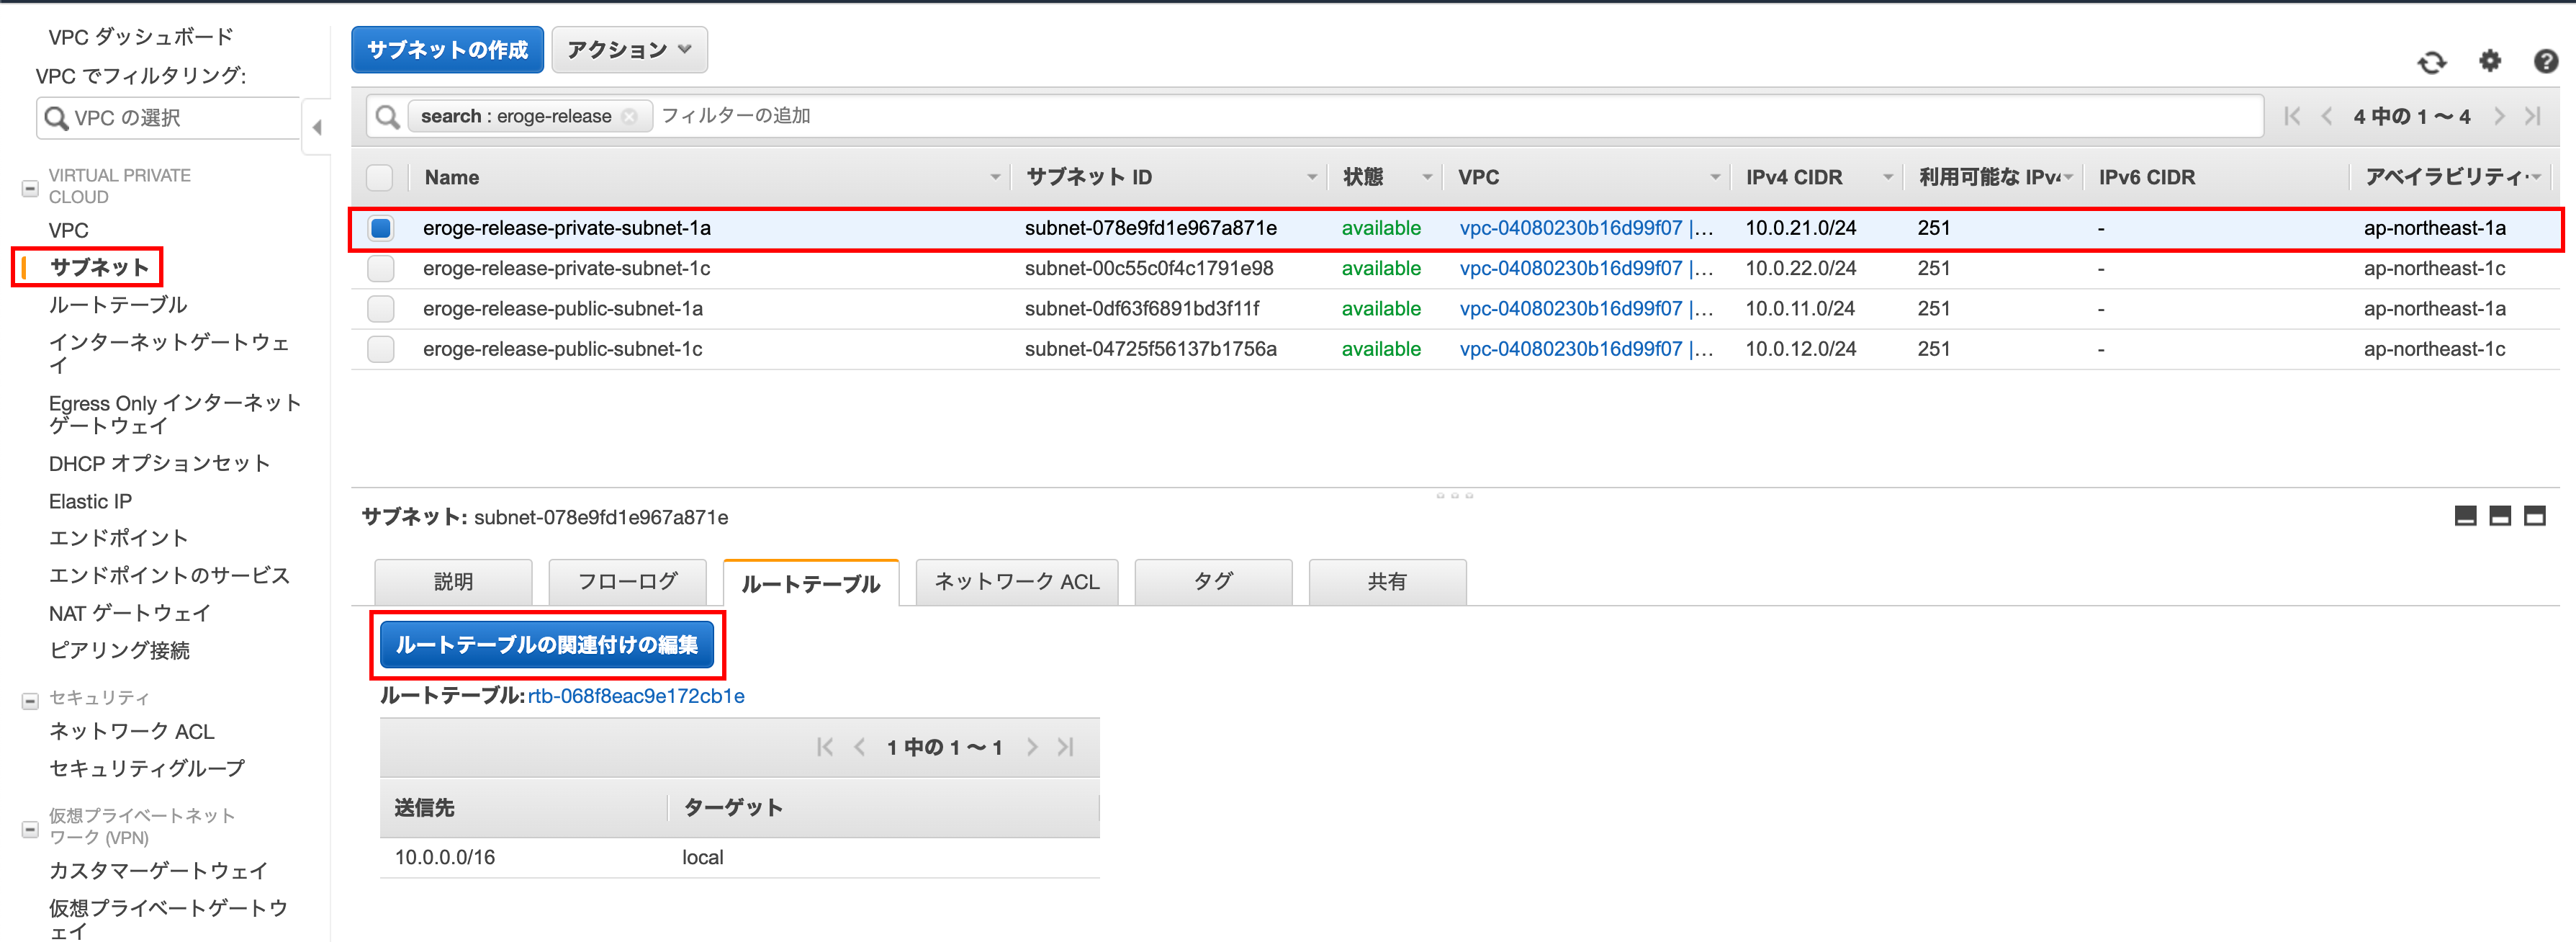
Create a private subnet
Create private subnets as well as public subnets
Created in ap-northeast-1a
ʻAp-northeast-1a` will create a subnet
Open the subnet creation screen
Click Create Subnet
Subnet creation
Enter the name tag, VPC, availability zone, ʻIPv4 CIDR block and click Create`
** Select the created VPC for VPC **
** Enter ʻap-northeast-1aforAvailability Zone ** ** ʻEnter 10.0.21.0 / 24 for the IPv4 CIDR block **
Click Close

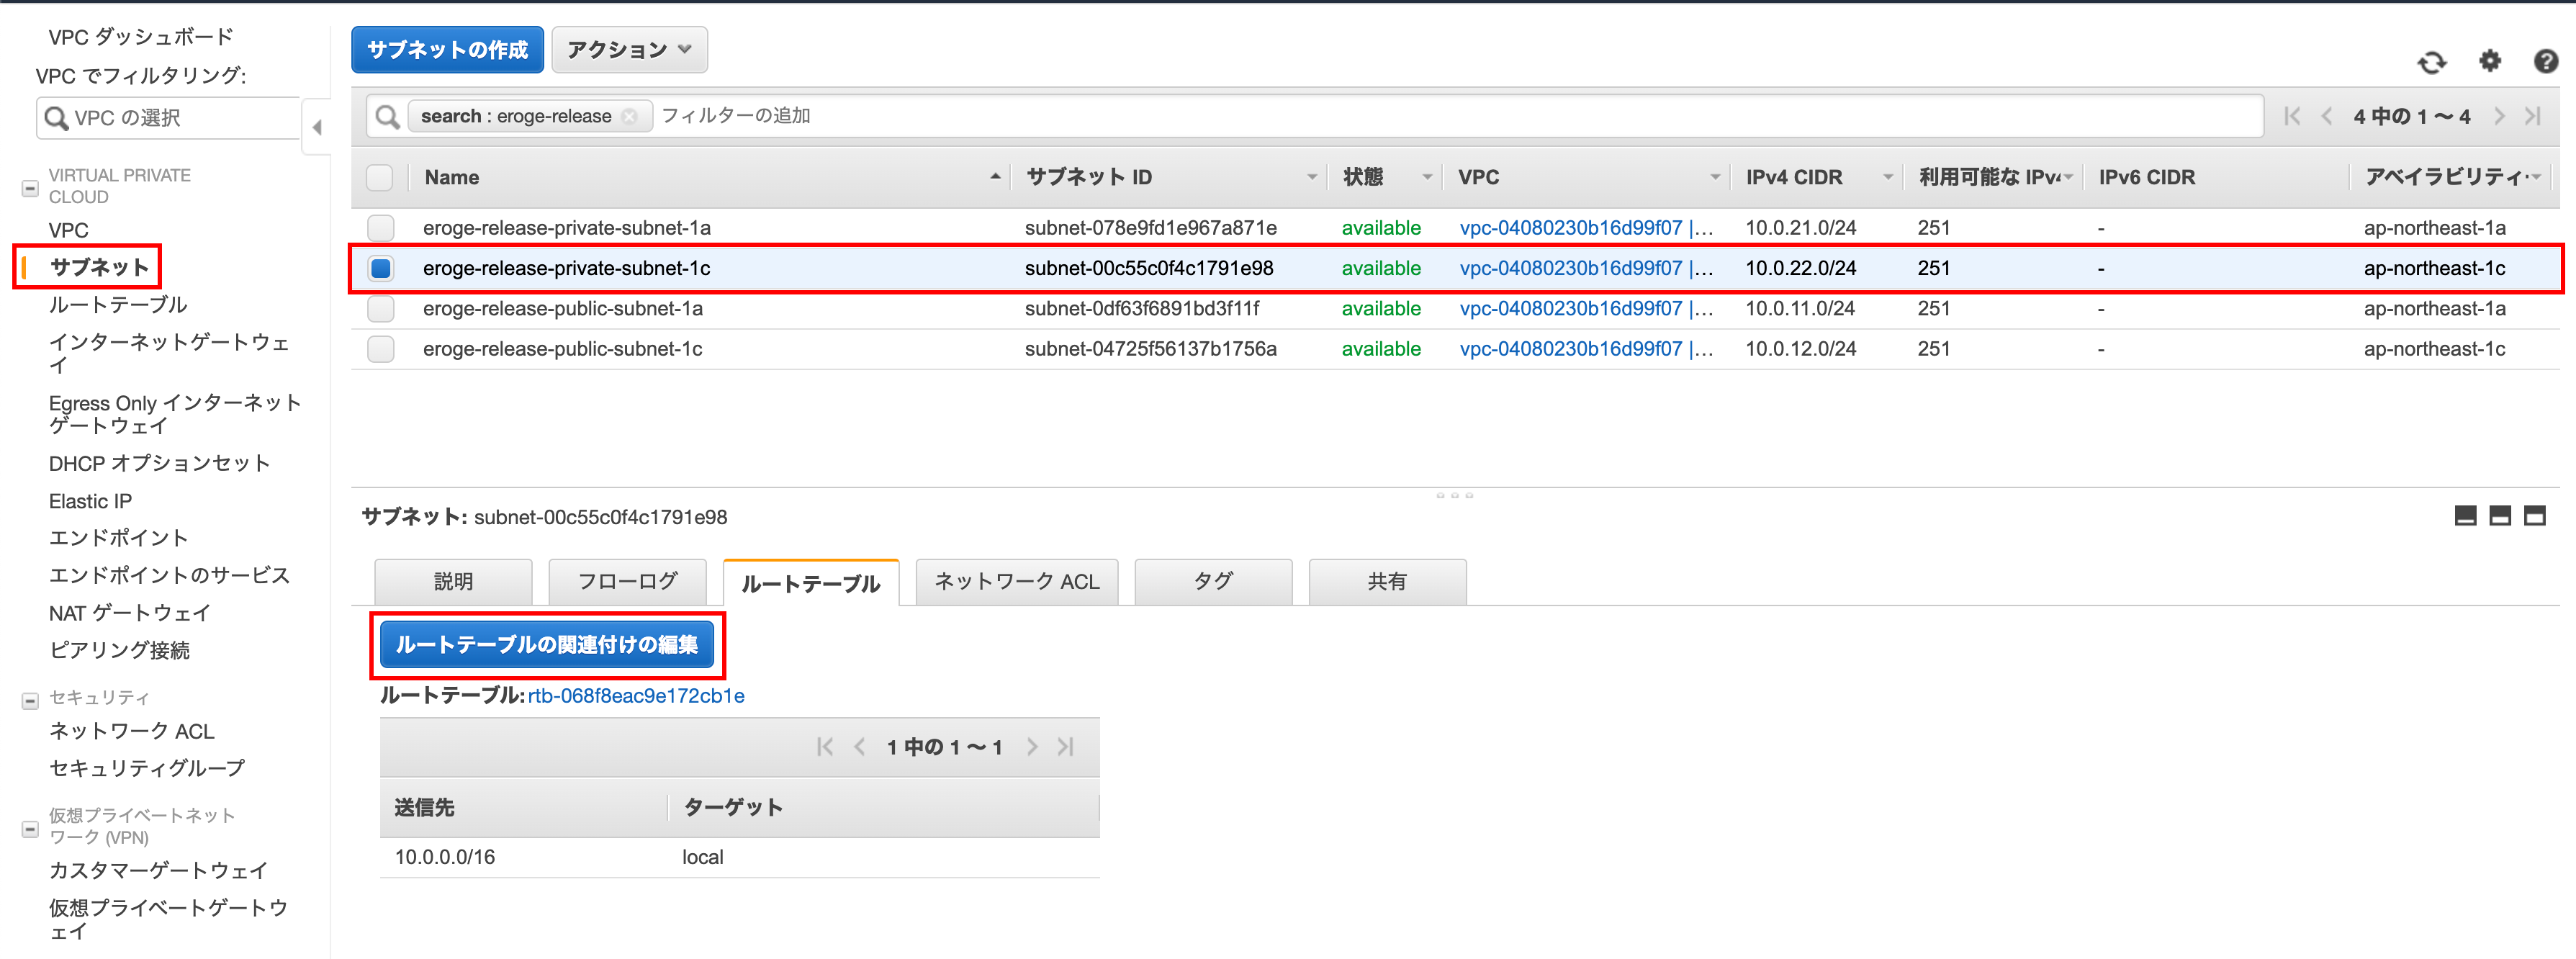
Created in ap-northeast-1c
ʻAp-northeast-1c` will create a subnet
Open the subnet creation screen
ʻA subnet has been created at ap-northeast-1a`
ʻAp-northeast-1cwill also create a subnet ClickCreate Subnet`
Subnet creation
Enter the name tag, VPC, availability zone, ʻIPv4 CIDR block and click Create`
** Select the created VPC for VPC **
** Enter ʻap-northeast-1cforAvailability Zone ** ** ʻEnter 10.0.22.0 / 24 for the IPv4 CIDR block **
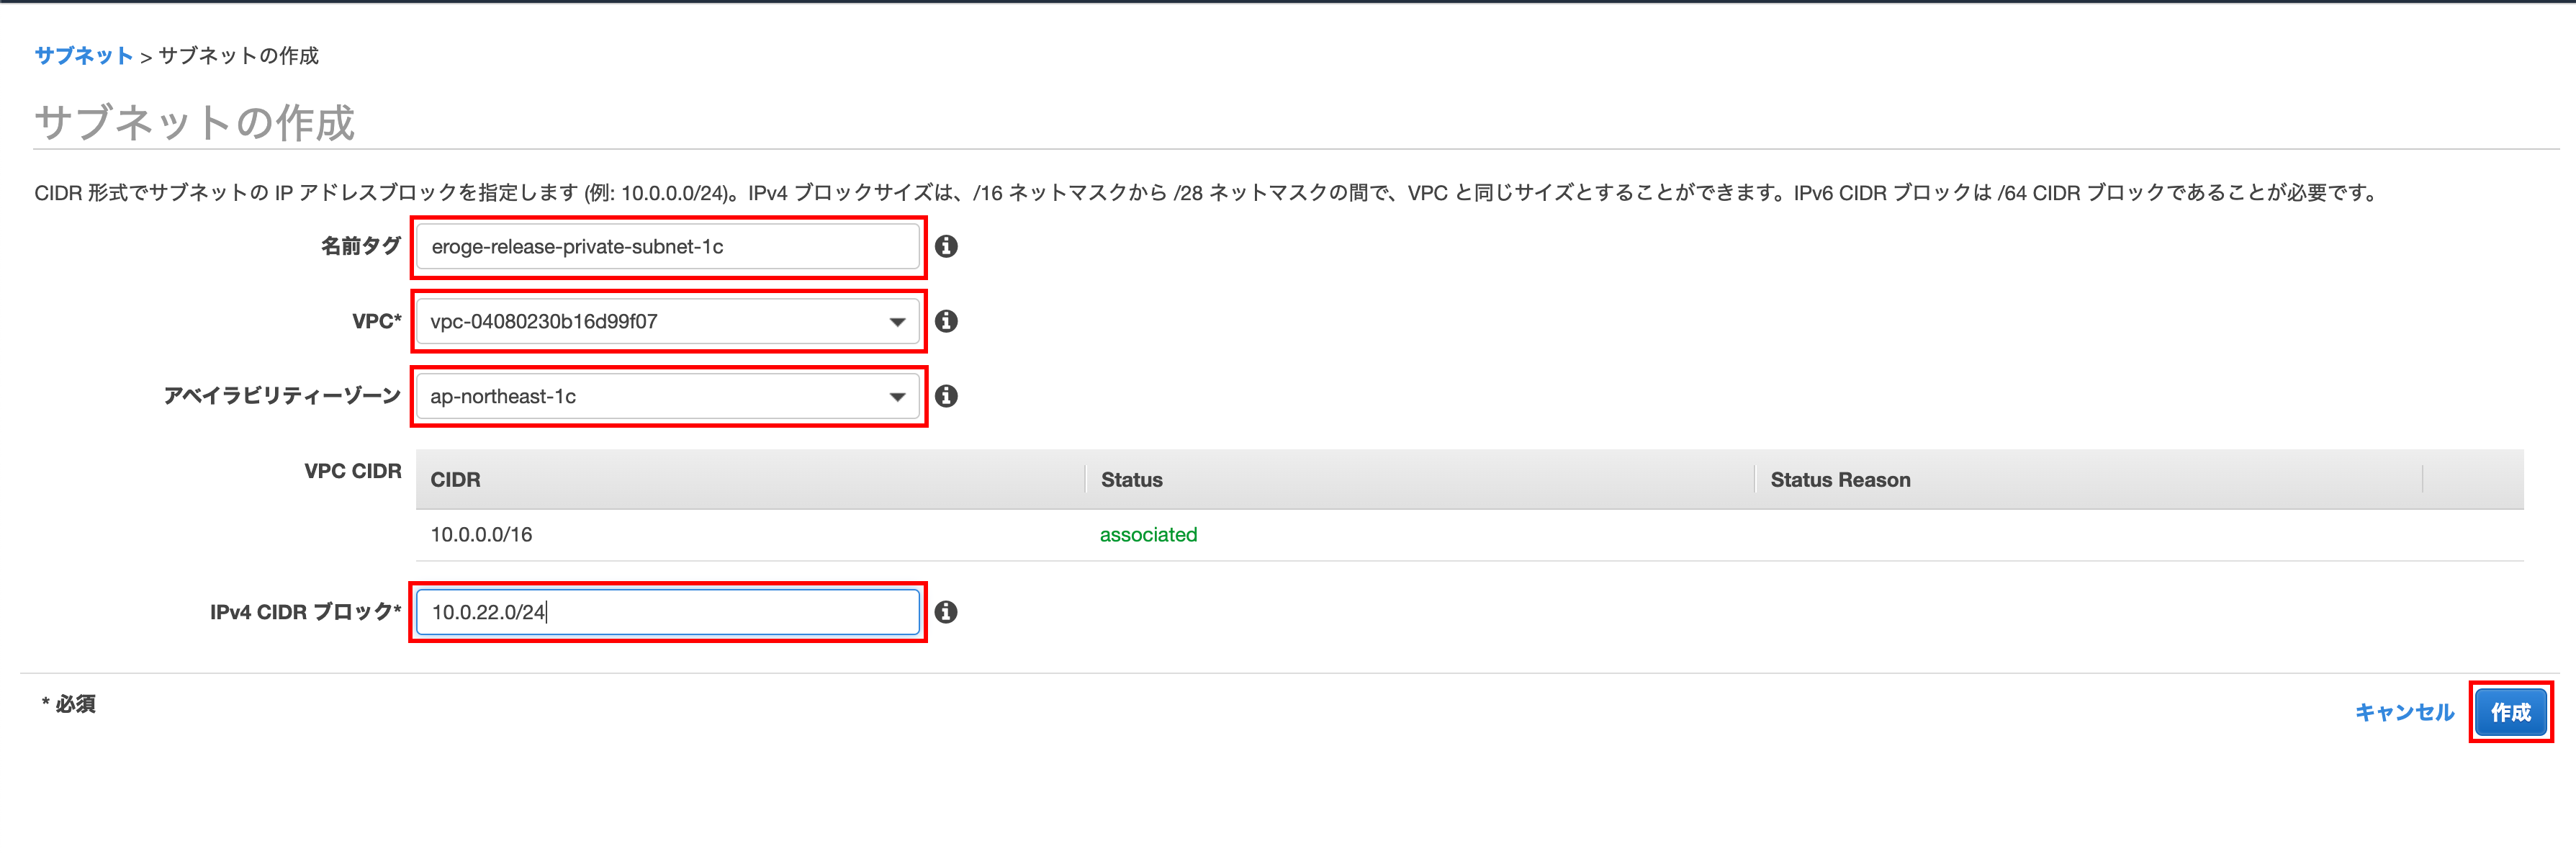
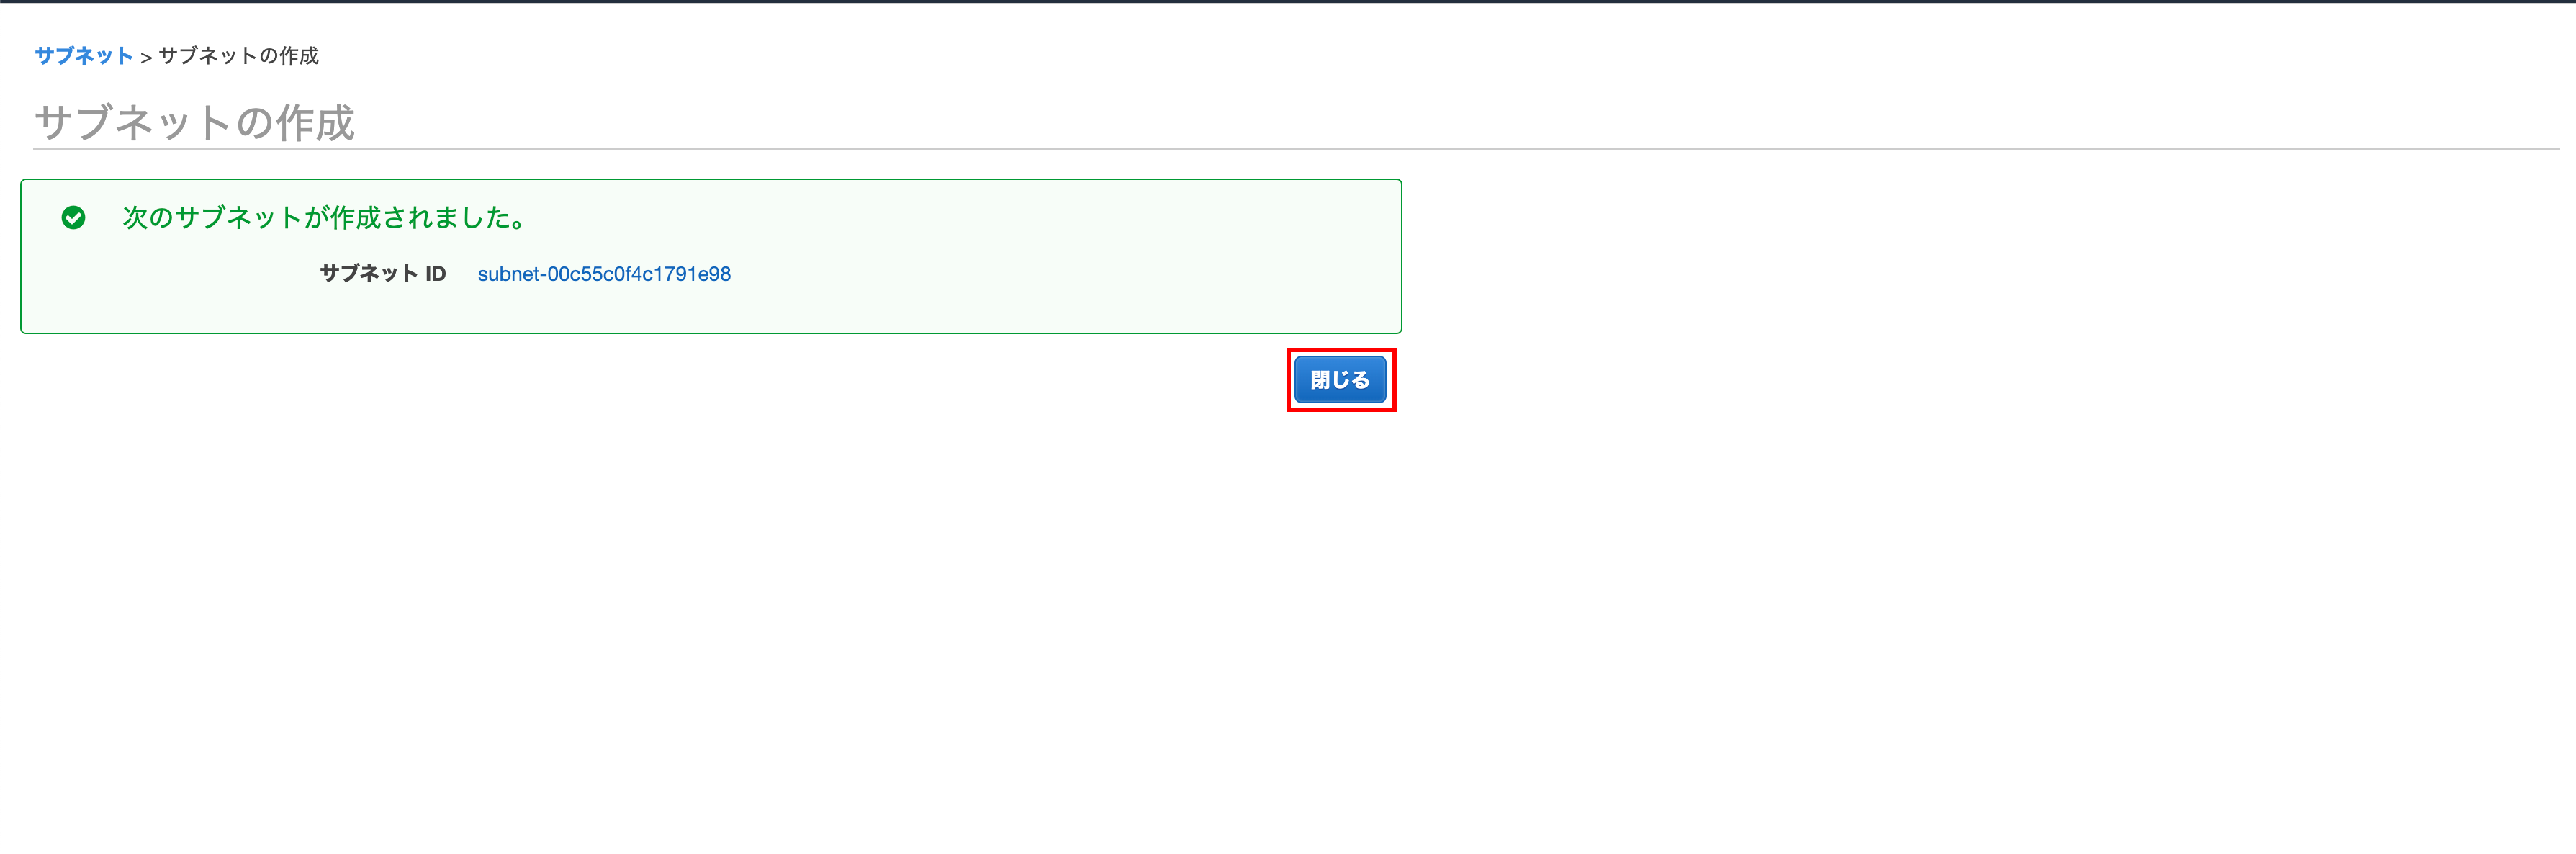
Click Close
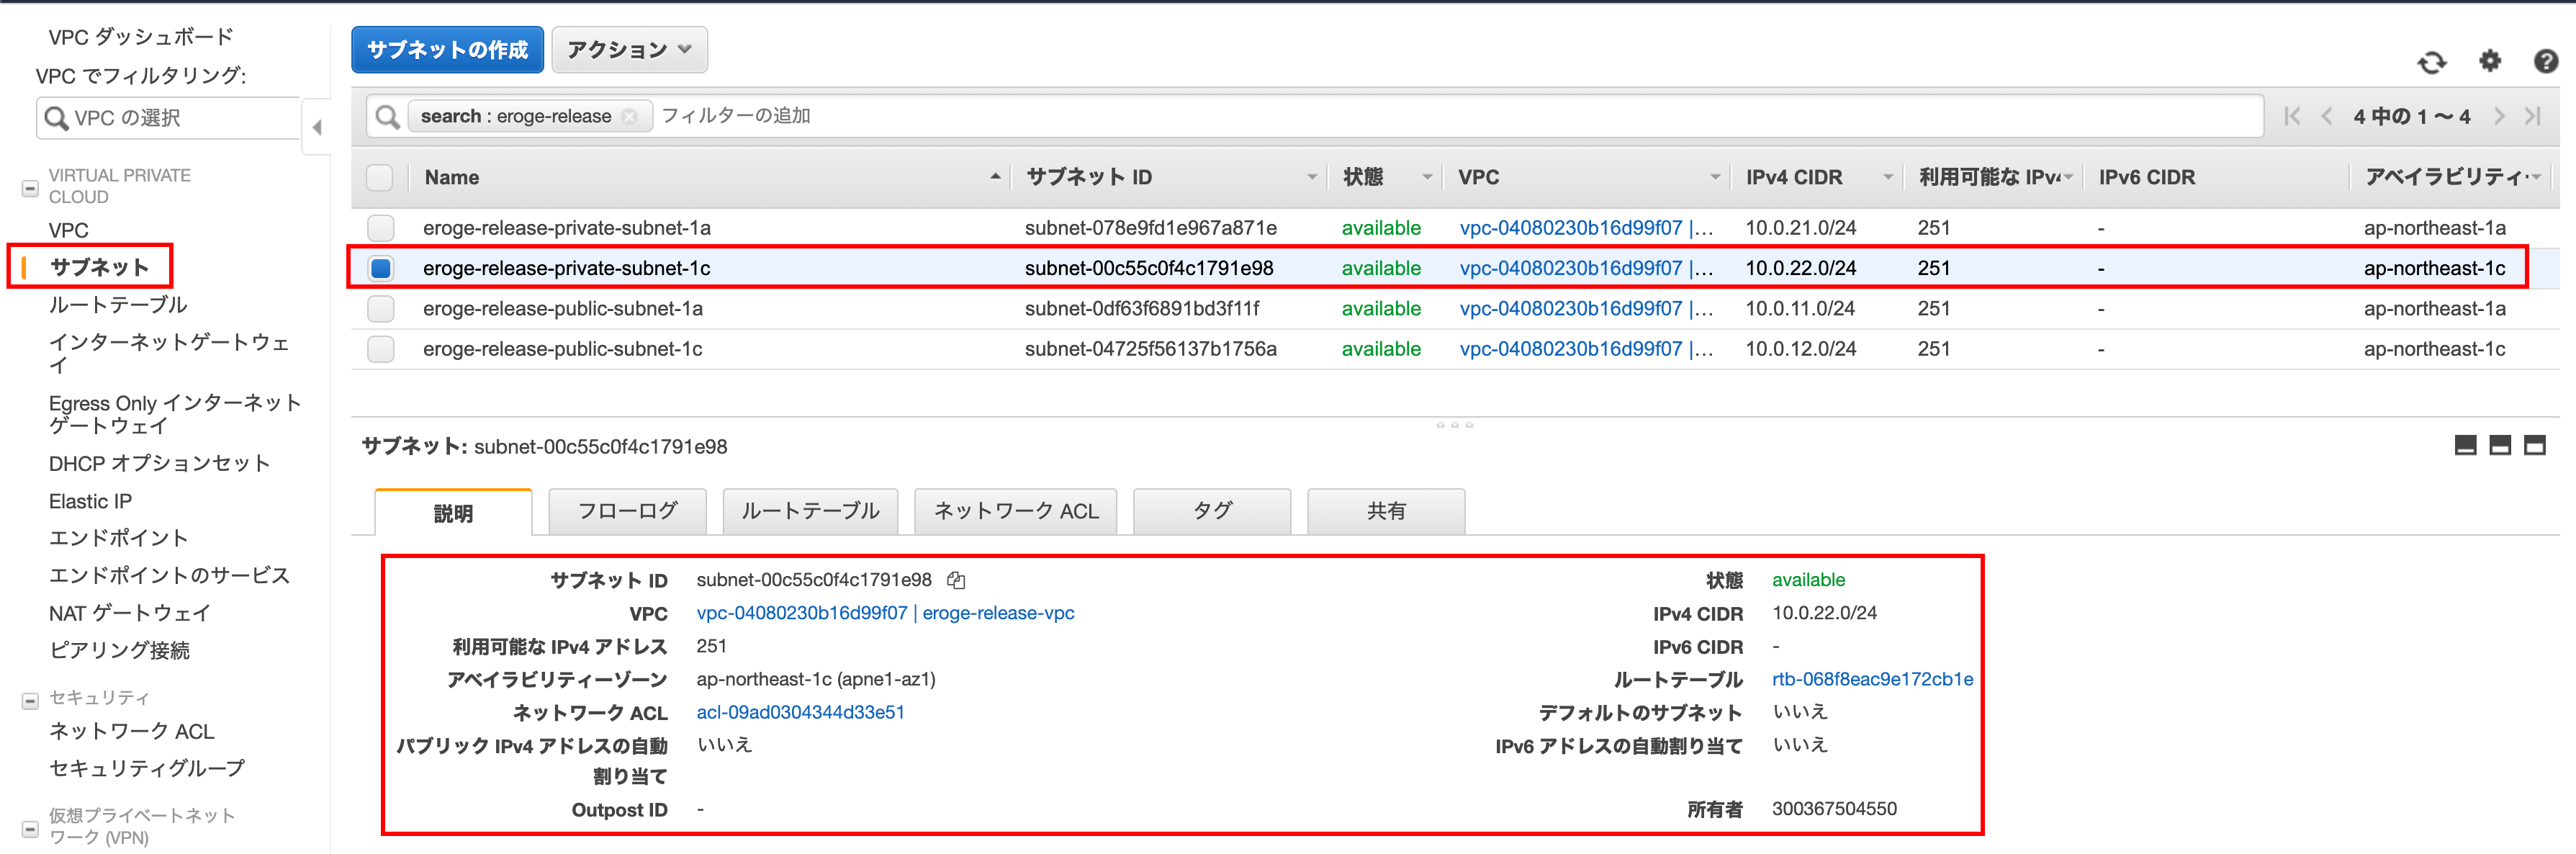
Confirm that it was created
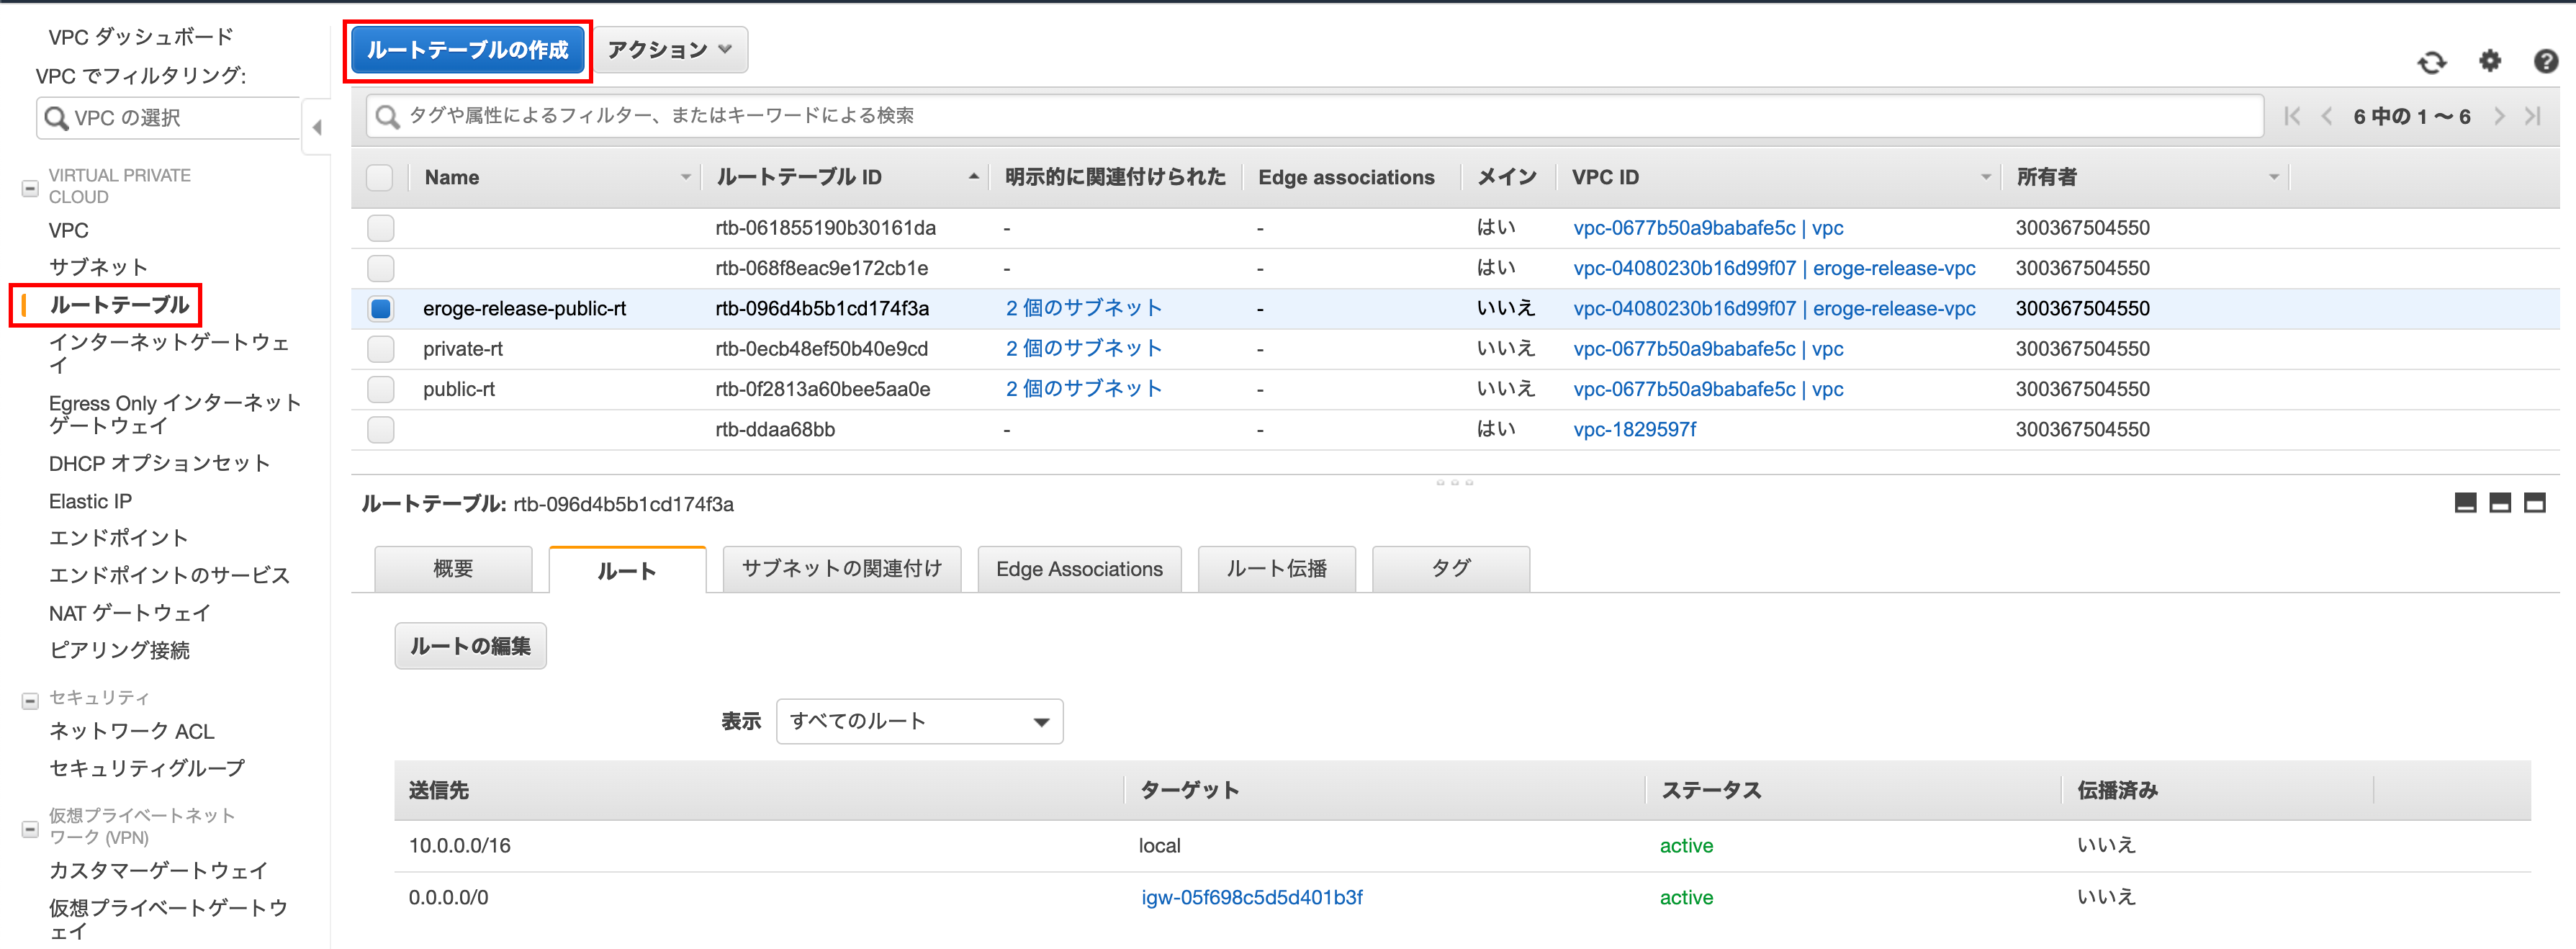
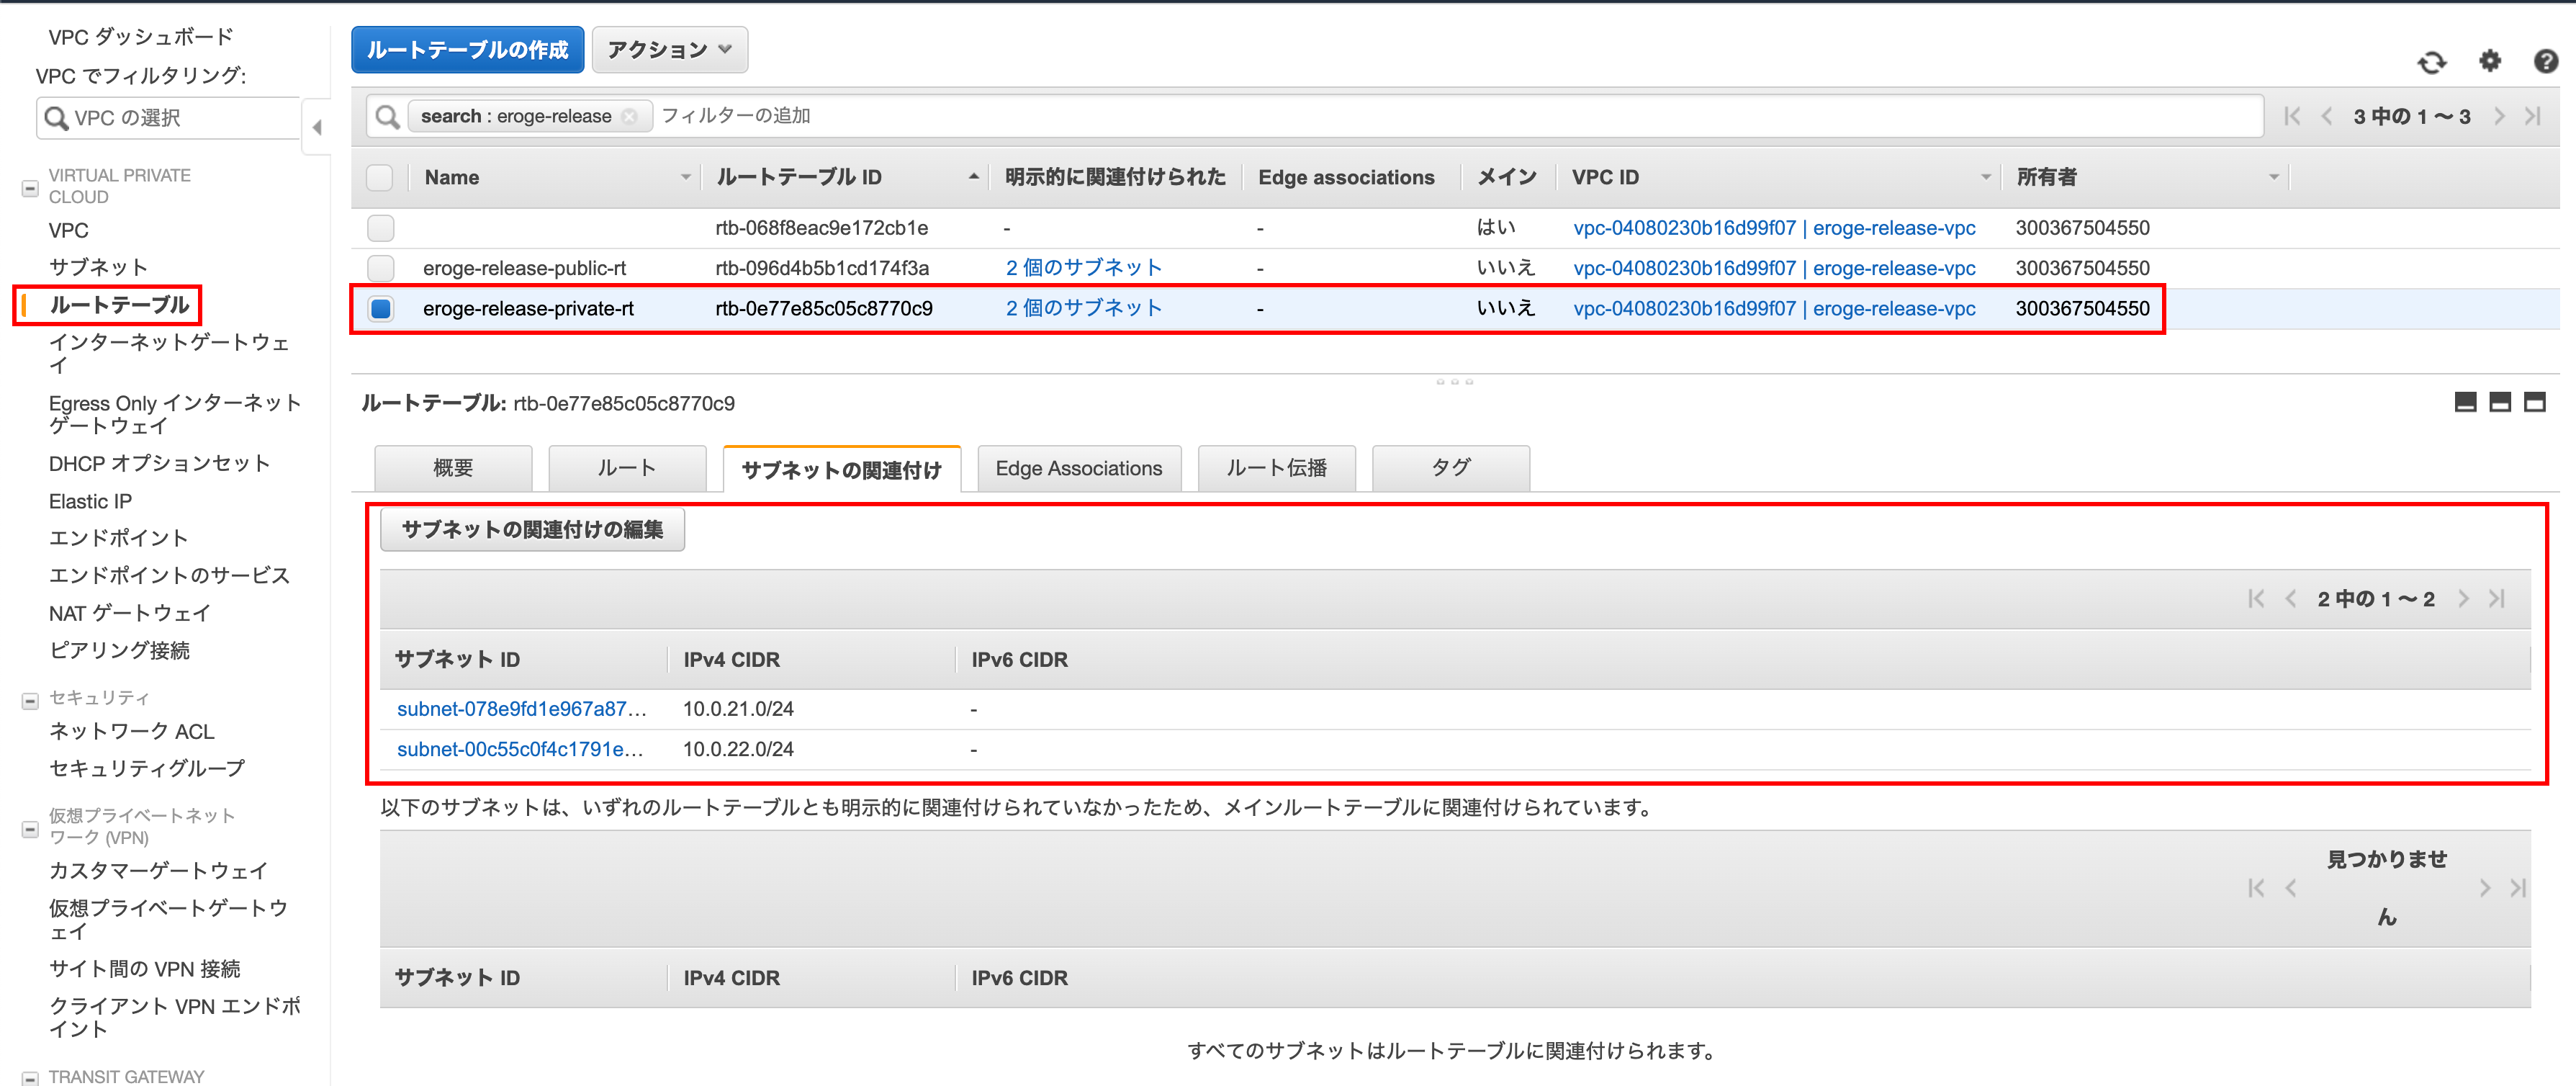
Create a route table for your private subnet
I will create a subnet for private use
Name the route table for the public subnet
Give it a descriptive name before creating a private subnet

Open the route table creation screen
Click Create Route Table
Creating a route table
Enter the name tag, VPC and click Create
** Select the created VPC for VPC **
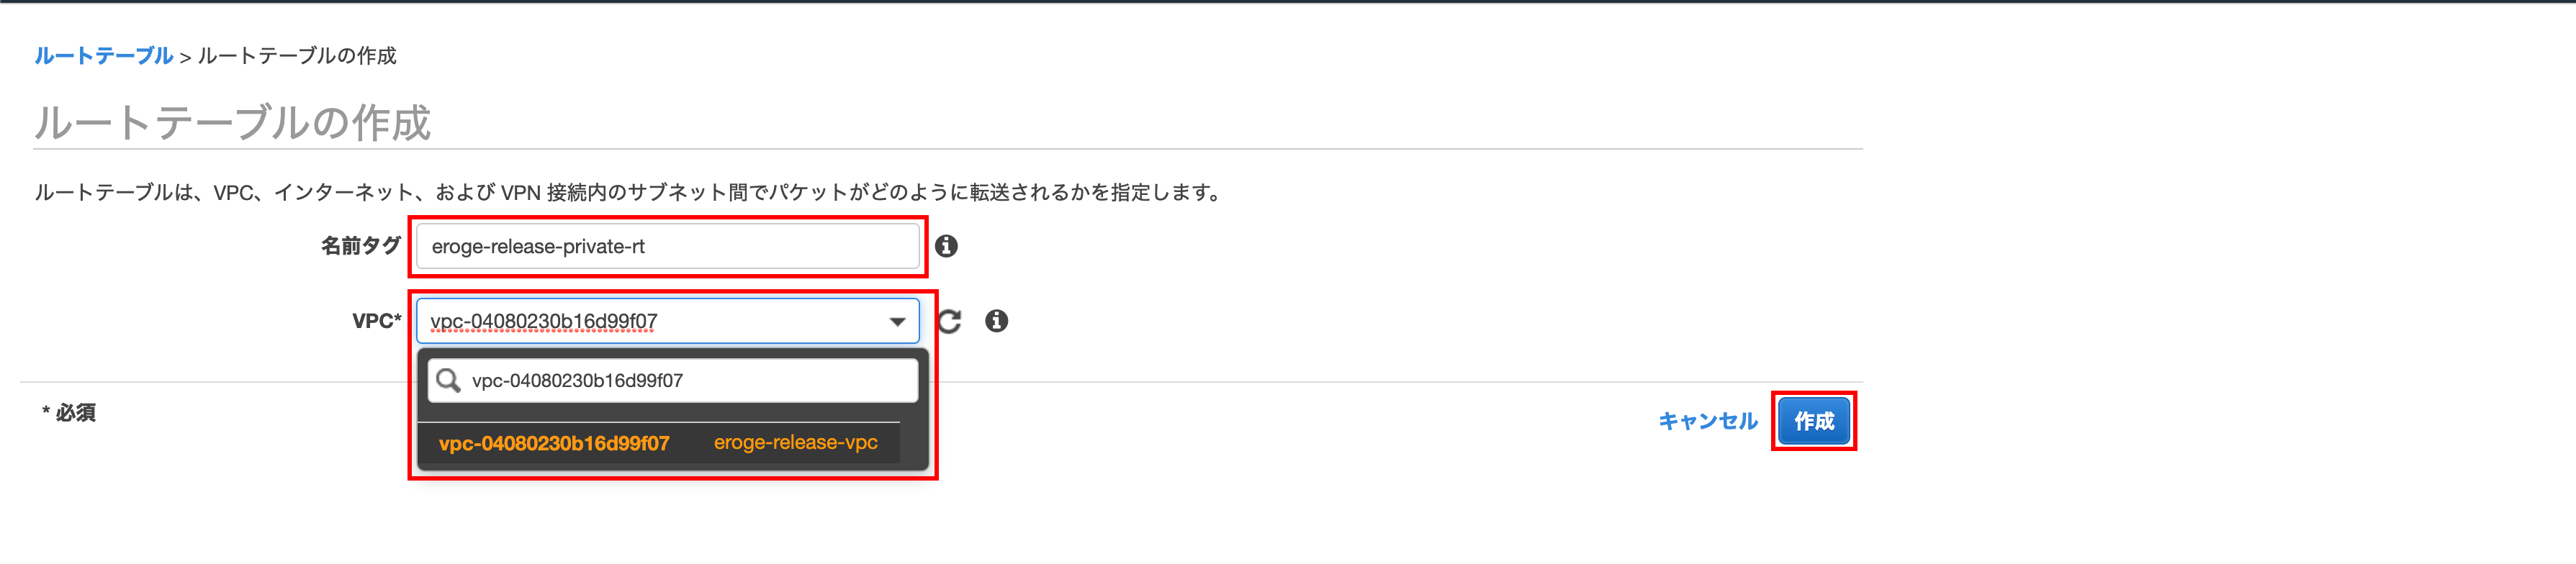
Click Close
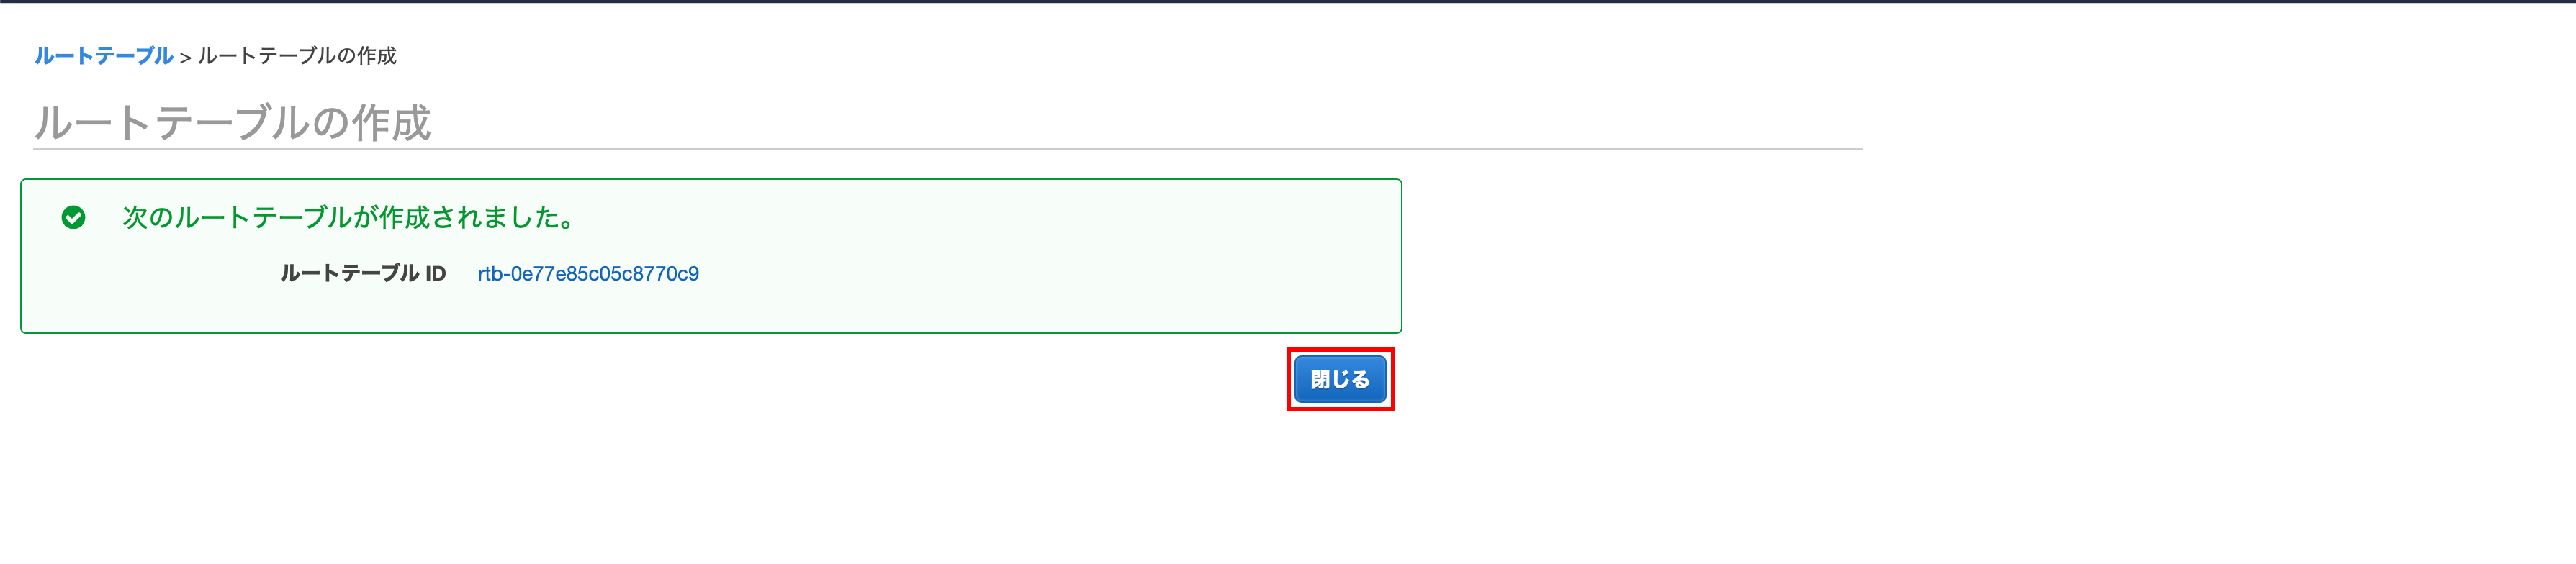
Confirm that it was created
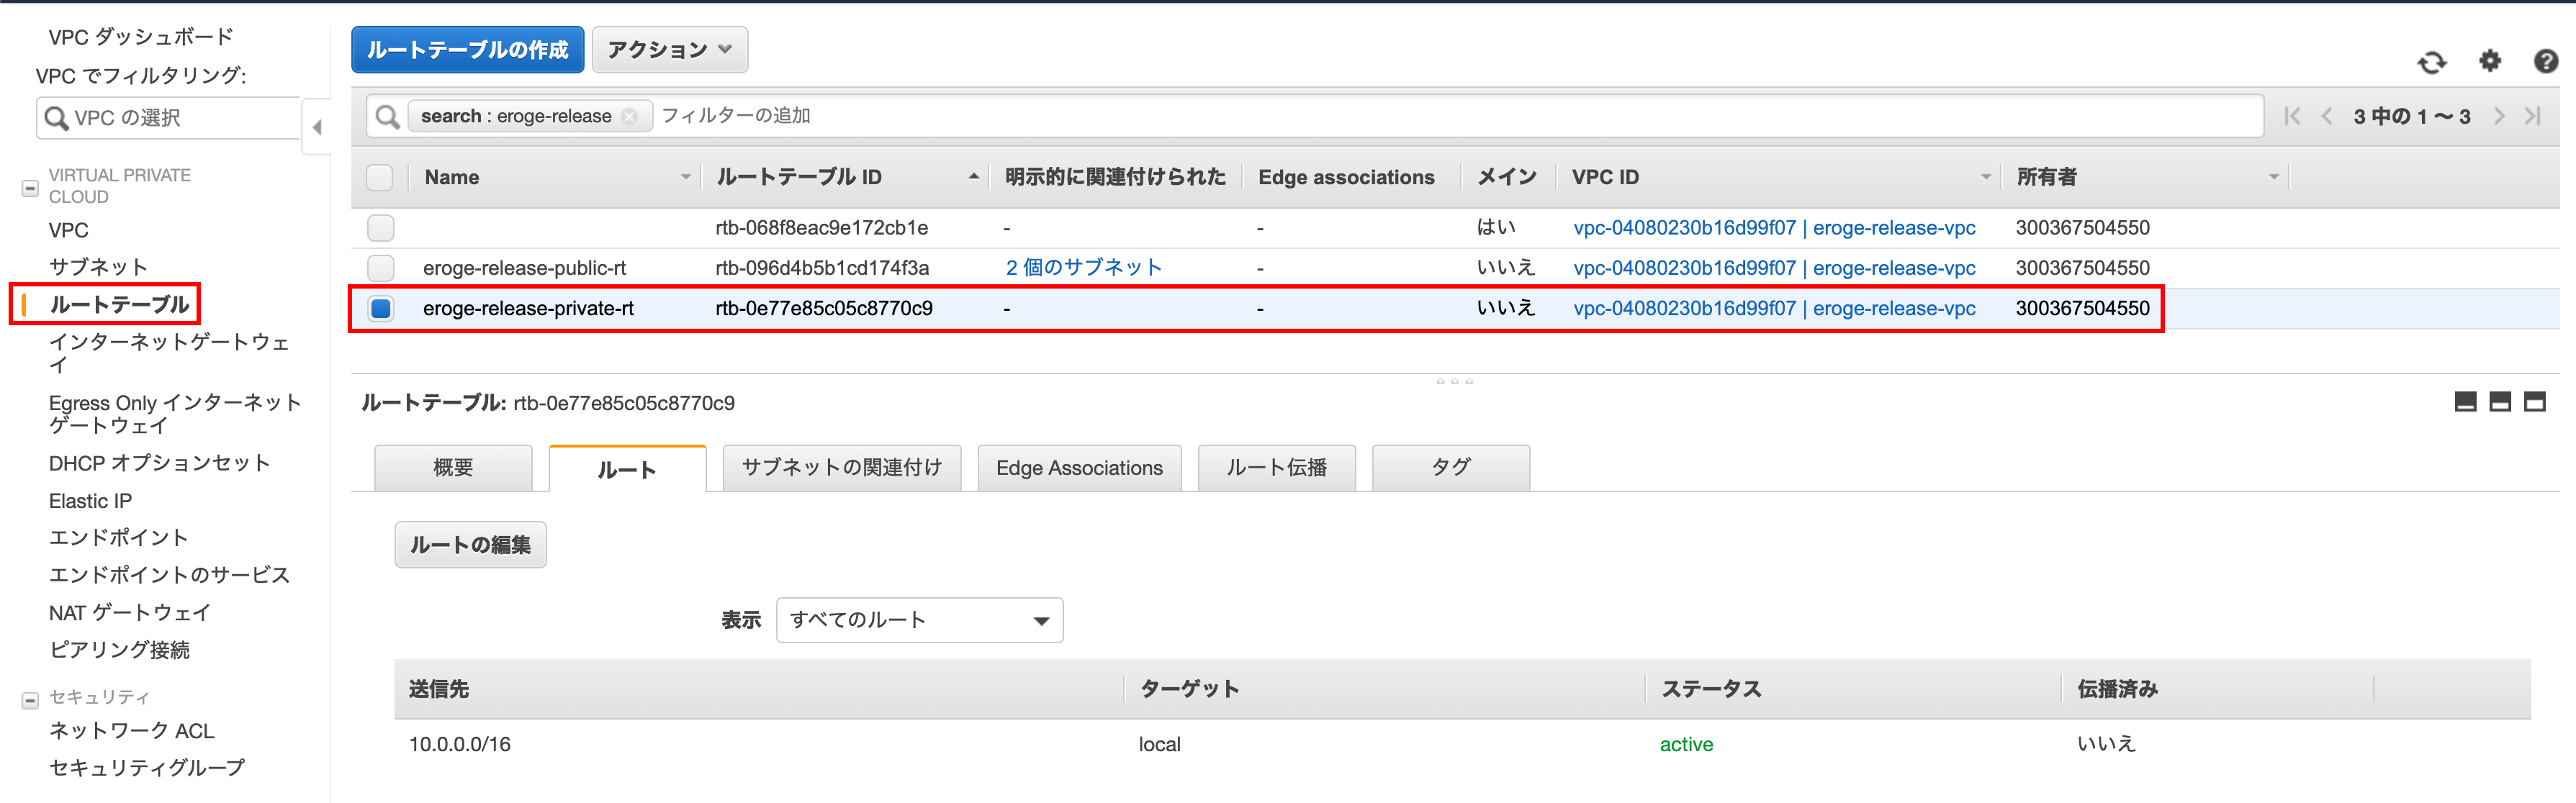
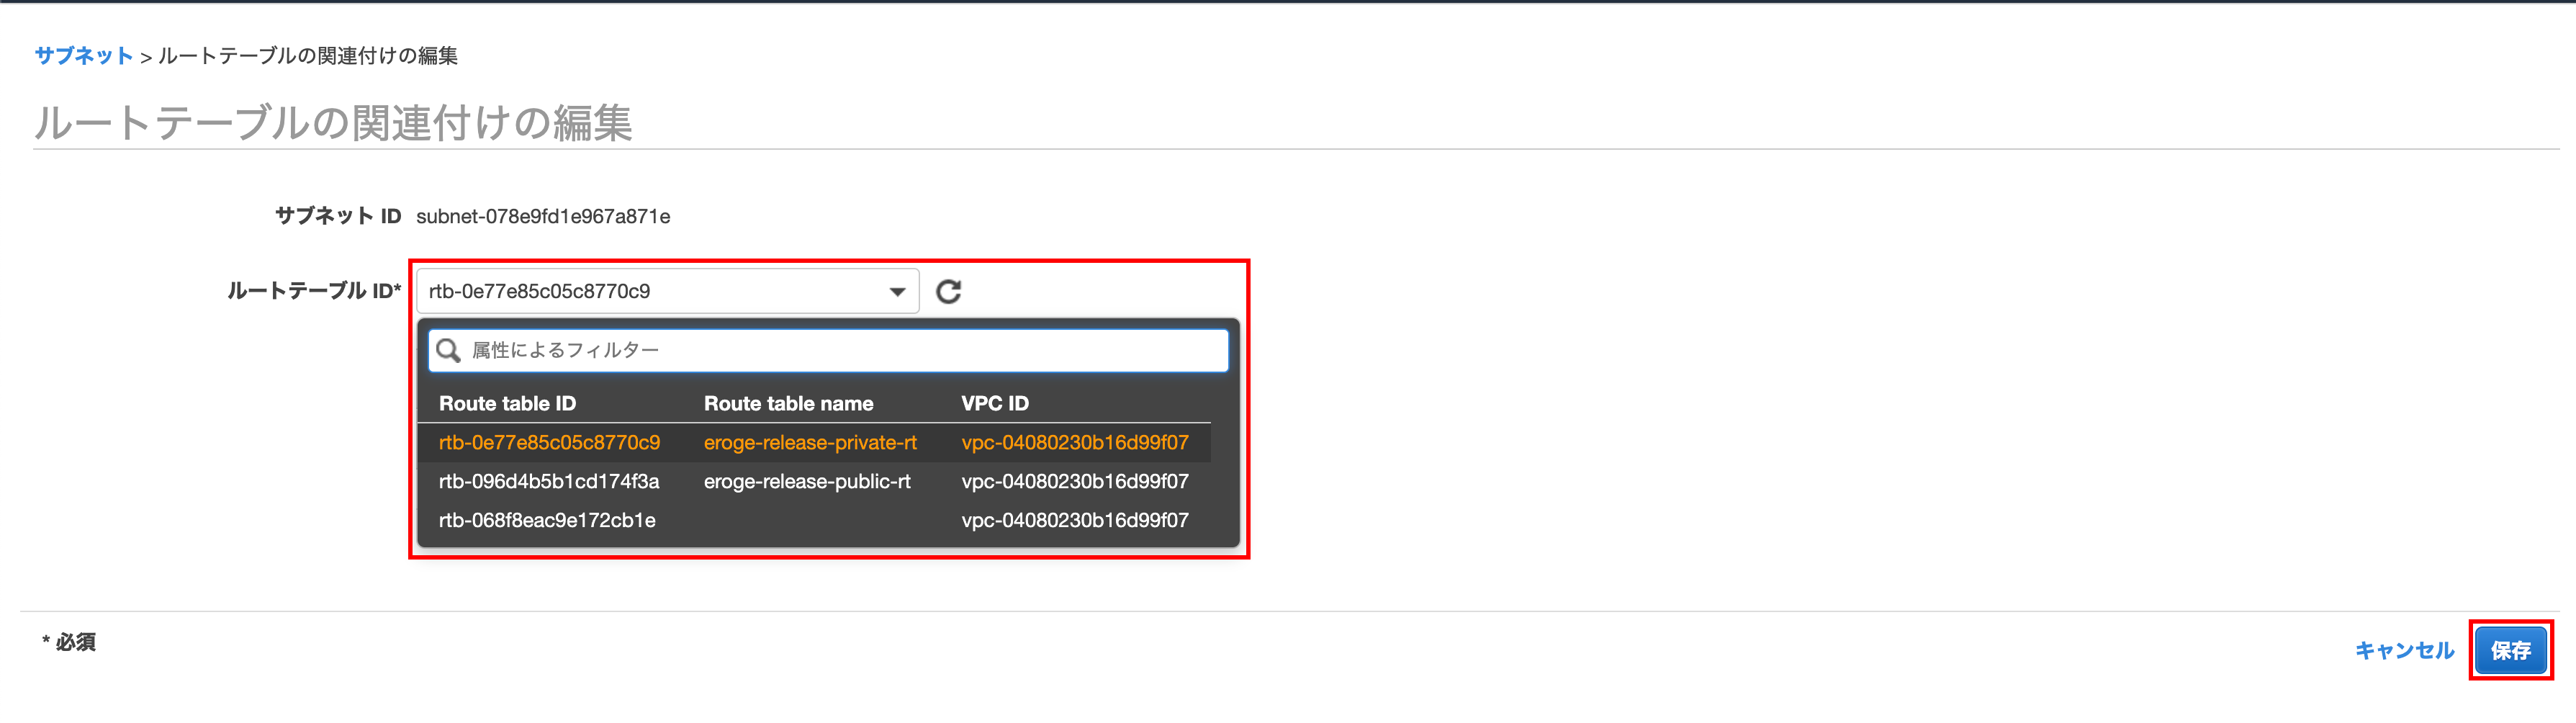
Associate the subnet created in ap-northeast-1a with the route table
I will link the route table created for private to the subnet
Open the edit screen of the route table association
Click Edit Route Table Association
Editing route table associations
Select the route table you just created and click Save
Click Close

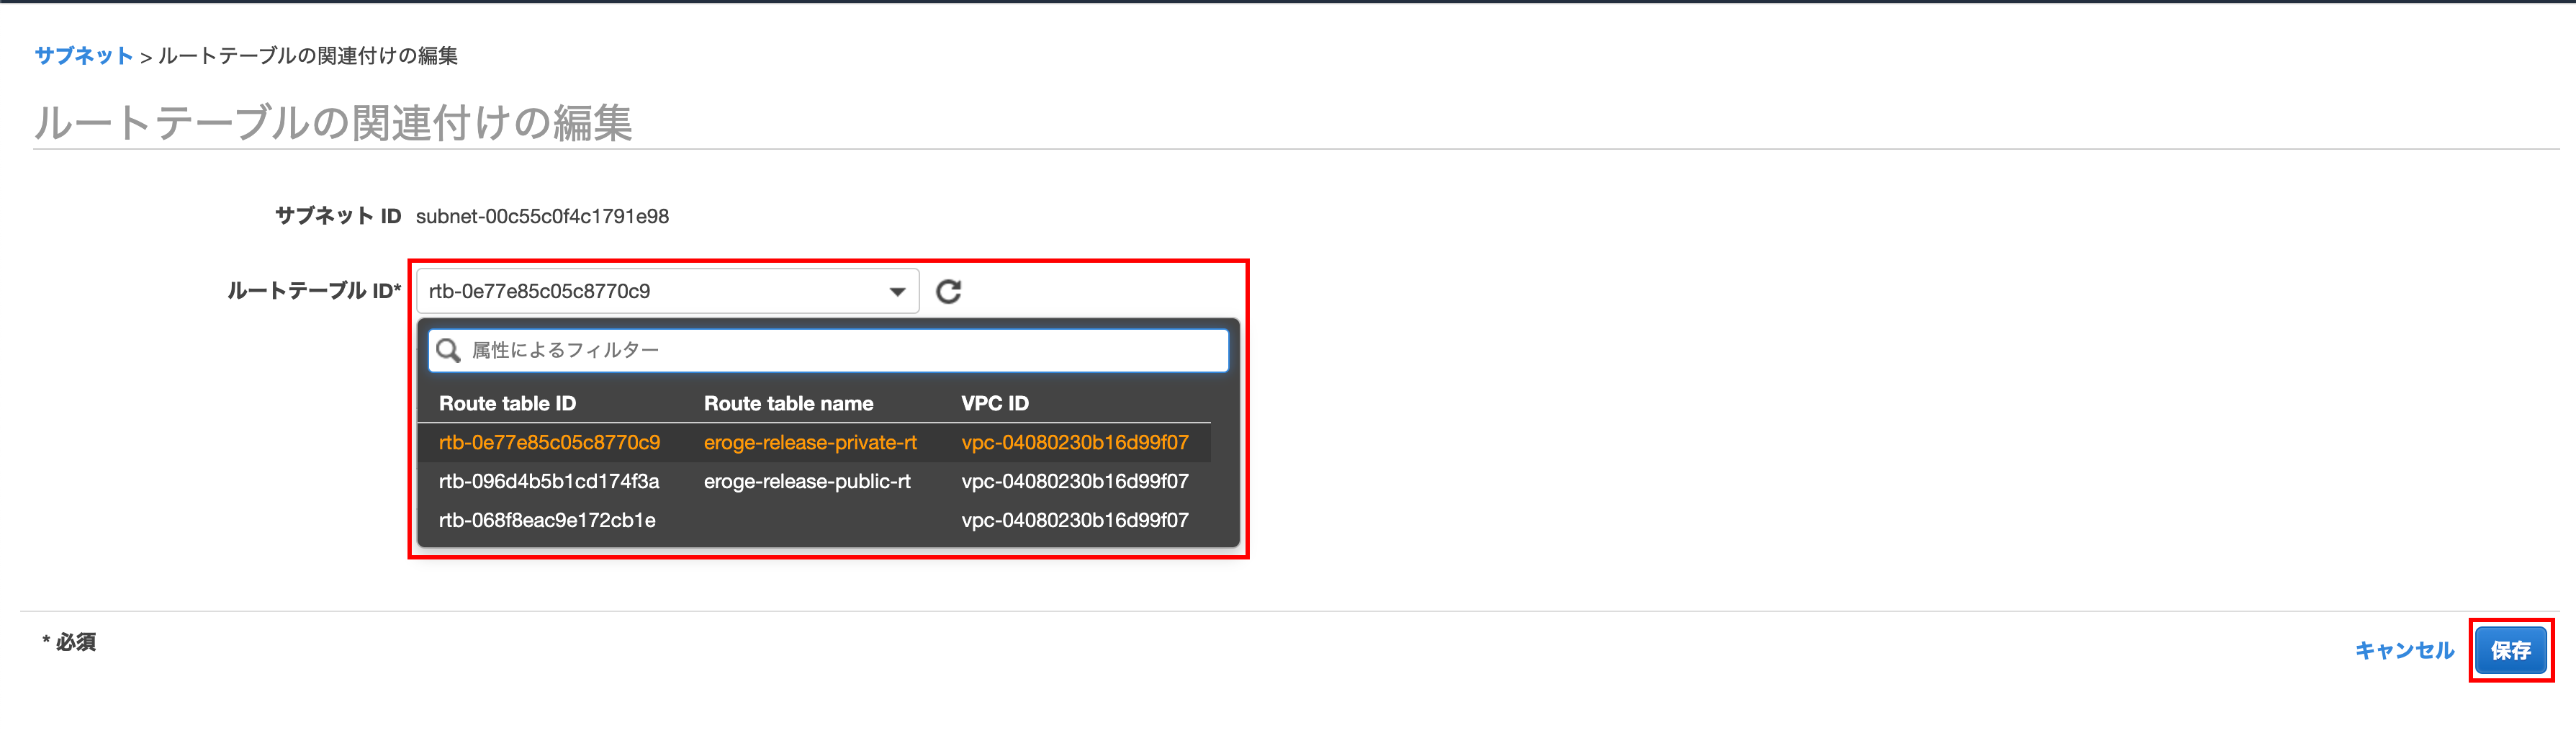
Associate the subnet created in ap-northeast-1c with the route table
I will link the route table created for private to the subnet
Open the edit screen of the route table association
Click Edit Route Table Association
Editing route table associations
Select the route table you just created and click Save
Click Close

Check if it is tied to the private route table
You can see that the subnet is linked to the route table
** This completes the VPC construction **
Building a bastion server environment
Build a bastion server (EC2) on the public subnet
Normally, it is better to build a bastion server using ʻAuto Scaling on the public subnet, but it costs money, so this time we will build it without using ʻAuto Scaling.
** Not very good configuration as the bastion server is a single point of failure **
Completion drawing
After construction, the configuration diagram will be as follows.
Let's build the environment immediately
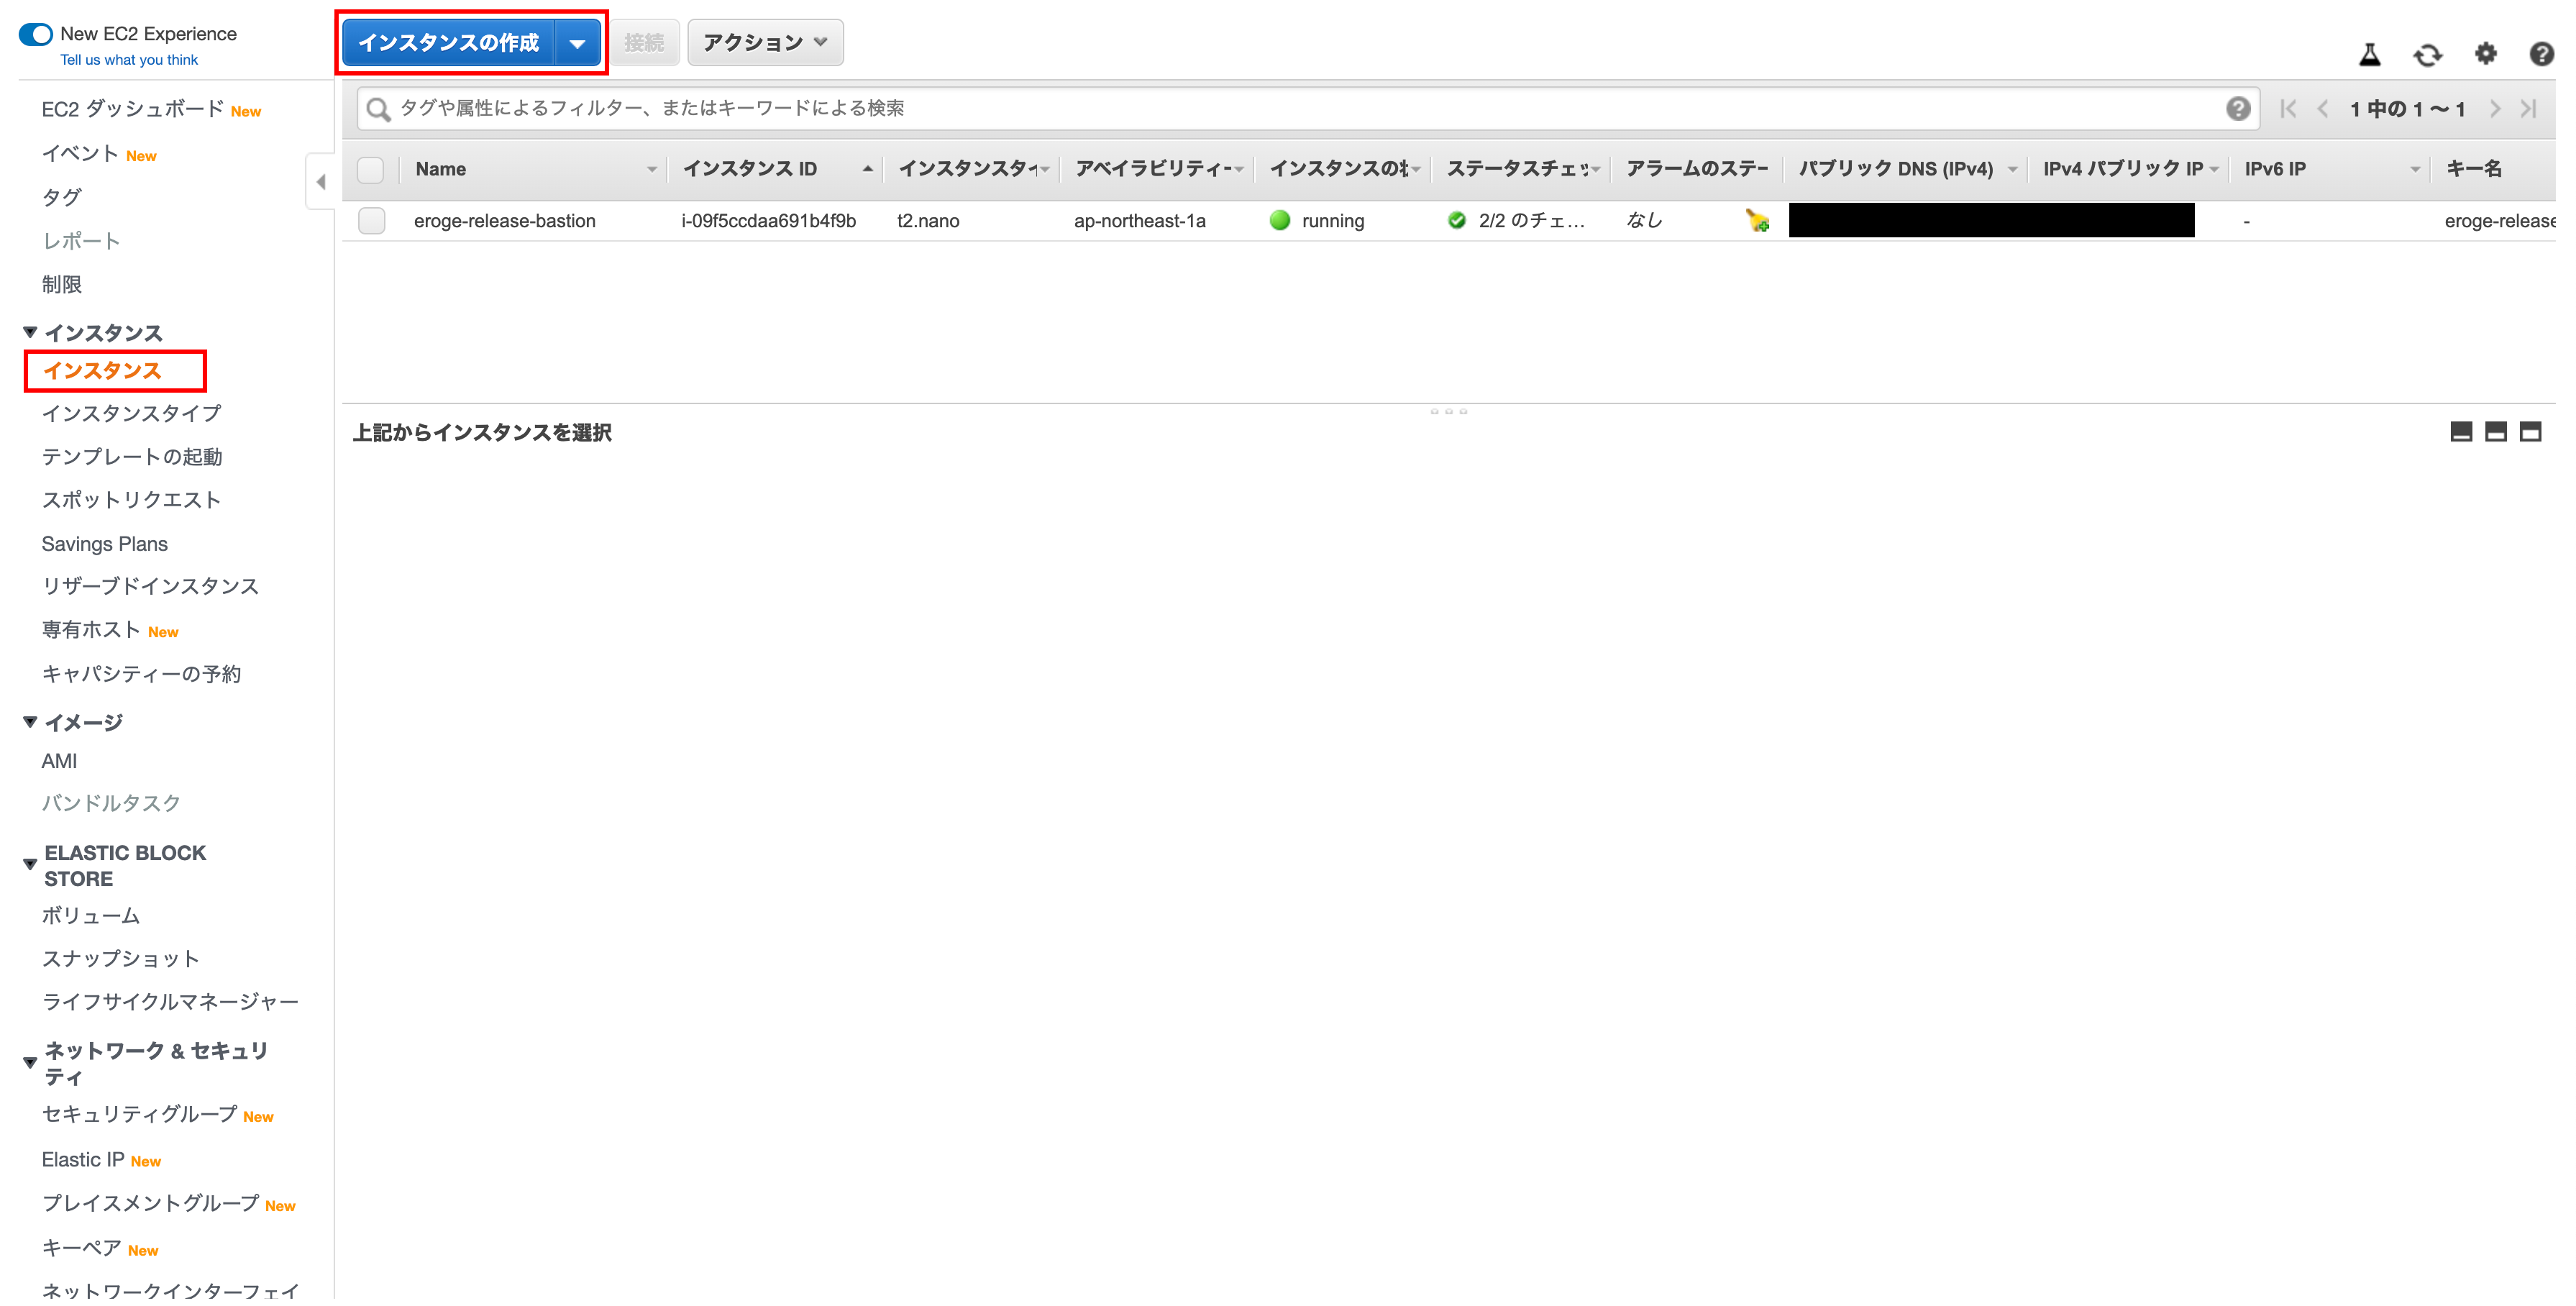
Create an EC2 instance for your bastion server
Create an EC2 instance for your bastion server
Open the EC2 instance creation screen
Click Create Instance
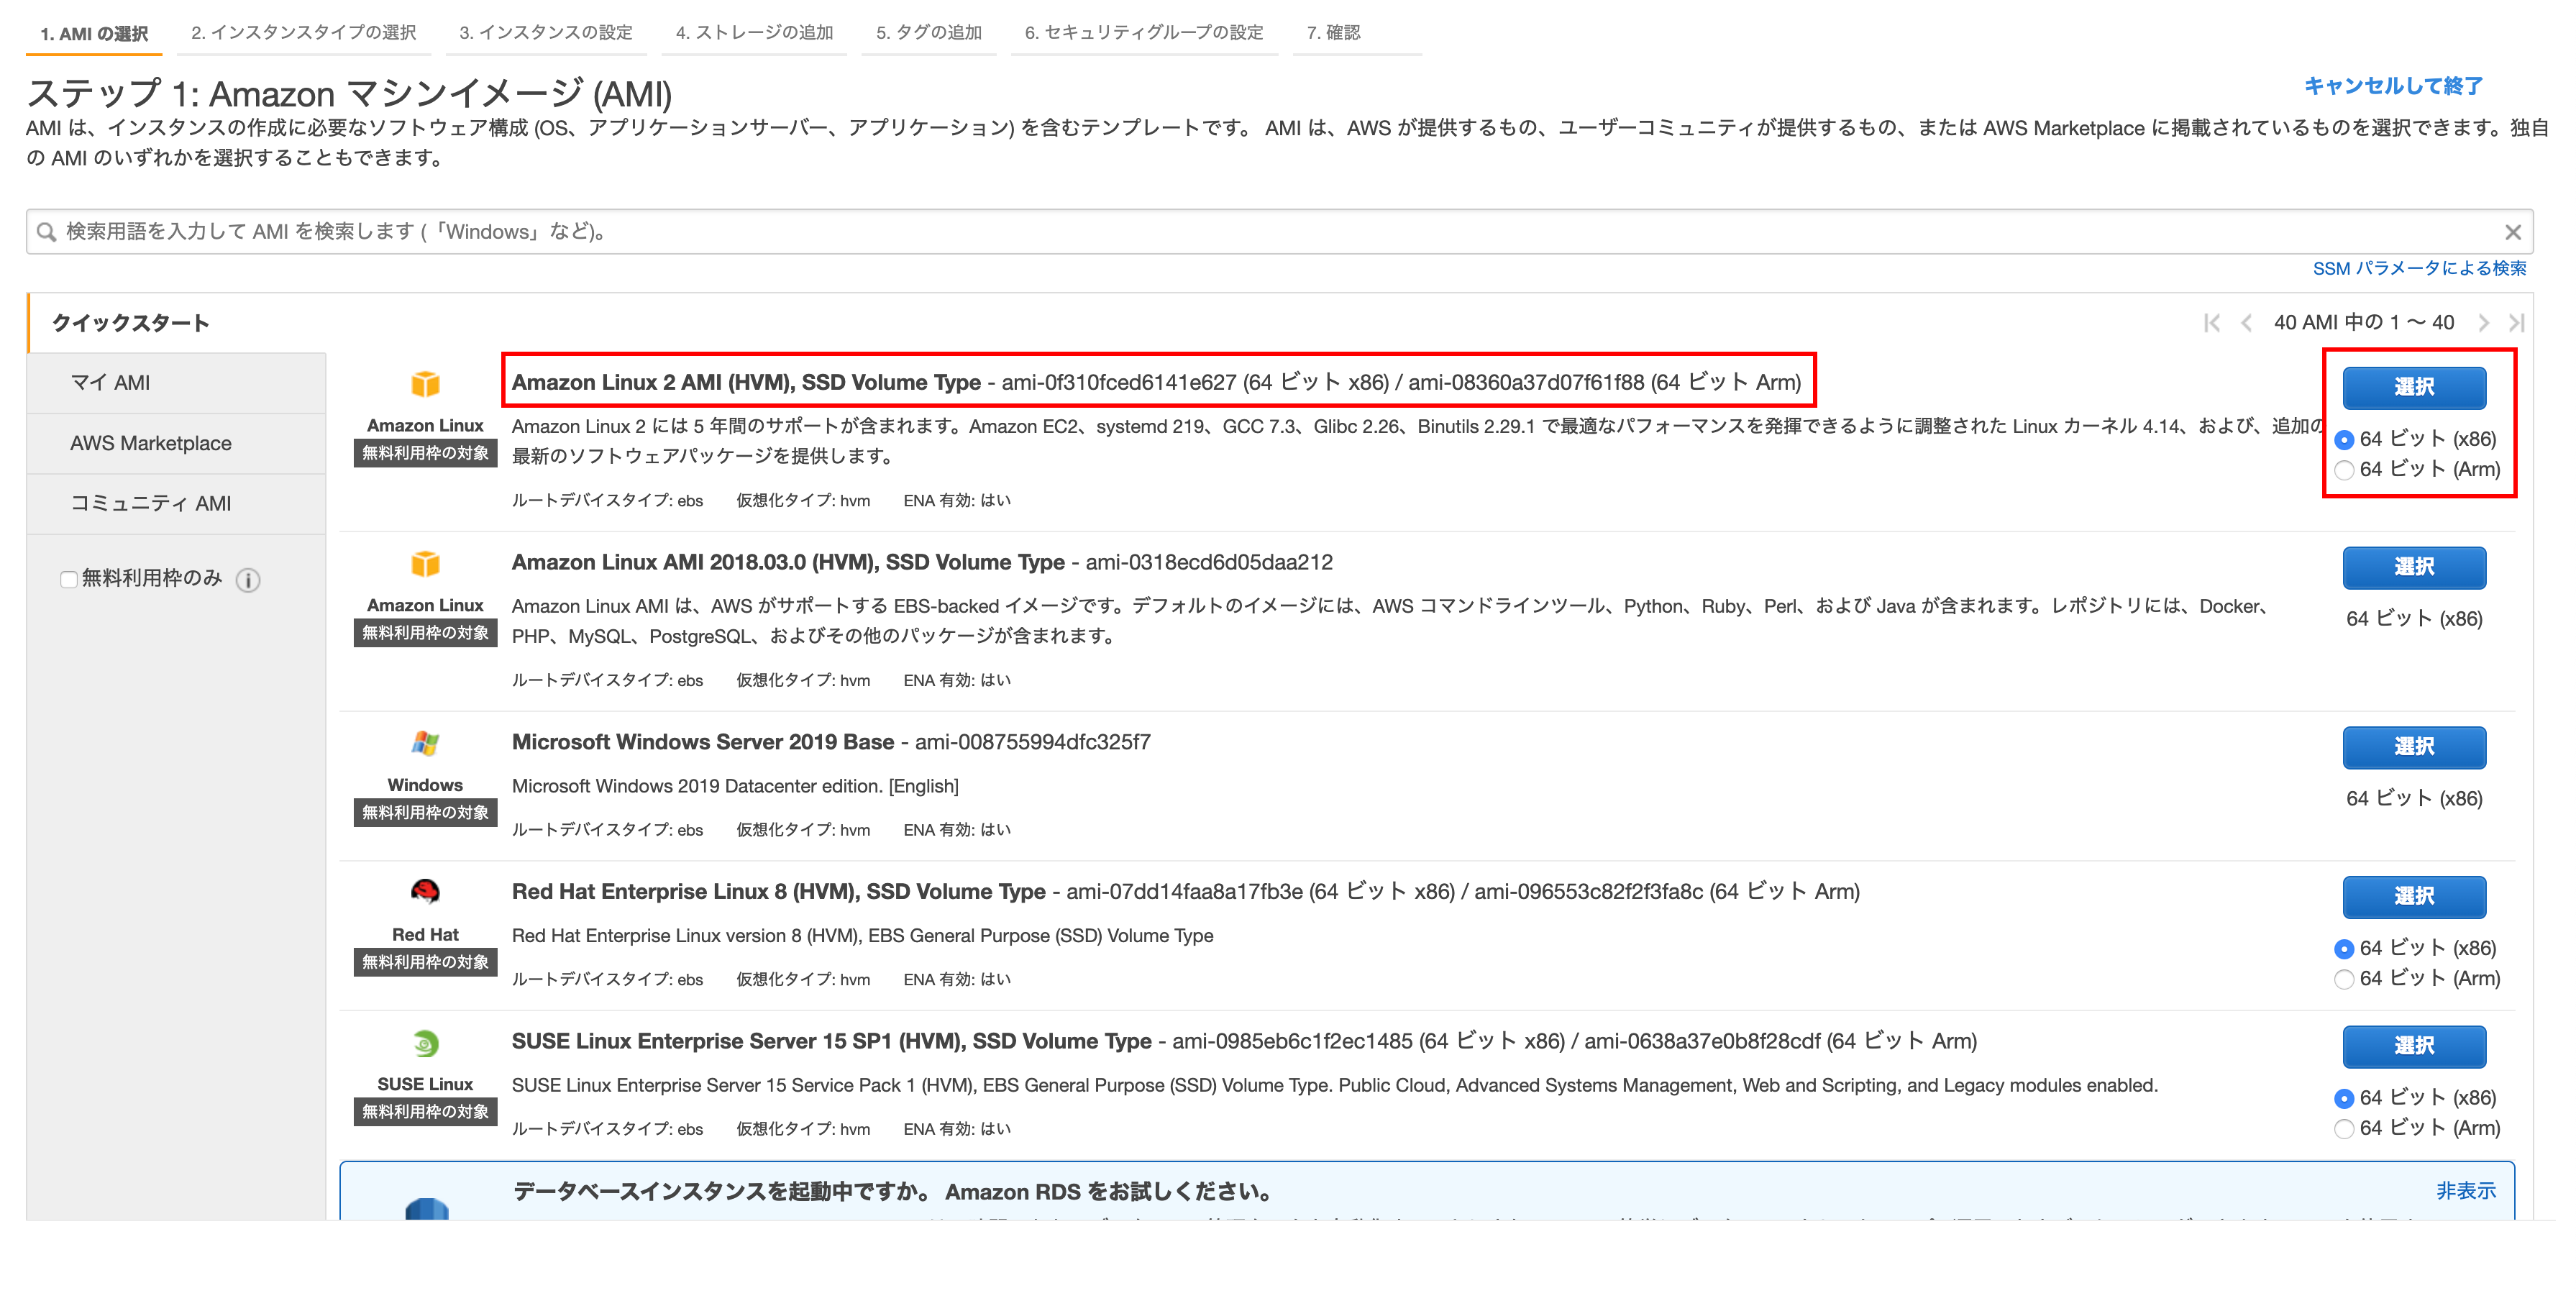
Step 1: Amazon Machine Image (AMI)
ʻSelect the64-bit (x86)of Amazon Linux 2 AMI (HVM), SSD Volume Type and click Select `
Step 2: Select instance type
Select t2.nano and click` Next Step: Set Instance Details``
** If you can afford it, you can choose a slightly higher type **

Step 3: Set up instance details
Enter Network, Subnet, Auto Assign Public IP
Select the target VPC for your network
Select the public subnetof ʻap-northeast-1a for the subnet SelectEnabled` for the auto-assigned public IP (I will configure the Elastic IP later, but I will enable it once)
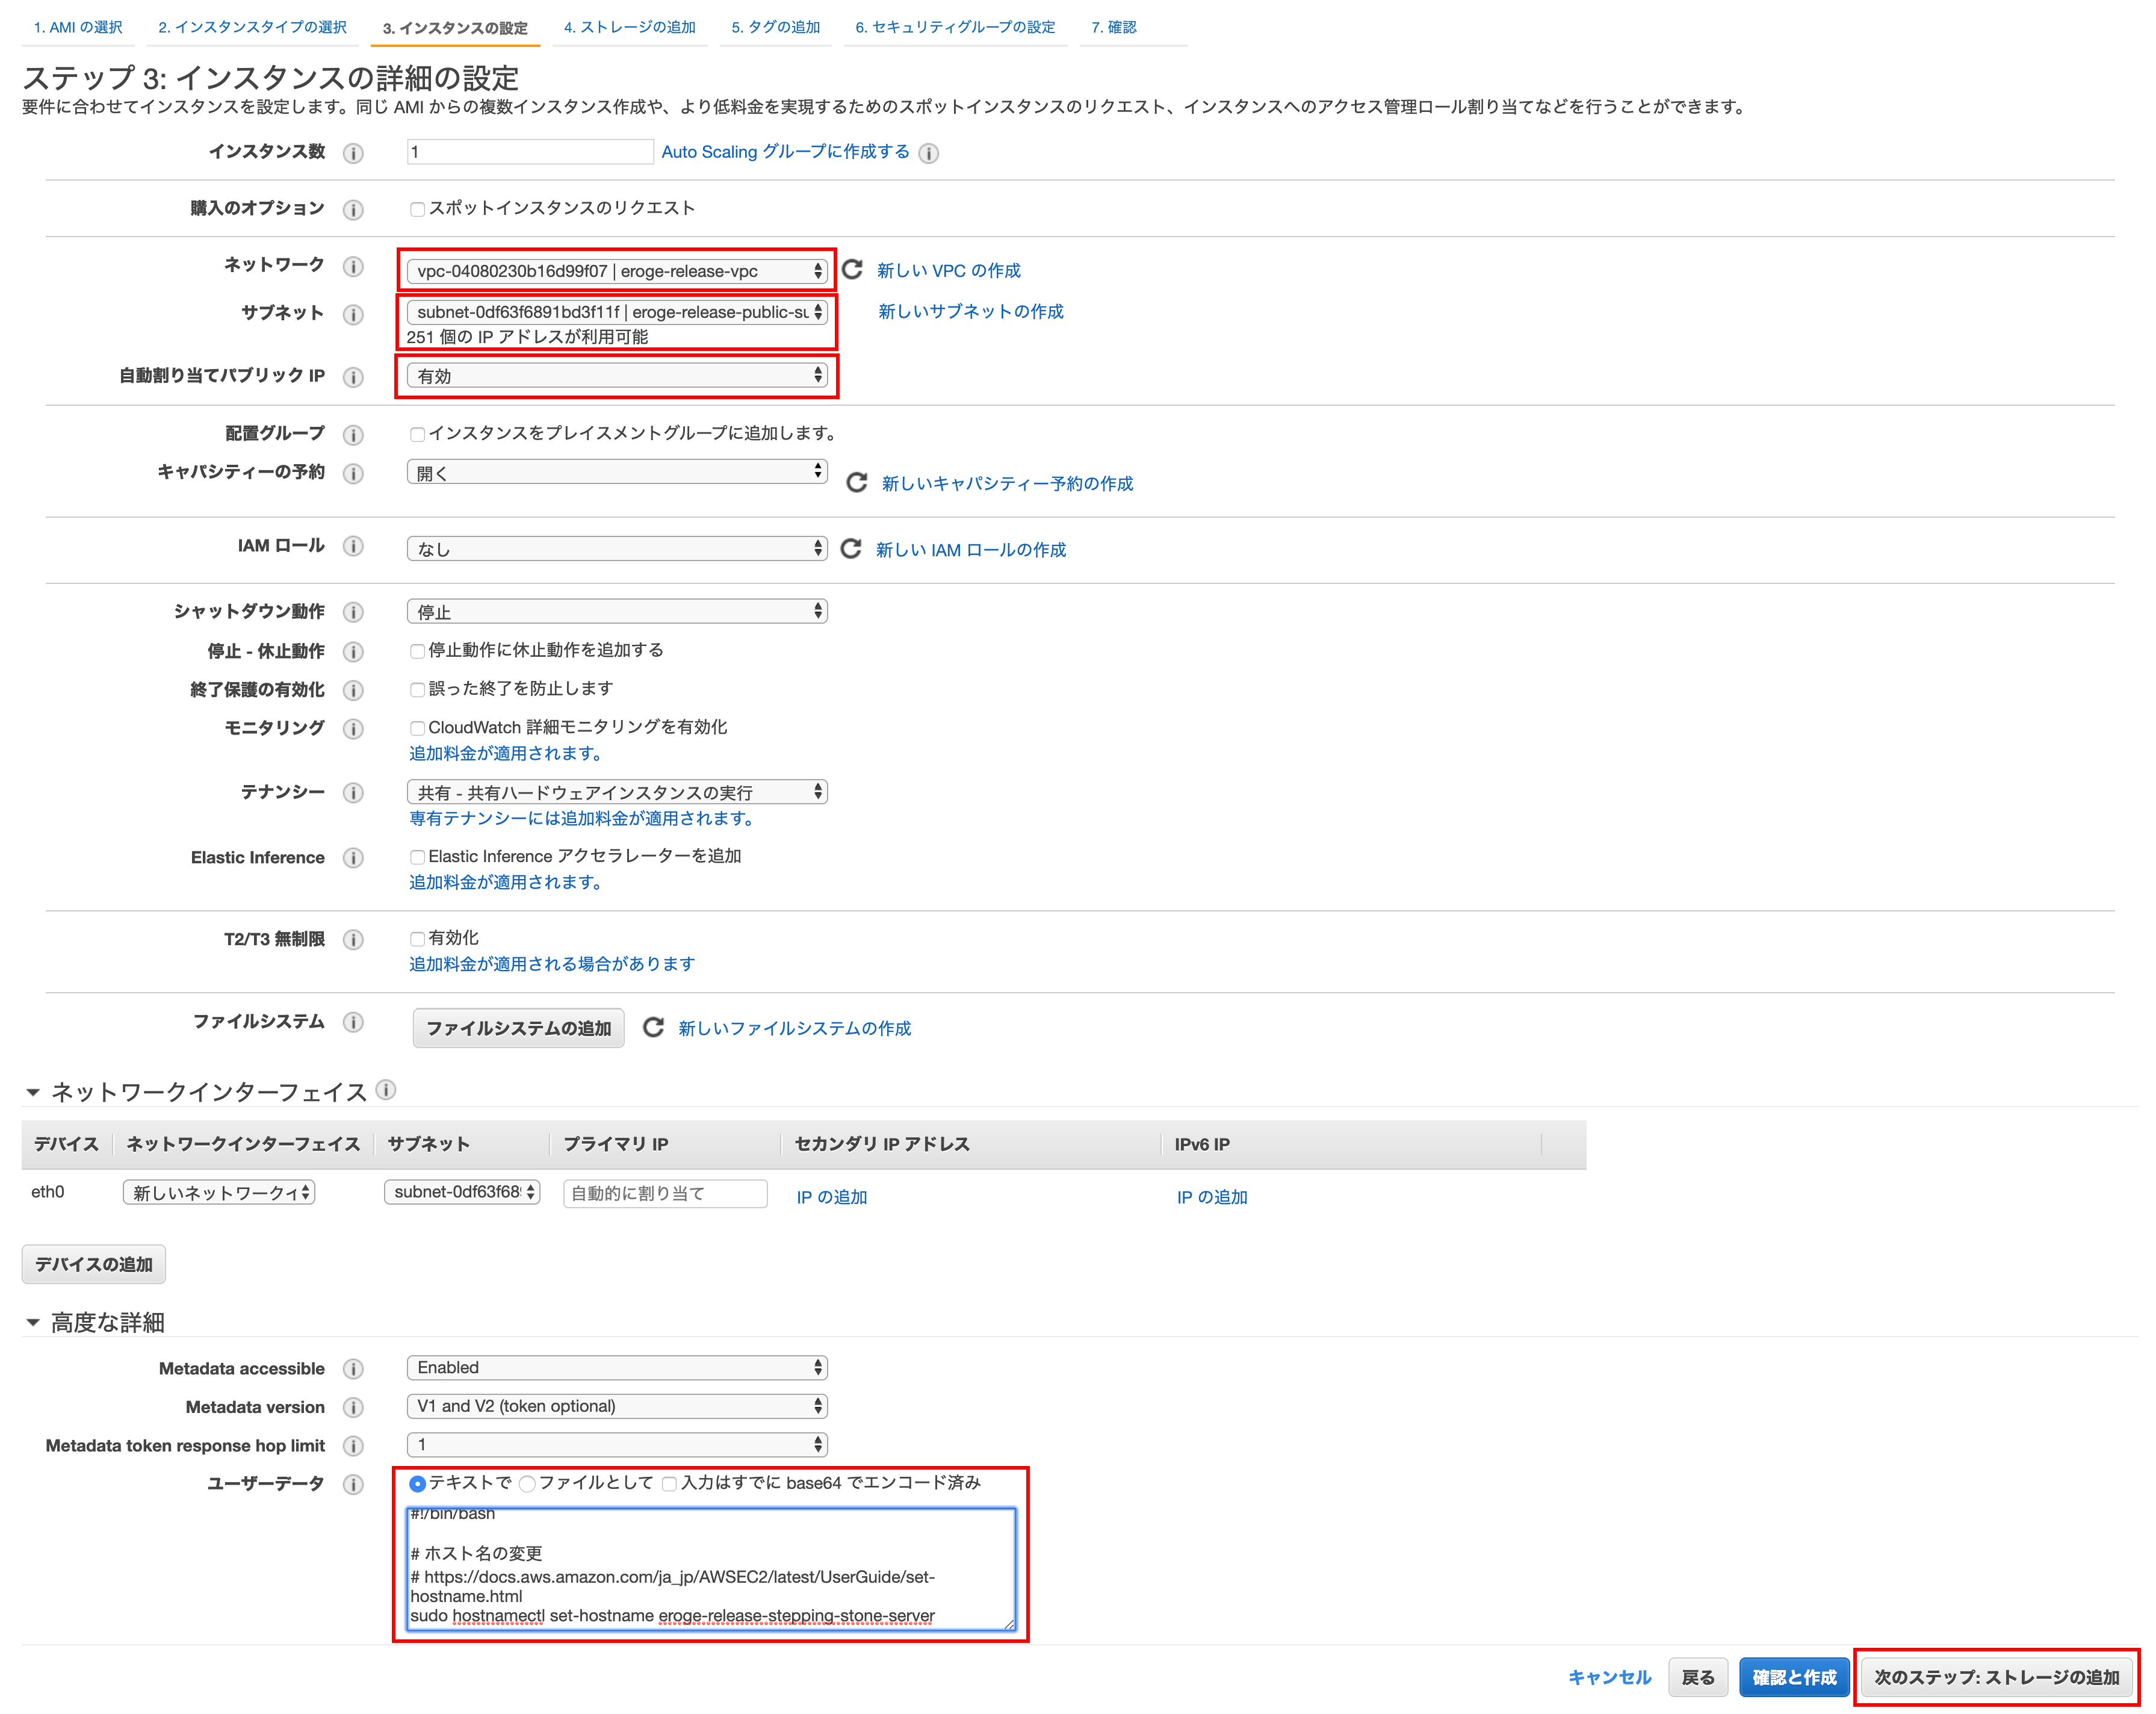
User data
For user data, selectintext and paste the following content
#!/bin/bash

#Change host name
# https://docs.aws.amazon.com/ja_jp/AWSEC2/latest/UserGuide/set-hostname.html
sudo hostnamectl set-hostname eroge-release-stepping-stone-server

#Installing PostgreSQL 11
# https://qiita.com/libra_lt/items/f2d2d8ee389daf21d3fb
sudo rpm -ivh --nodeps https://download.postgresql.org/pub/repos/yum/11/redhat/rhel-7-x86_64/pgdg-redhat-repo-latest.noarch.rpm
sudo sed -i "s/\$releasever/7/g" "/etc/yum.repos.d/pgdg-redhat-all.repo"
sudo yum install -y postgresql11

#Asia time zone/Change to Tokyo
# https://docs.aws.amazon.com/ja_jp/AWSEC2/latest/UserGuide/set-time.html#change_time_zone
sudo ln -sf /usr/share/zoneinfo/Asia/Tokyo /etc/localtime
sudo sed -i 's|^ZONE=[a-zA-Z0-9\.\-\"]*$|ZONE="Asia/Tokyo”|g' /etc/sysconfig/clock
Finally, click Next Step: Add Storage
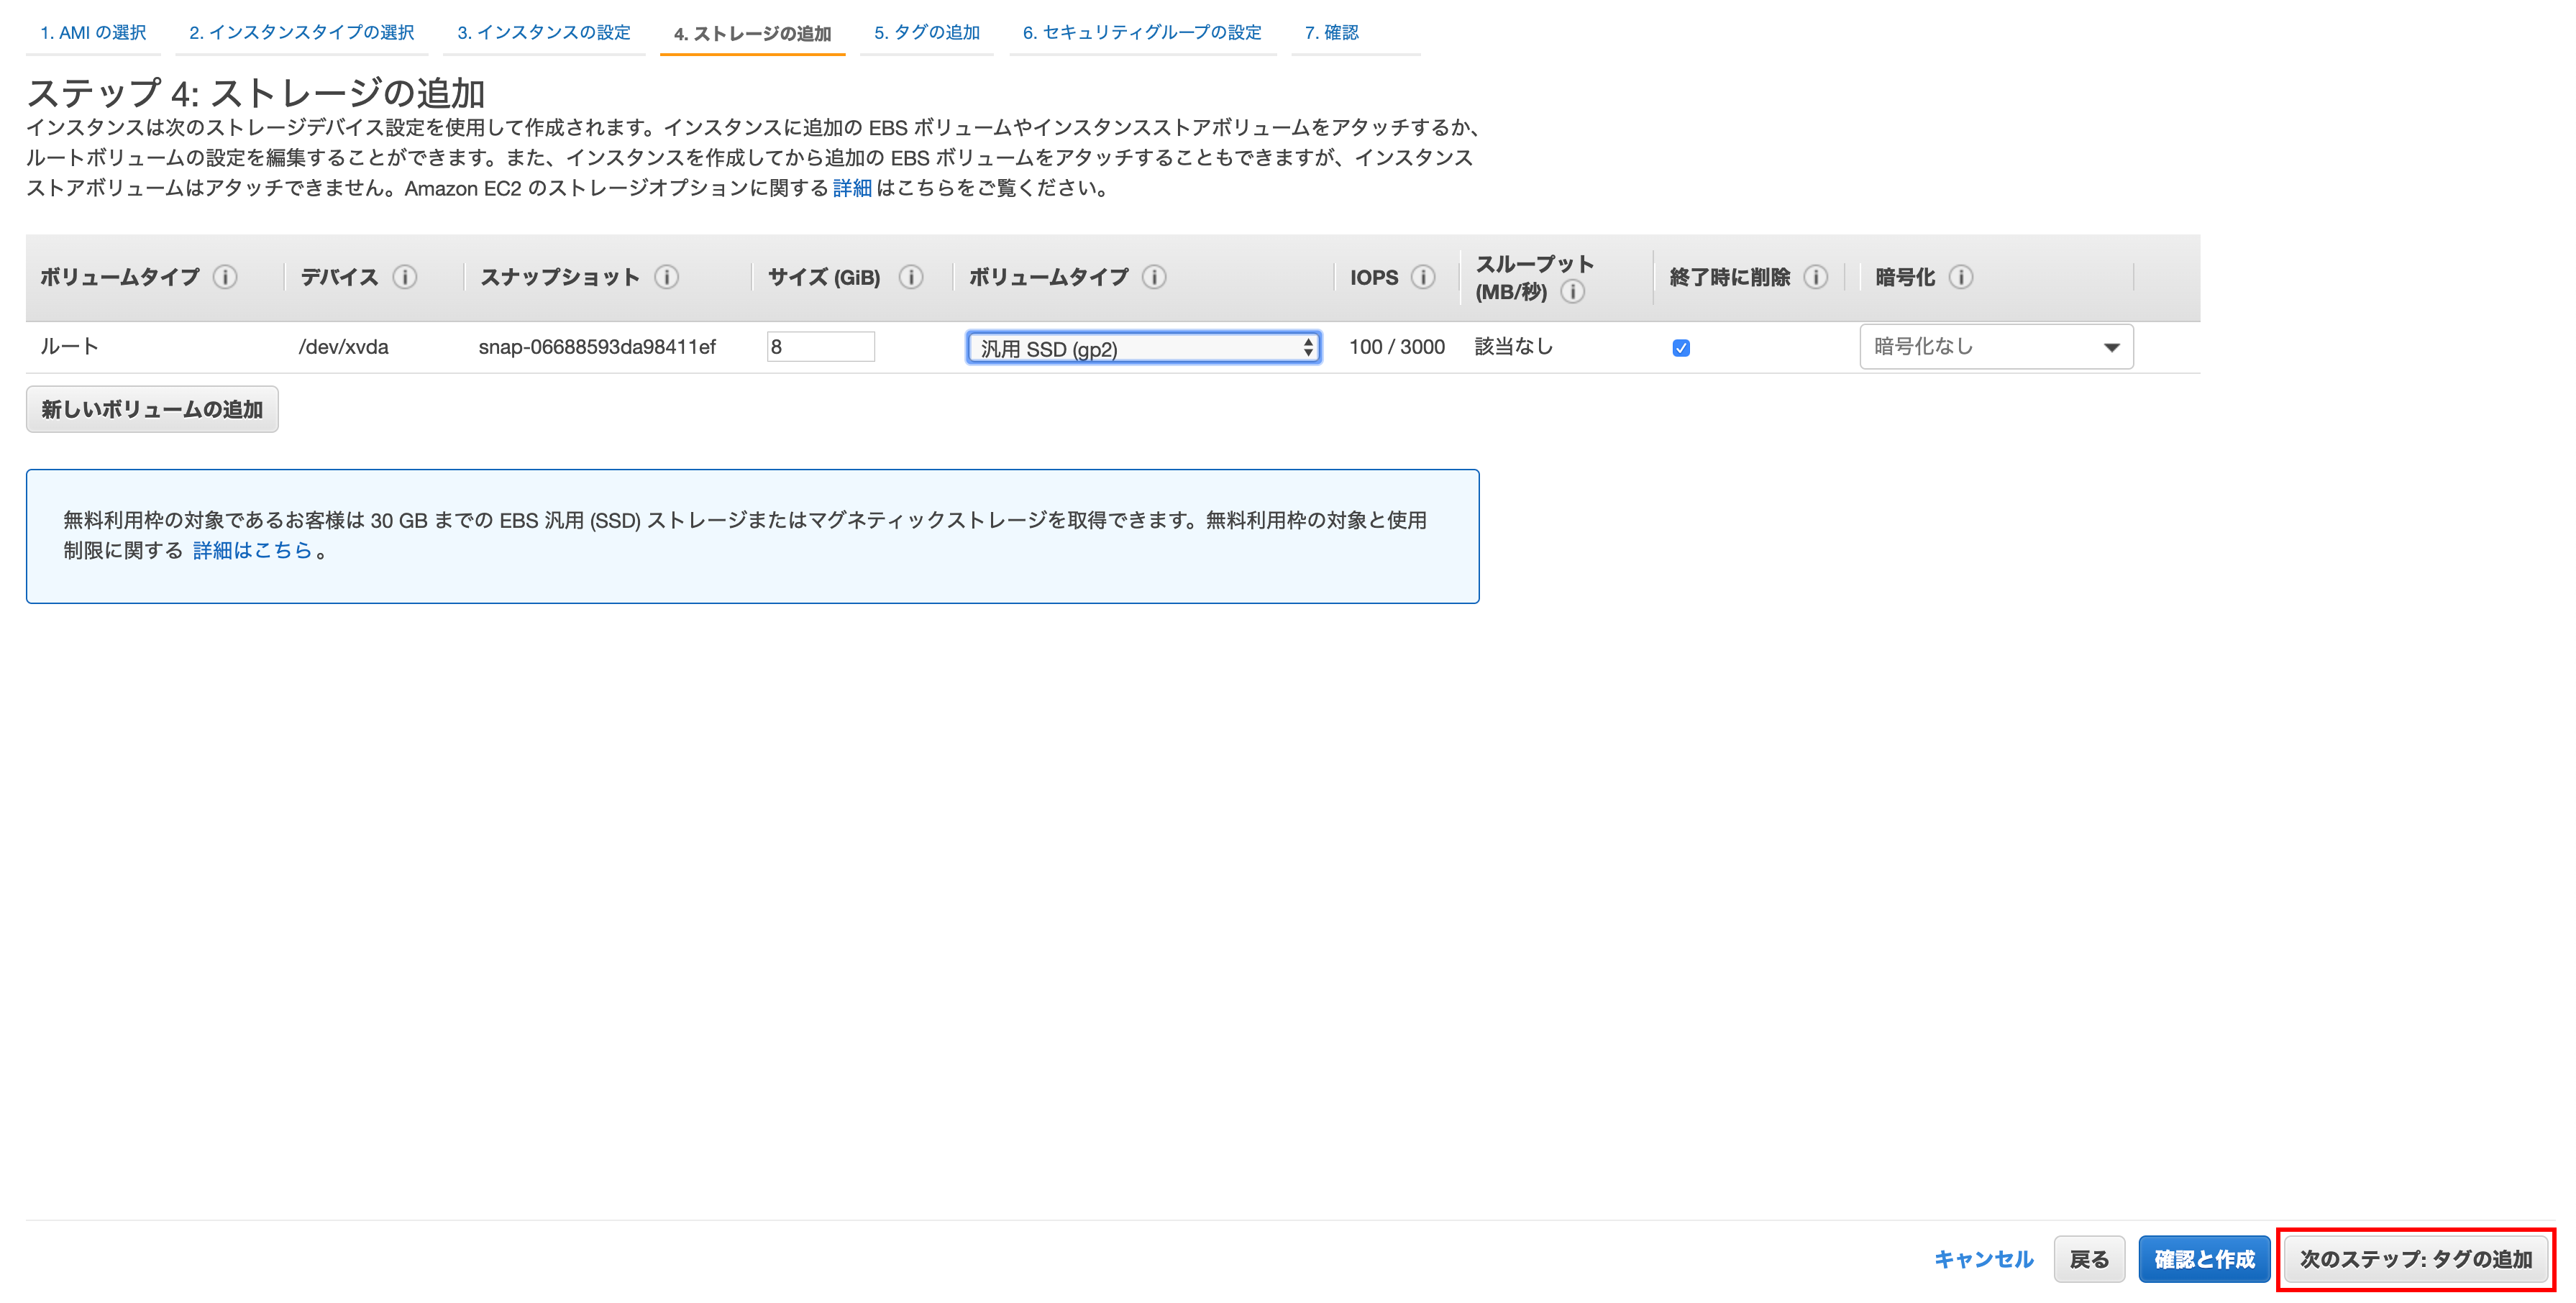
Step 4: Add storage
Basically you can leave the default
Click Next Step: Add Tag
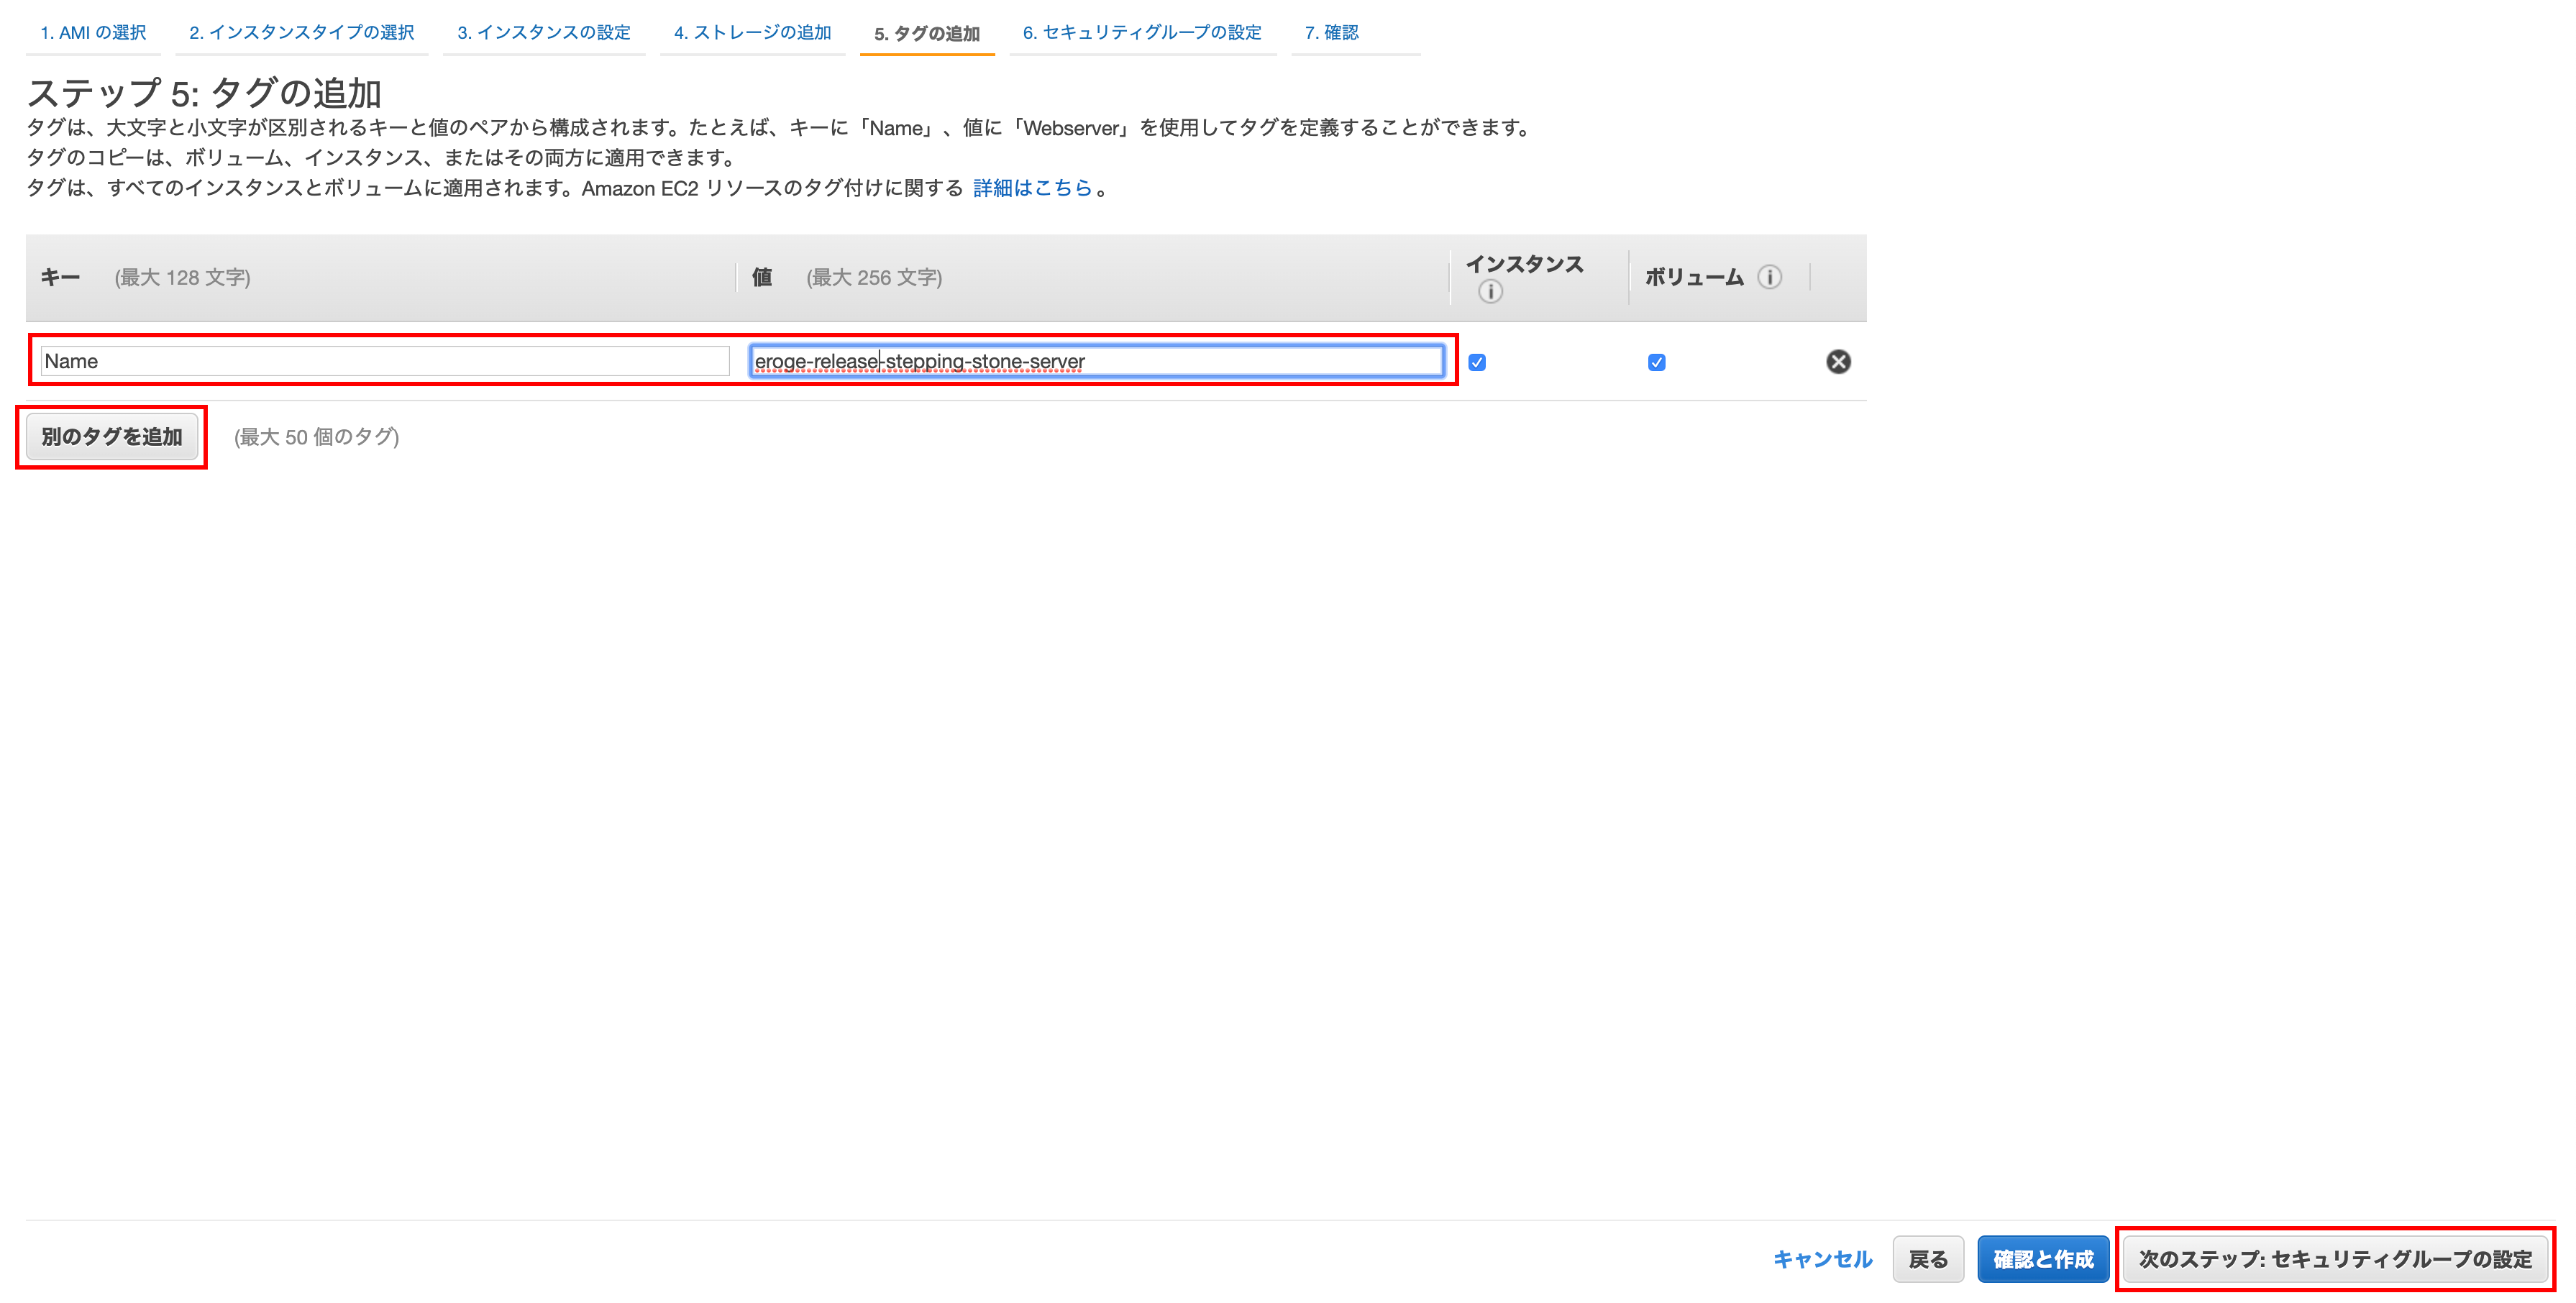
Step 5: Add tag
Click Add another tag, set the key to Name and the value to a descriptive name, and click Next Step: Set Security Group.
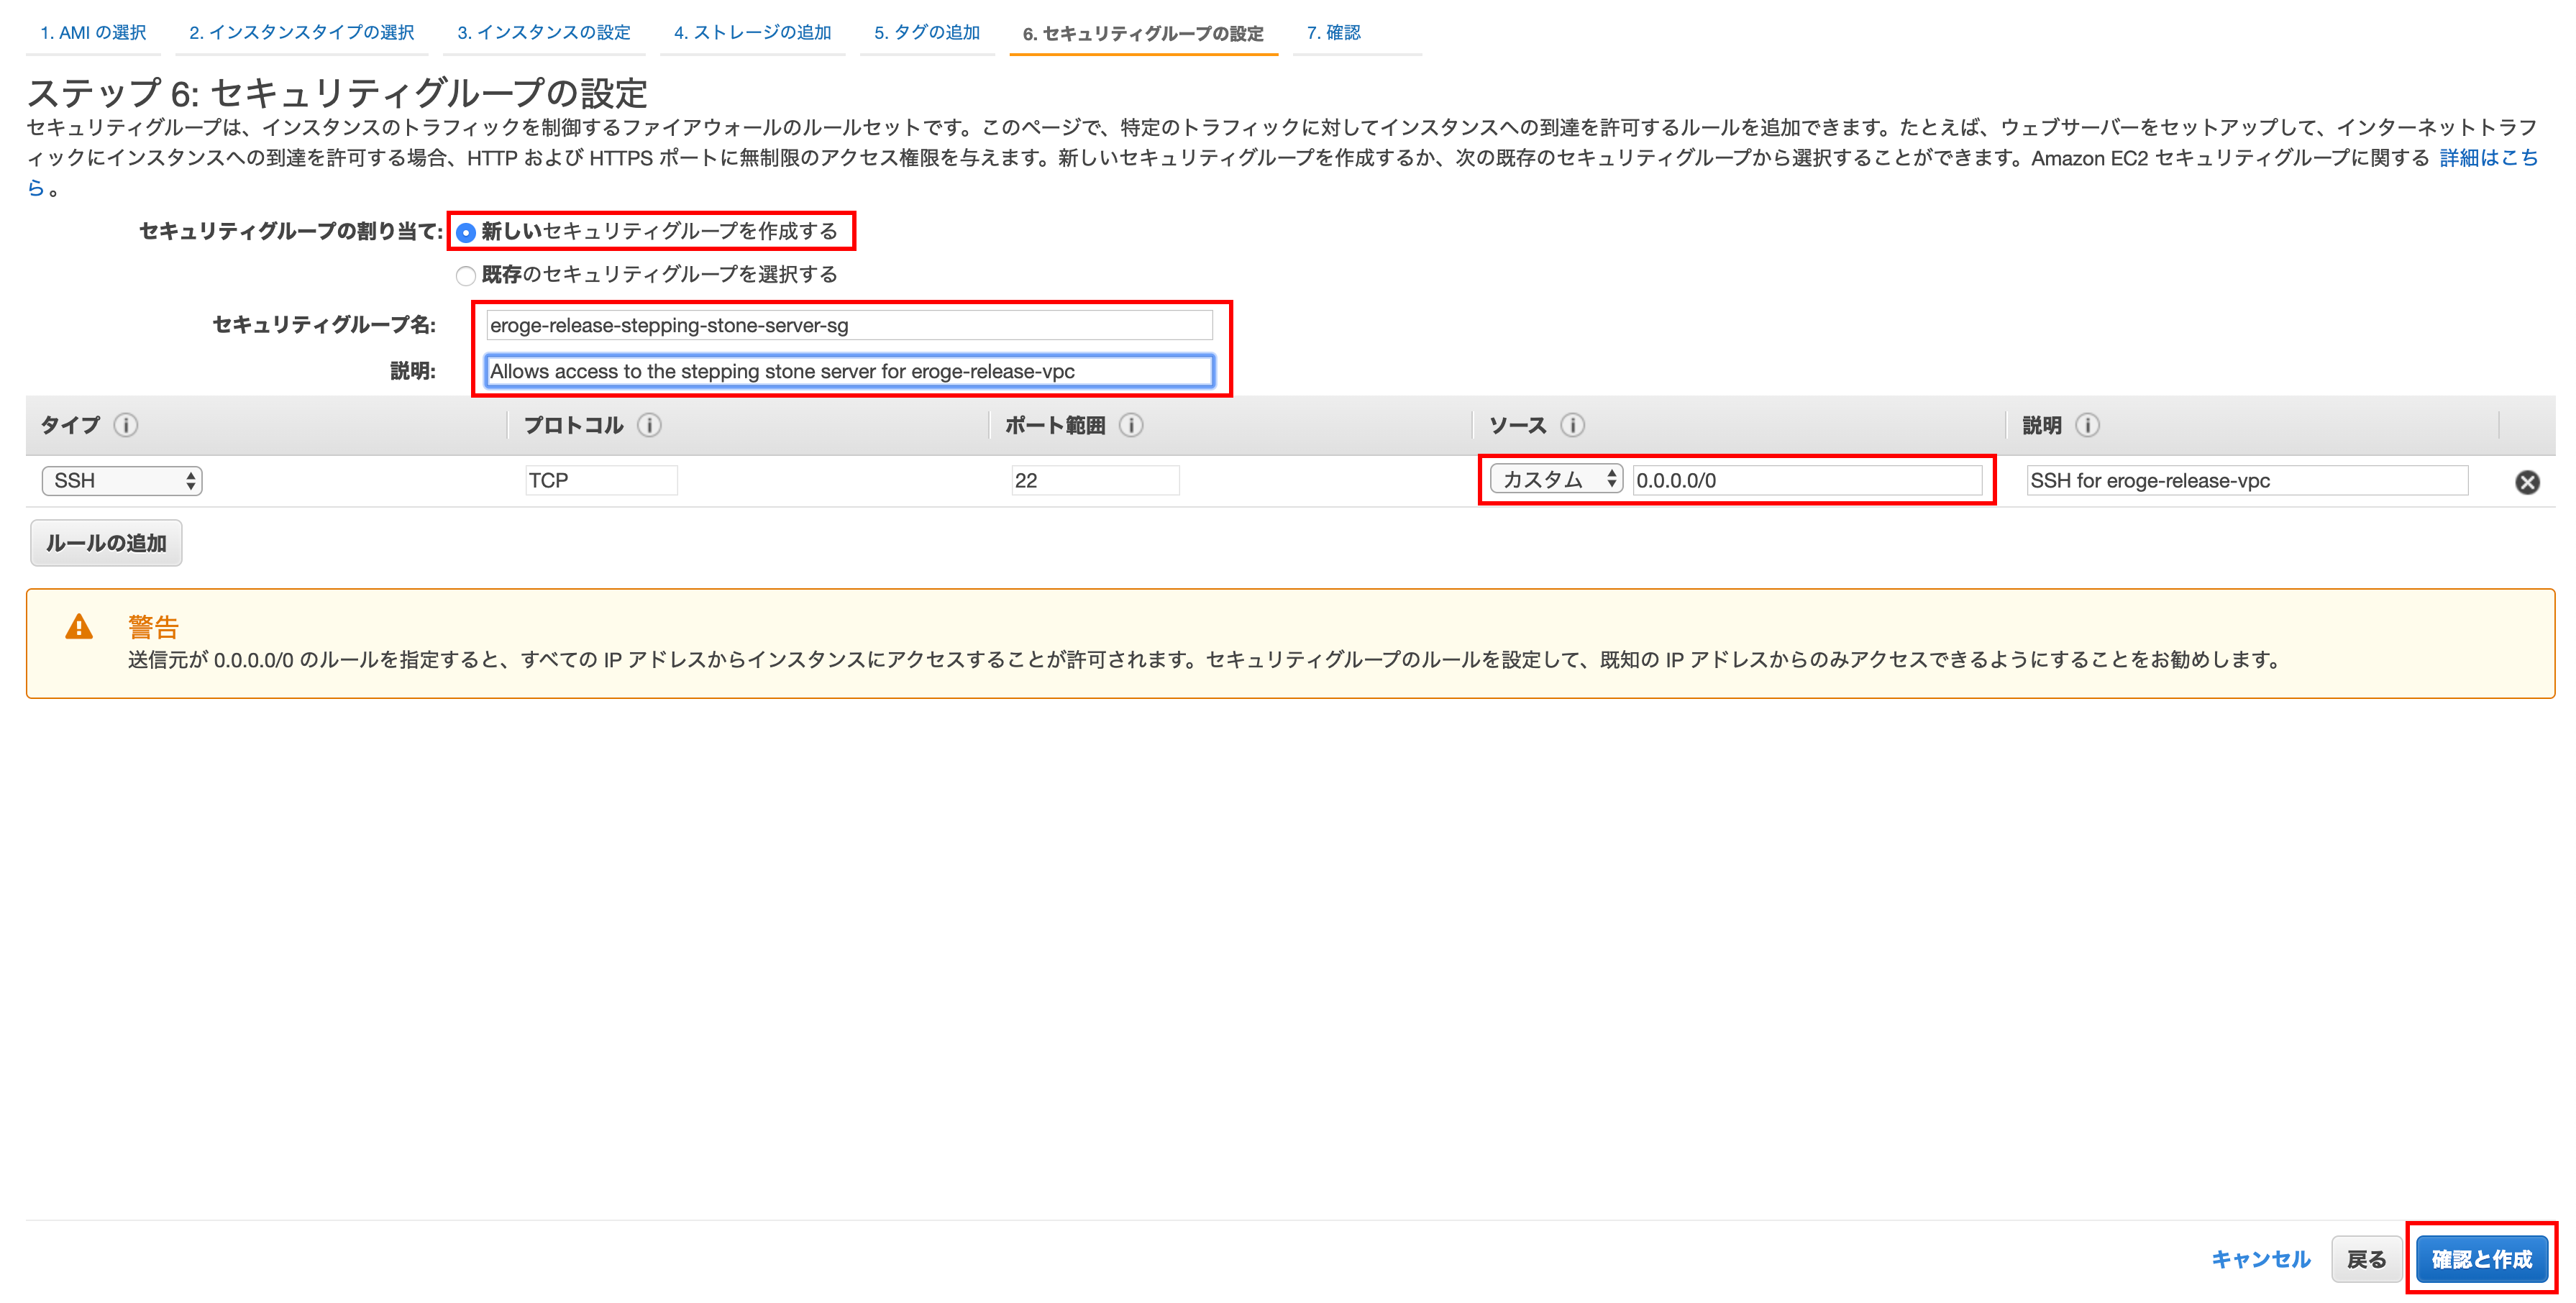
Step 6: Set up a security group
Select Create a new security group and enter something descriptive for security group name and description.
Finally click Confirm and Create
** Normally, do not set 0.0.0.0/0 for the source part (because it is fully open) **
** Set the global IP address of your home to narrow down SSH access **
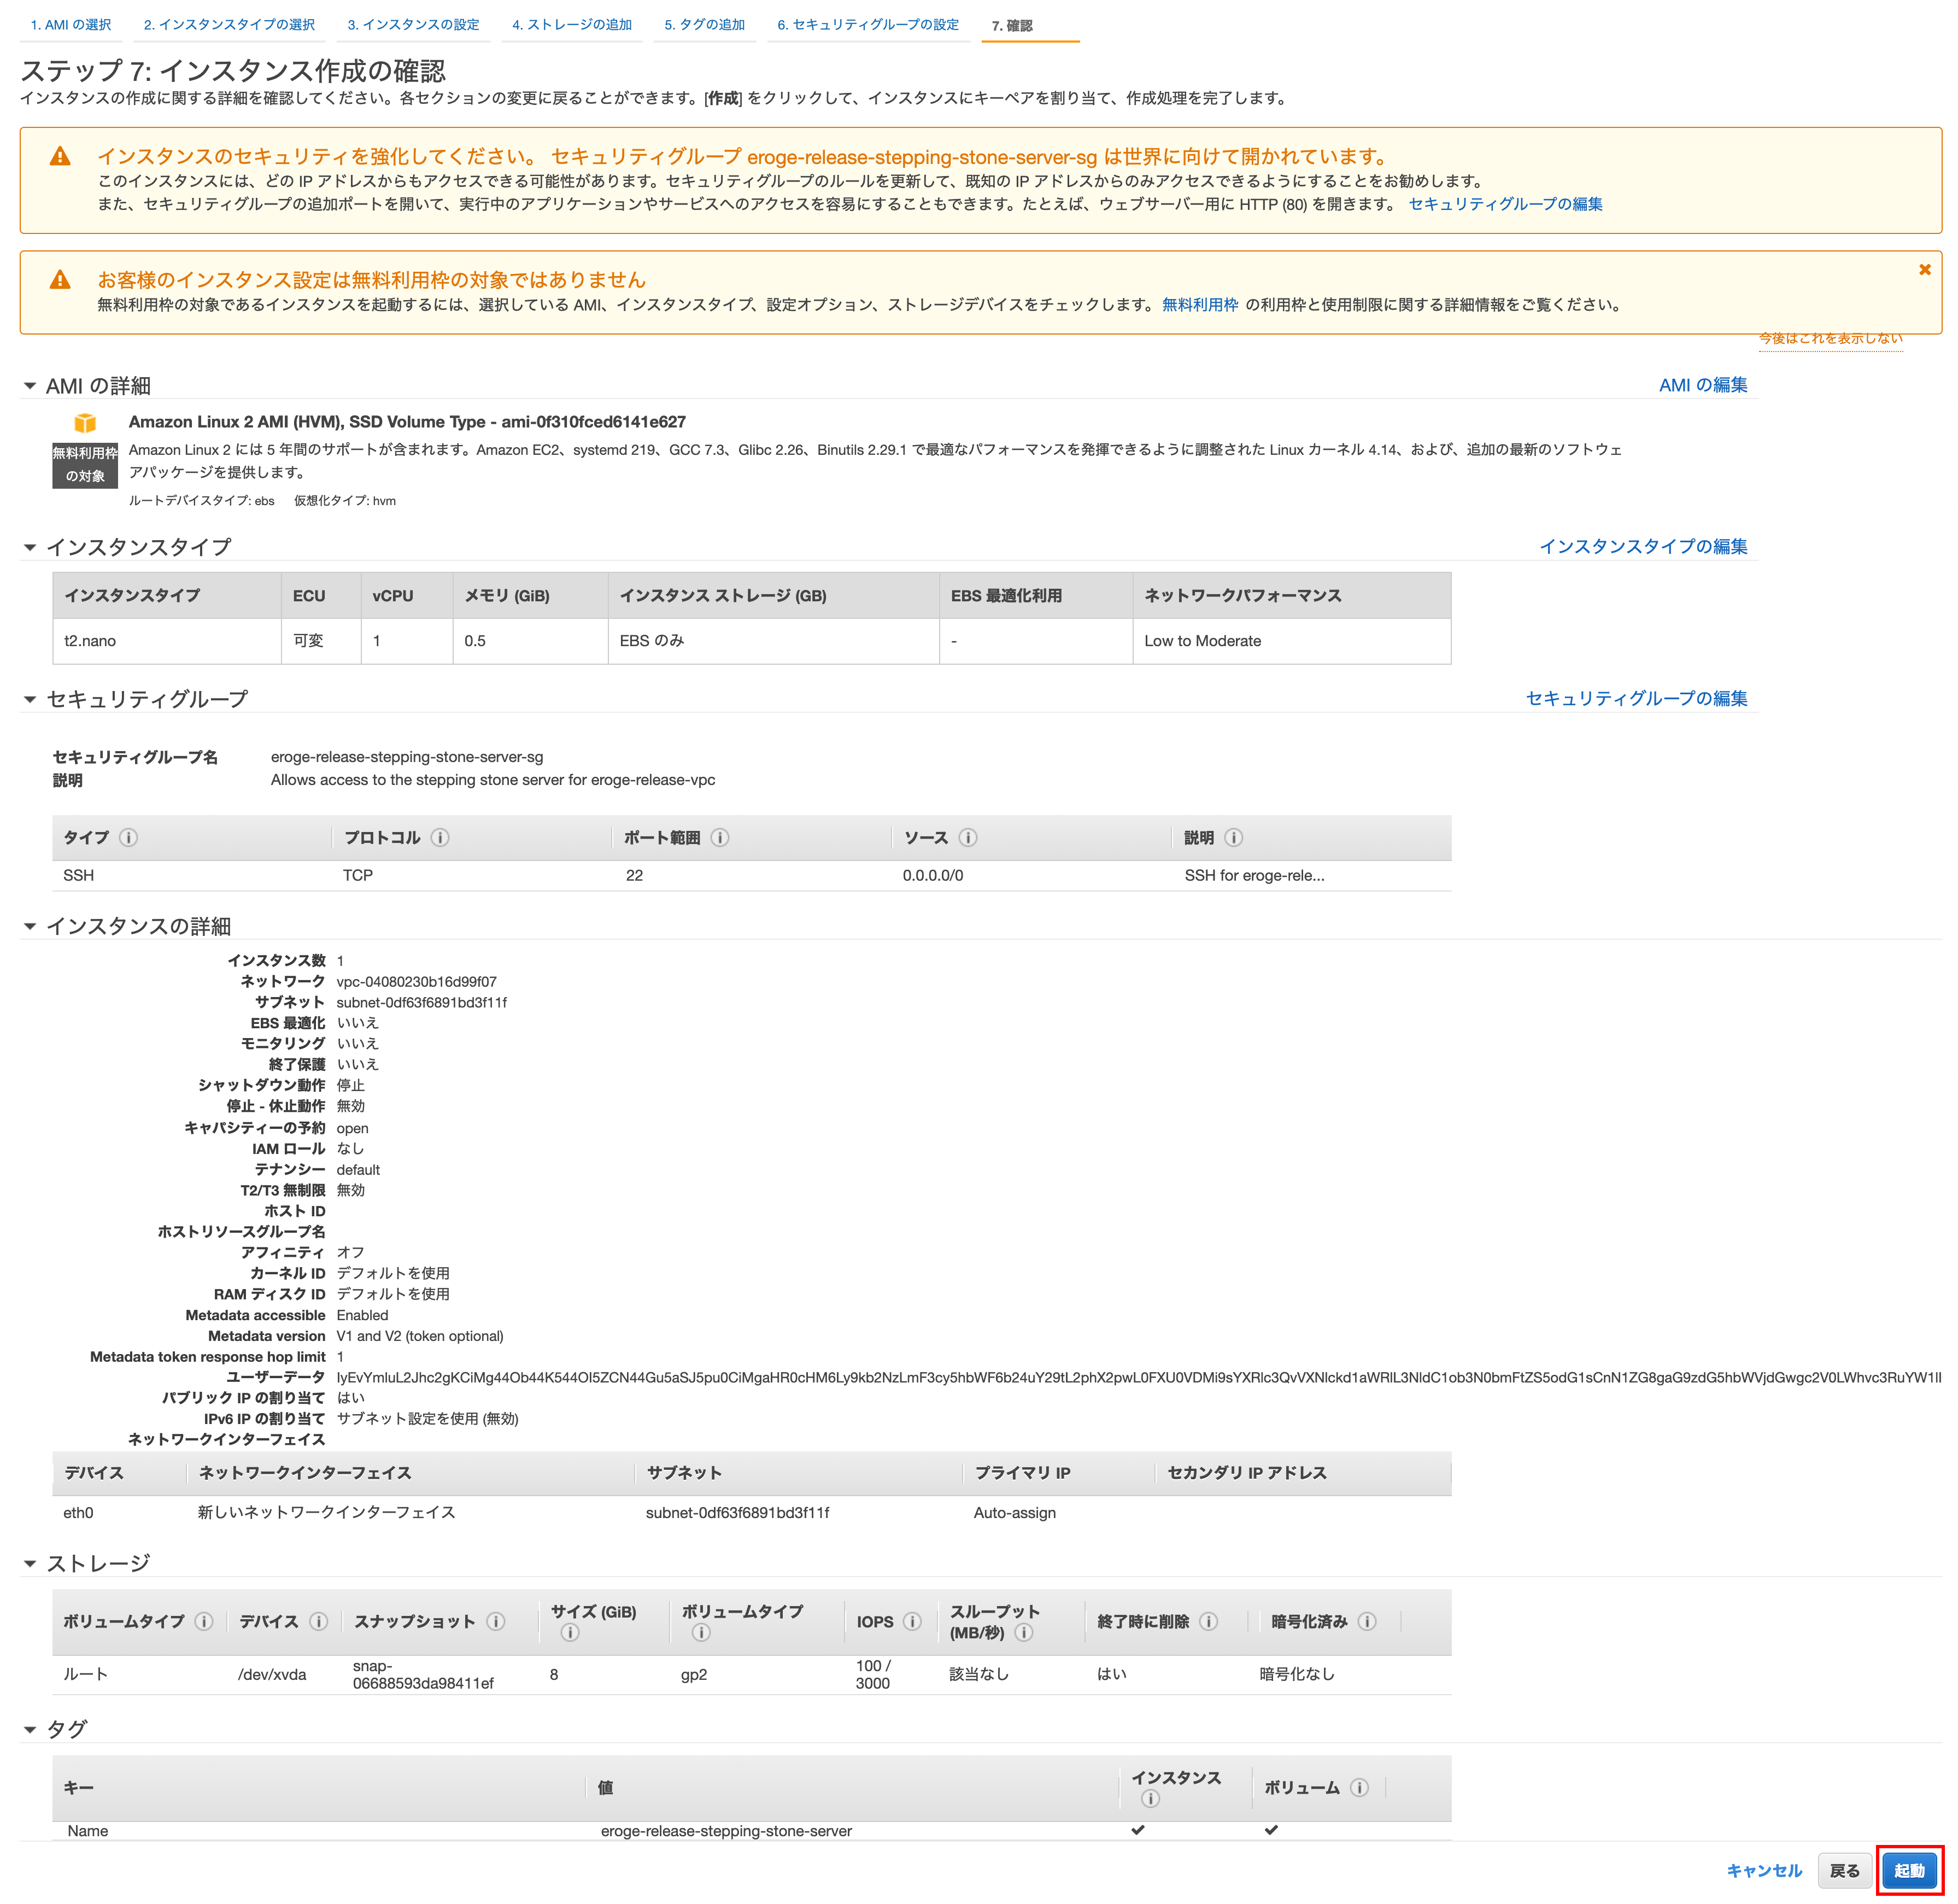
Step 7: Confirm instance creation
If you are satisfied with the displayed contents, click Start.
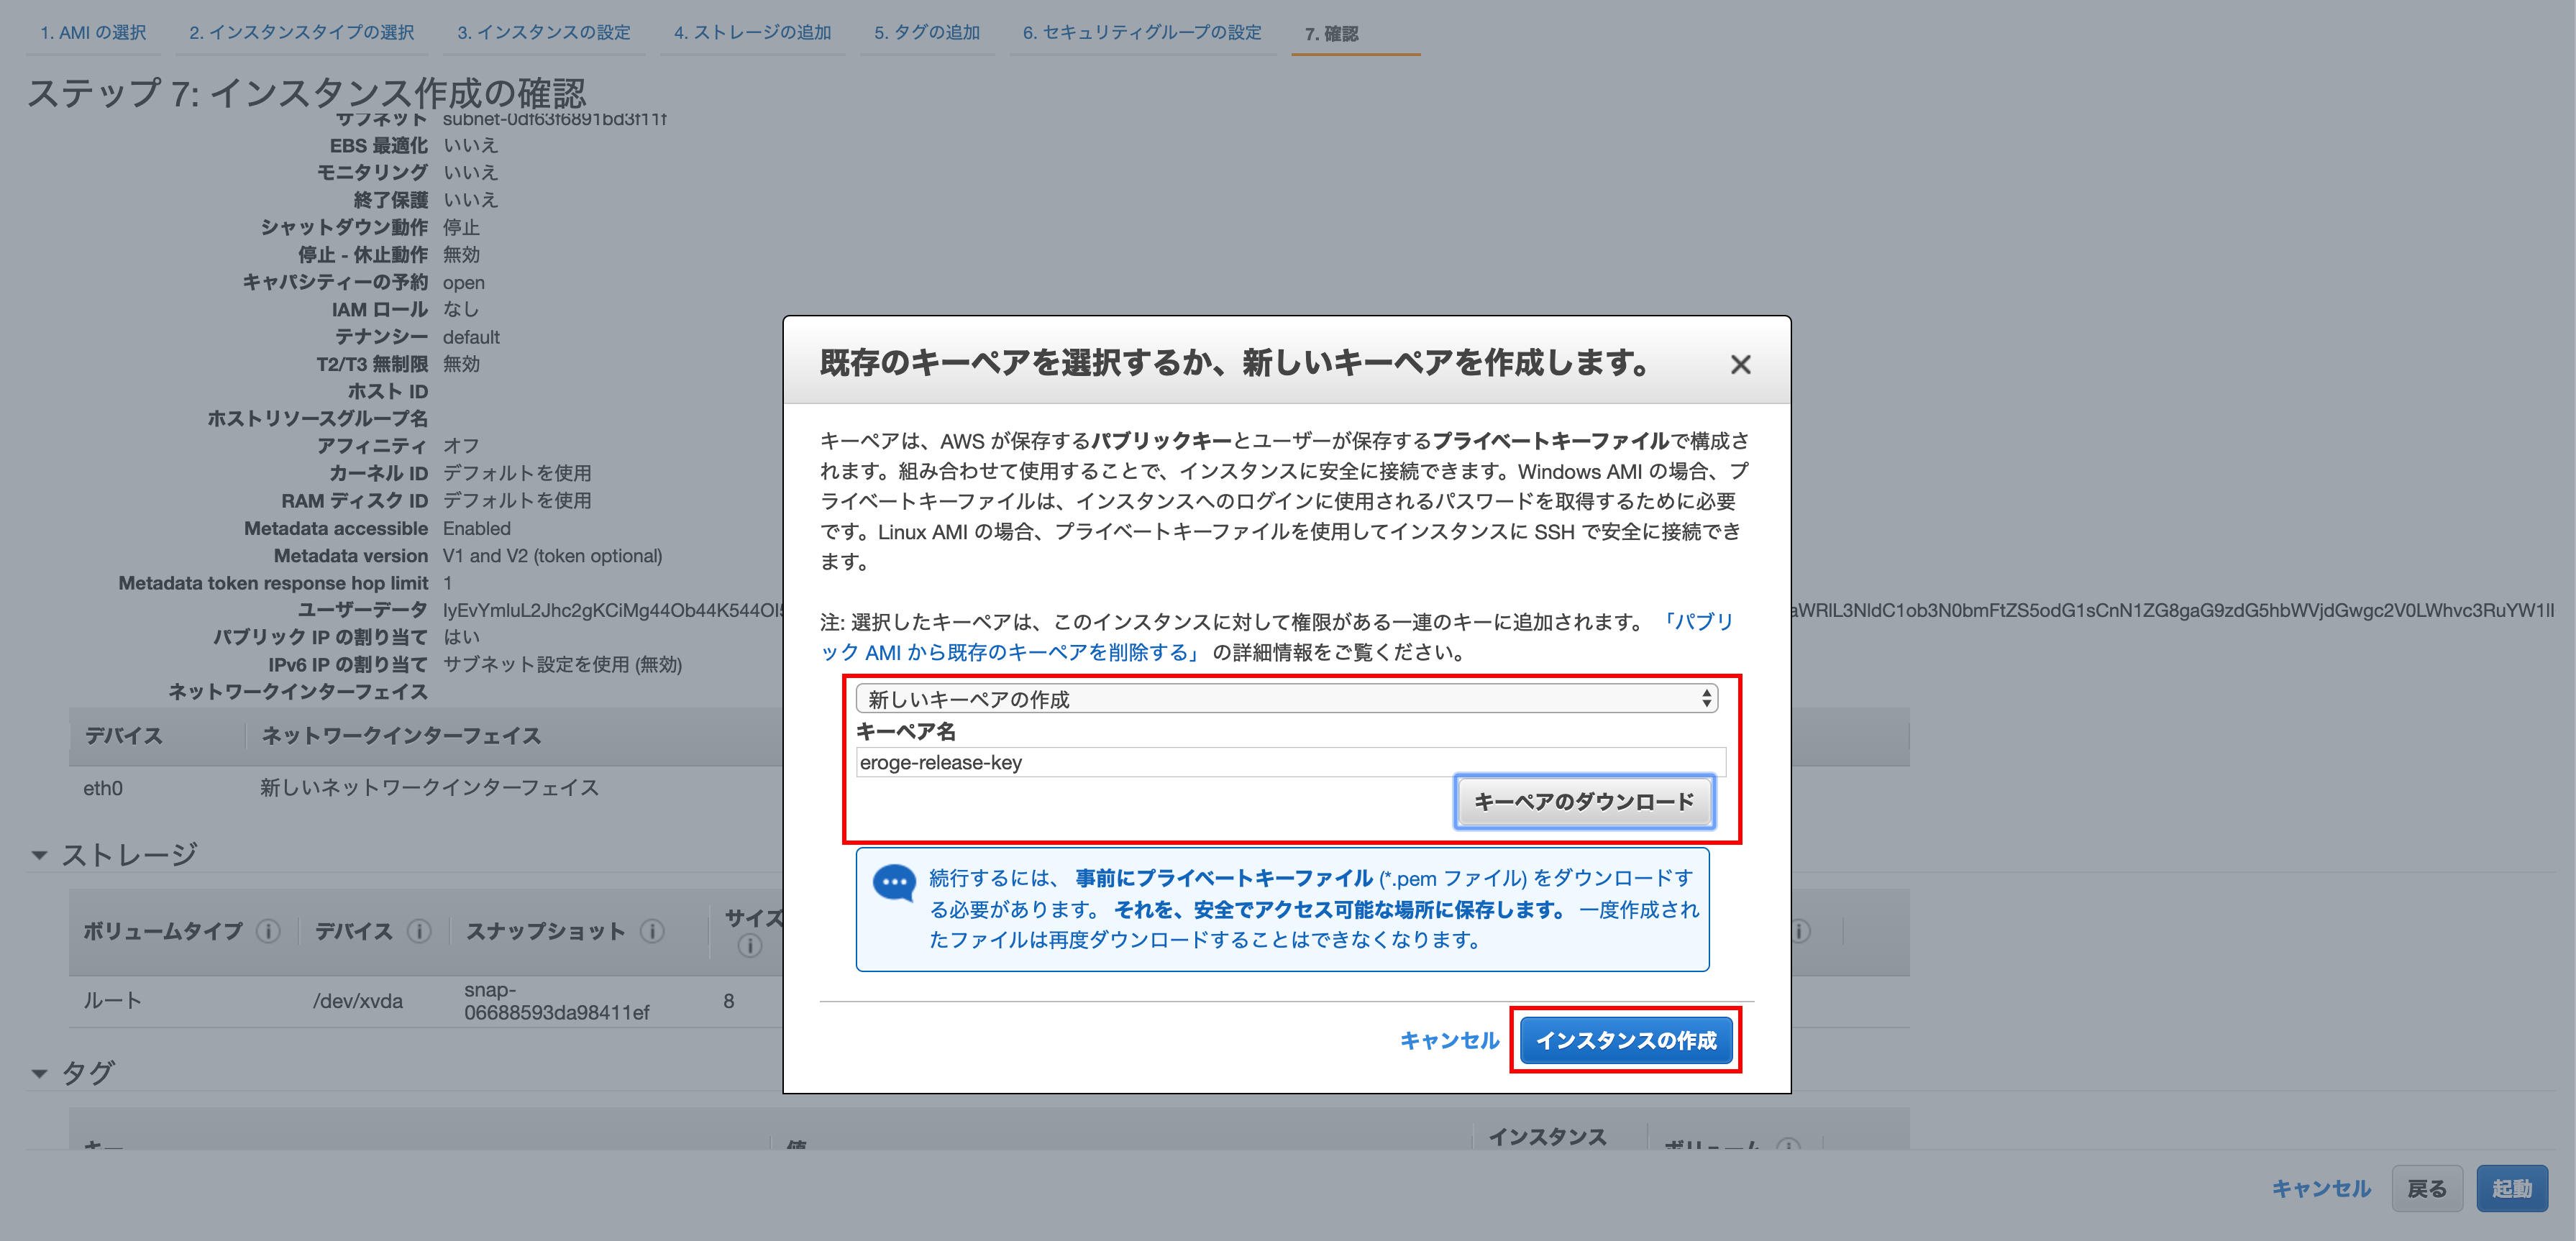
Key pair
Select Create a new key pair, enter a descriptive key pair name, and click Download key pair.
Finally, click `Create Instance``
** The downloaded key pair will be used to connect to the bastion server **
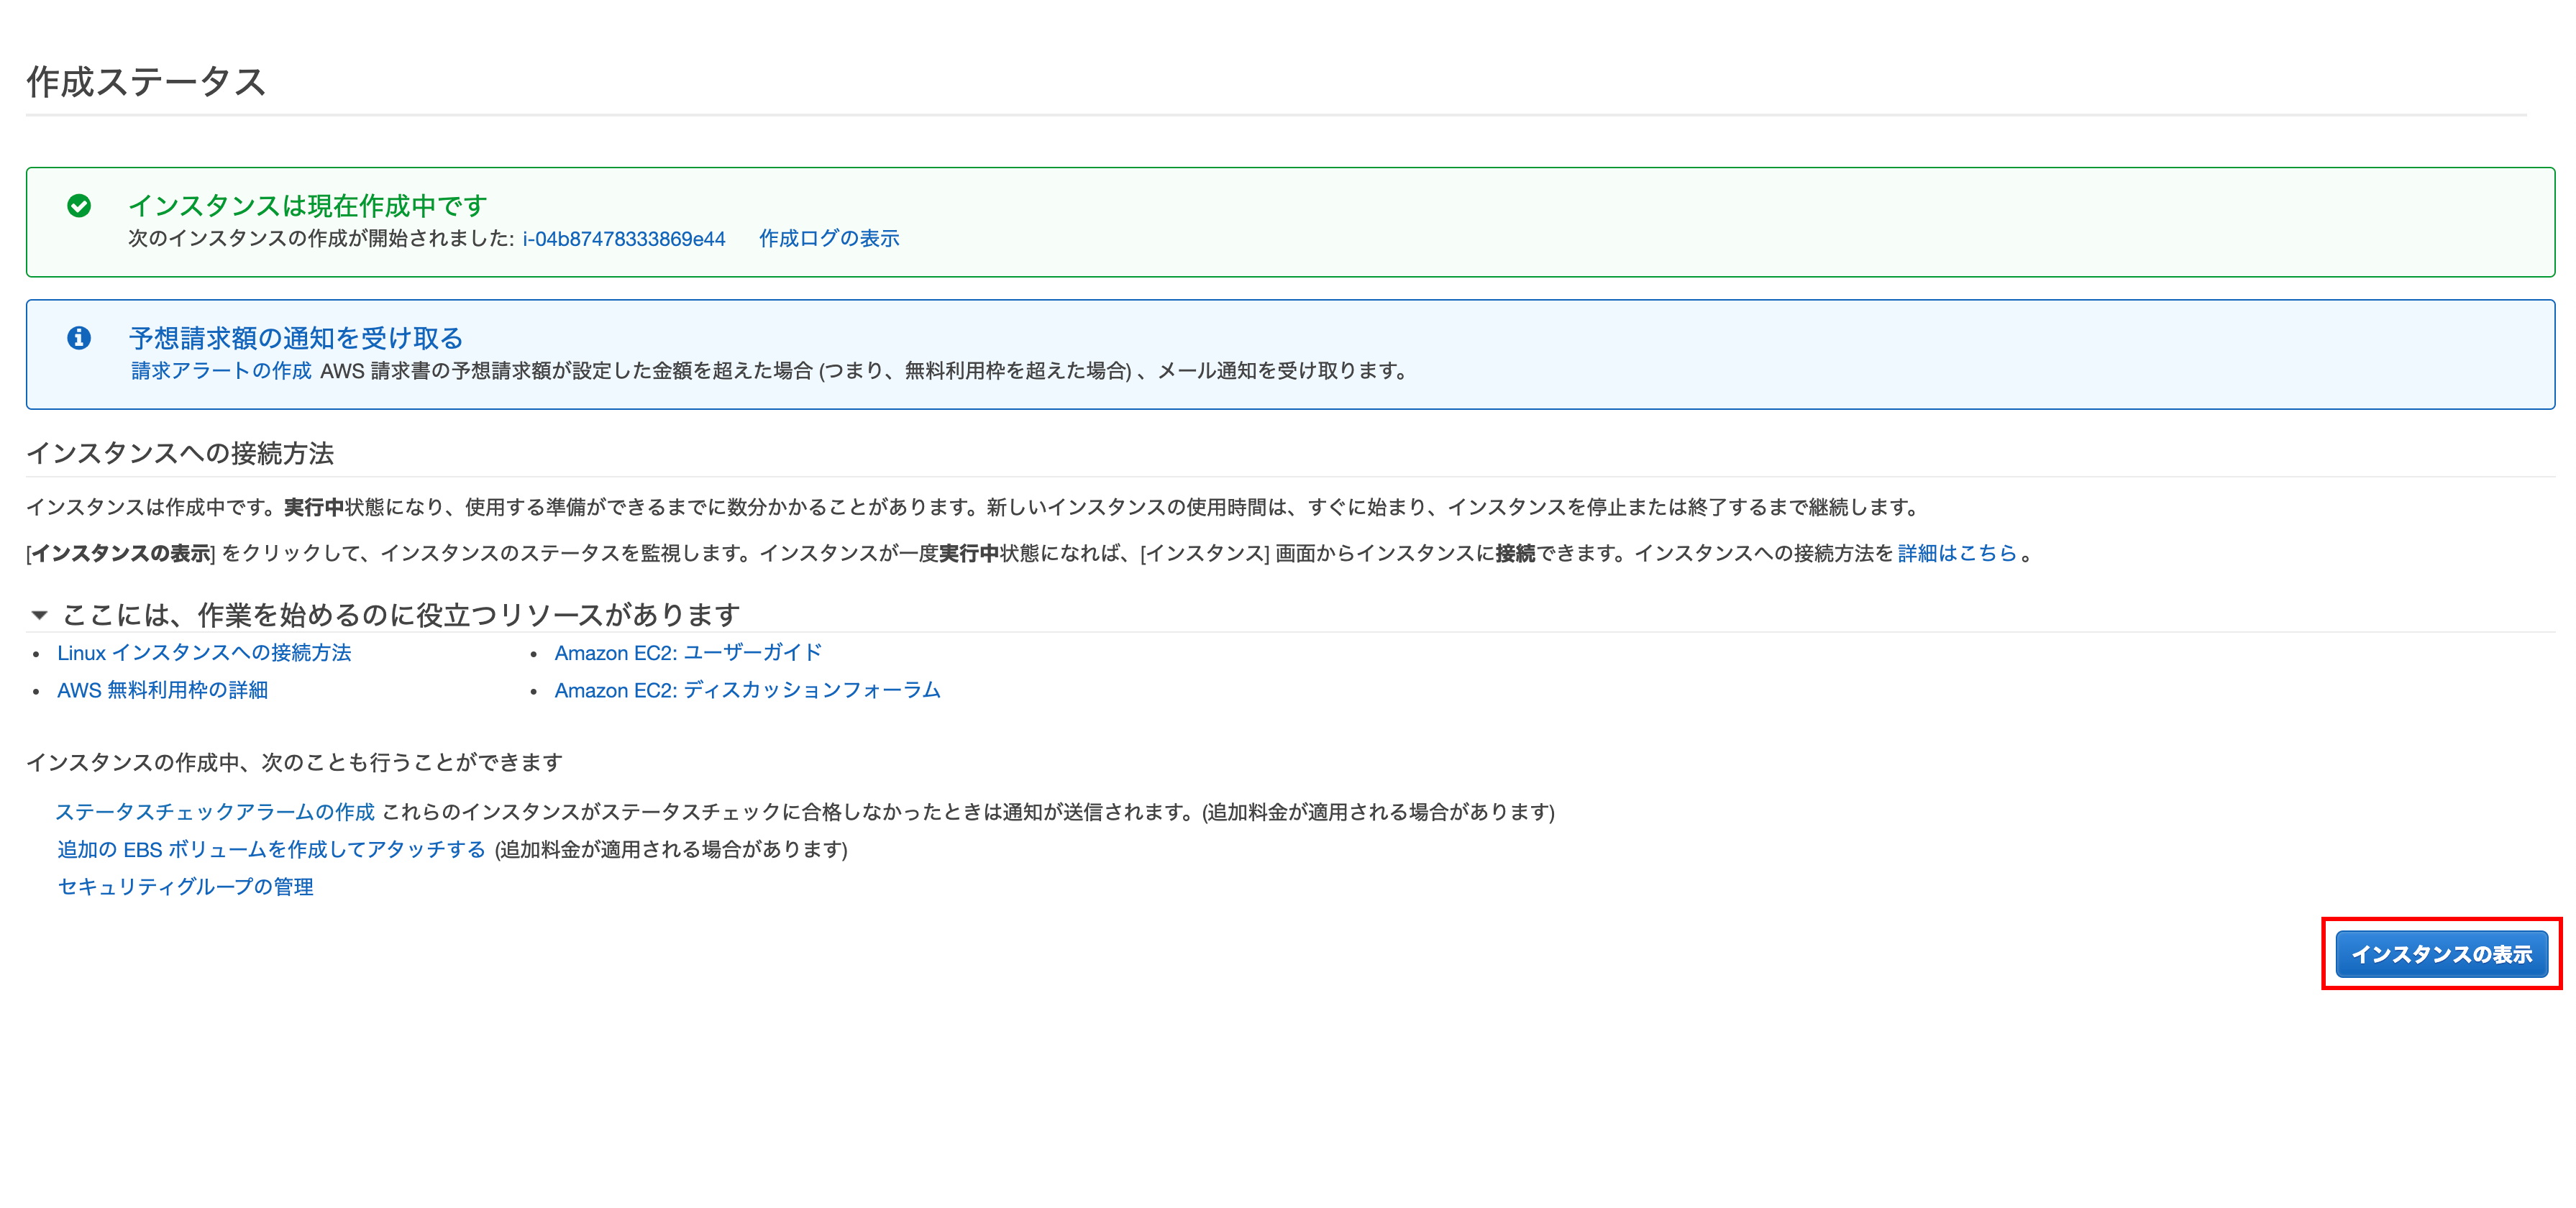
Creating an instance
Click Show Instances
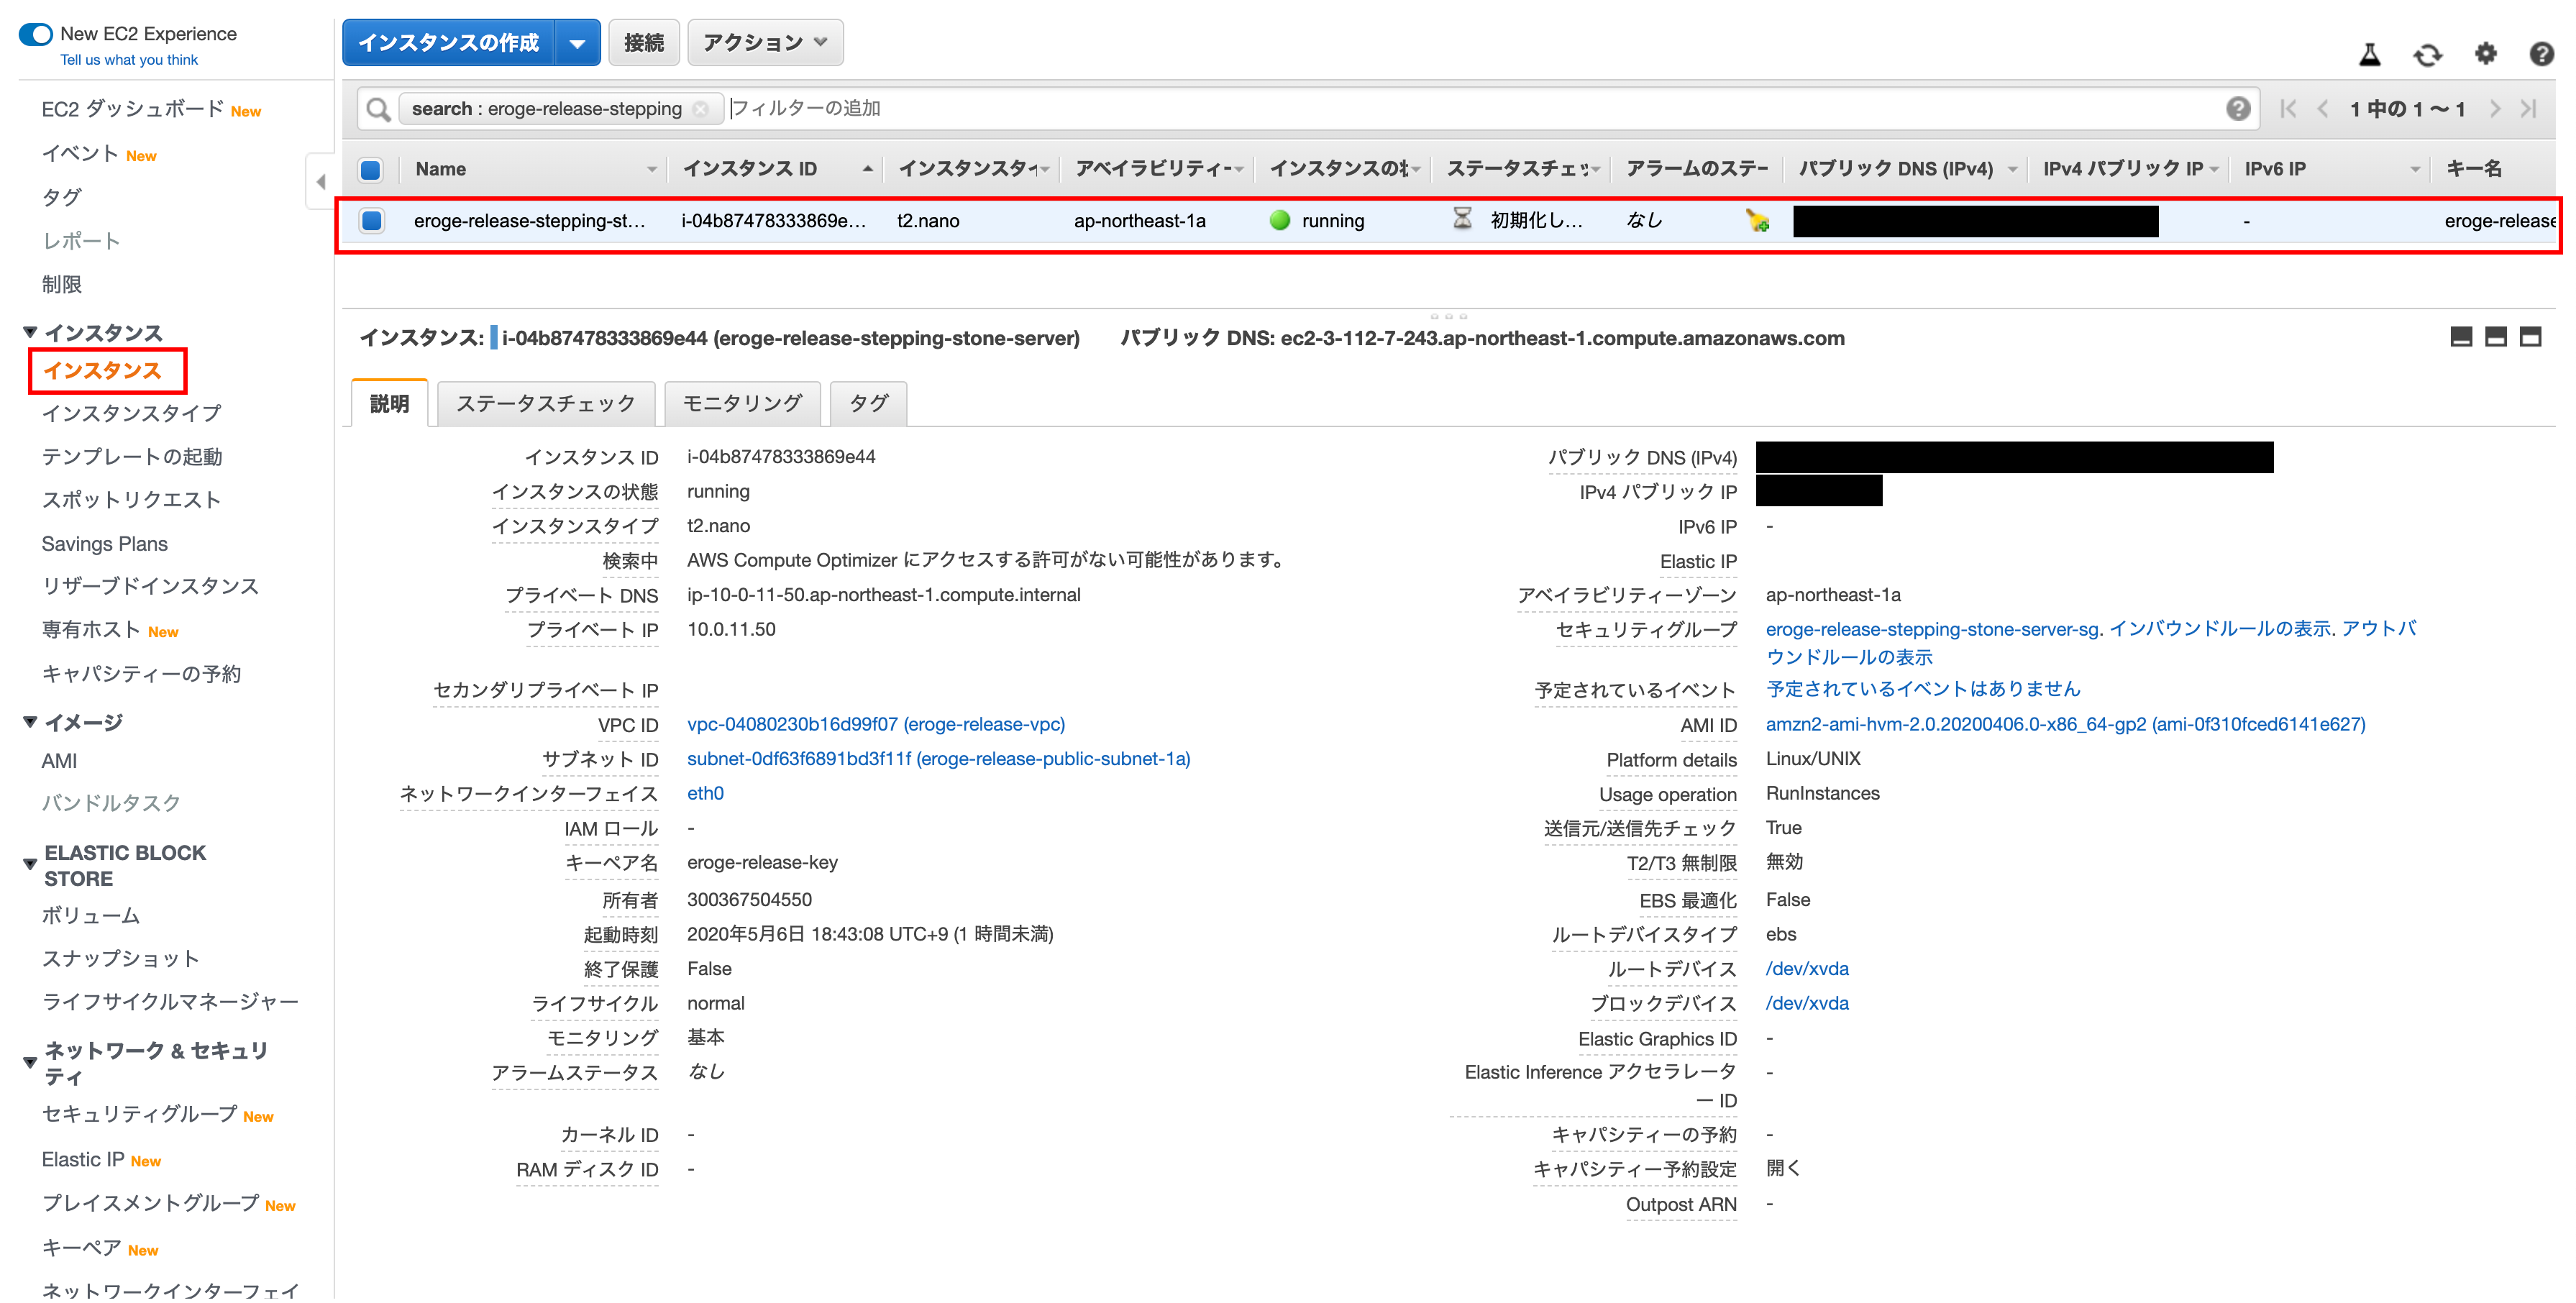
After creating the instance
Confirm that the instance has been created Elastic IP has not been set yet, so we will set Elastic IP in the future.
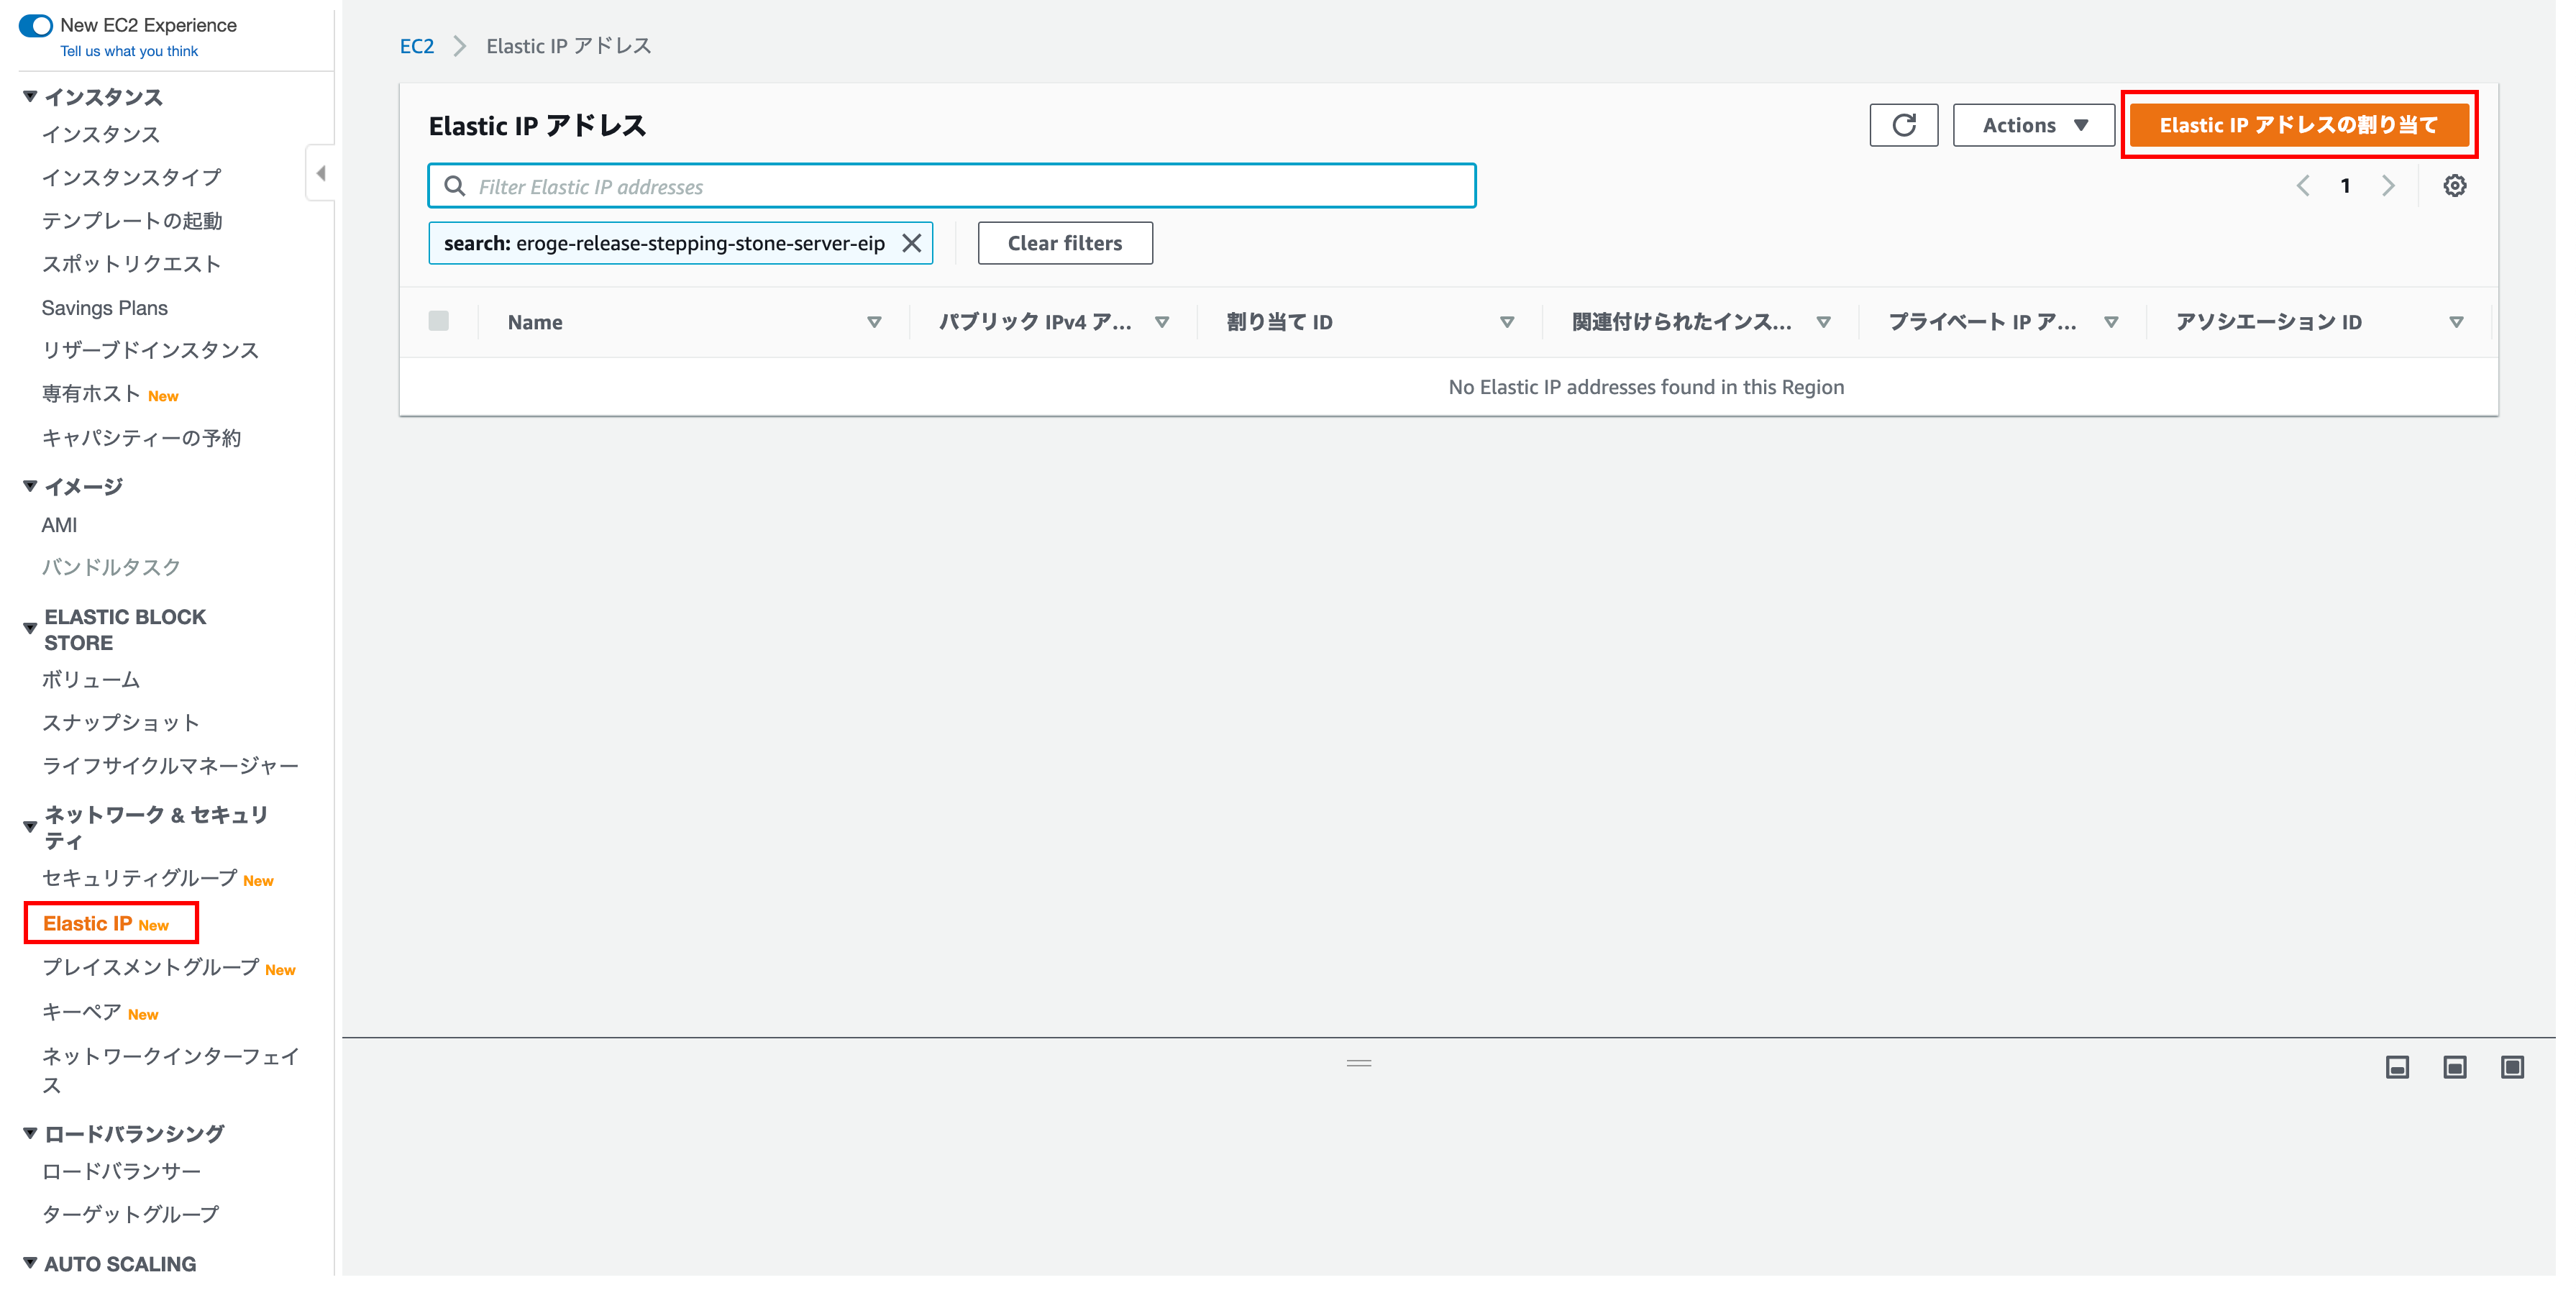
Create an Elastic IP
In the current situation, the IP address changes every time the bastion server is started, so create ʻElastic IP` so that the IP address is fixed.
Displaying the Elastic IP address assignment screen
ʻClick Assign Elastic IP Address`
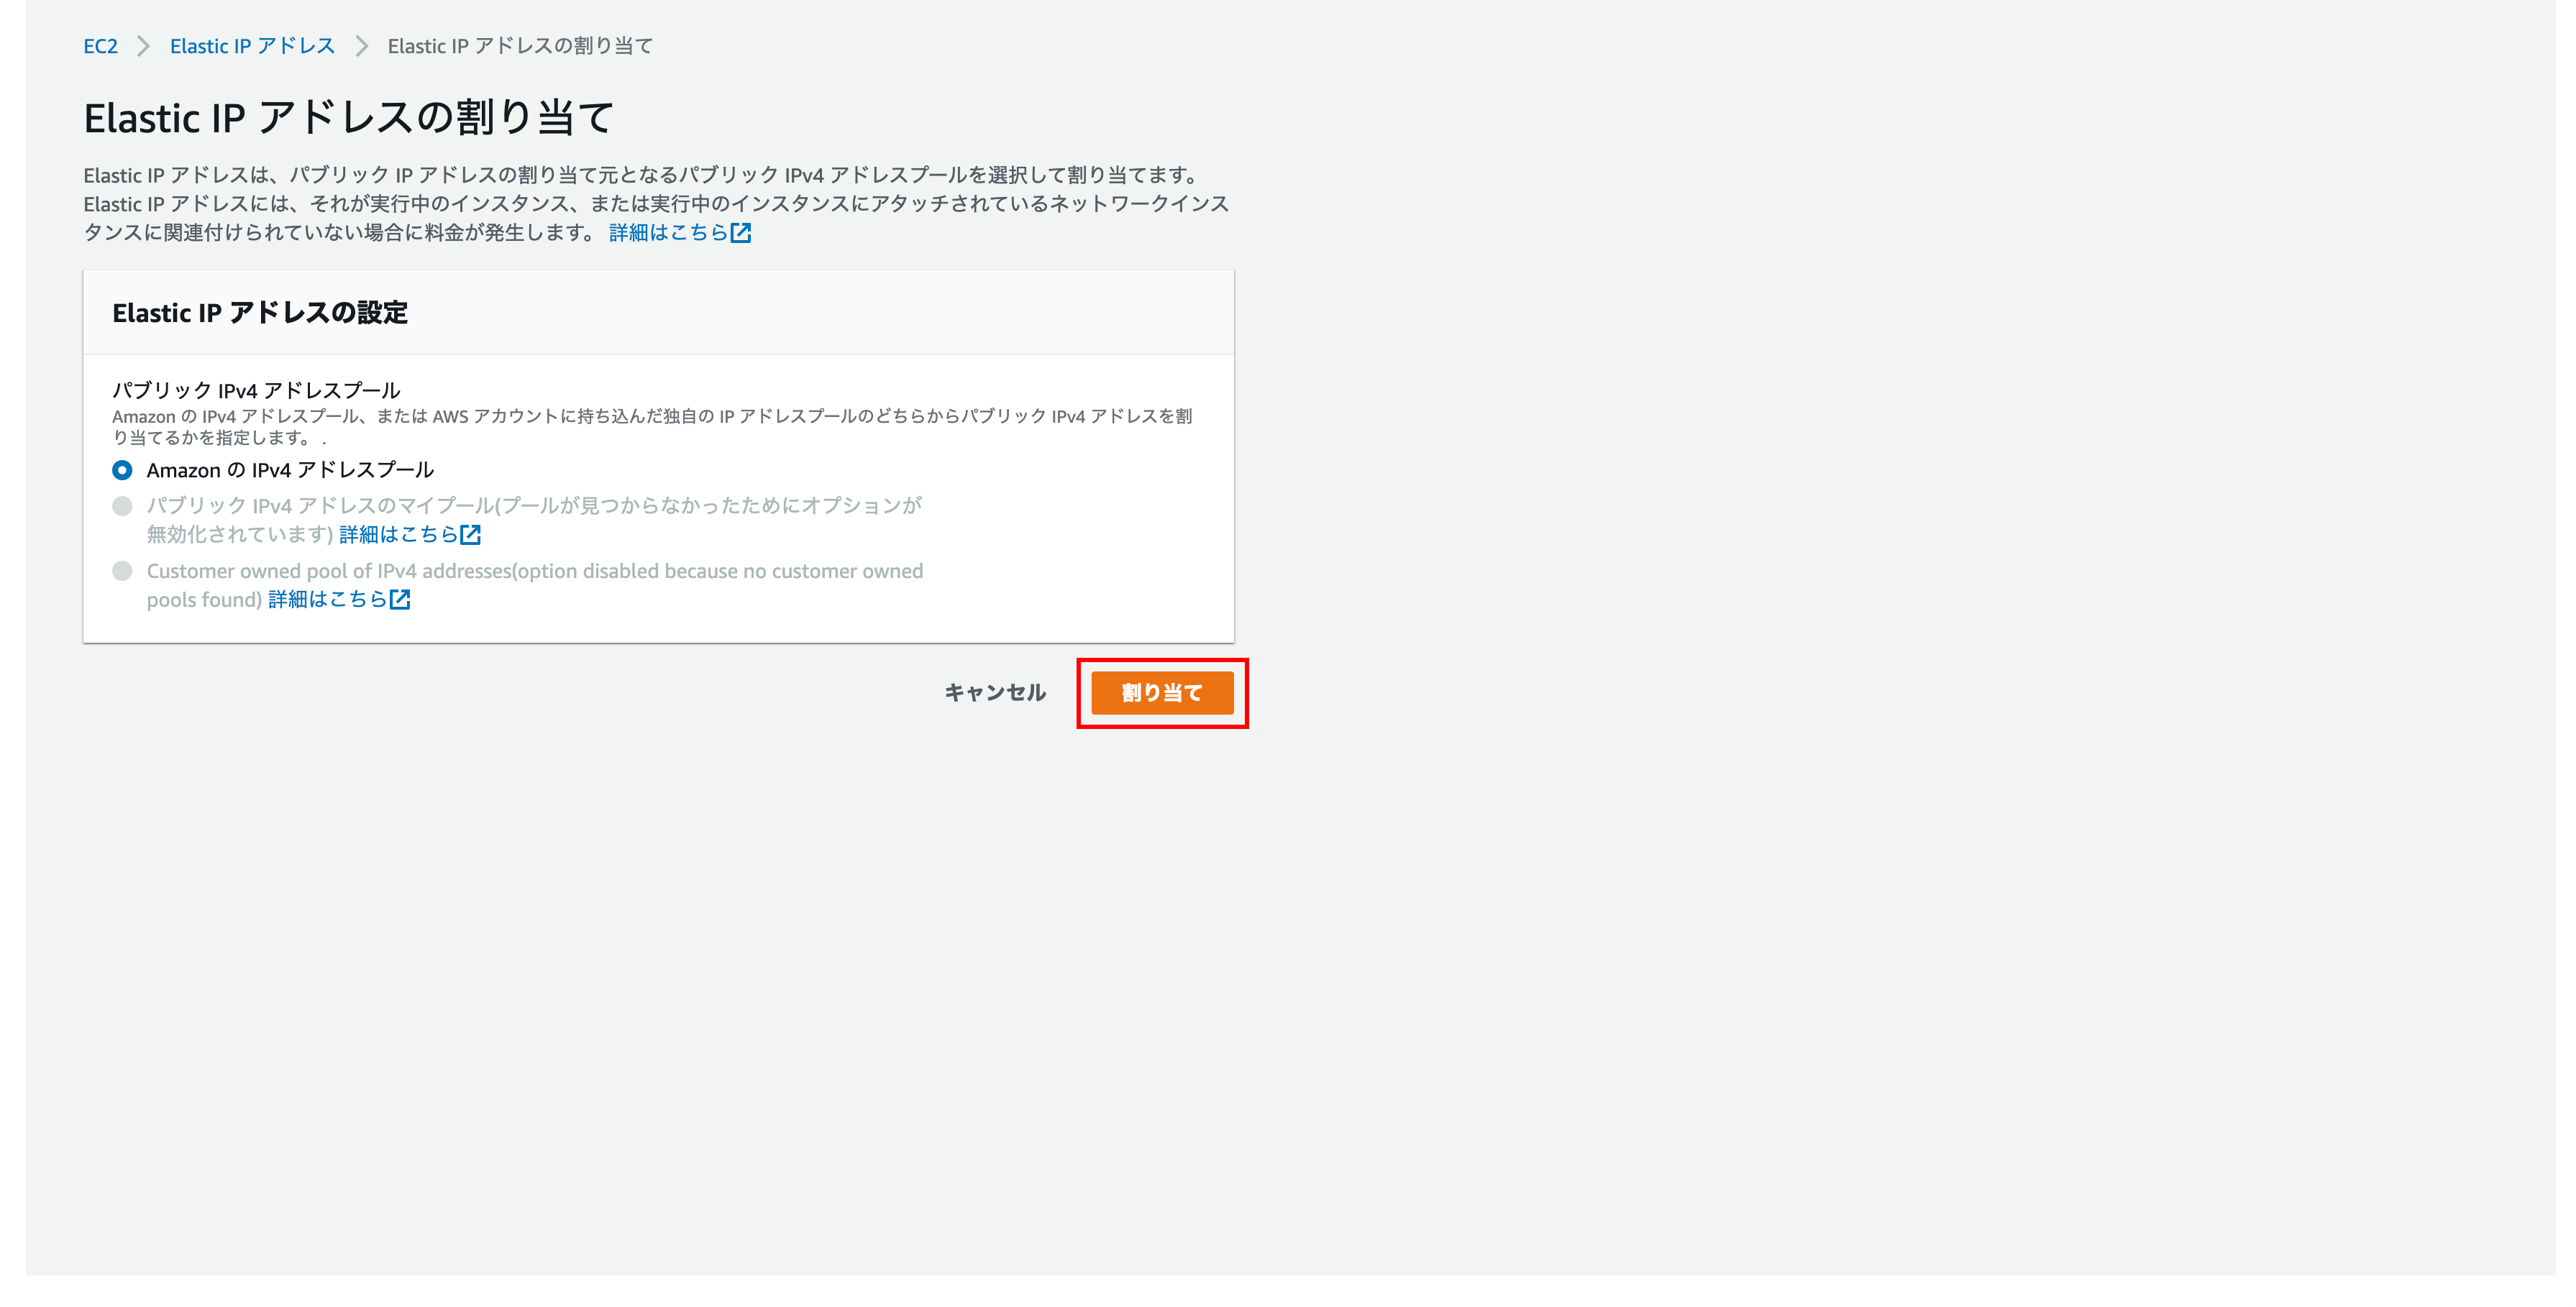
Elastic IP address assignment
There is nothing to set, so click Assign
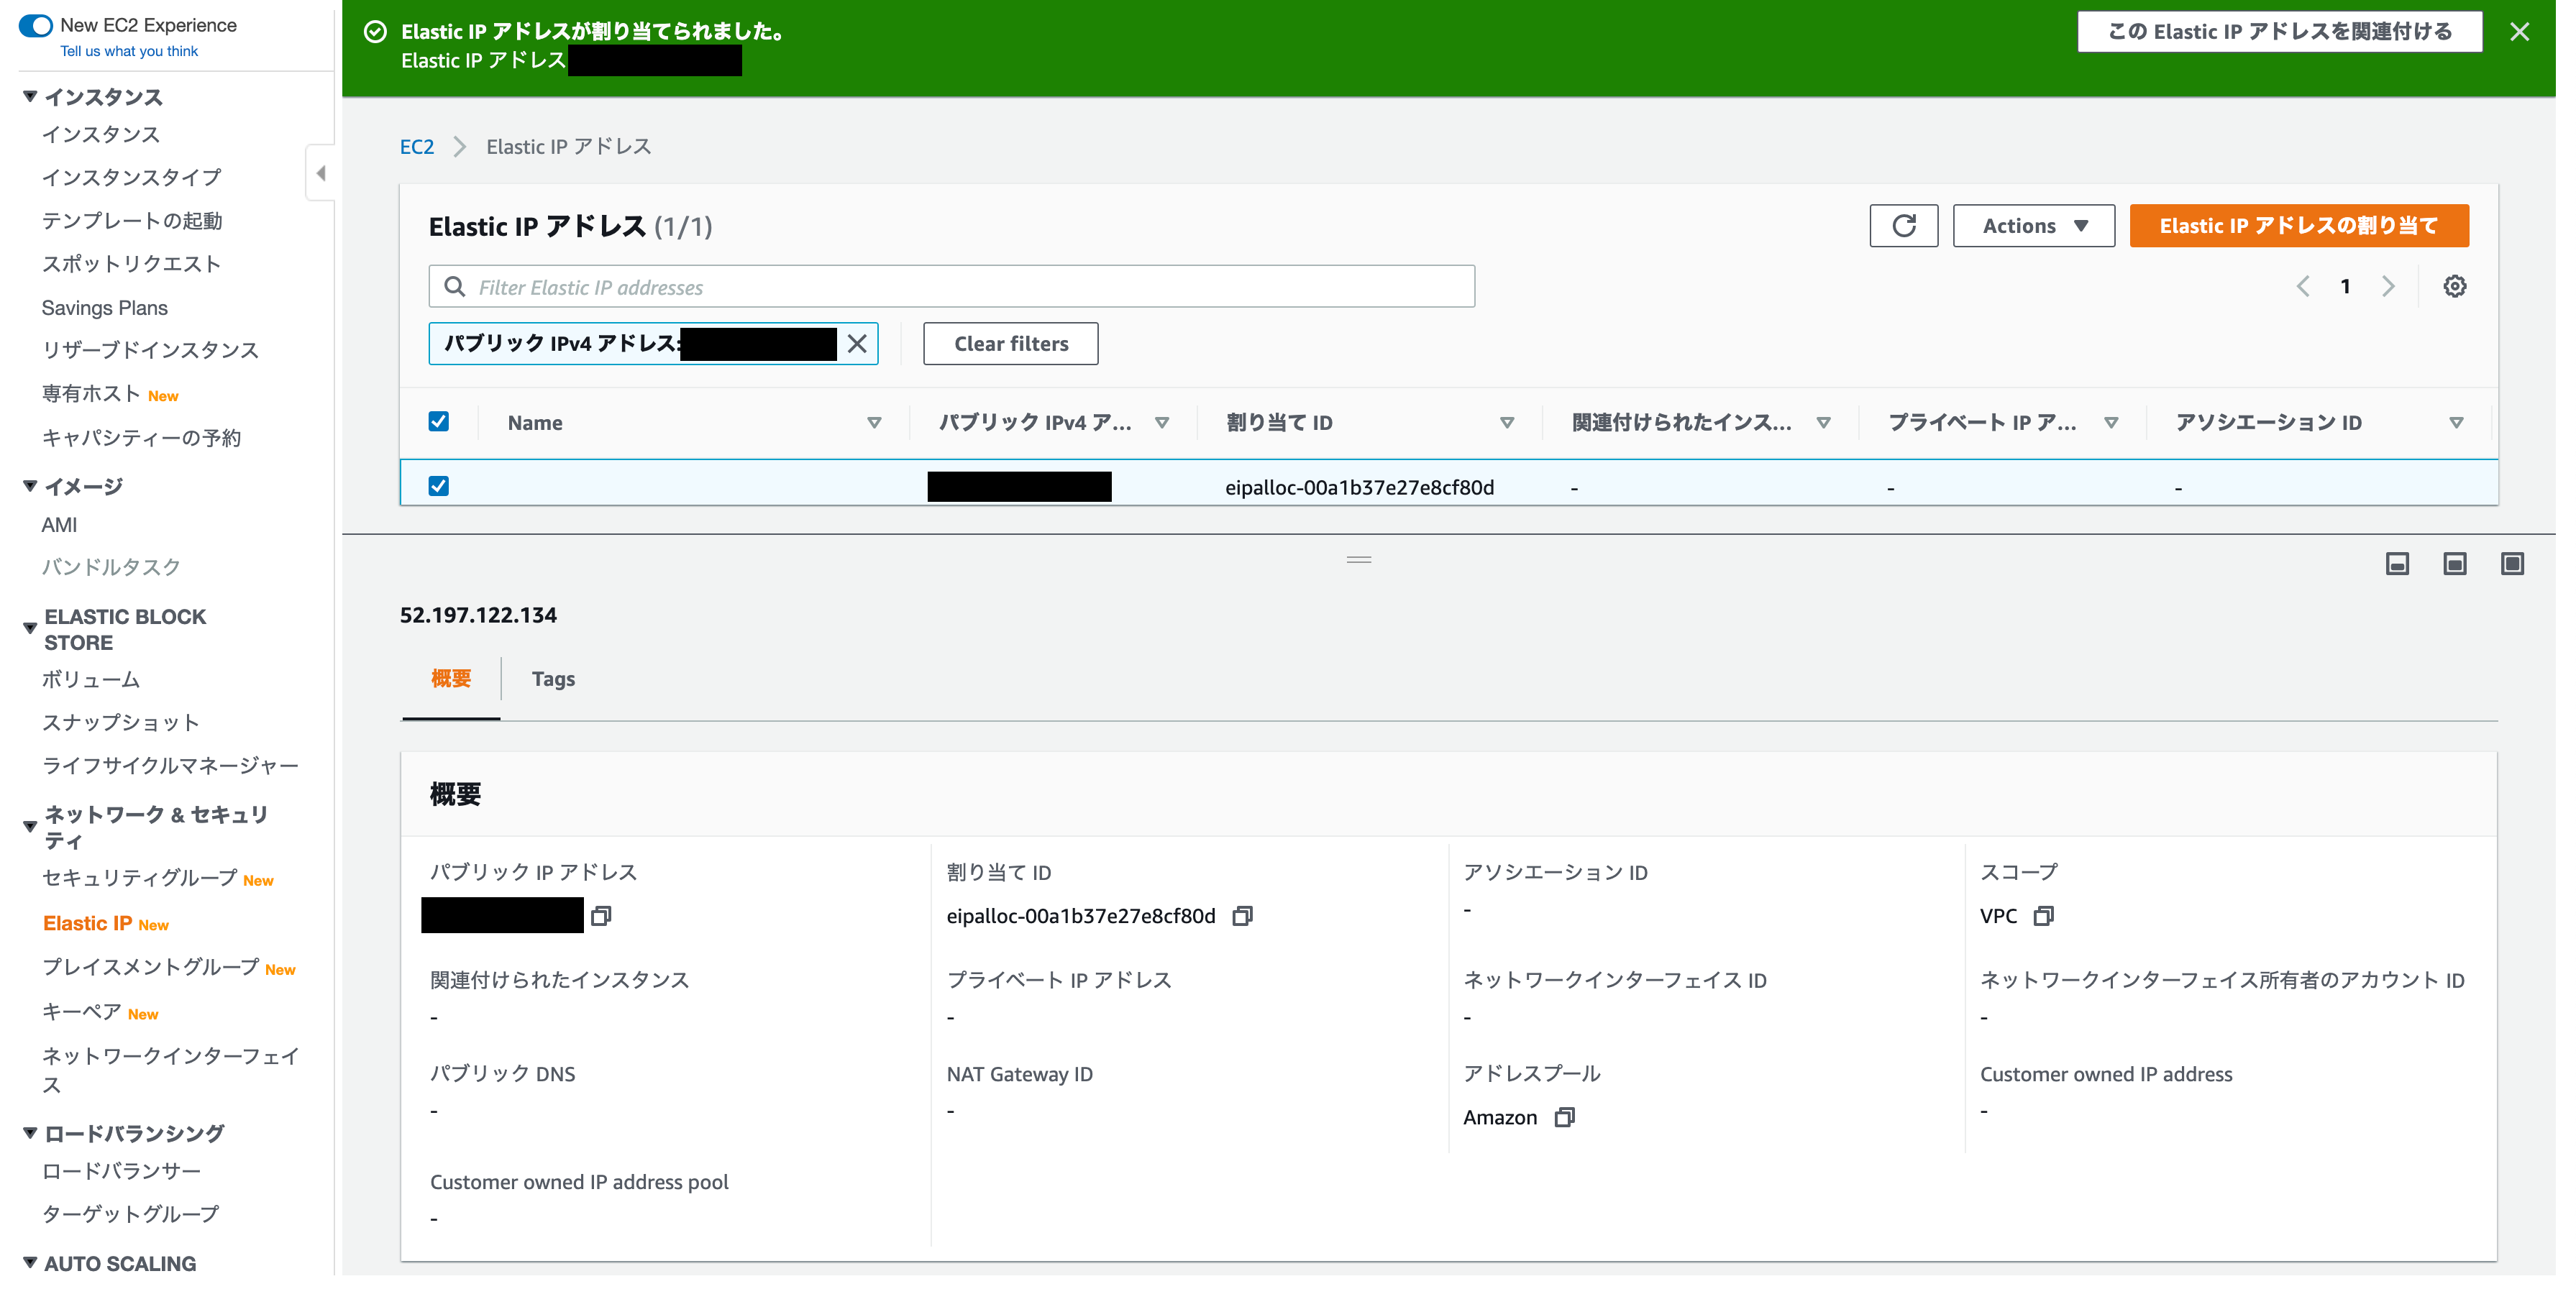
Elastic IP address assignment complete
Elastic IP address assignment is complete
Name the Elastic IP address
Since there is no name and it is difficult to understand, add a tag so that the name is displayed
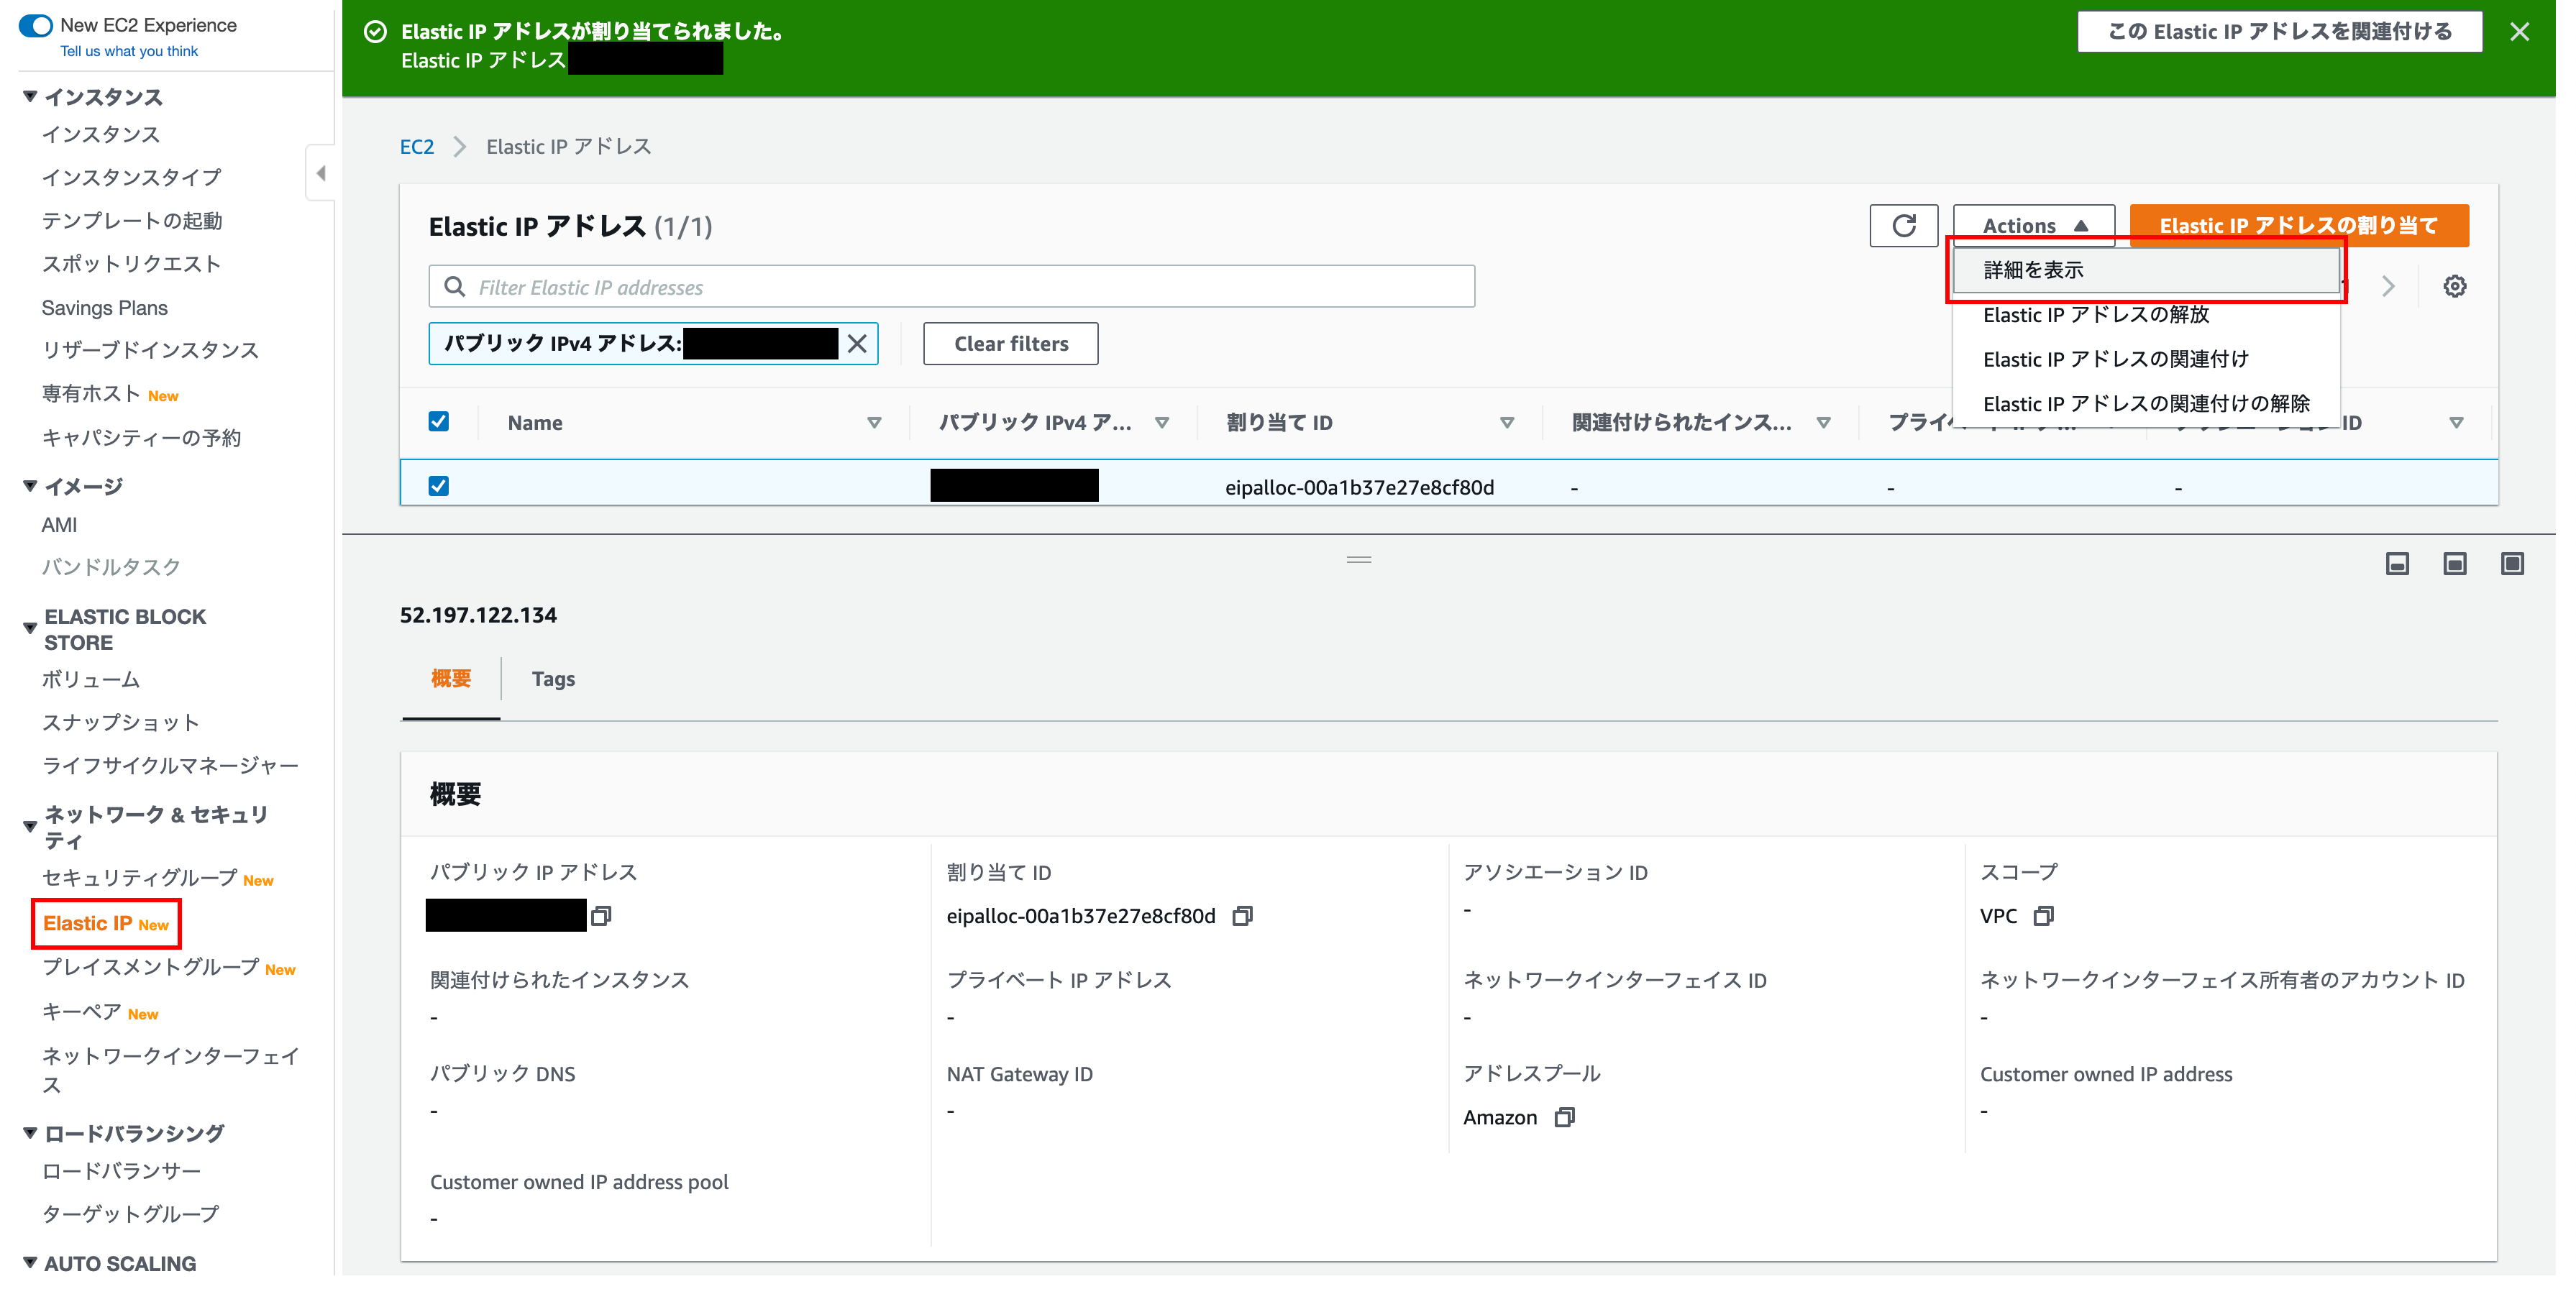
Open the Elastic IP address details screen
Click ʻActions and click Show Details`
Elastic IP address details
Click Manage Tags
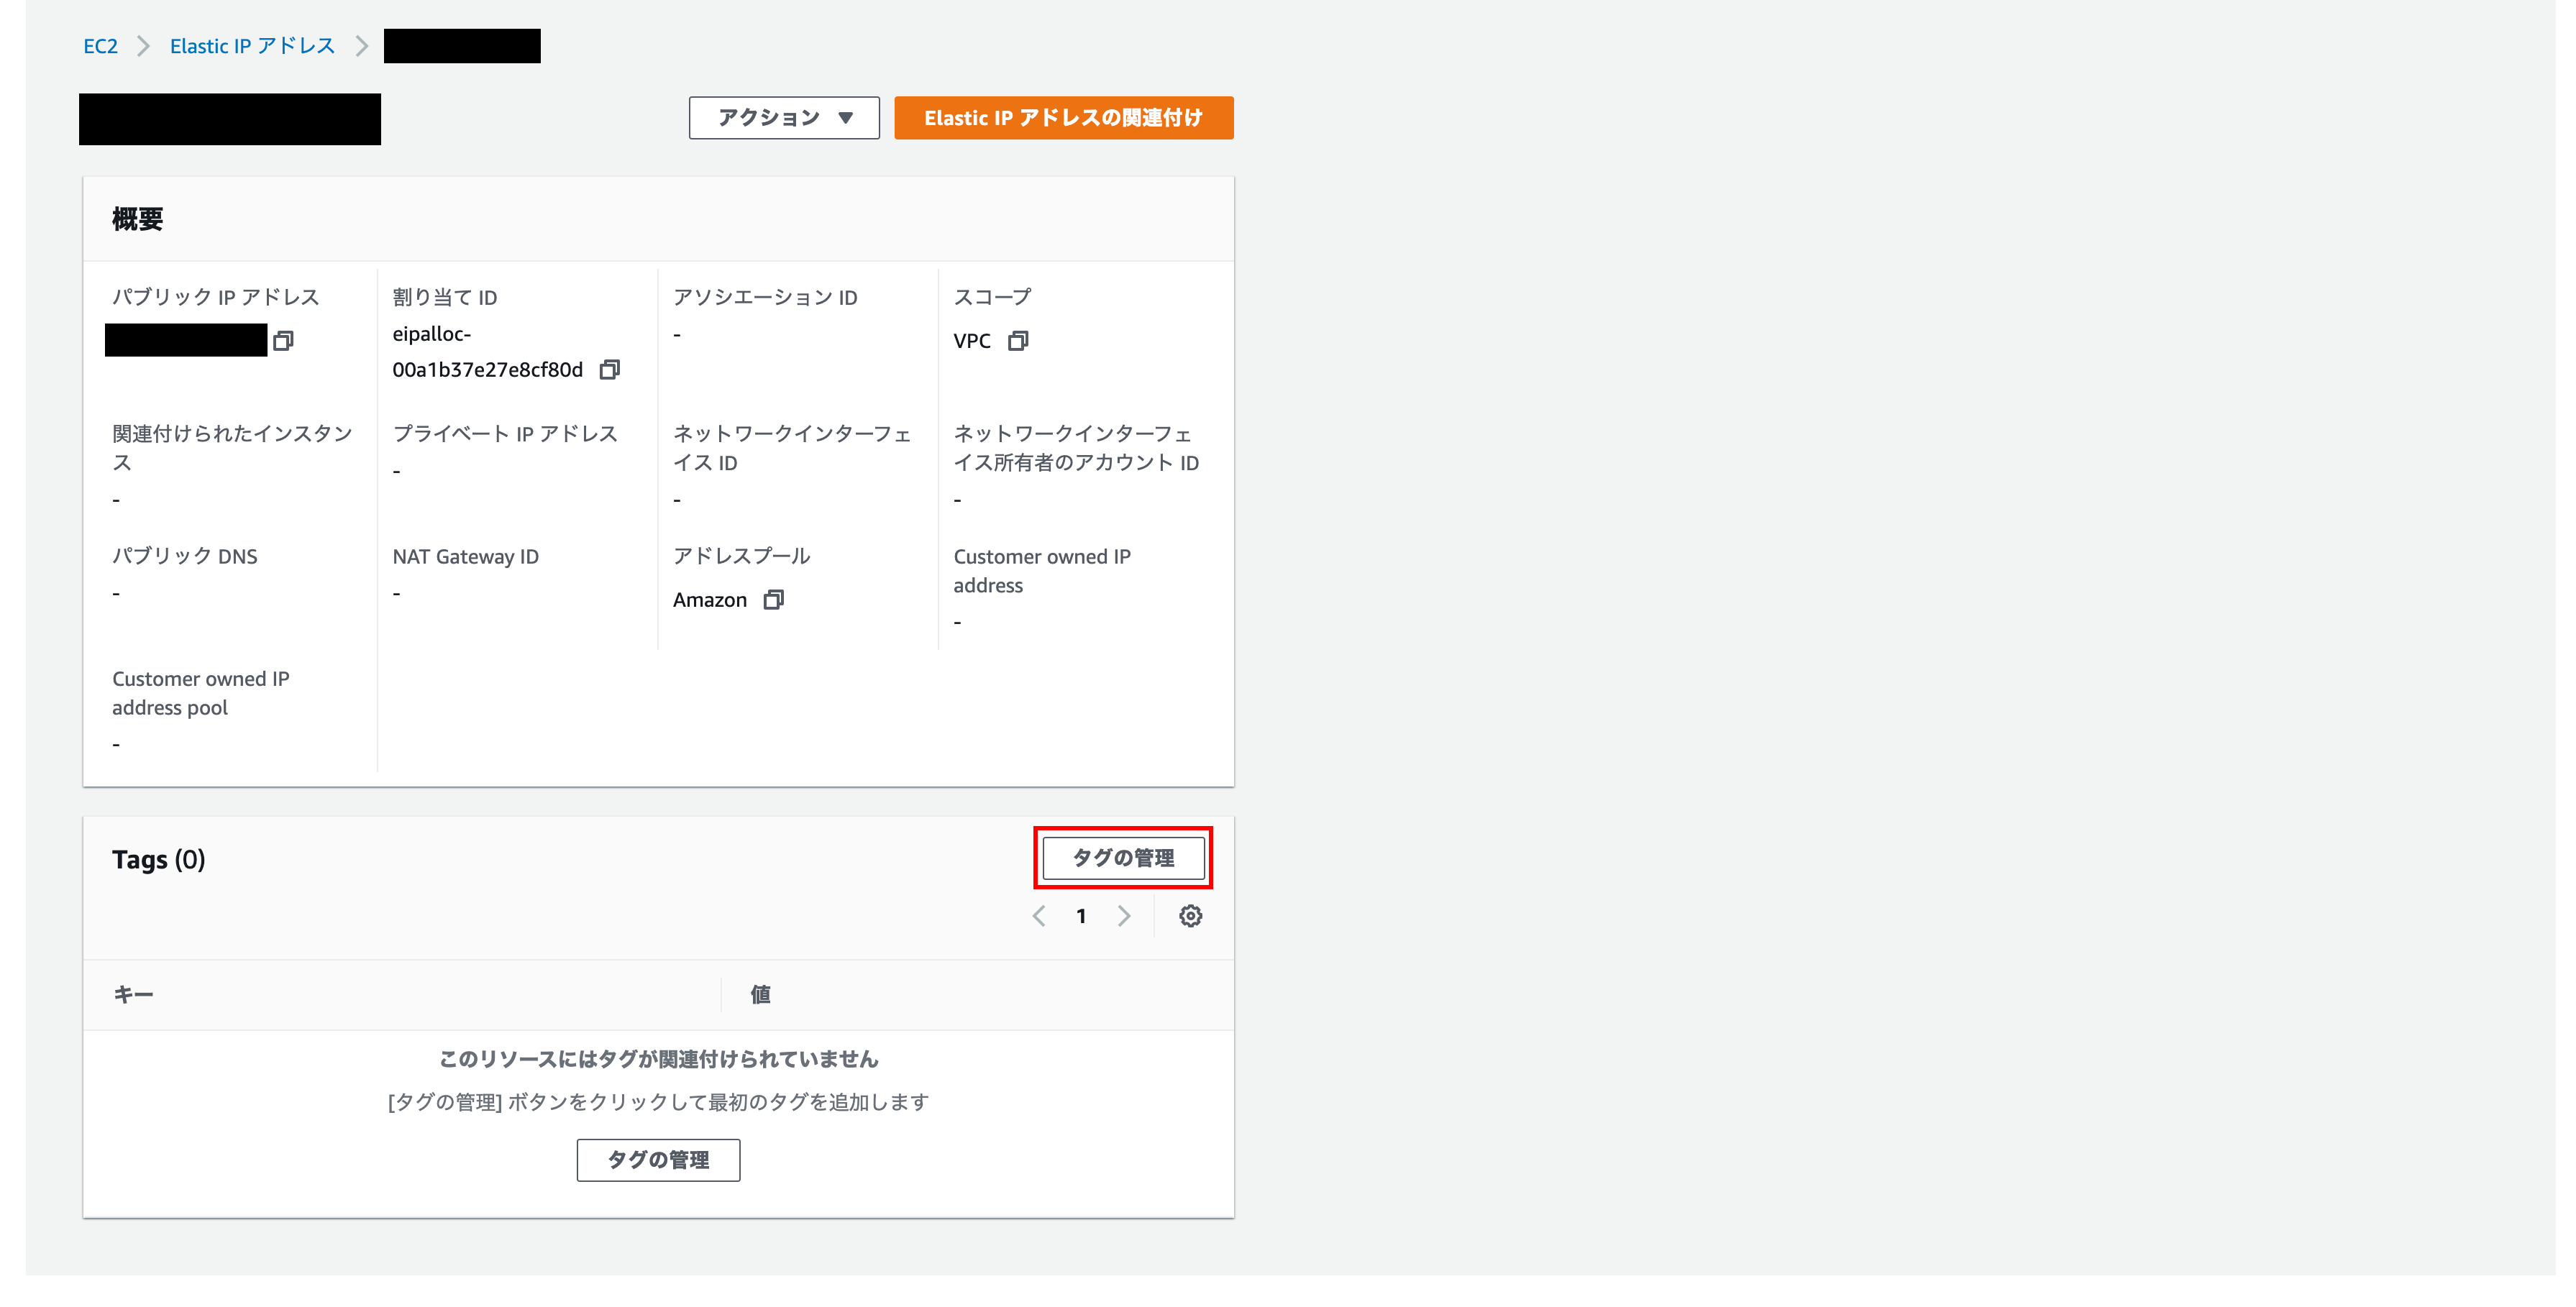
Tag management
Enter a descriptive name for Name and value-option for key
Finally click Save
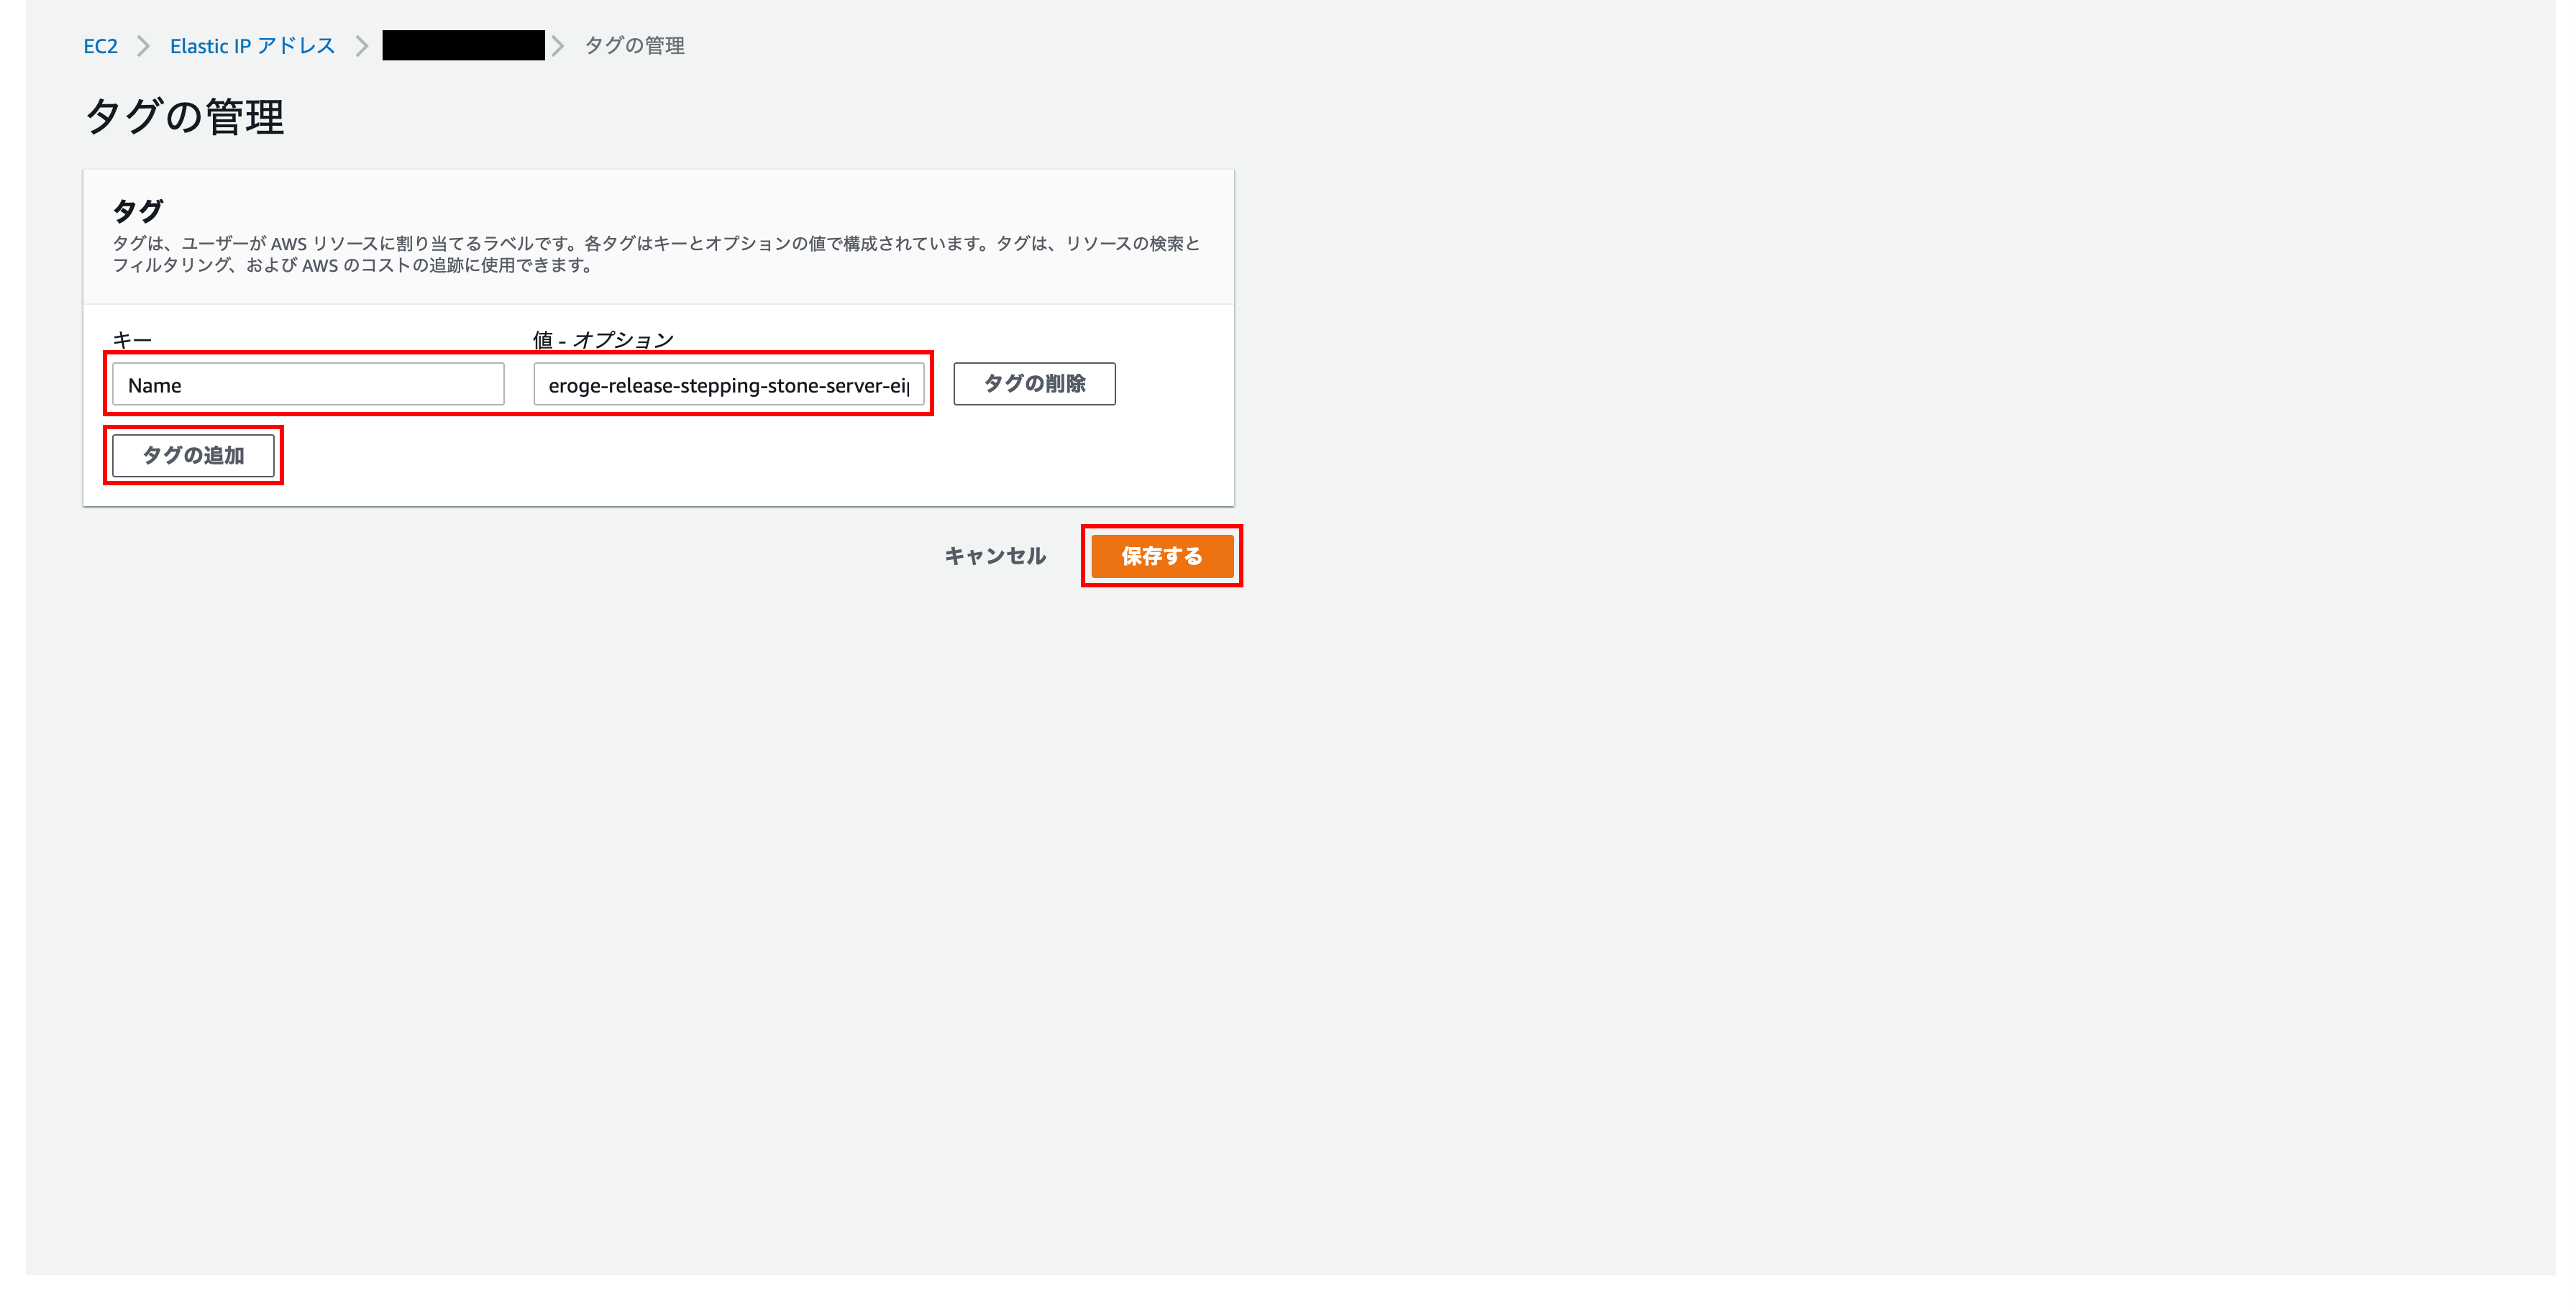
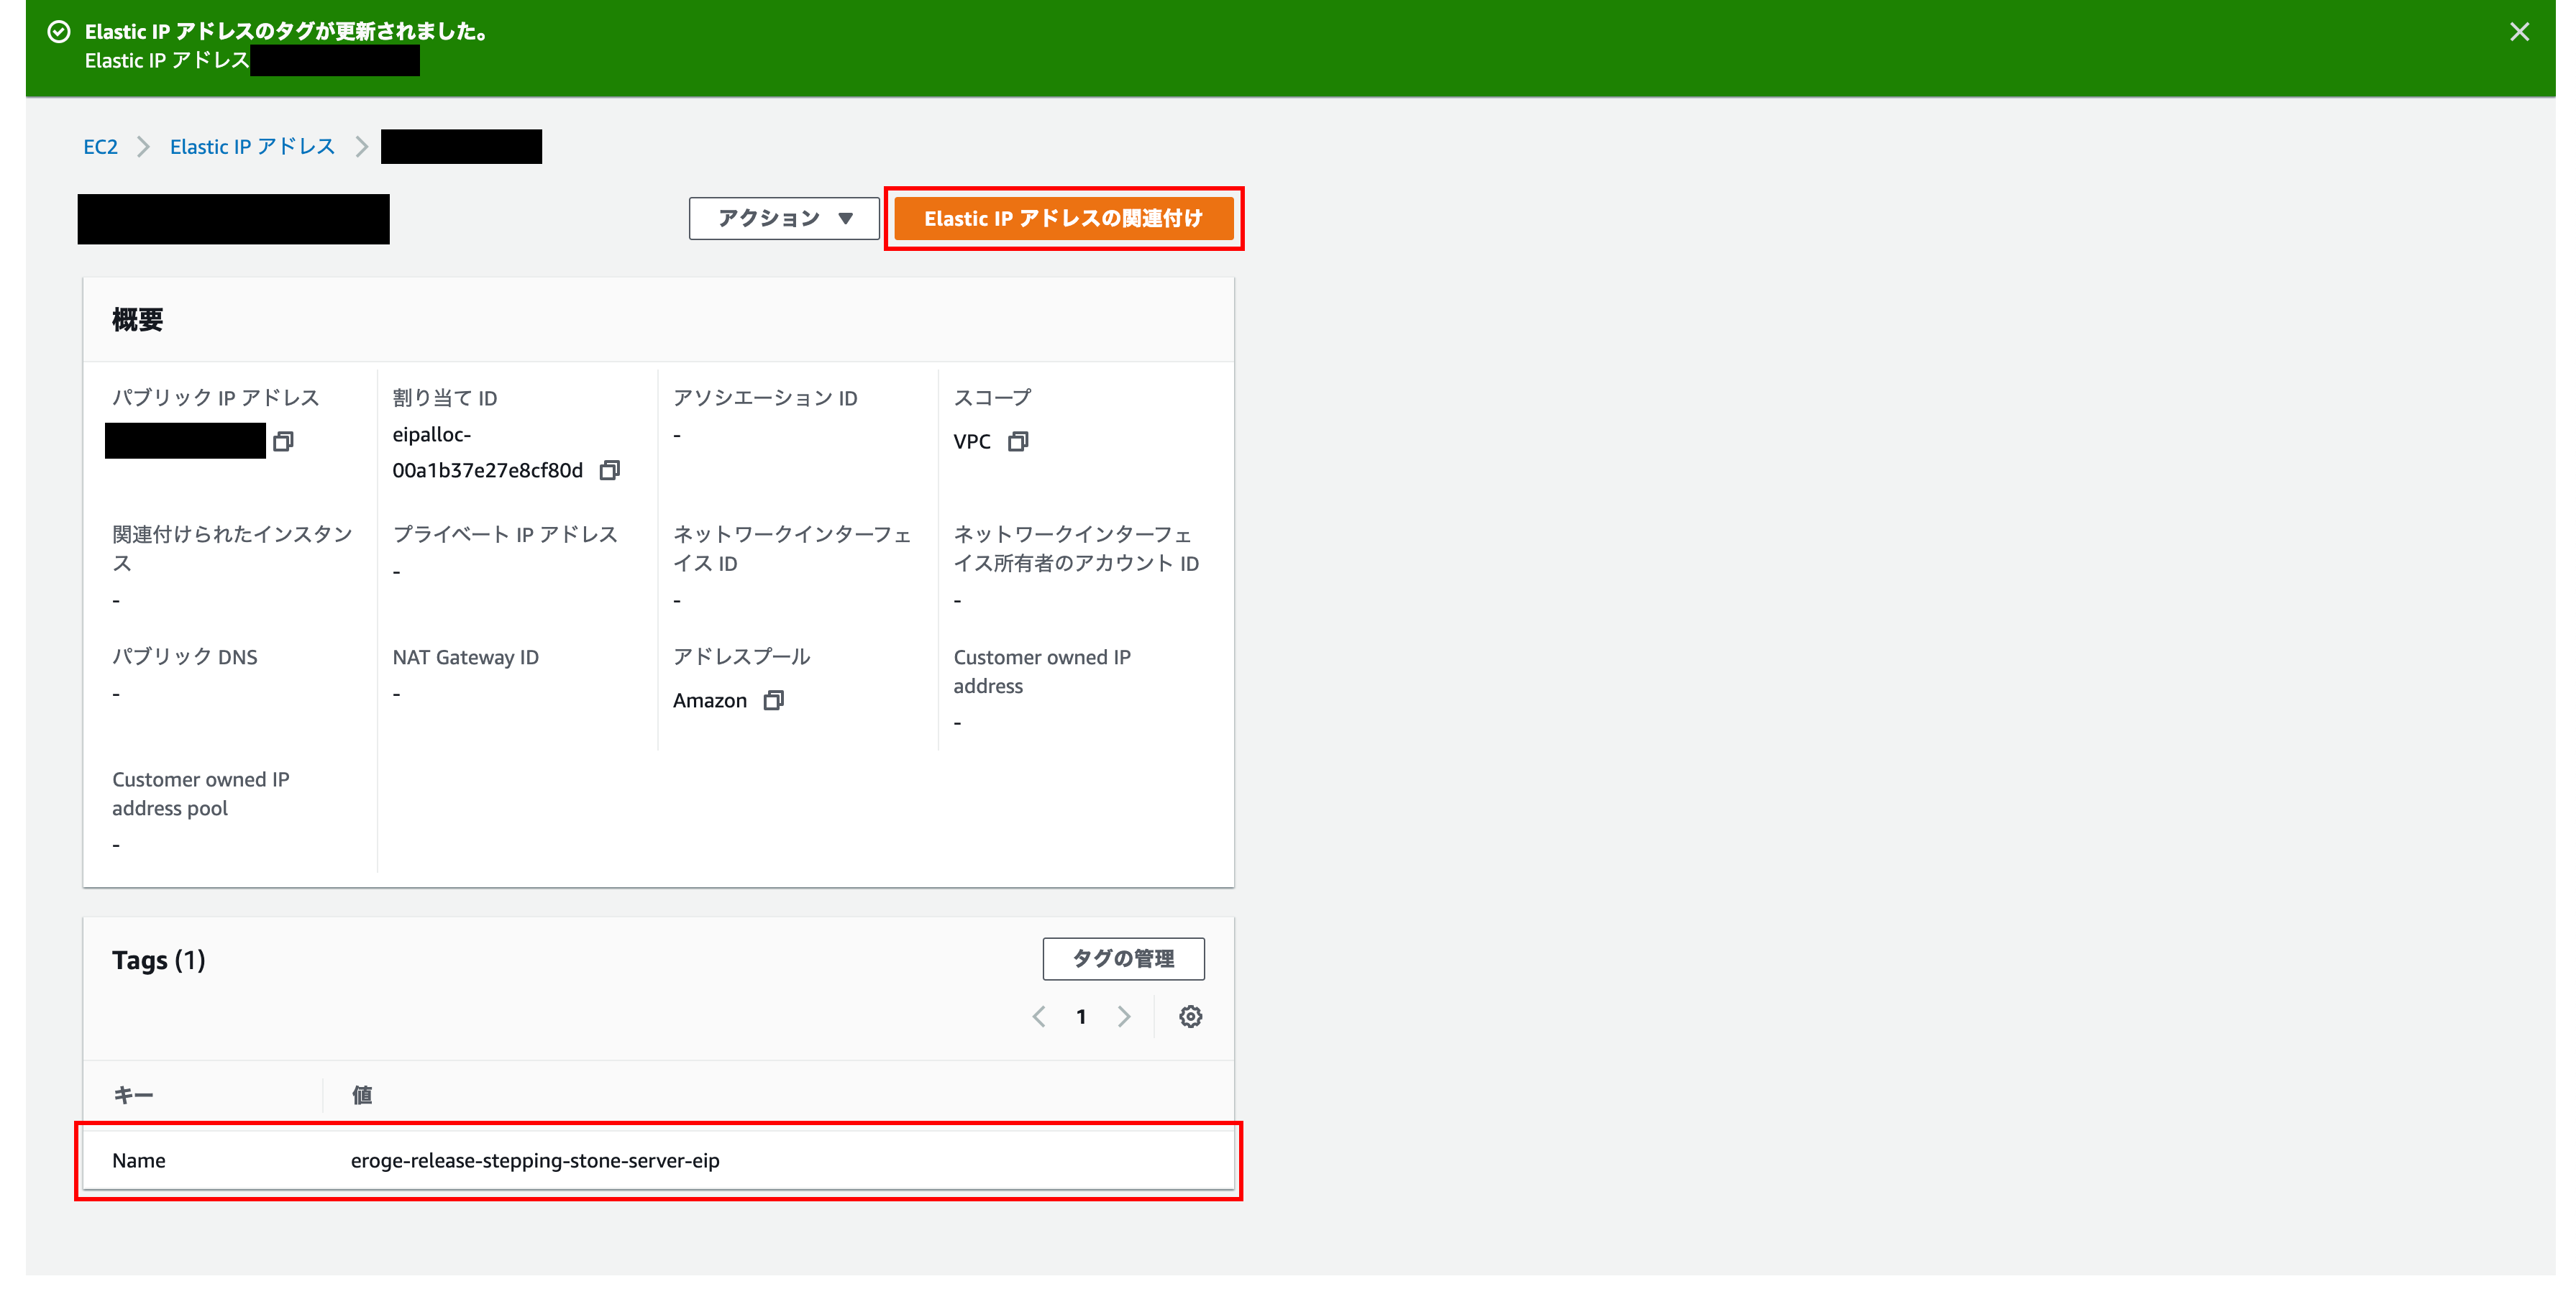
Tags have been added
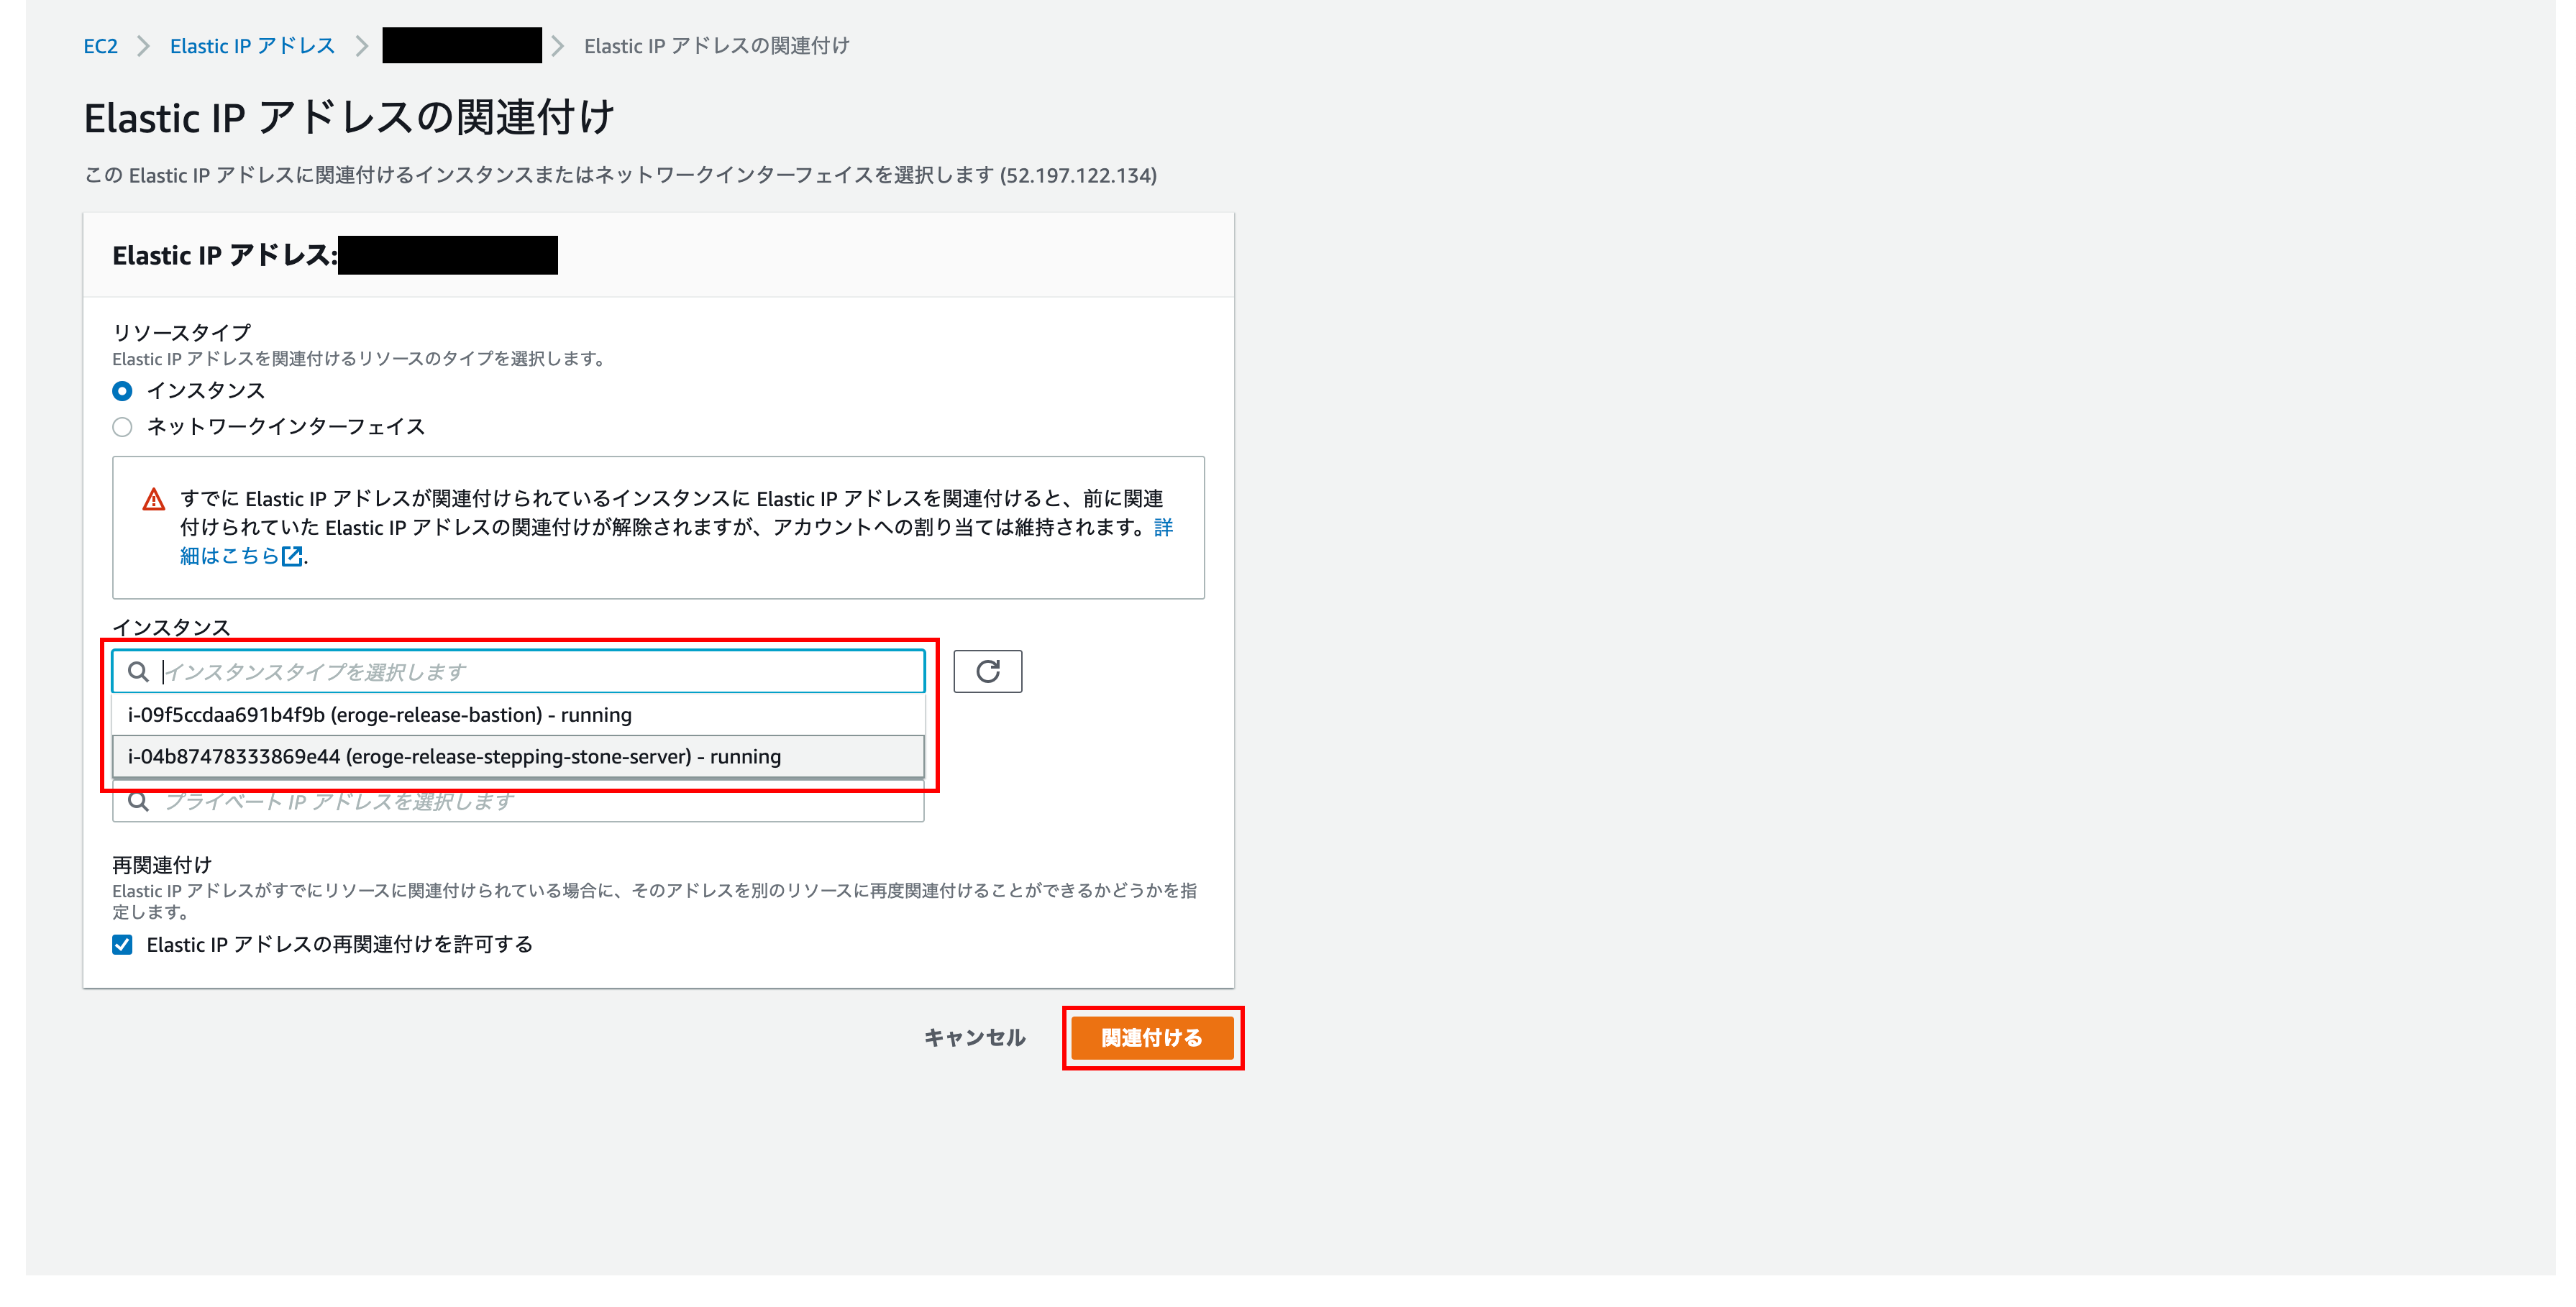
Associate an Elastic IP address with your EC2 instance
Associate the created ʻElastic IP addresswith thestep server (EC2)` you created earlier.
Open the Elastic IP Address Association screen
ʻClick on Elastic IP Address Association`
Elastic IP address association
For the instance item, select the ʻEC2 instancecreated earlier. Finally clickAssociate`
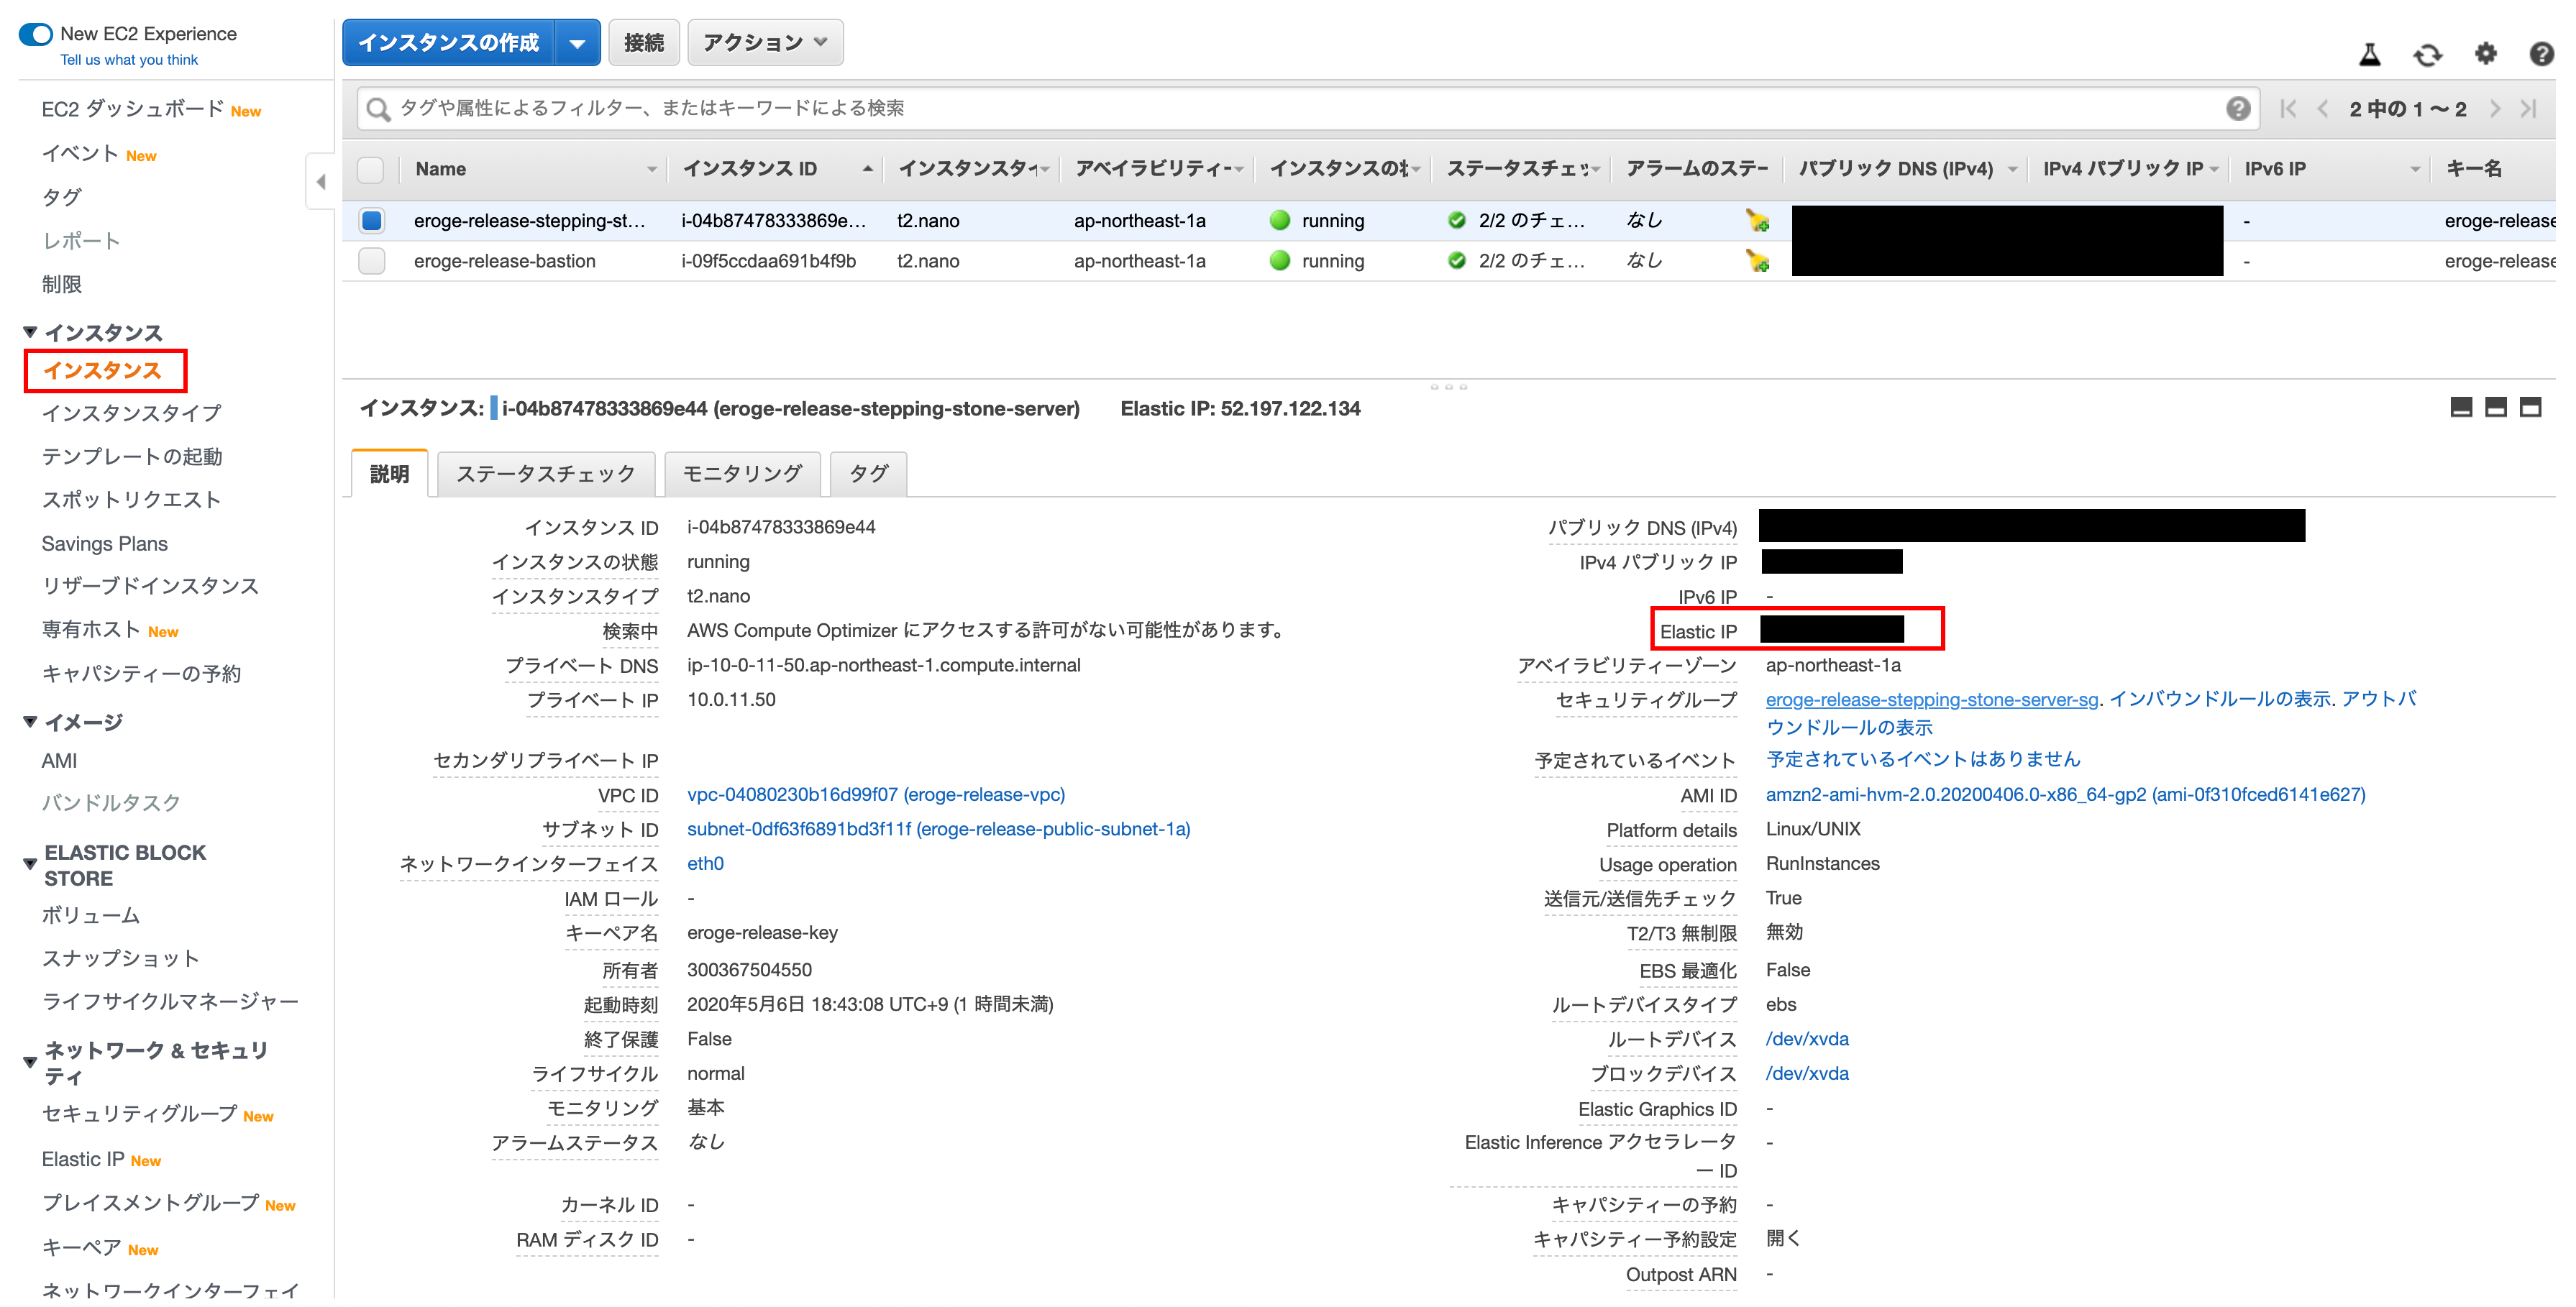
Check if an Elastic IP address is associated
You can see that the EC2 instance you set earlier is displayed in the associated instance
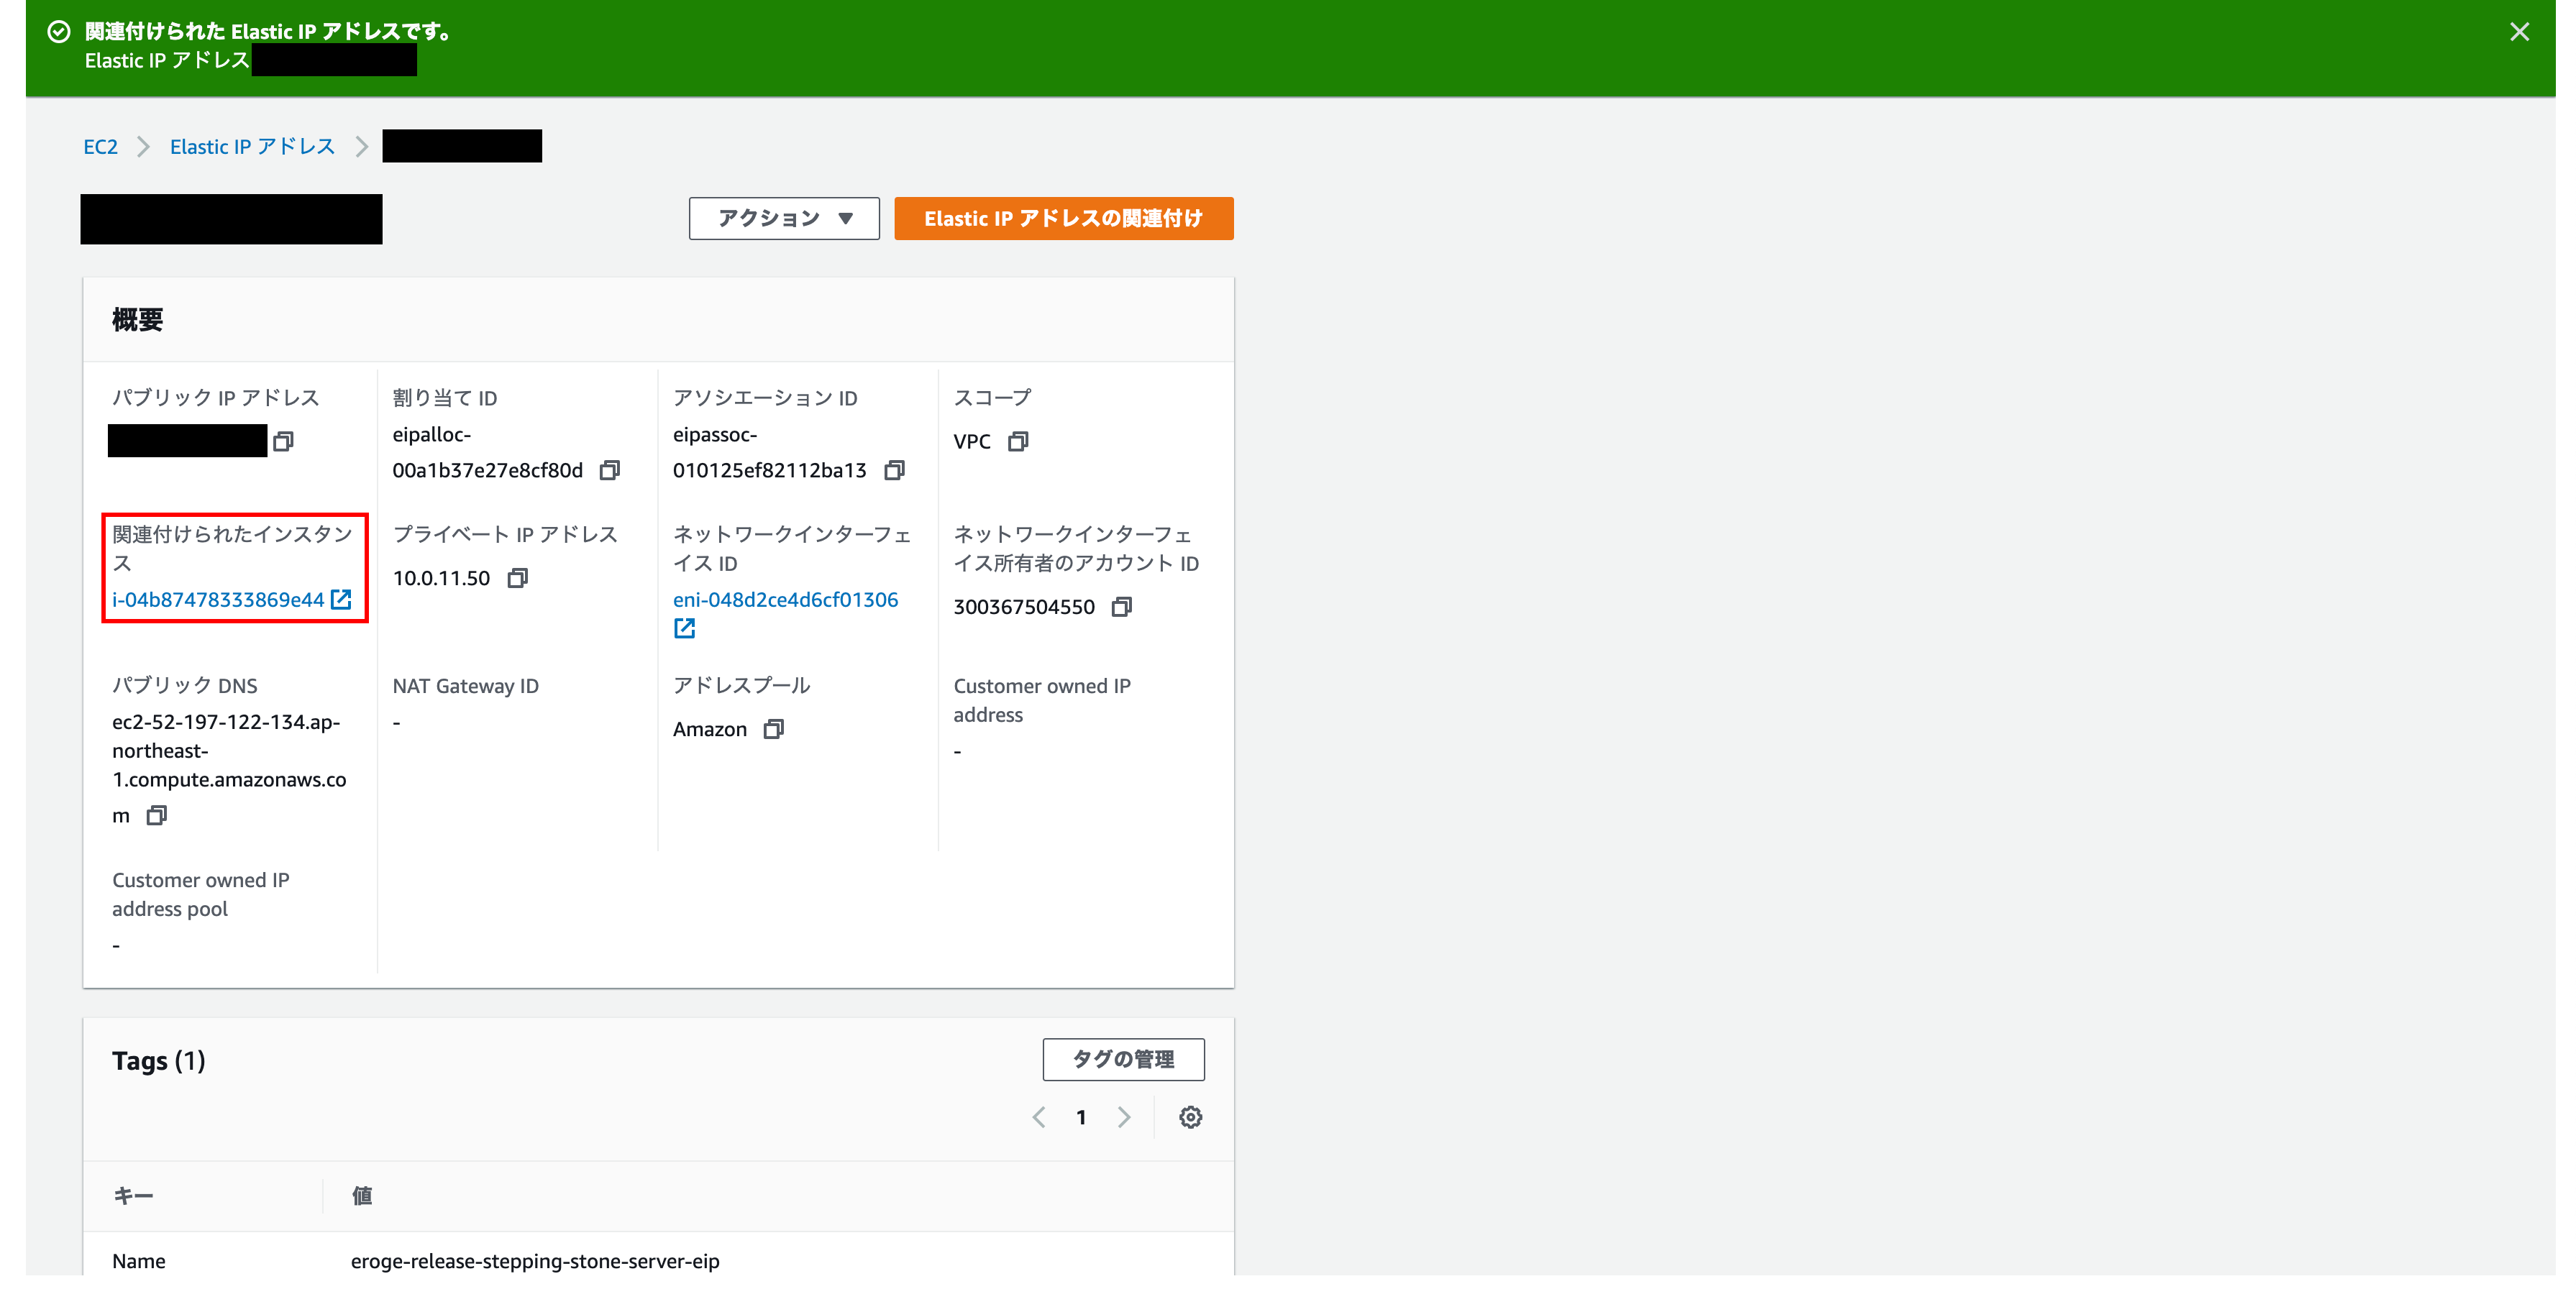
You can also see that the ʻElastic IP ʻElastic IP you created earlier is displayed on the EC2 instance screen.
Try to actually connect
Check if you can access the bastion server created by using a command like the following
** The key pair will be the one you downloaded when you created your EC2 instance **
$ ssh -i key pair ec2–user@Elastic IP address
If you can connect, you're done

** This completes the construction of the bastion server **
RDS environment construction
Build PostgreSQL Master and Slave configurations with RDS
Completion drawing
After construction, the configuration diagram will be as follows.
Let's build the environment immediately
Create a DB subnet group
It is a setting for Master and Slave on which subnet to start the DB instance Please check the following documents for details
--Using a DB Instance in VPC--Amazon Relational Database Service
Open the DB subnet group creation screen
Click Subnet Group in the left menu and click Create DB Subnet Group in the upper right.
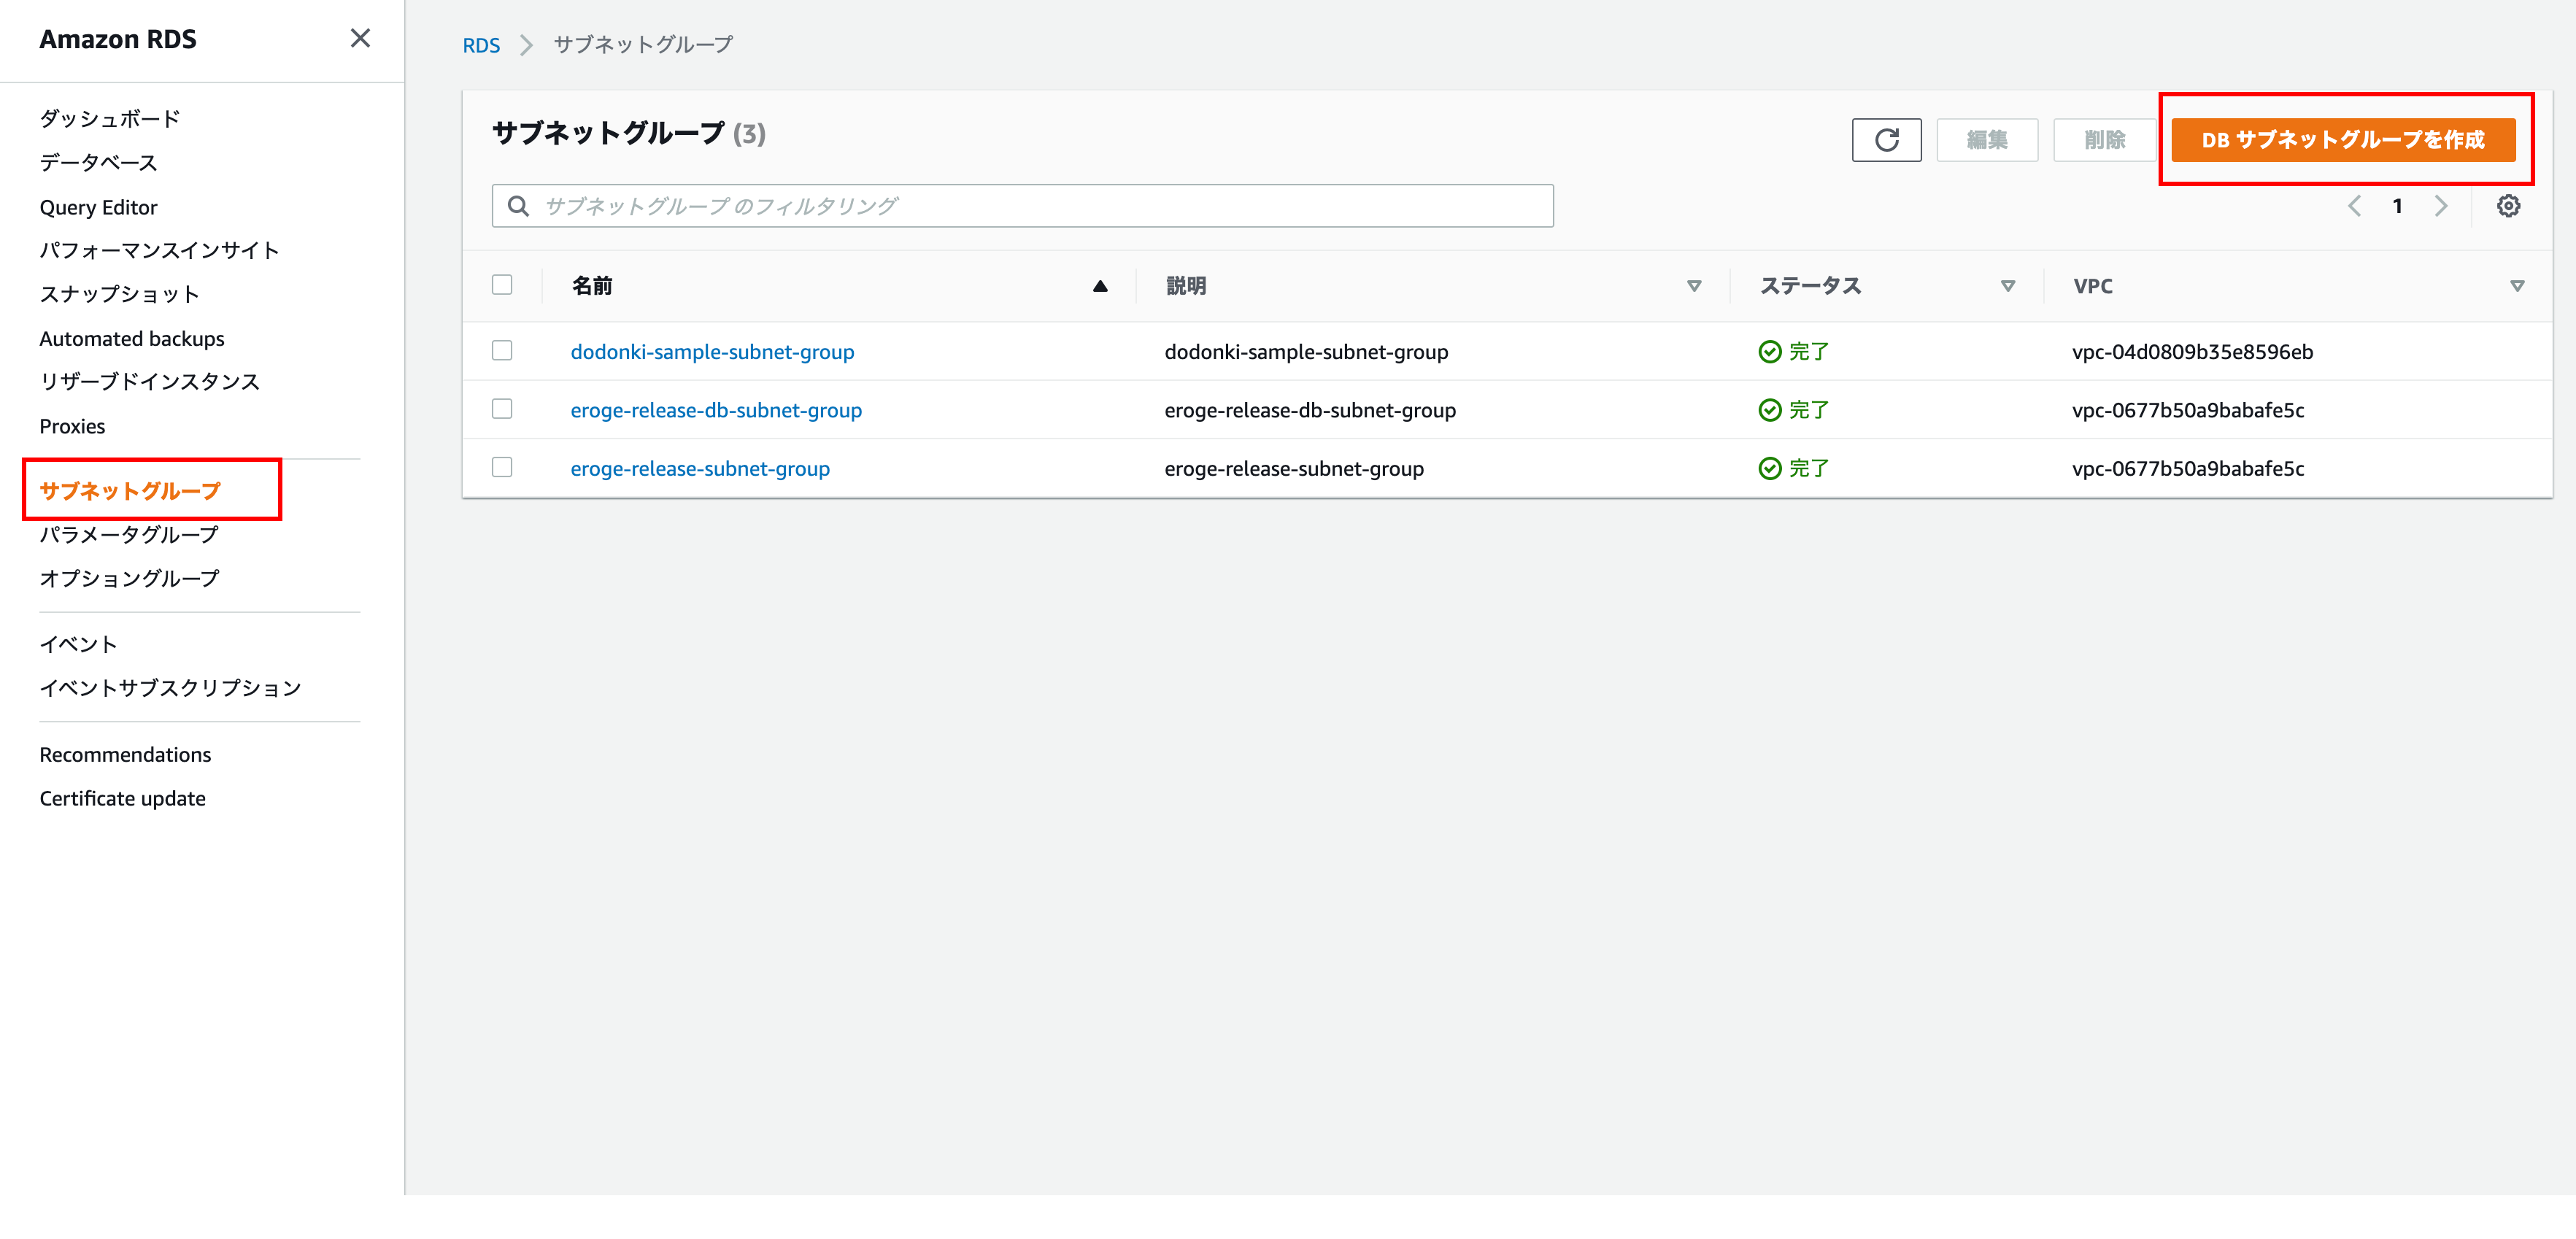
Subnet group details
Enter Name, Description, VPC
** Note: Make sure to select the created VPC instead of the default VPC **
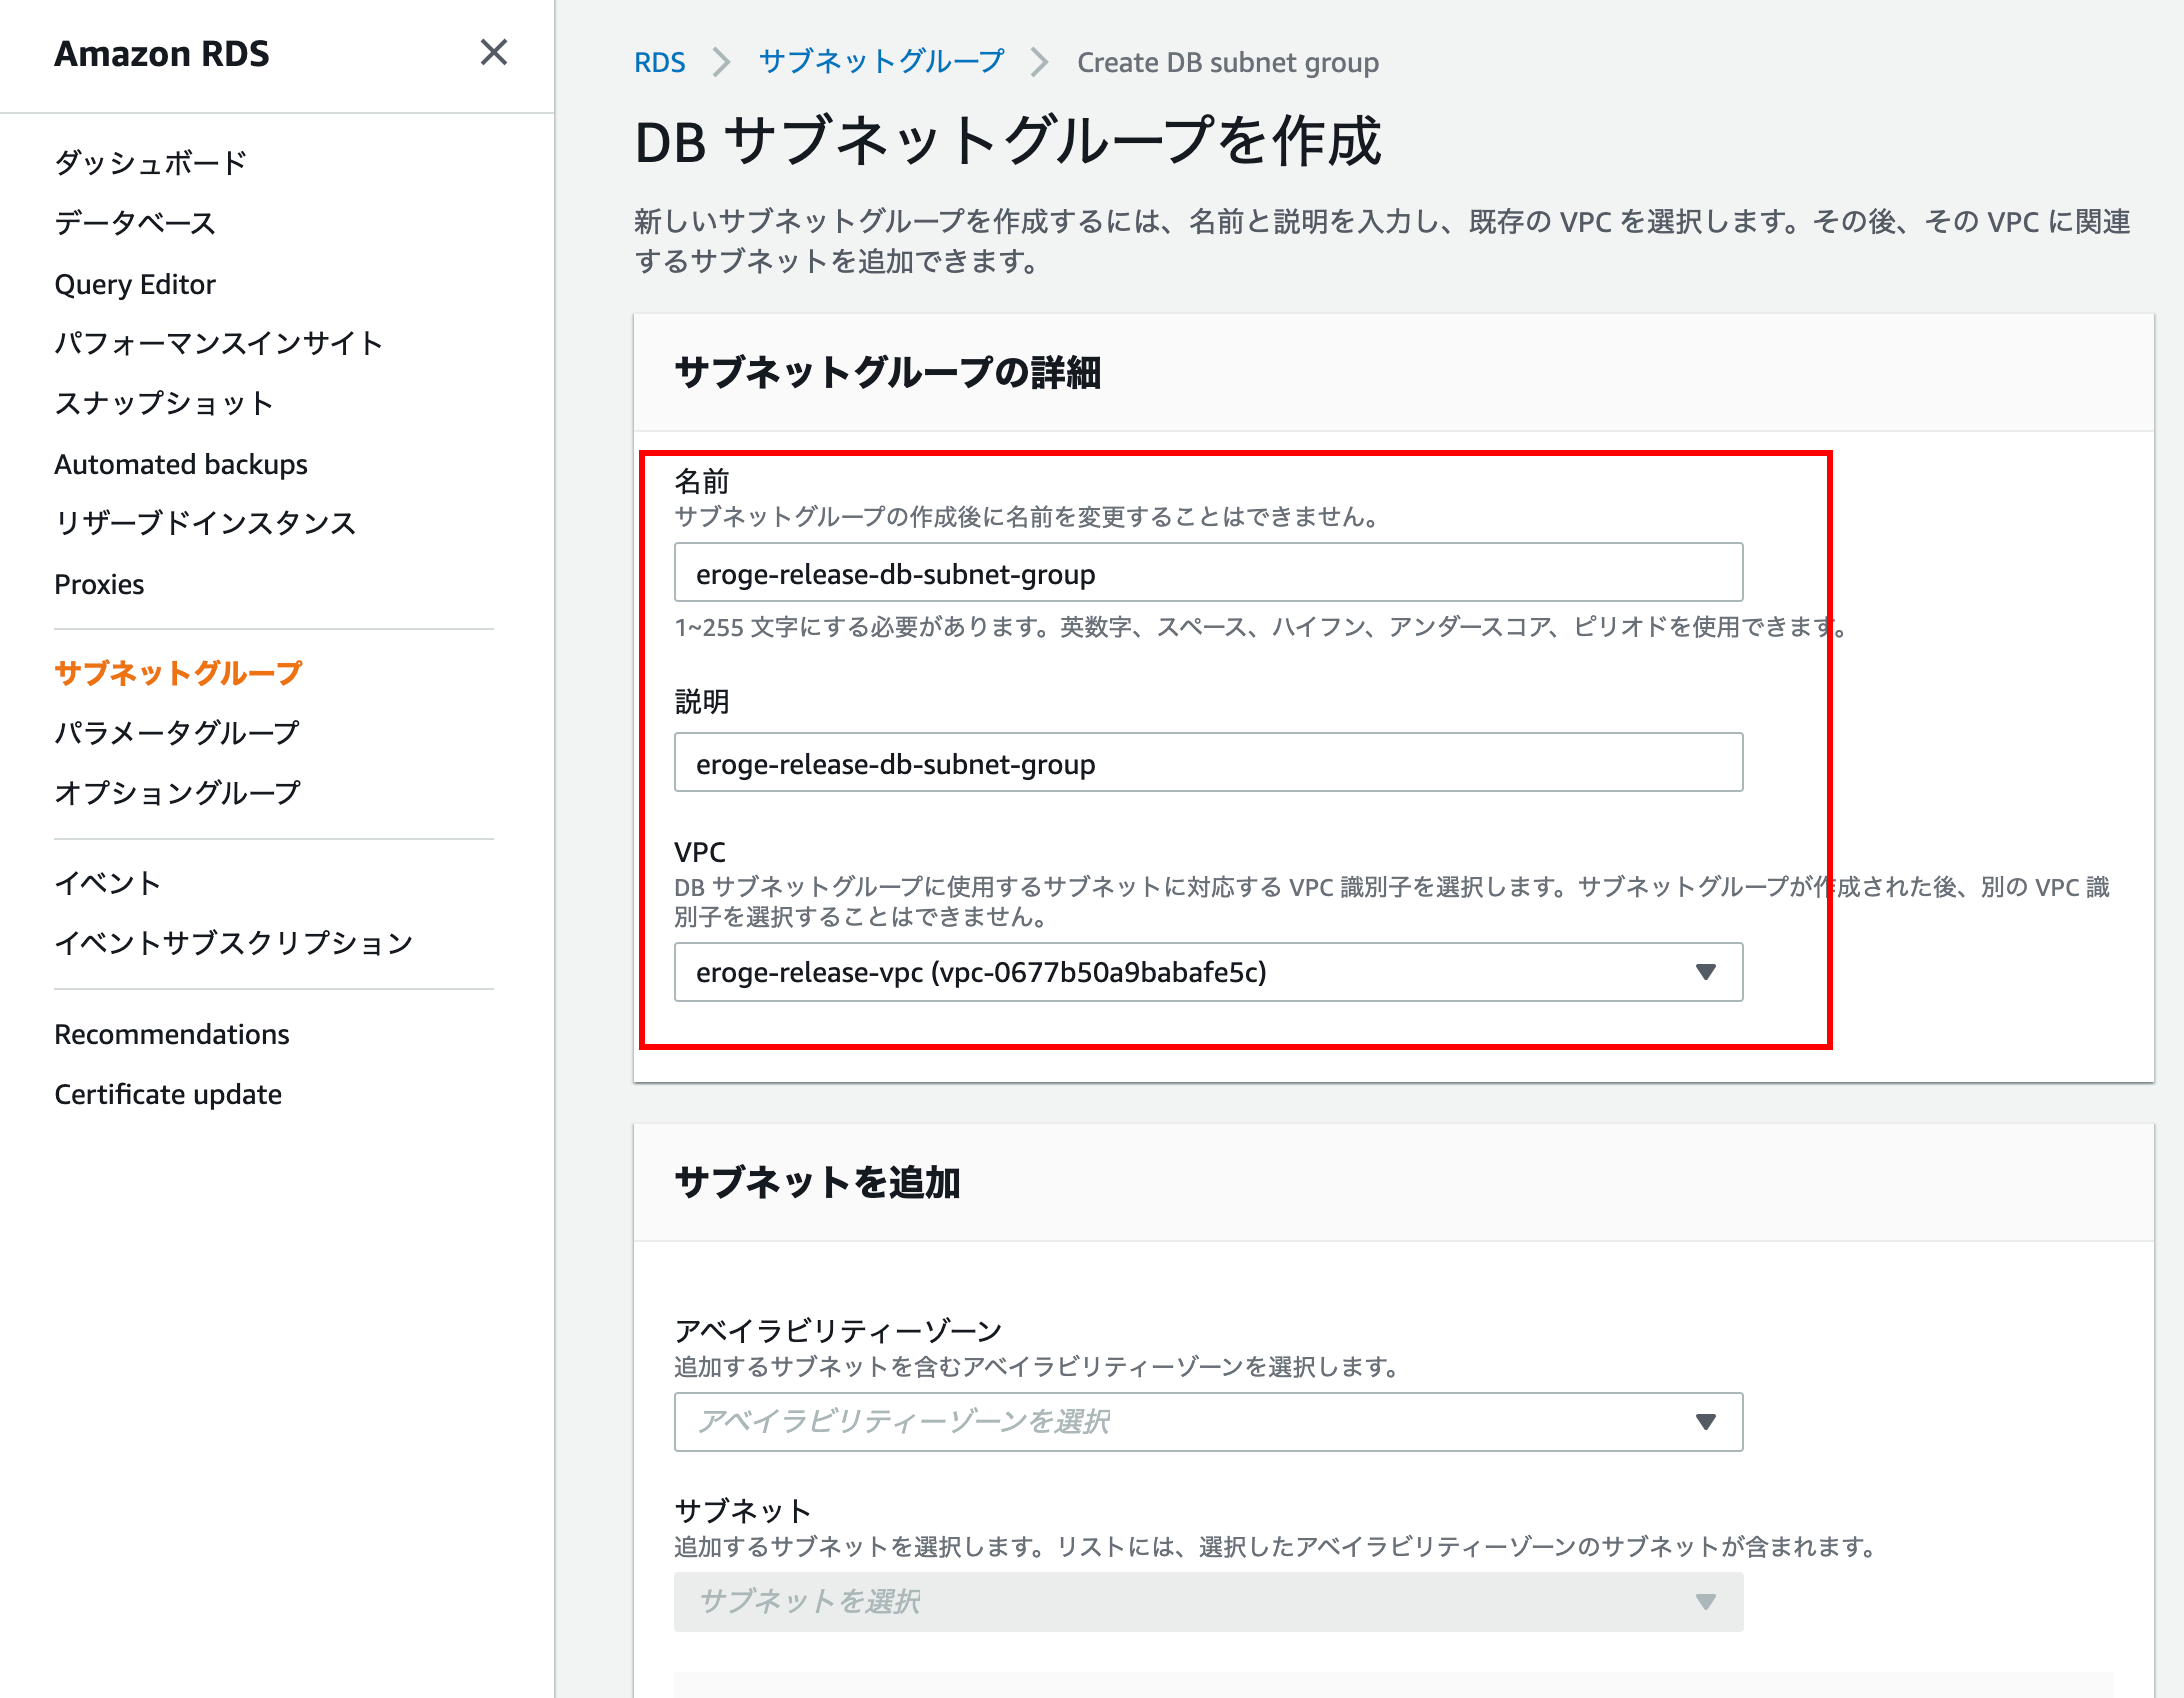
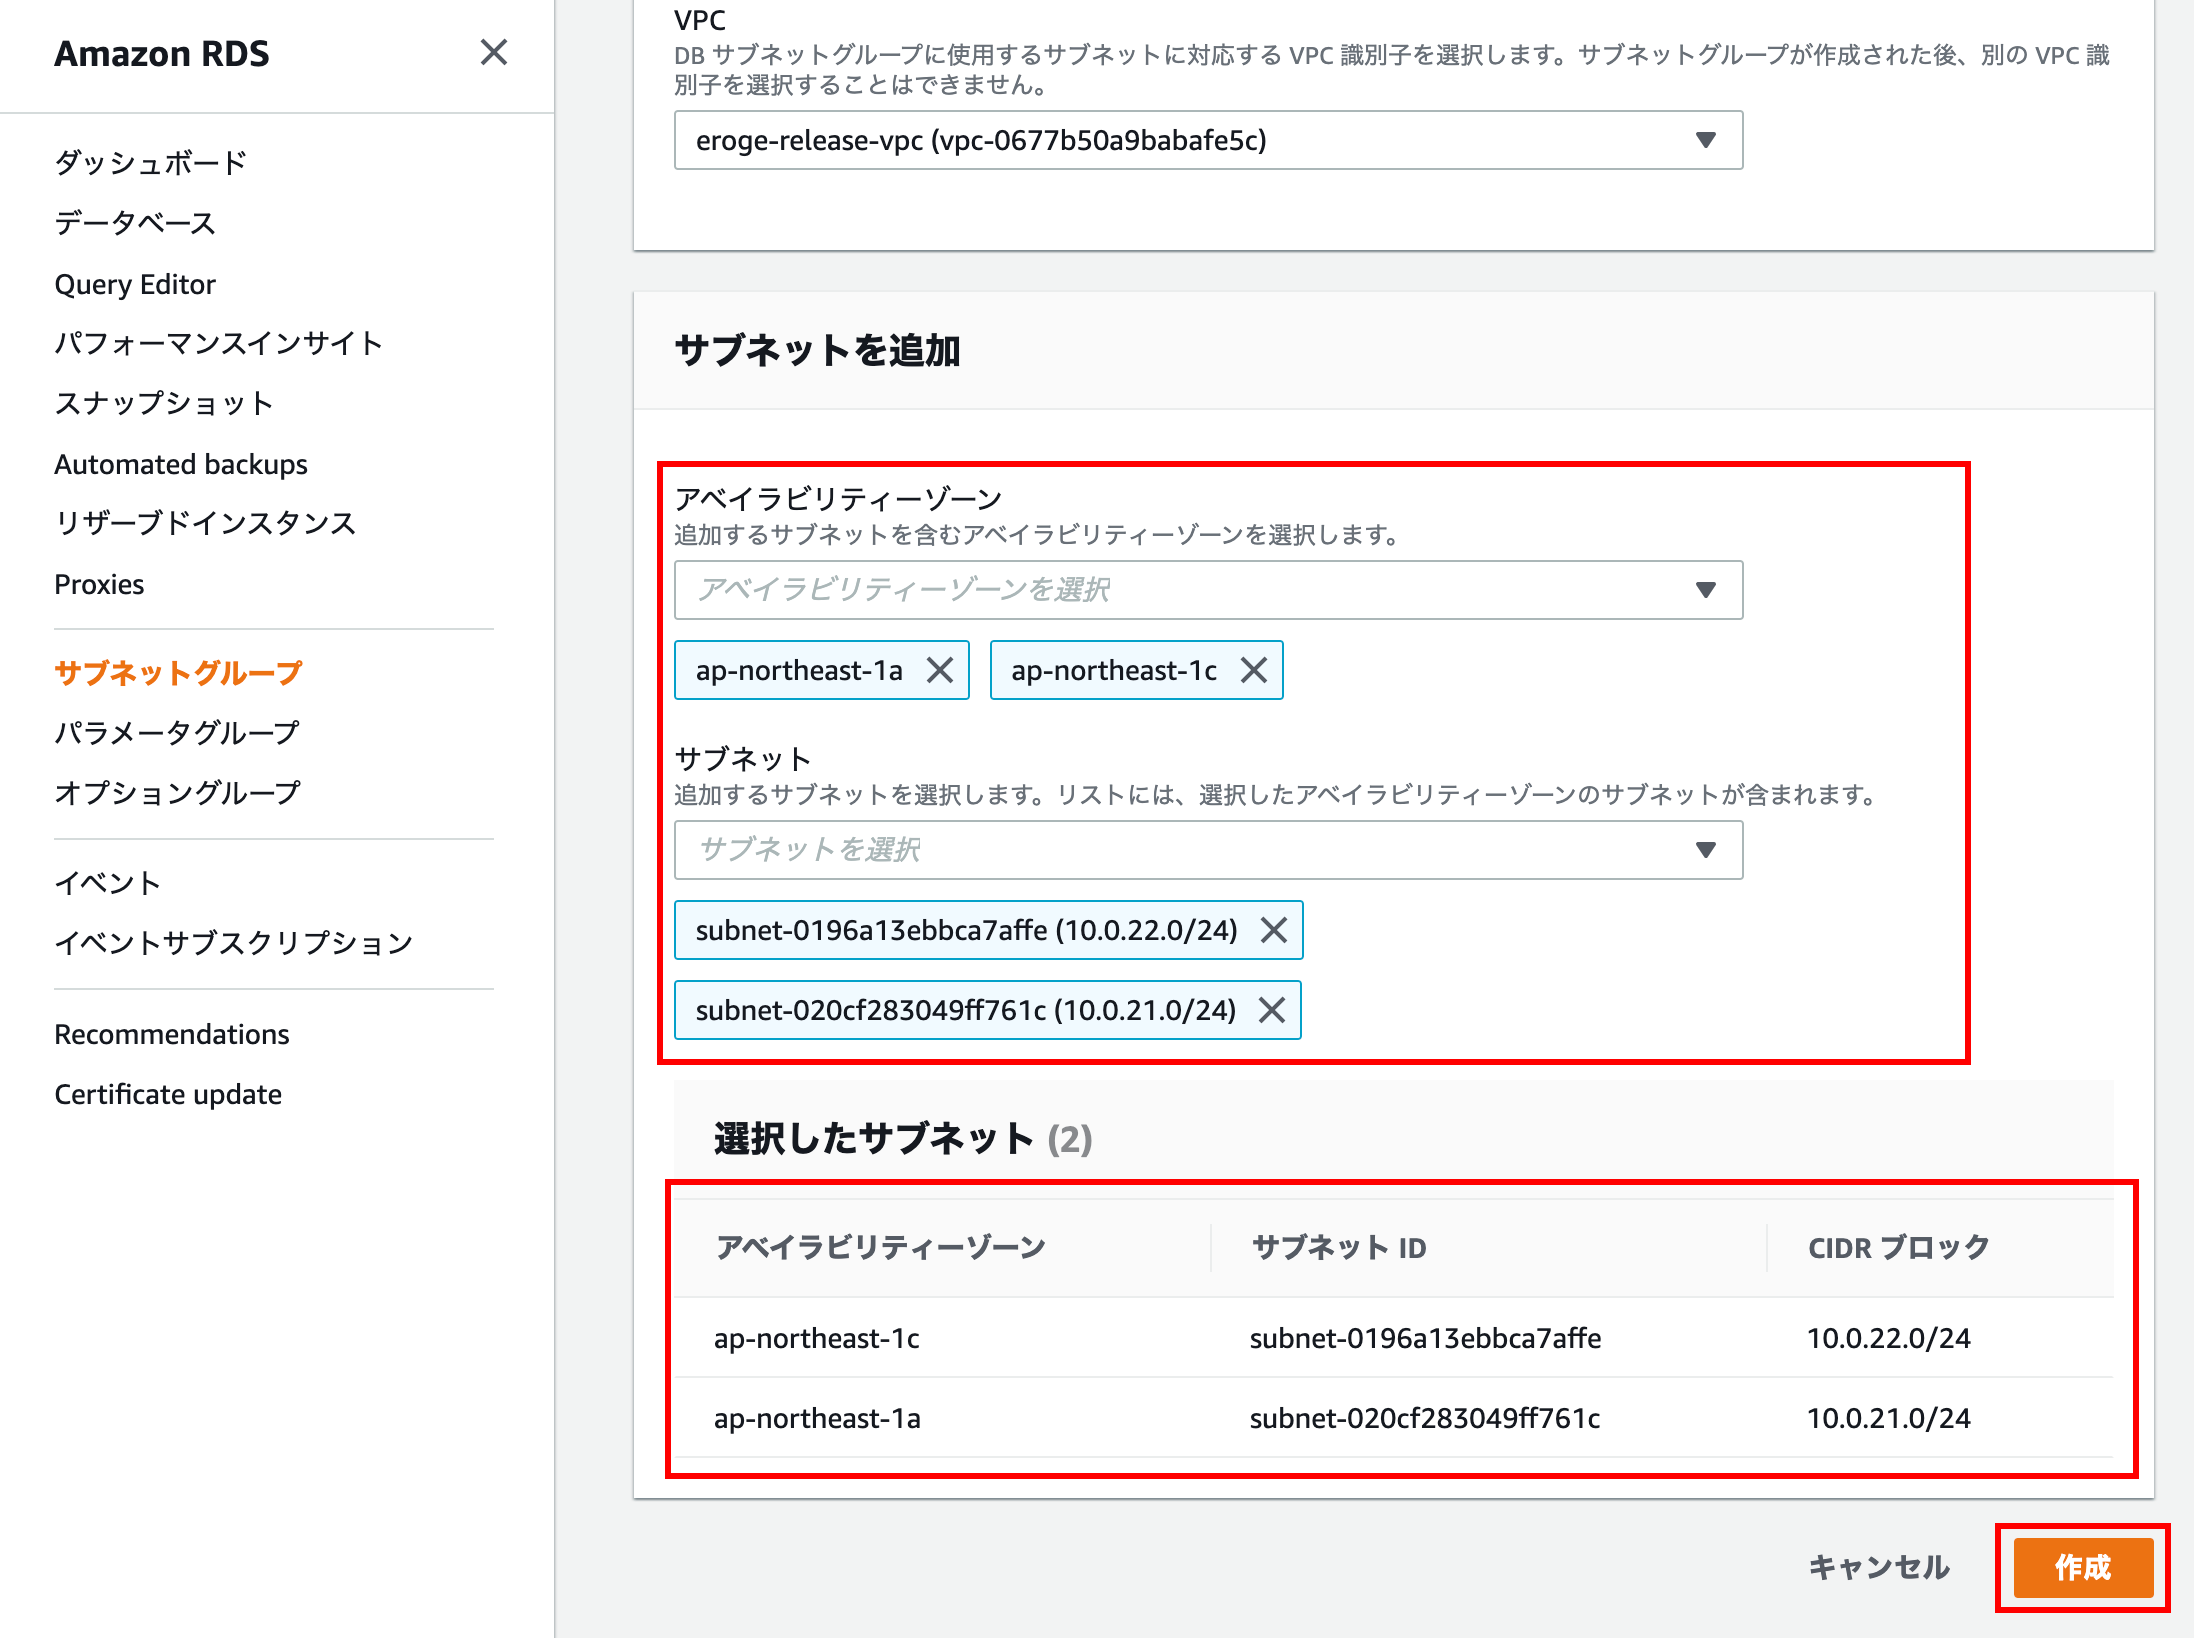
Add subnet
Add a Private subnet for the target Availability Zone (1a and 1c)
Finally, click the Create button to finish.
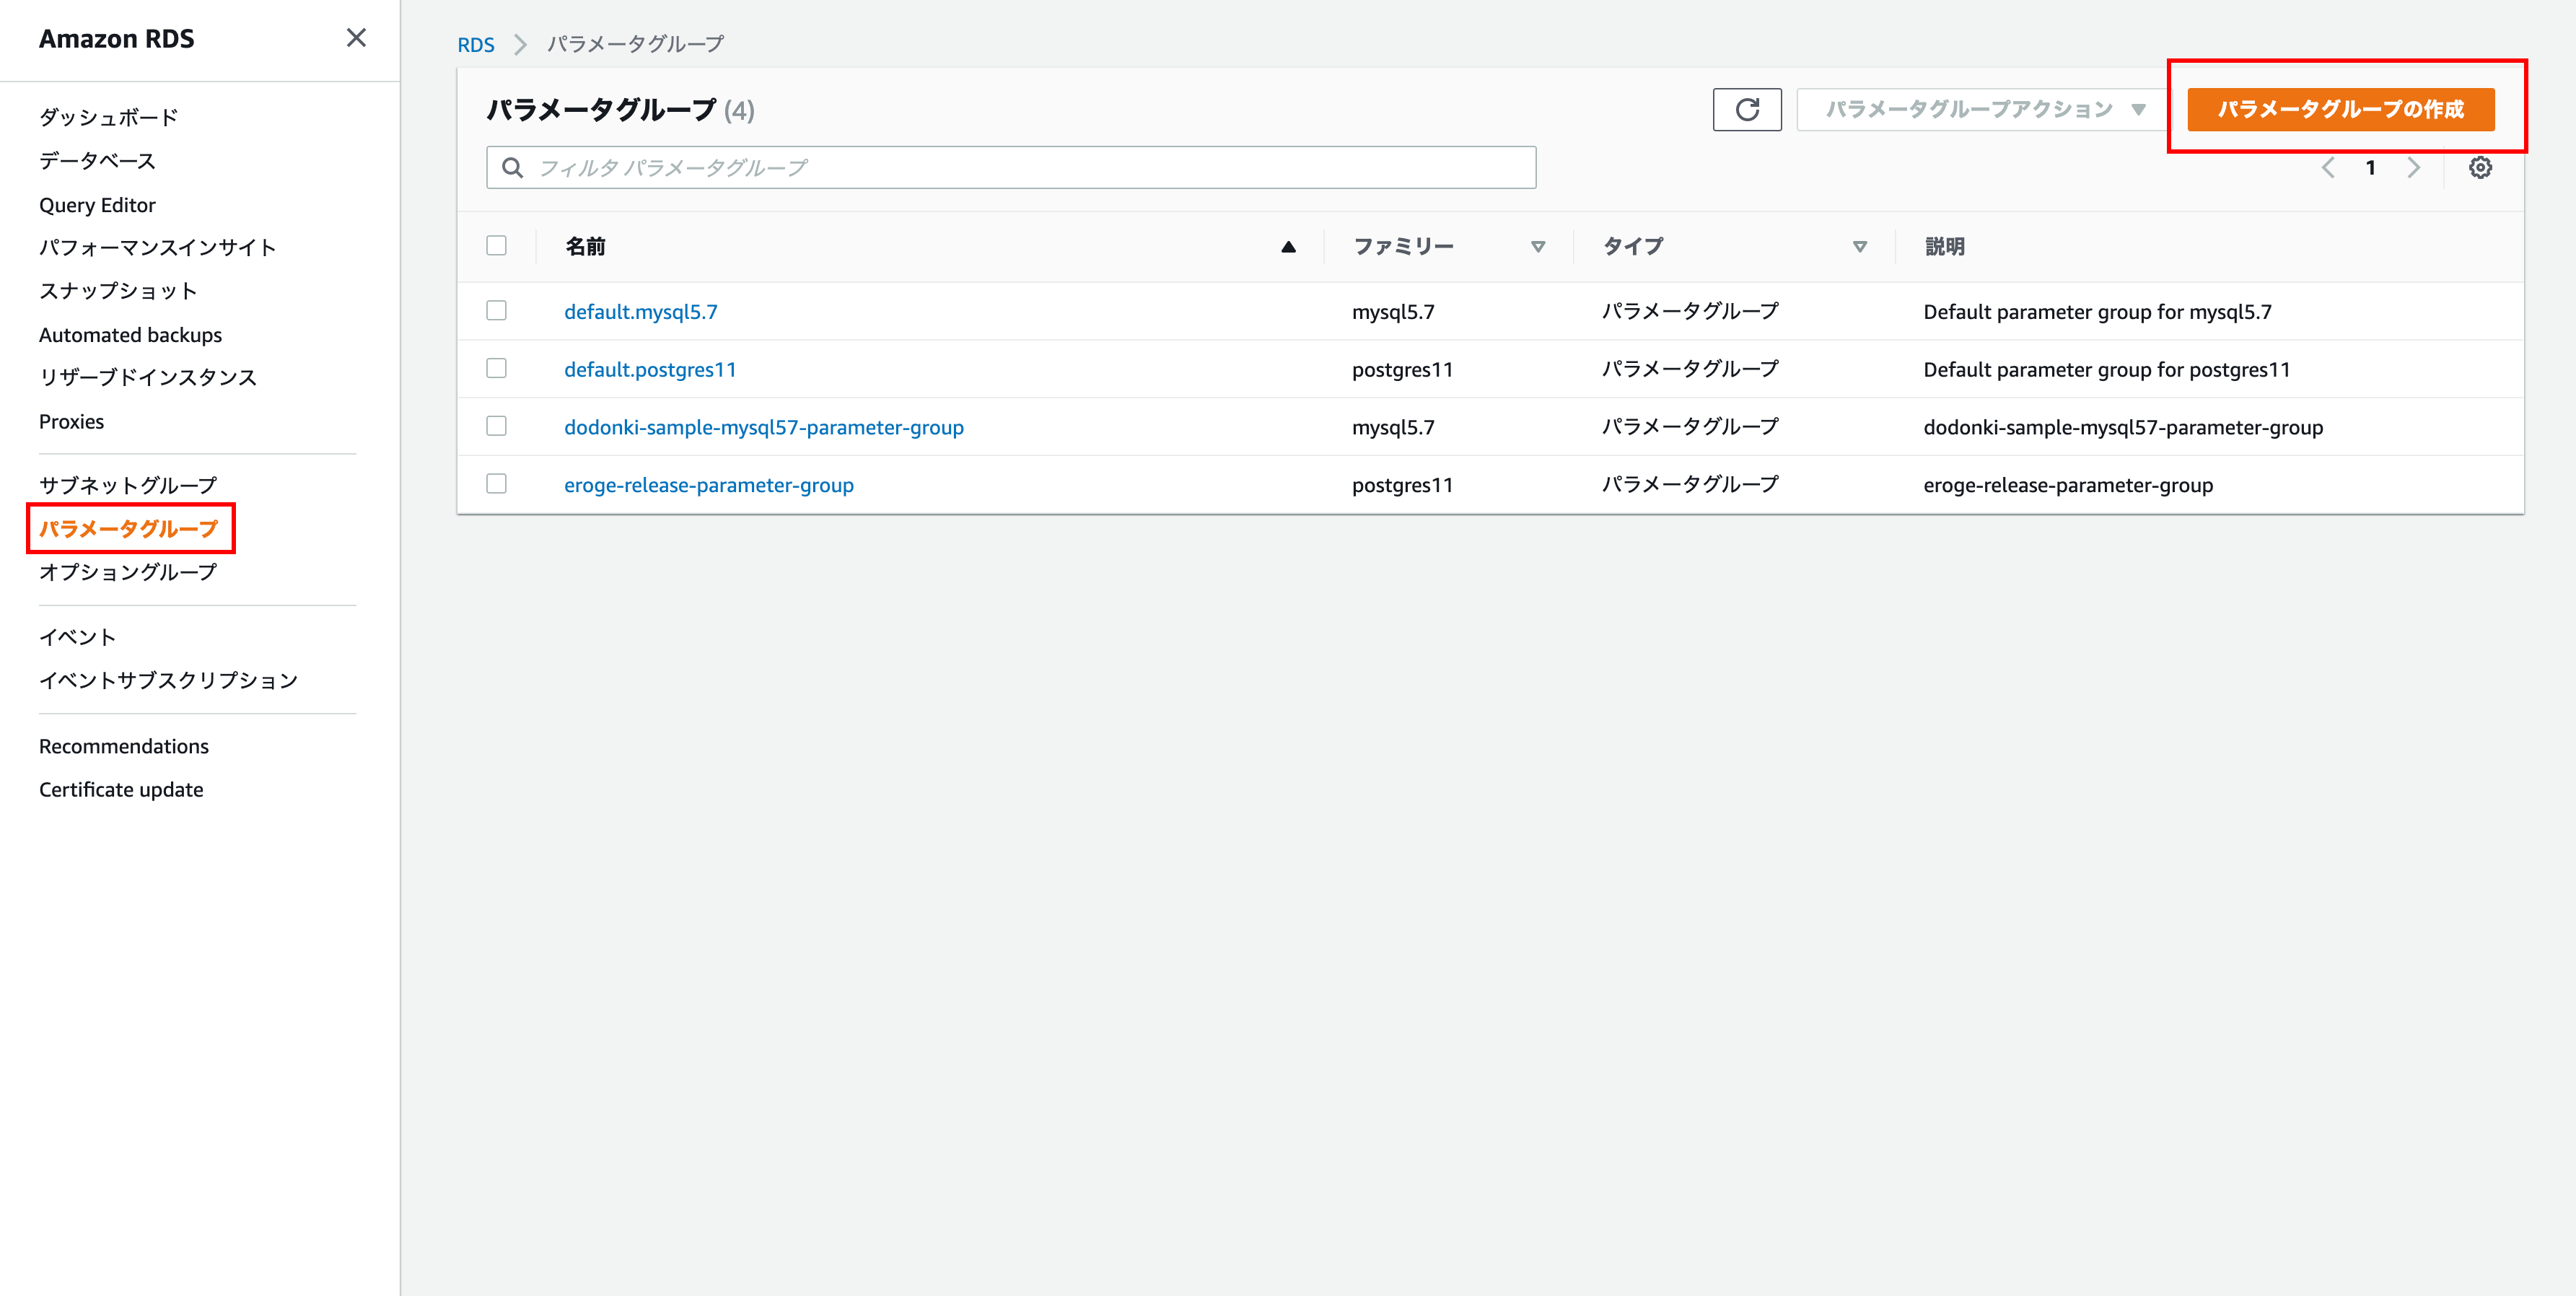
Creating a parameter group
RDS uses parameter groups to configure DB instances If you create a DB instance without using a parameter group, the default parameter group will be used. This ** default parameter group cannot be changed **, so it is recommended to set it.
Please check the following documents for details
--Use DB Parameter Groups --Amazon Relational Database Service
Open the parameter group creation screen
Click Parameter Group in the left menu and click Create Parameter Group in the upper right.
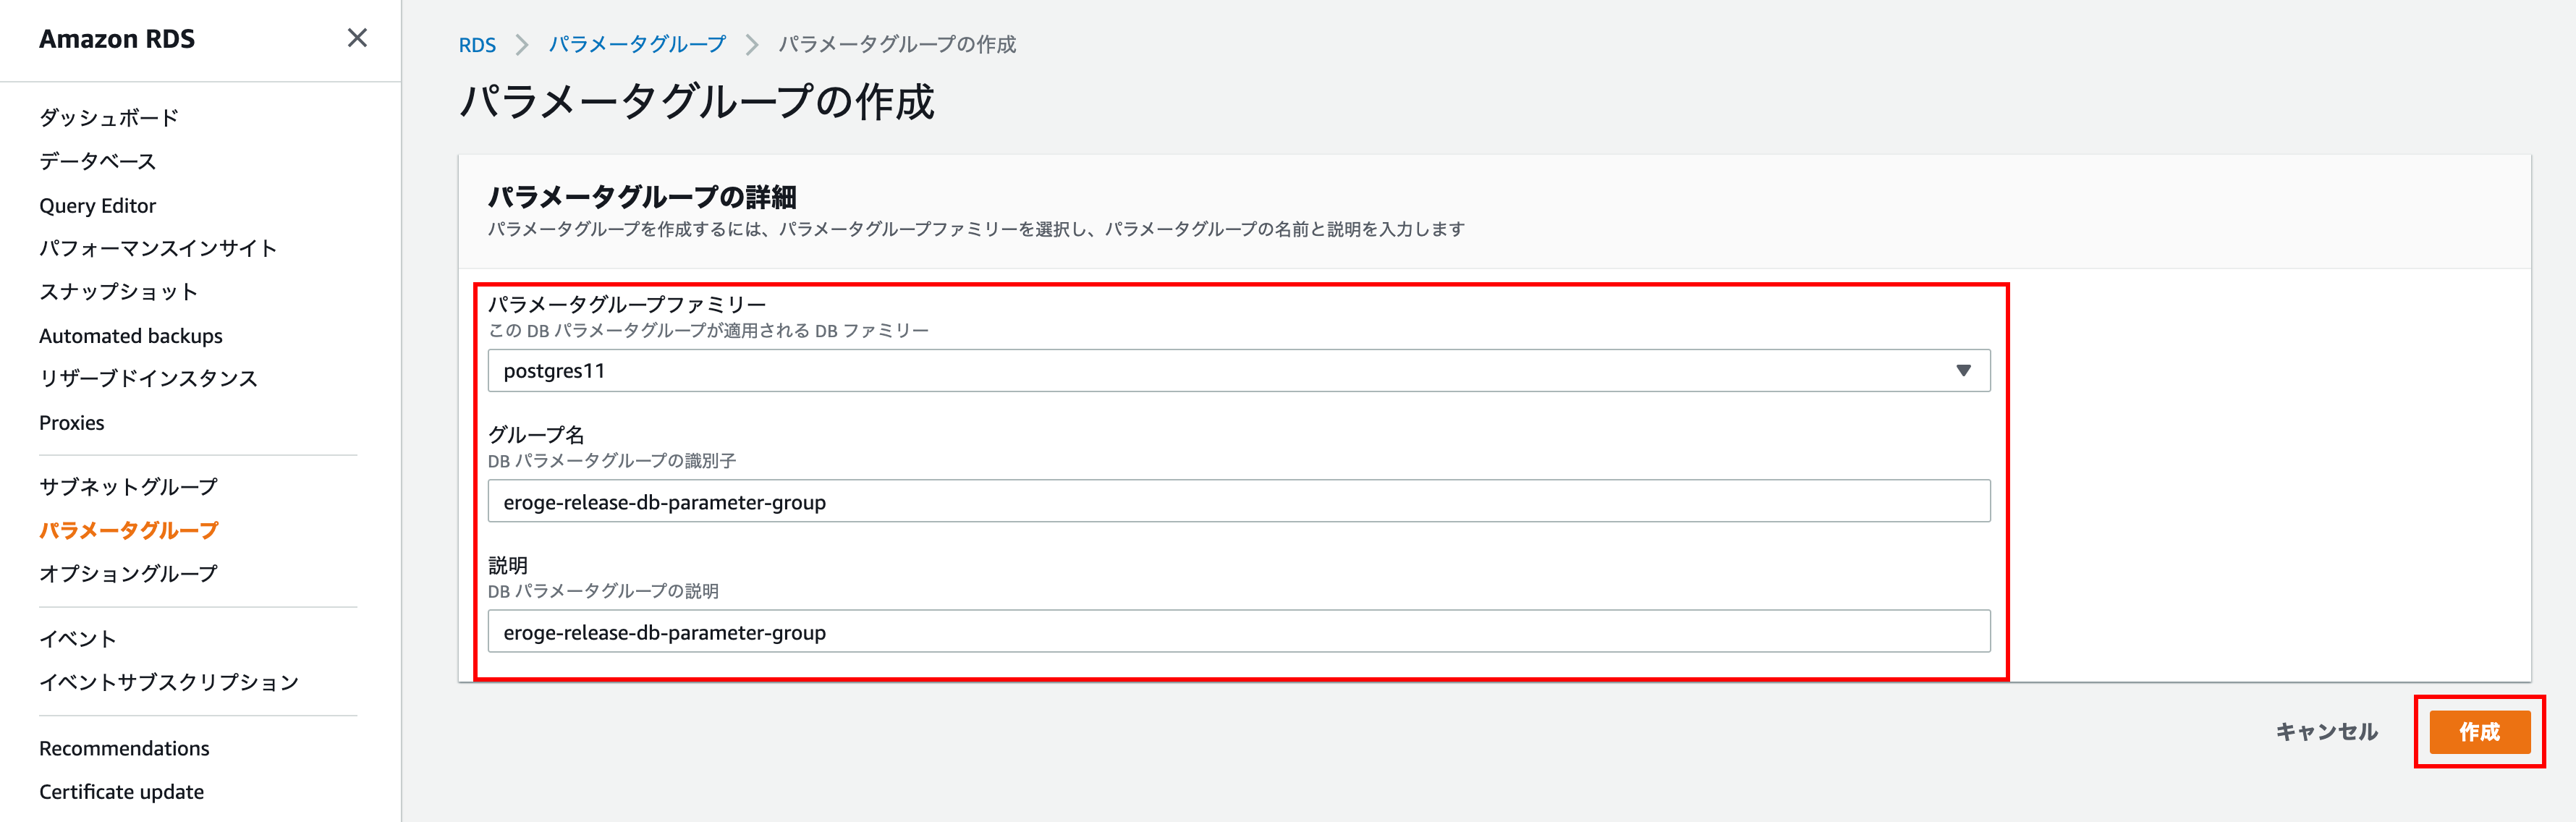
Parameter group details
Enter the parameter group family, group name, and description
Select PostgreSQL for the parameter group family
Finally click Create
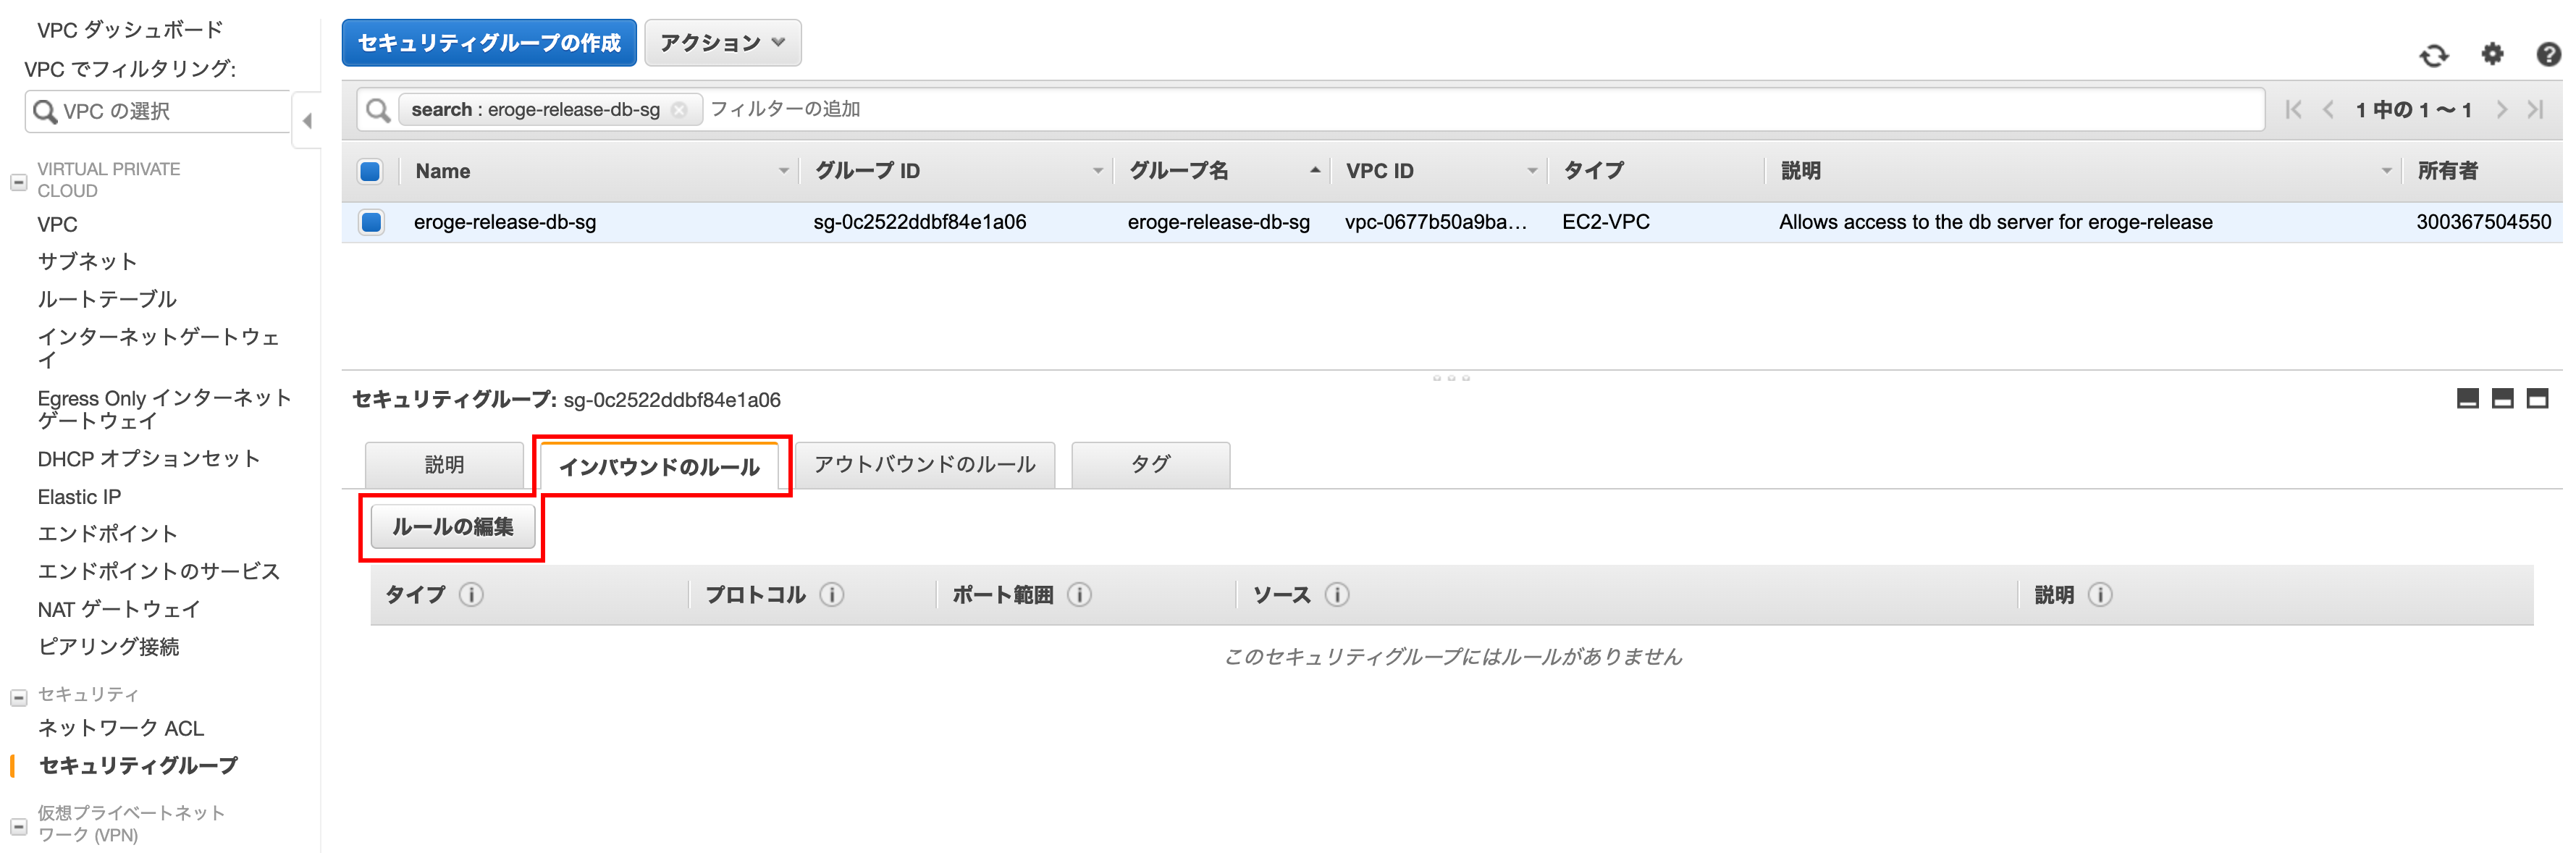
Create a security group for RDS
Create a security group that only allows access from the bastion server to increase security for RDS ** Attach this security group on the RDS settings screen **
Open the security group creation screen
Open the VPC console screen, click Security Group in the left menu, and click Create Security Group in the upper left.
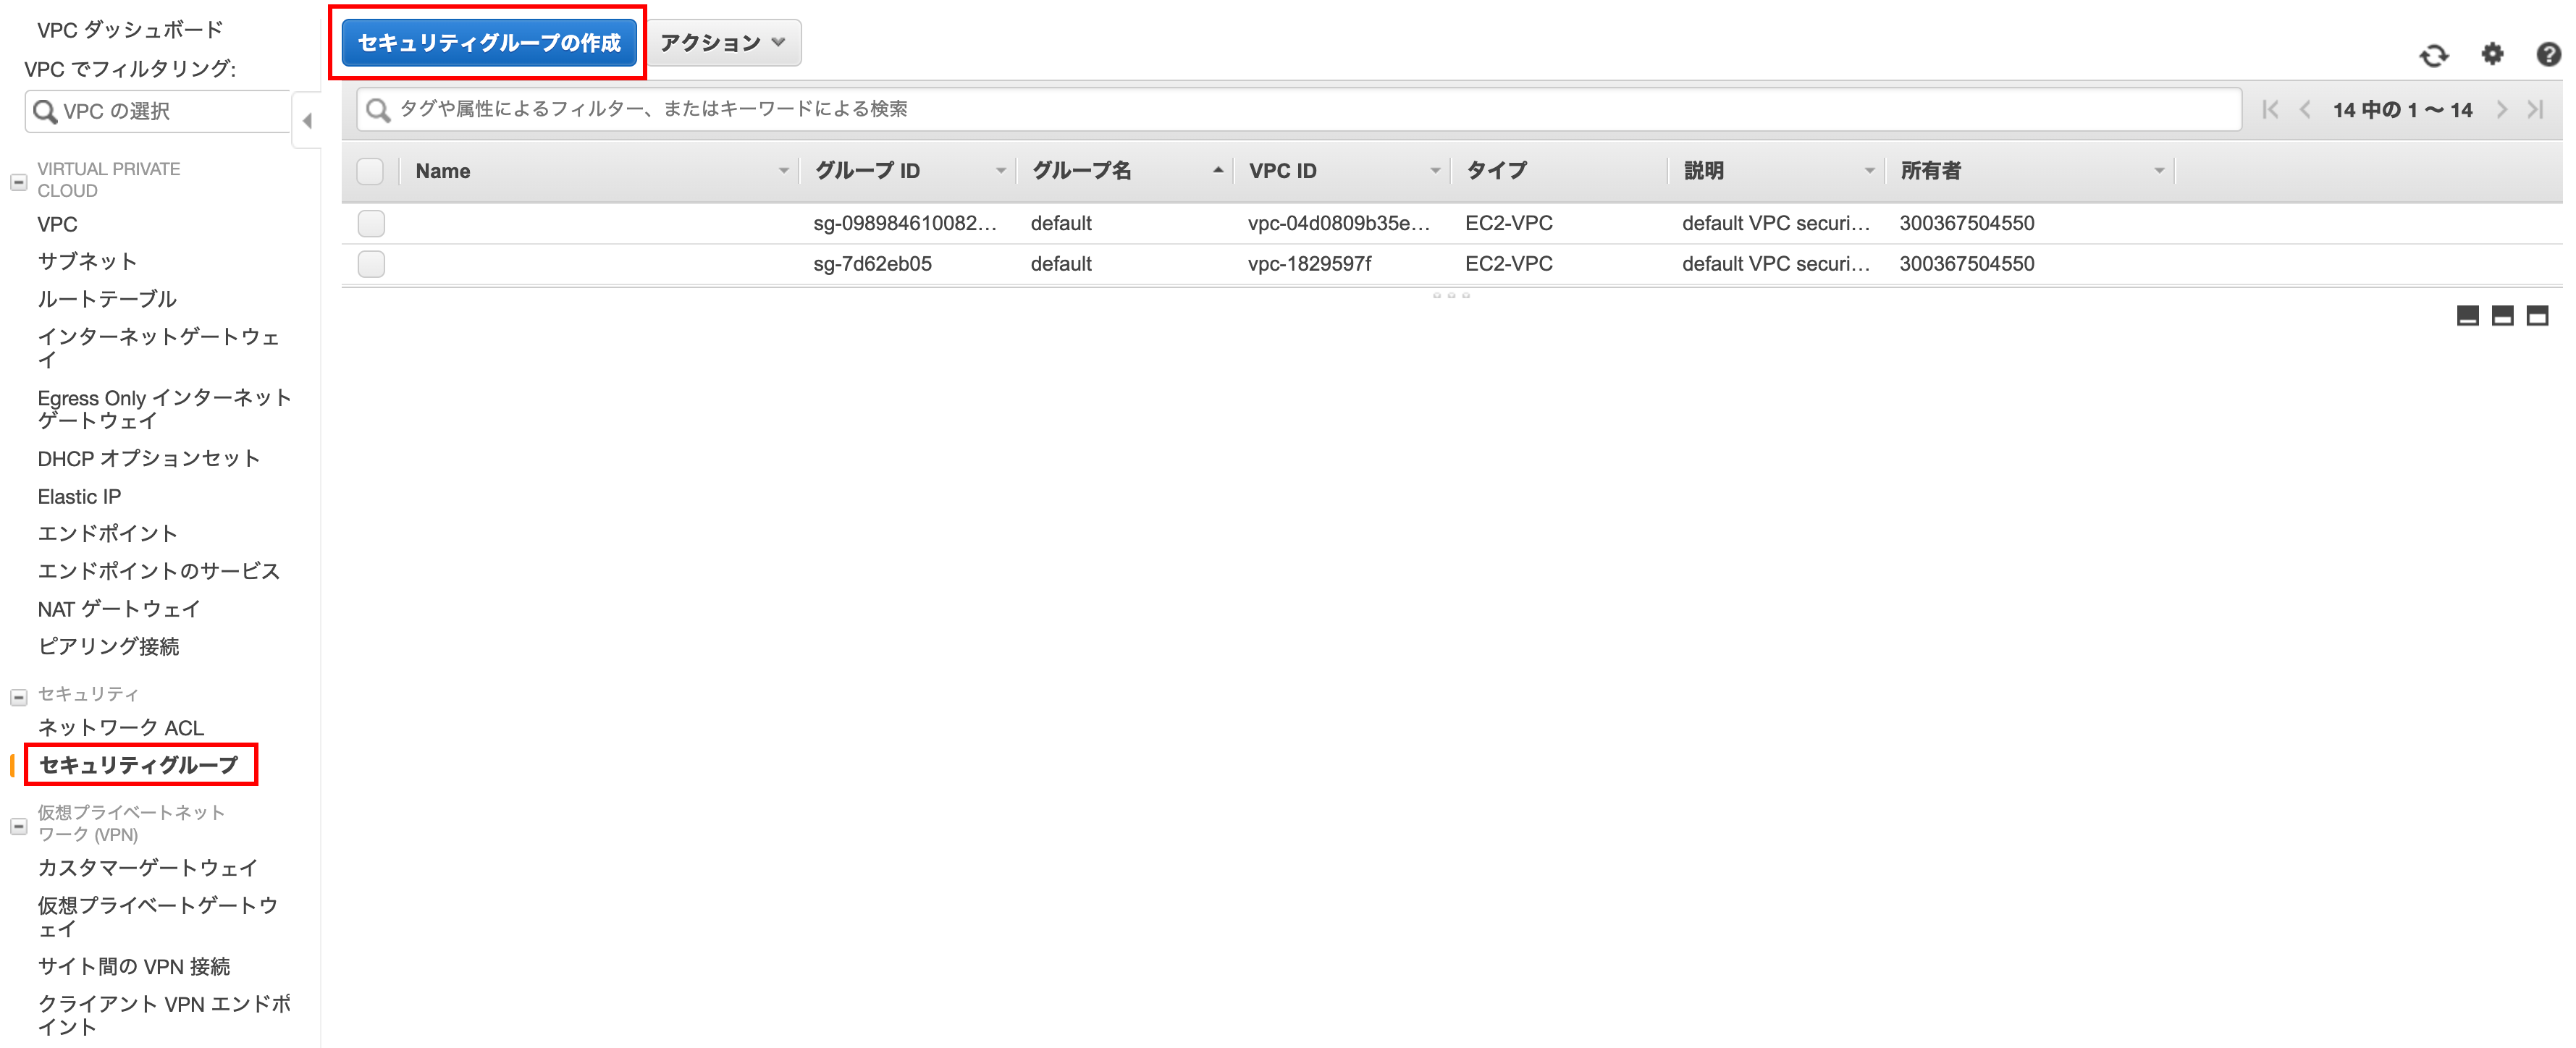
Creating a security group
Enter the security group name, description, and VPC and click the Create button.
** Note: Make sure to select the created VPC instead of the default VPC **
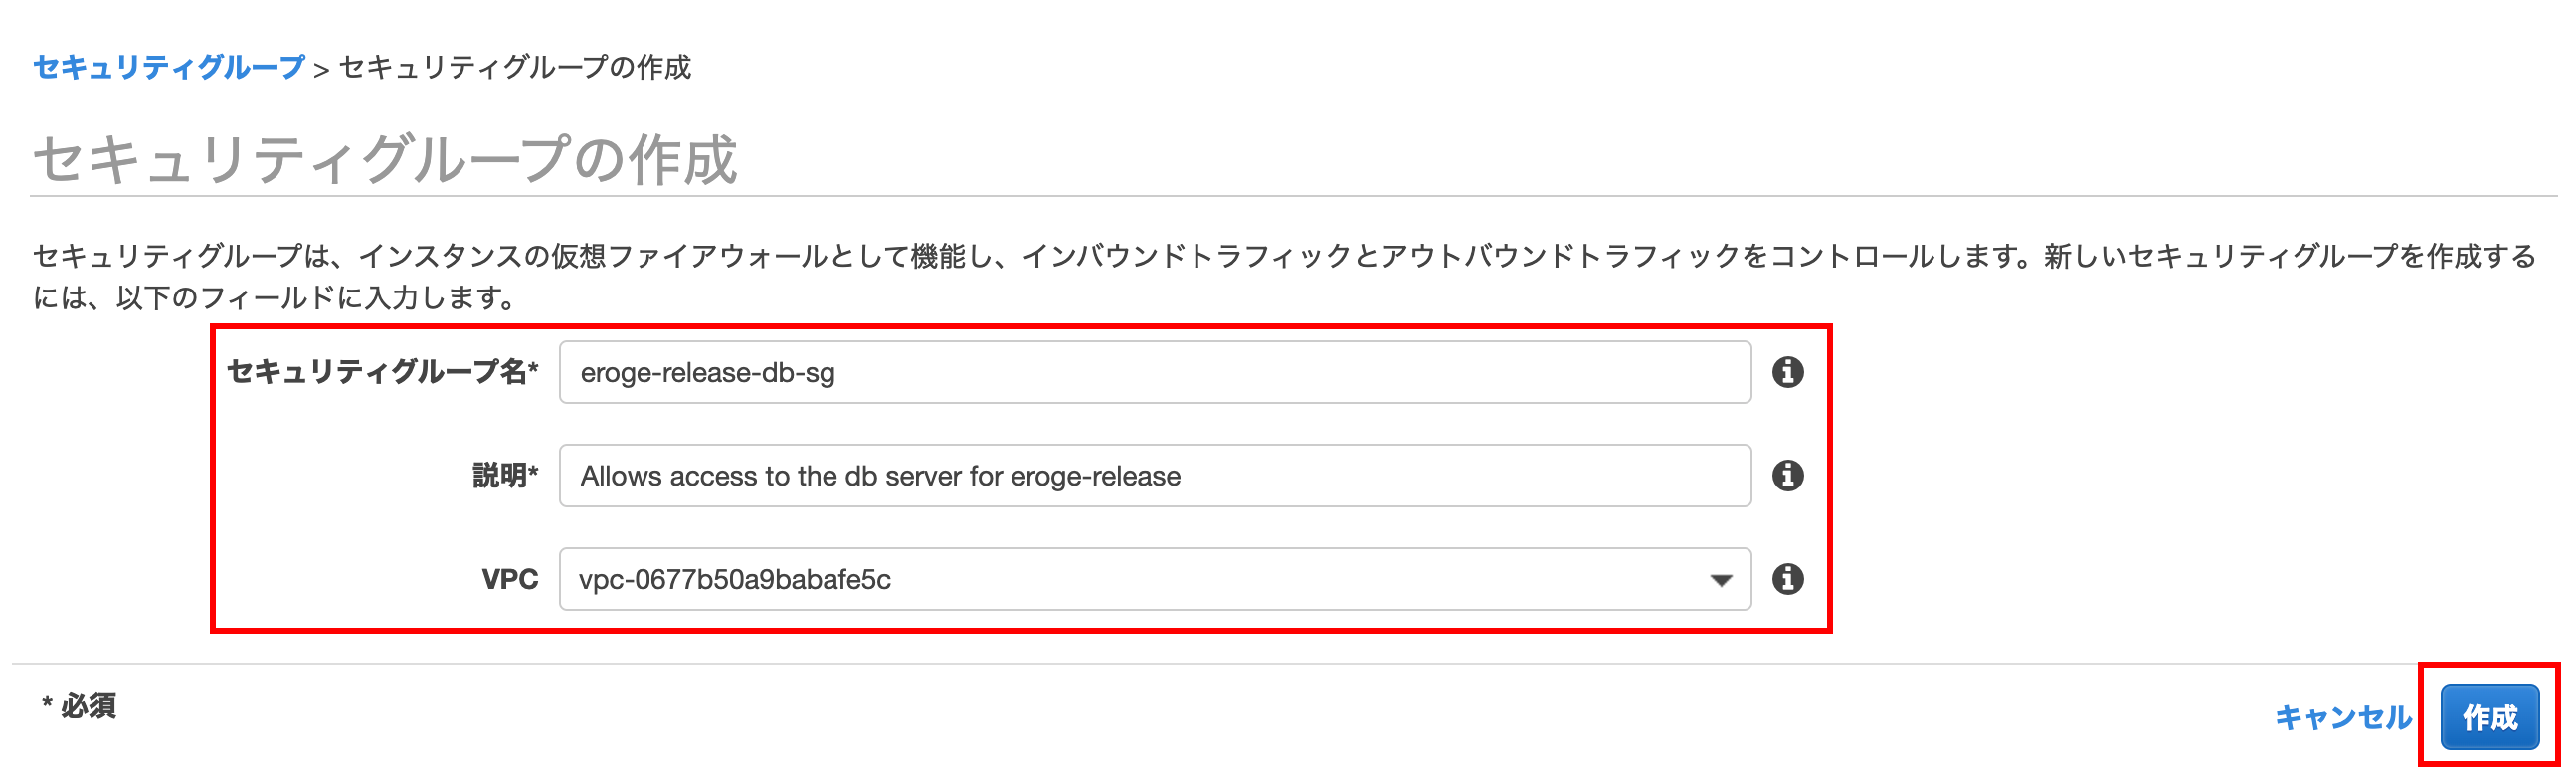
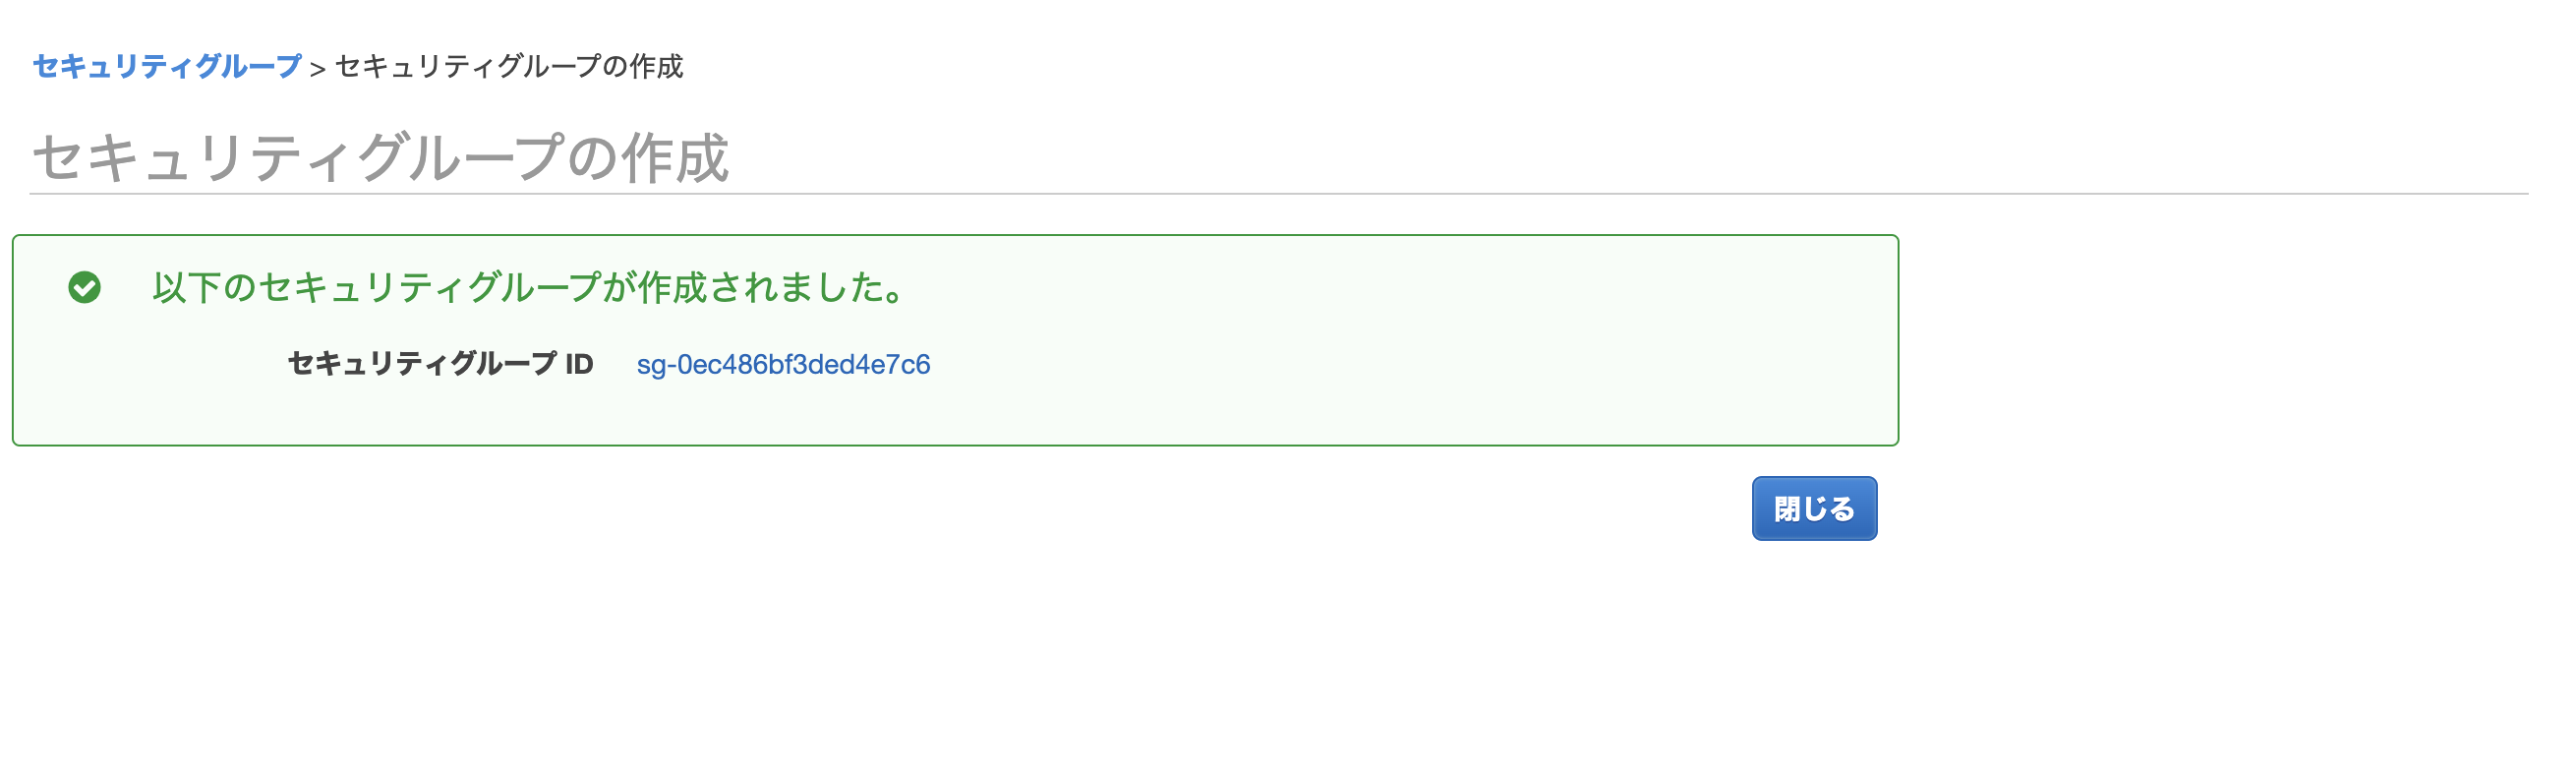
Click the Close button to close the creation screen
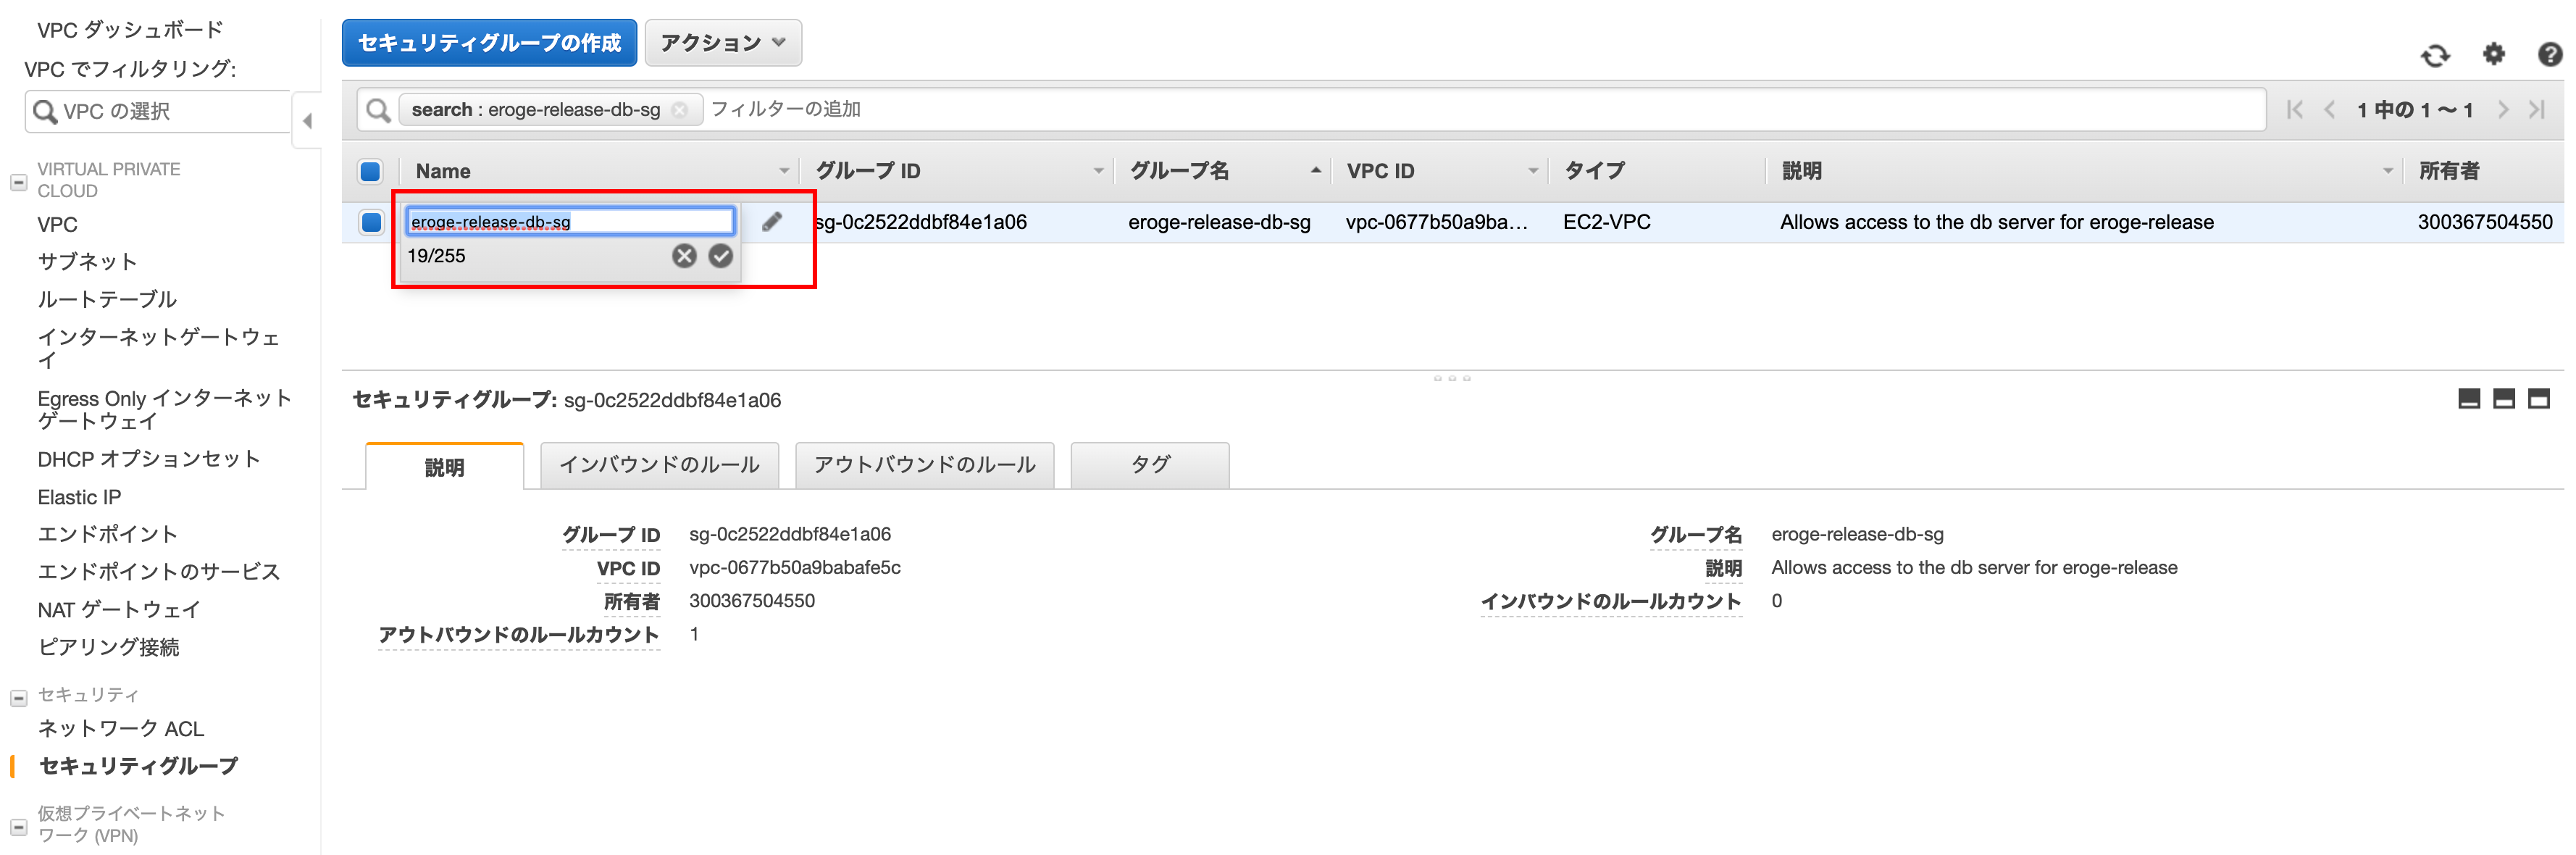
Name the security group
By default, name is empty, so click the pencil button on the far right of the Name column and give it a descriptive name.
Inbound rule settings
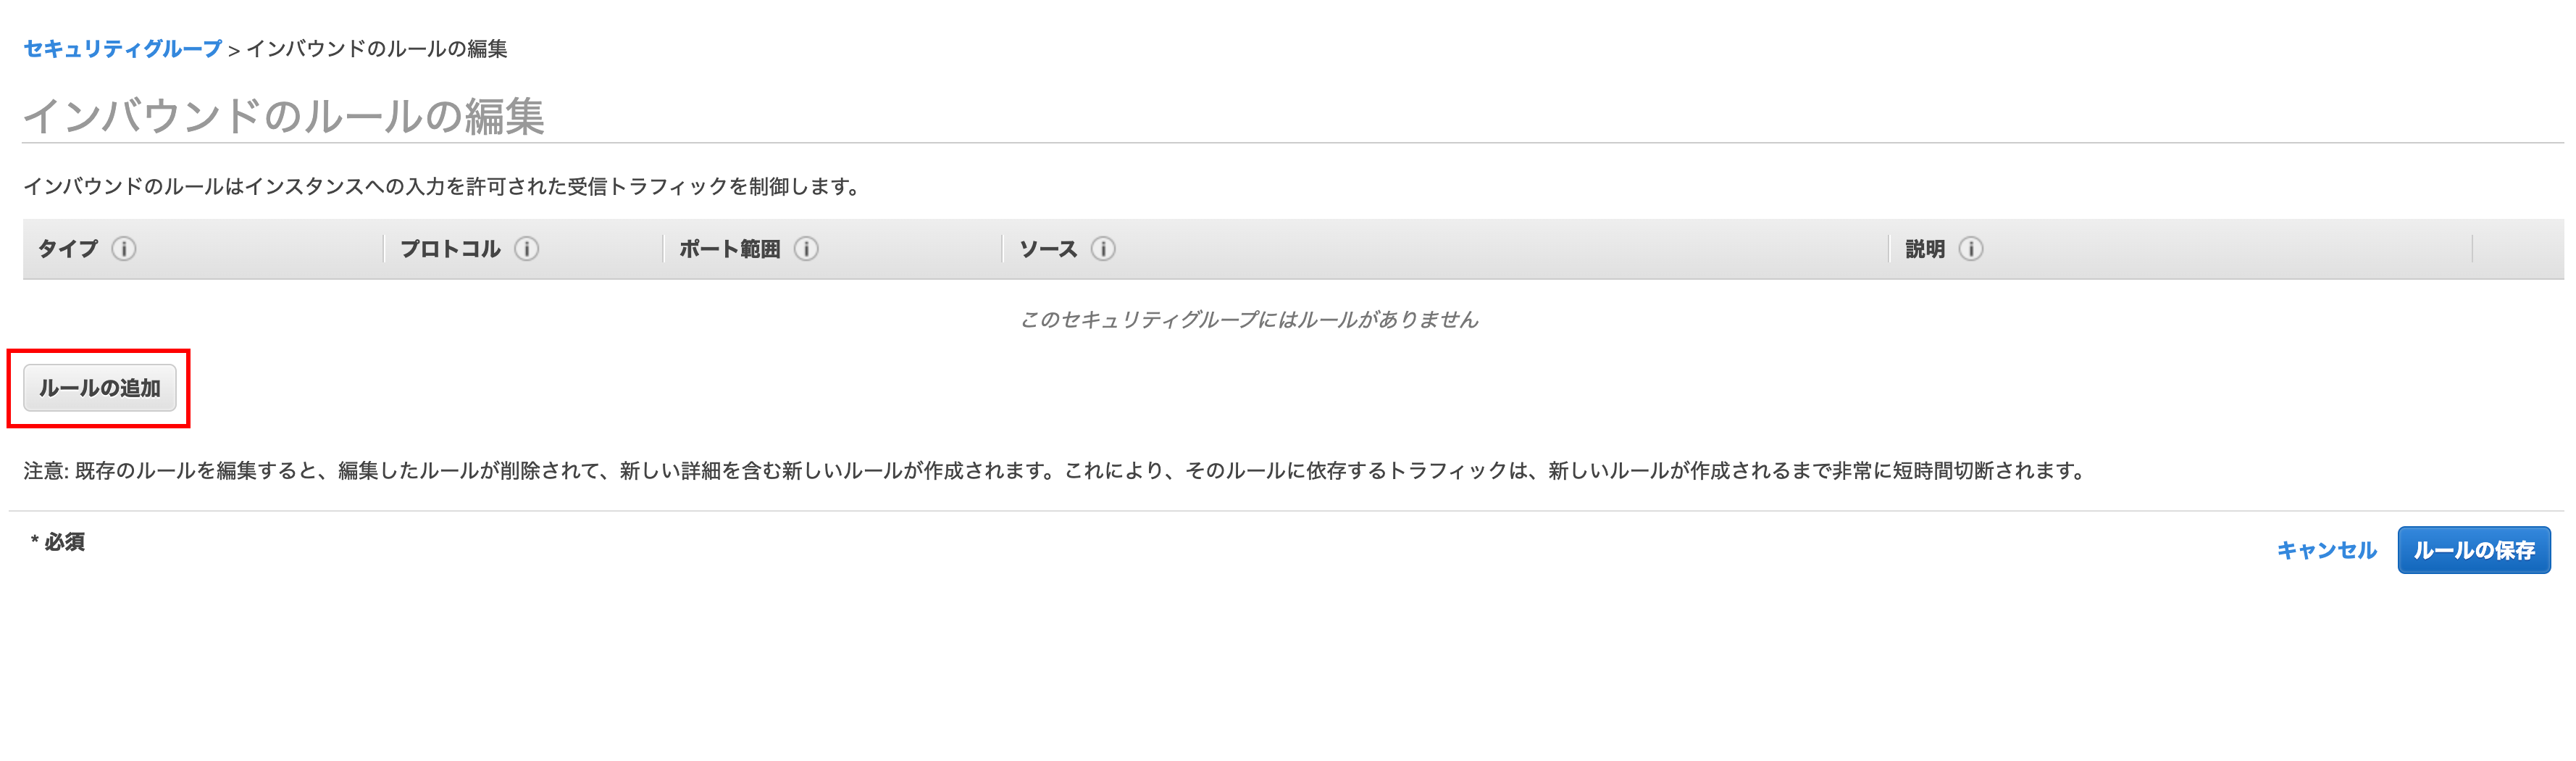
Click the Inbound Rules tab and click Edit Rule
Click Add Rule when the screen changes
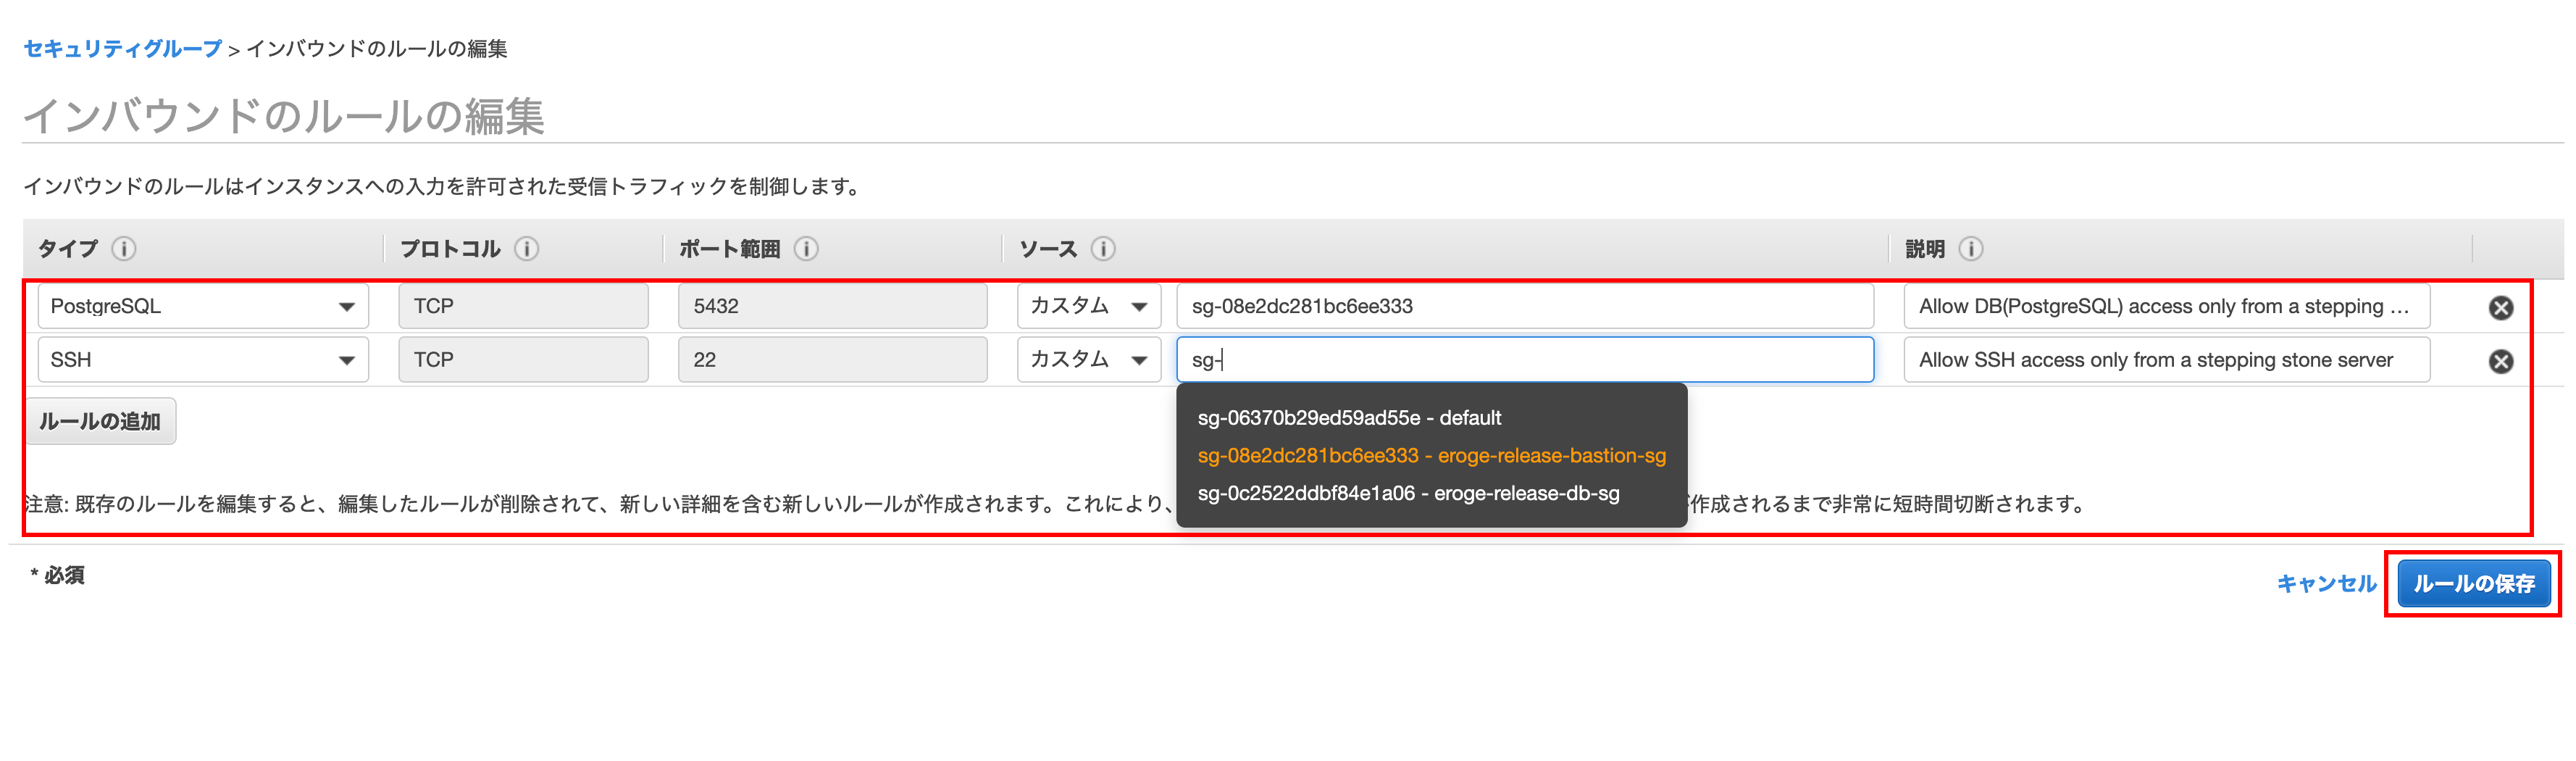
Click on the type and add PostgreSQL and SSH
Select Step Server Security Group for the source part
** By selecting the bastion server security group, access will only be allowed from instances with the bastion server security group **
Finally, enter description and click Save Rule
Click the close button
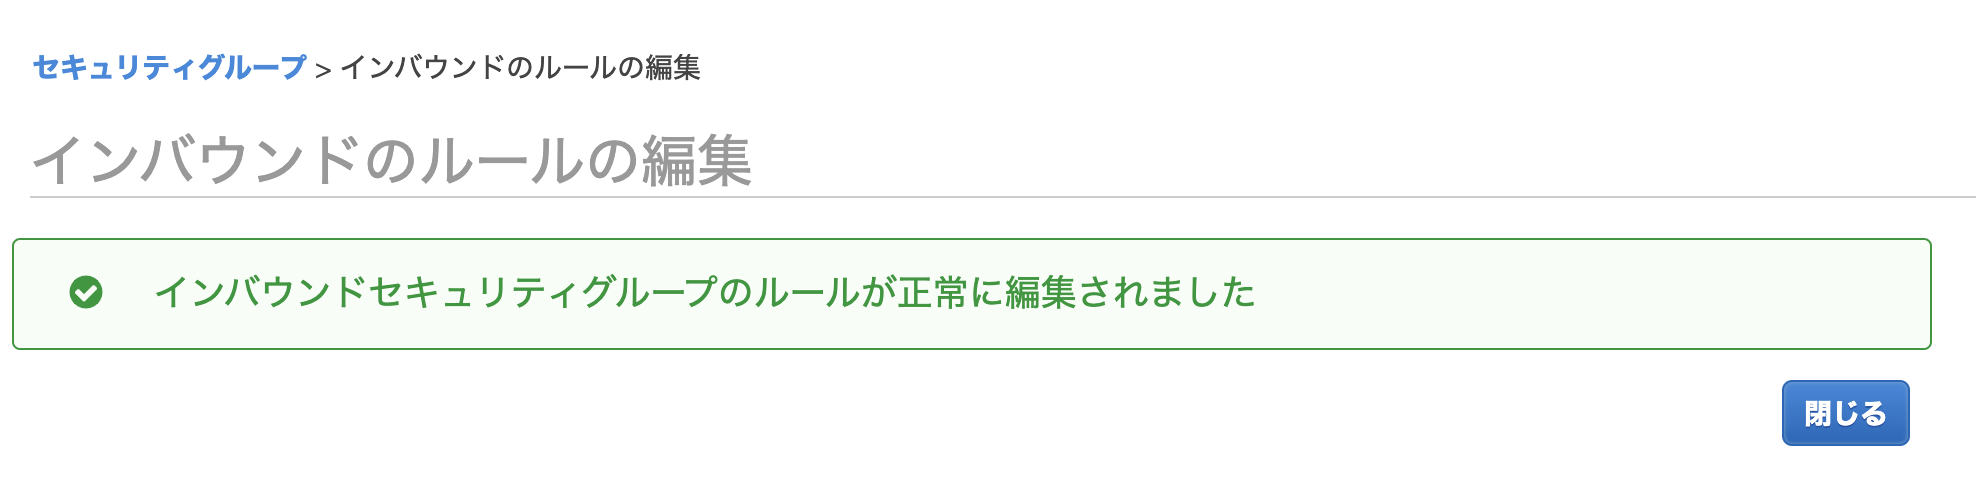
This completes the security group creation.
Creating RDS (PostgreSQL)
Now that we are ready to create the database, we will create it now.
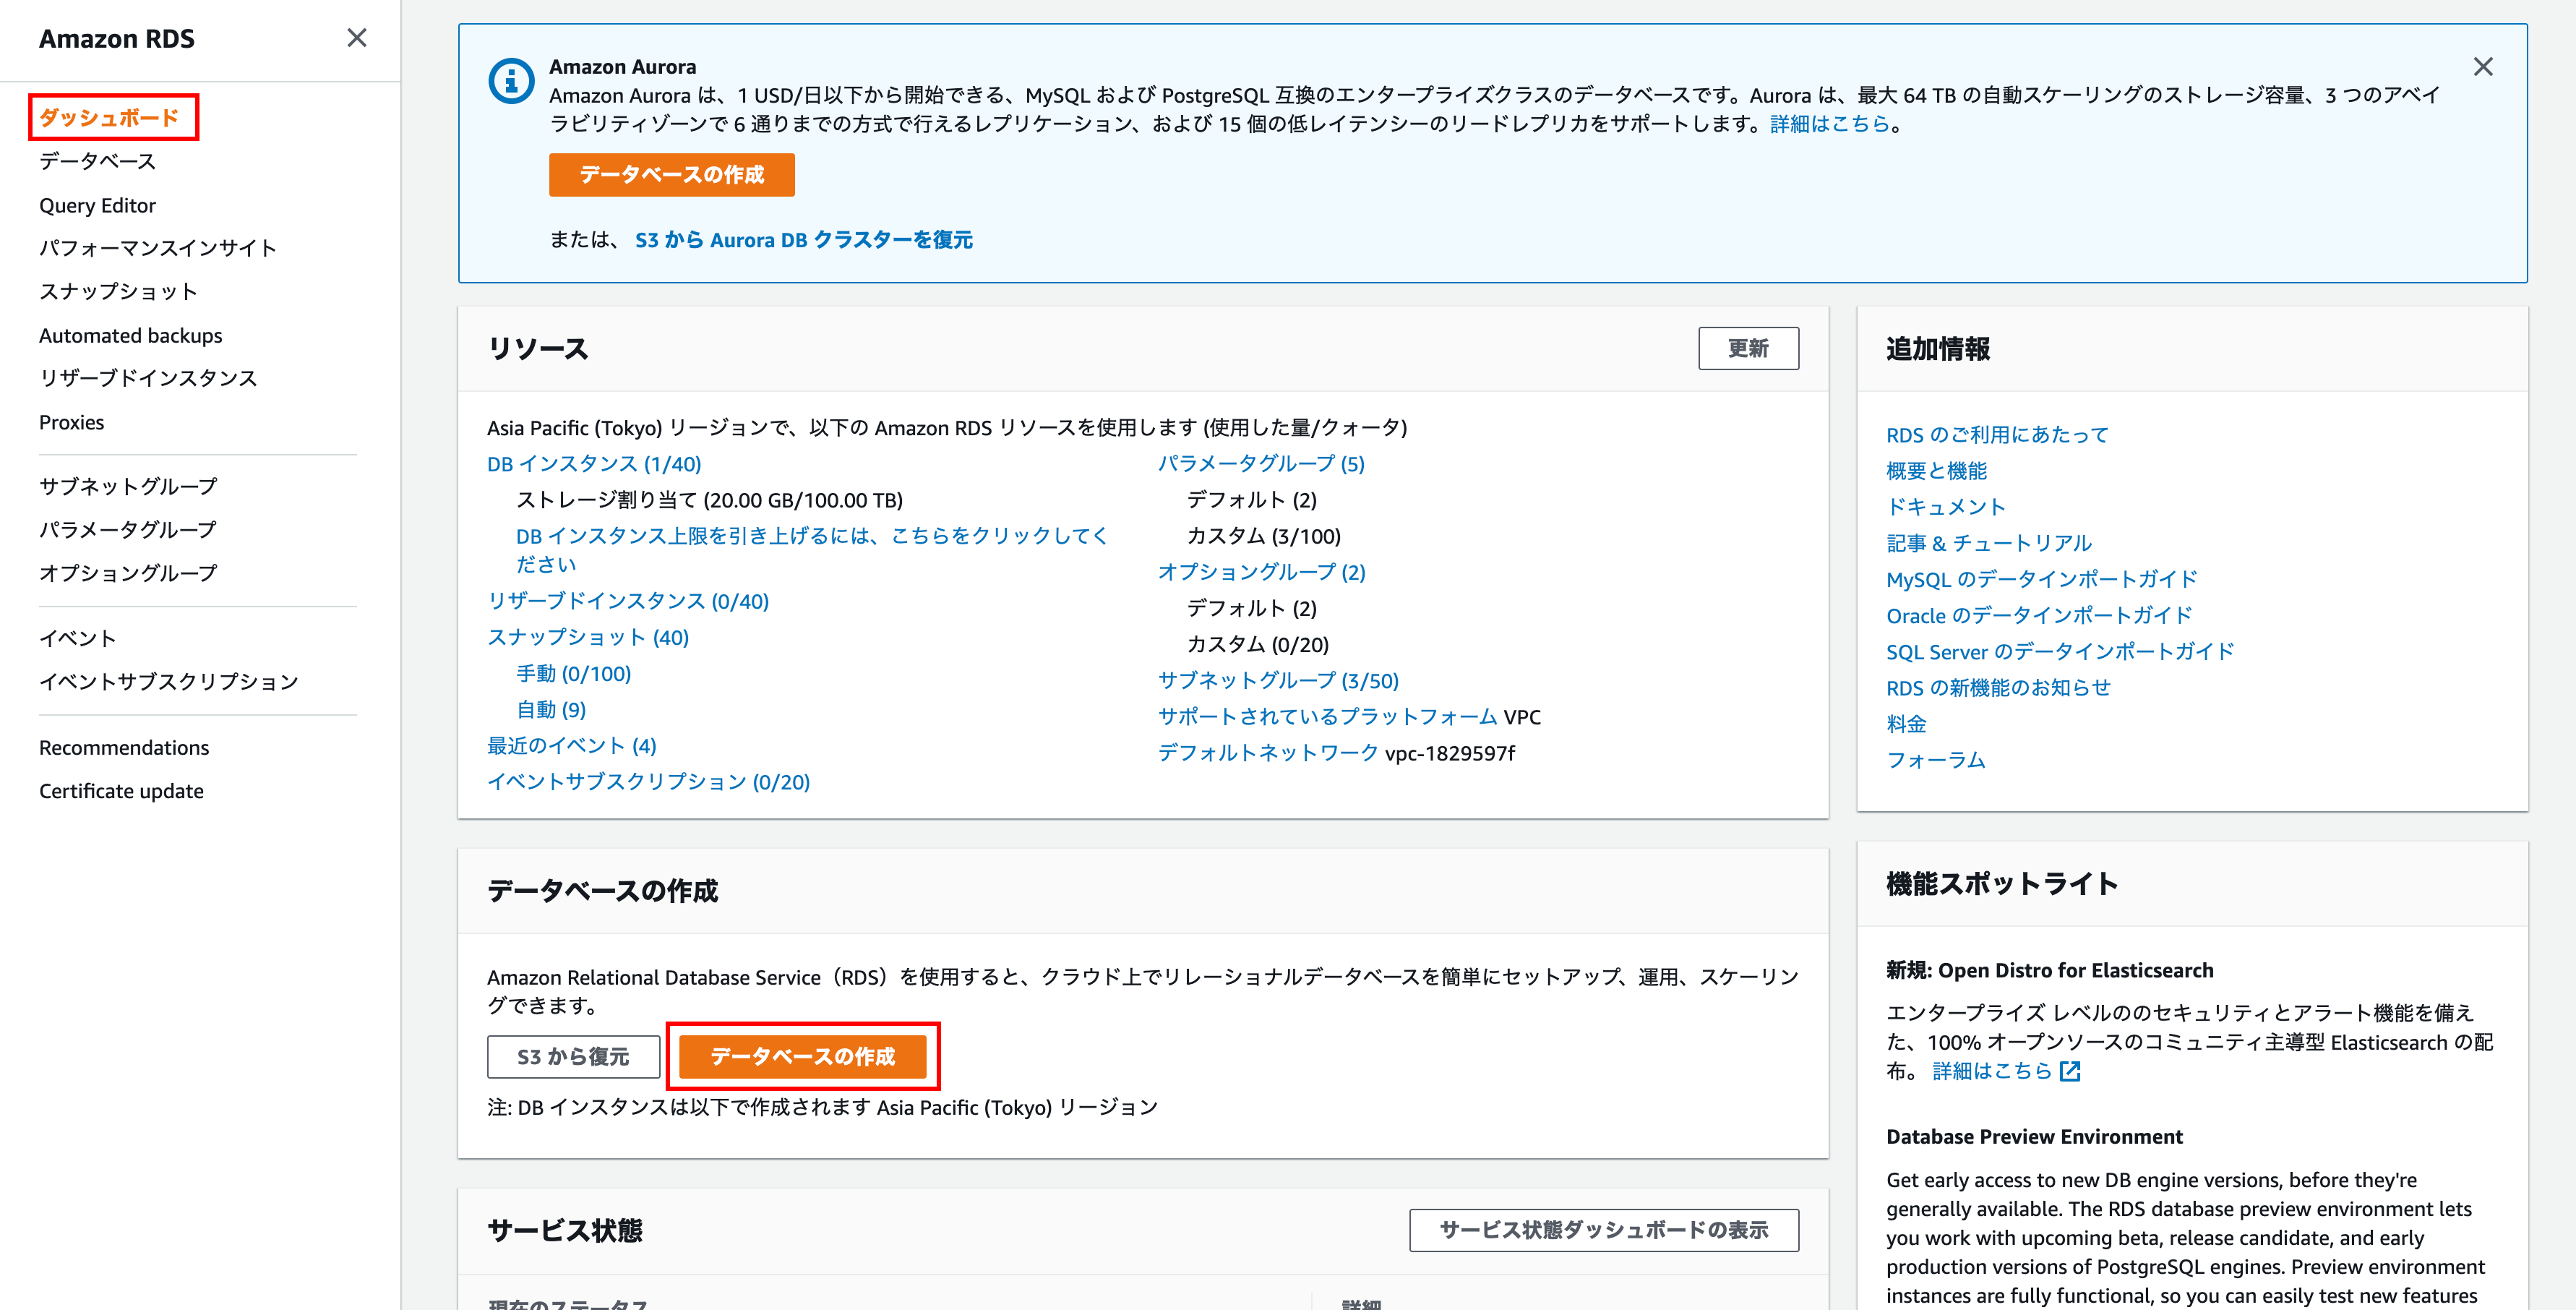
Open the database creation screen
Click Dashboard on the left menu and click Create Database at the bottom
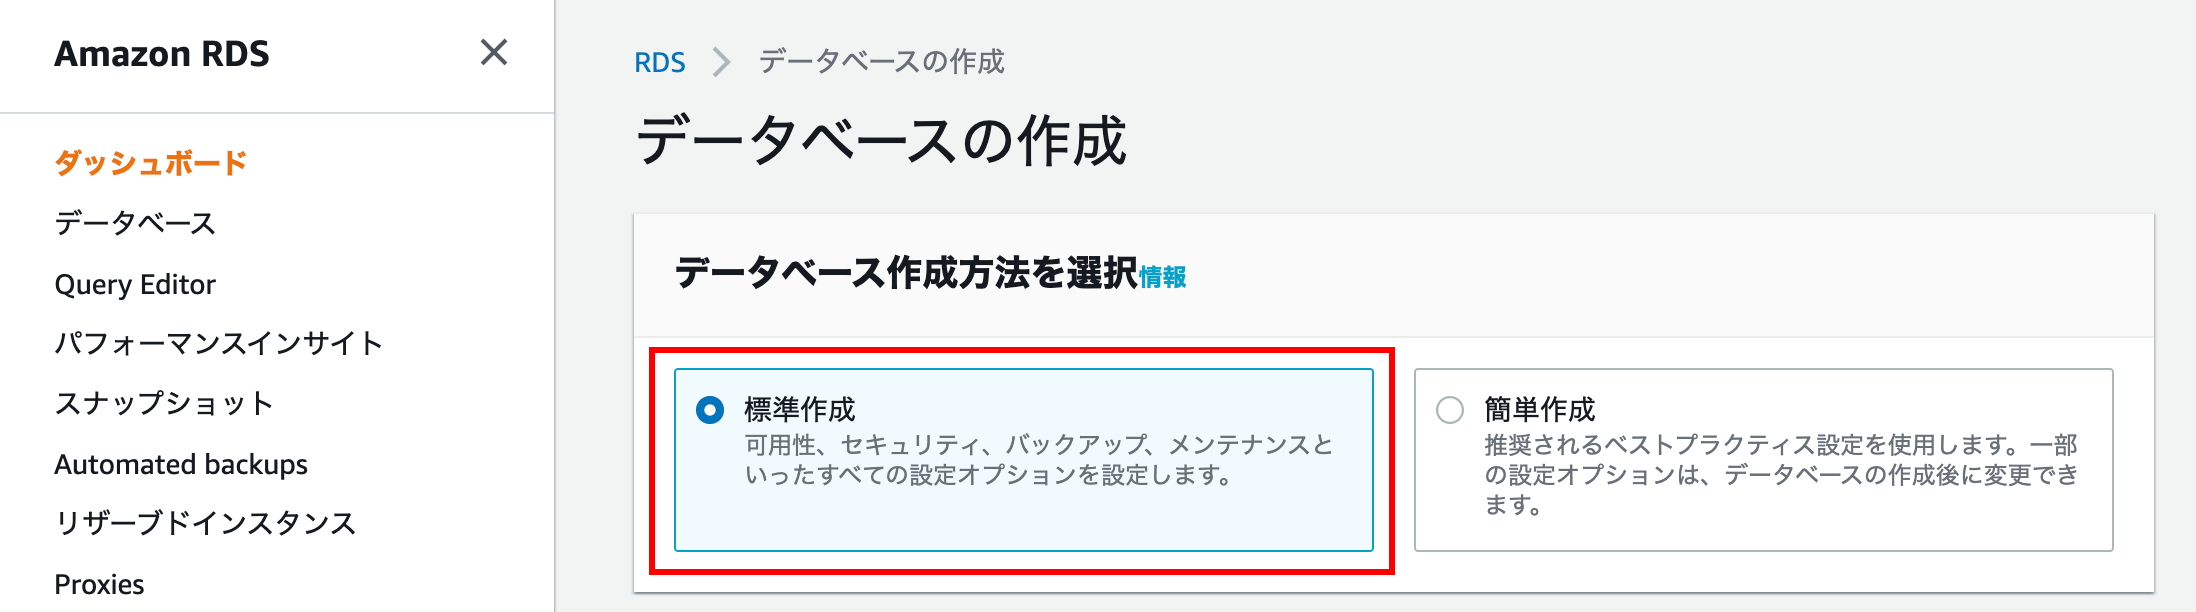
Select database creation method
This time, we will set them one by one, so select Standard Creation.
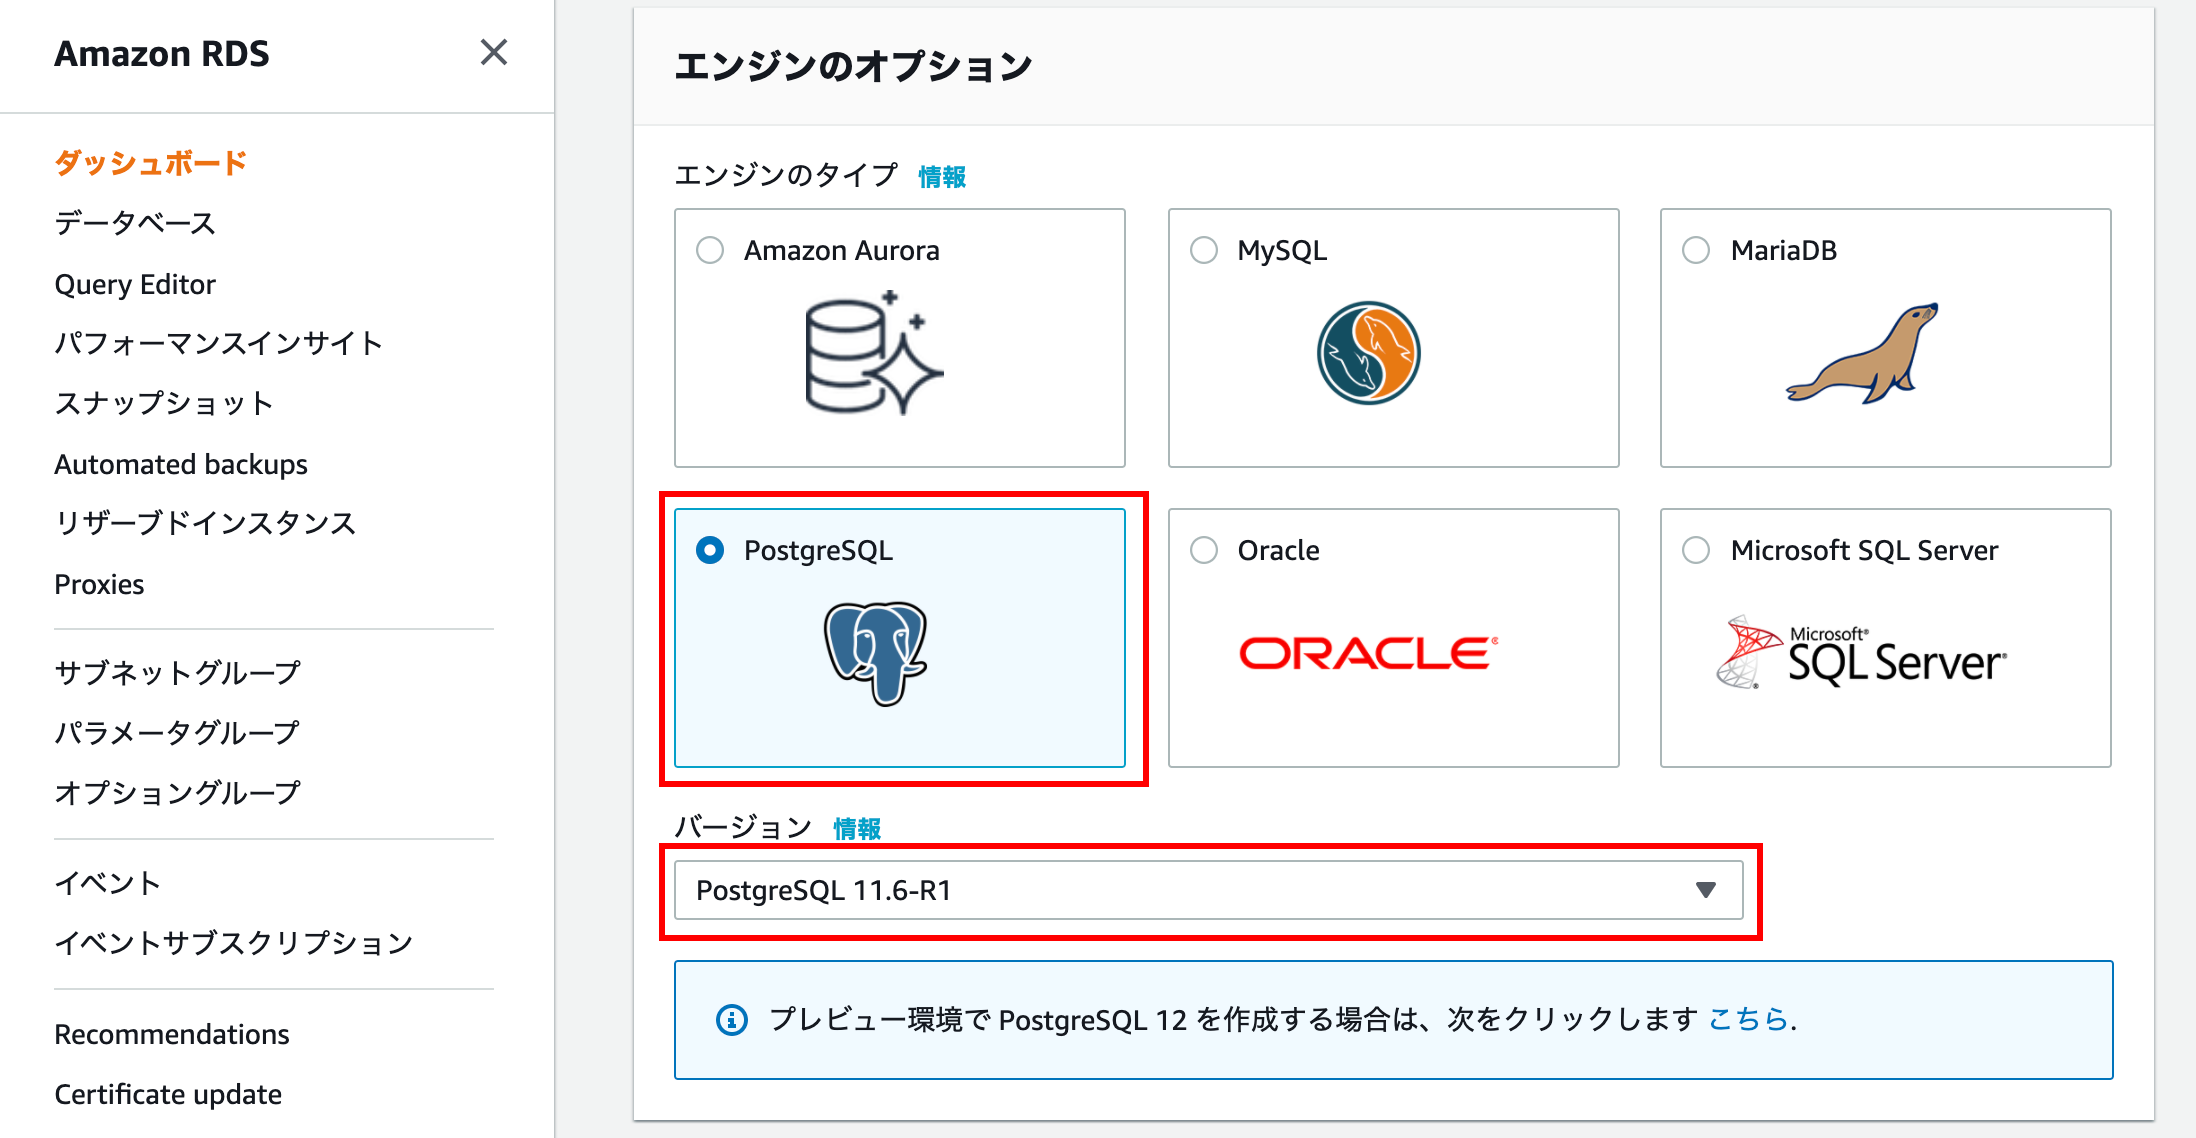
Engine options
Since we will create a PostgreSQL DB, it is a good idea to select PostgreSQL and also select the latest minor version of version.
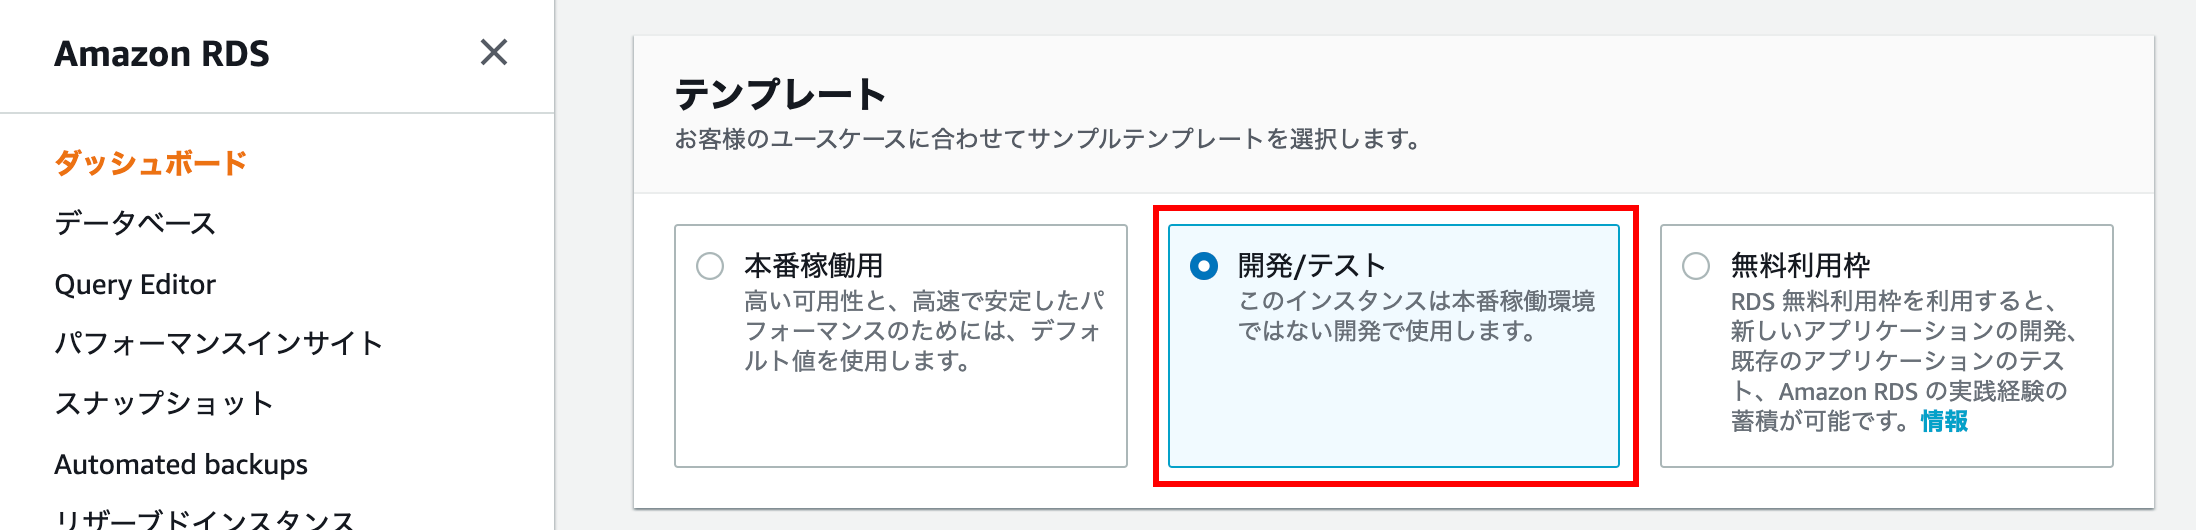
template
If you select Free tier, you will not be able to select Multi-AZ placement, so select Development / Test.
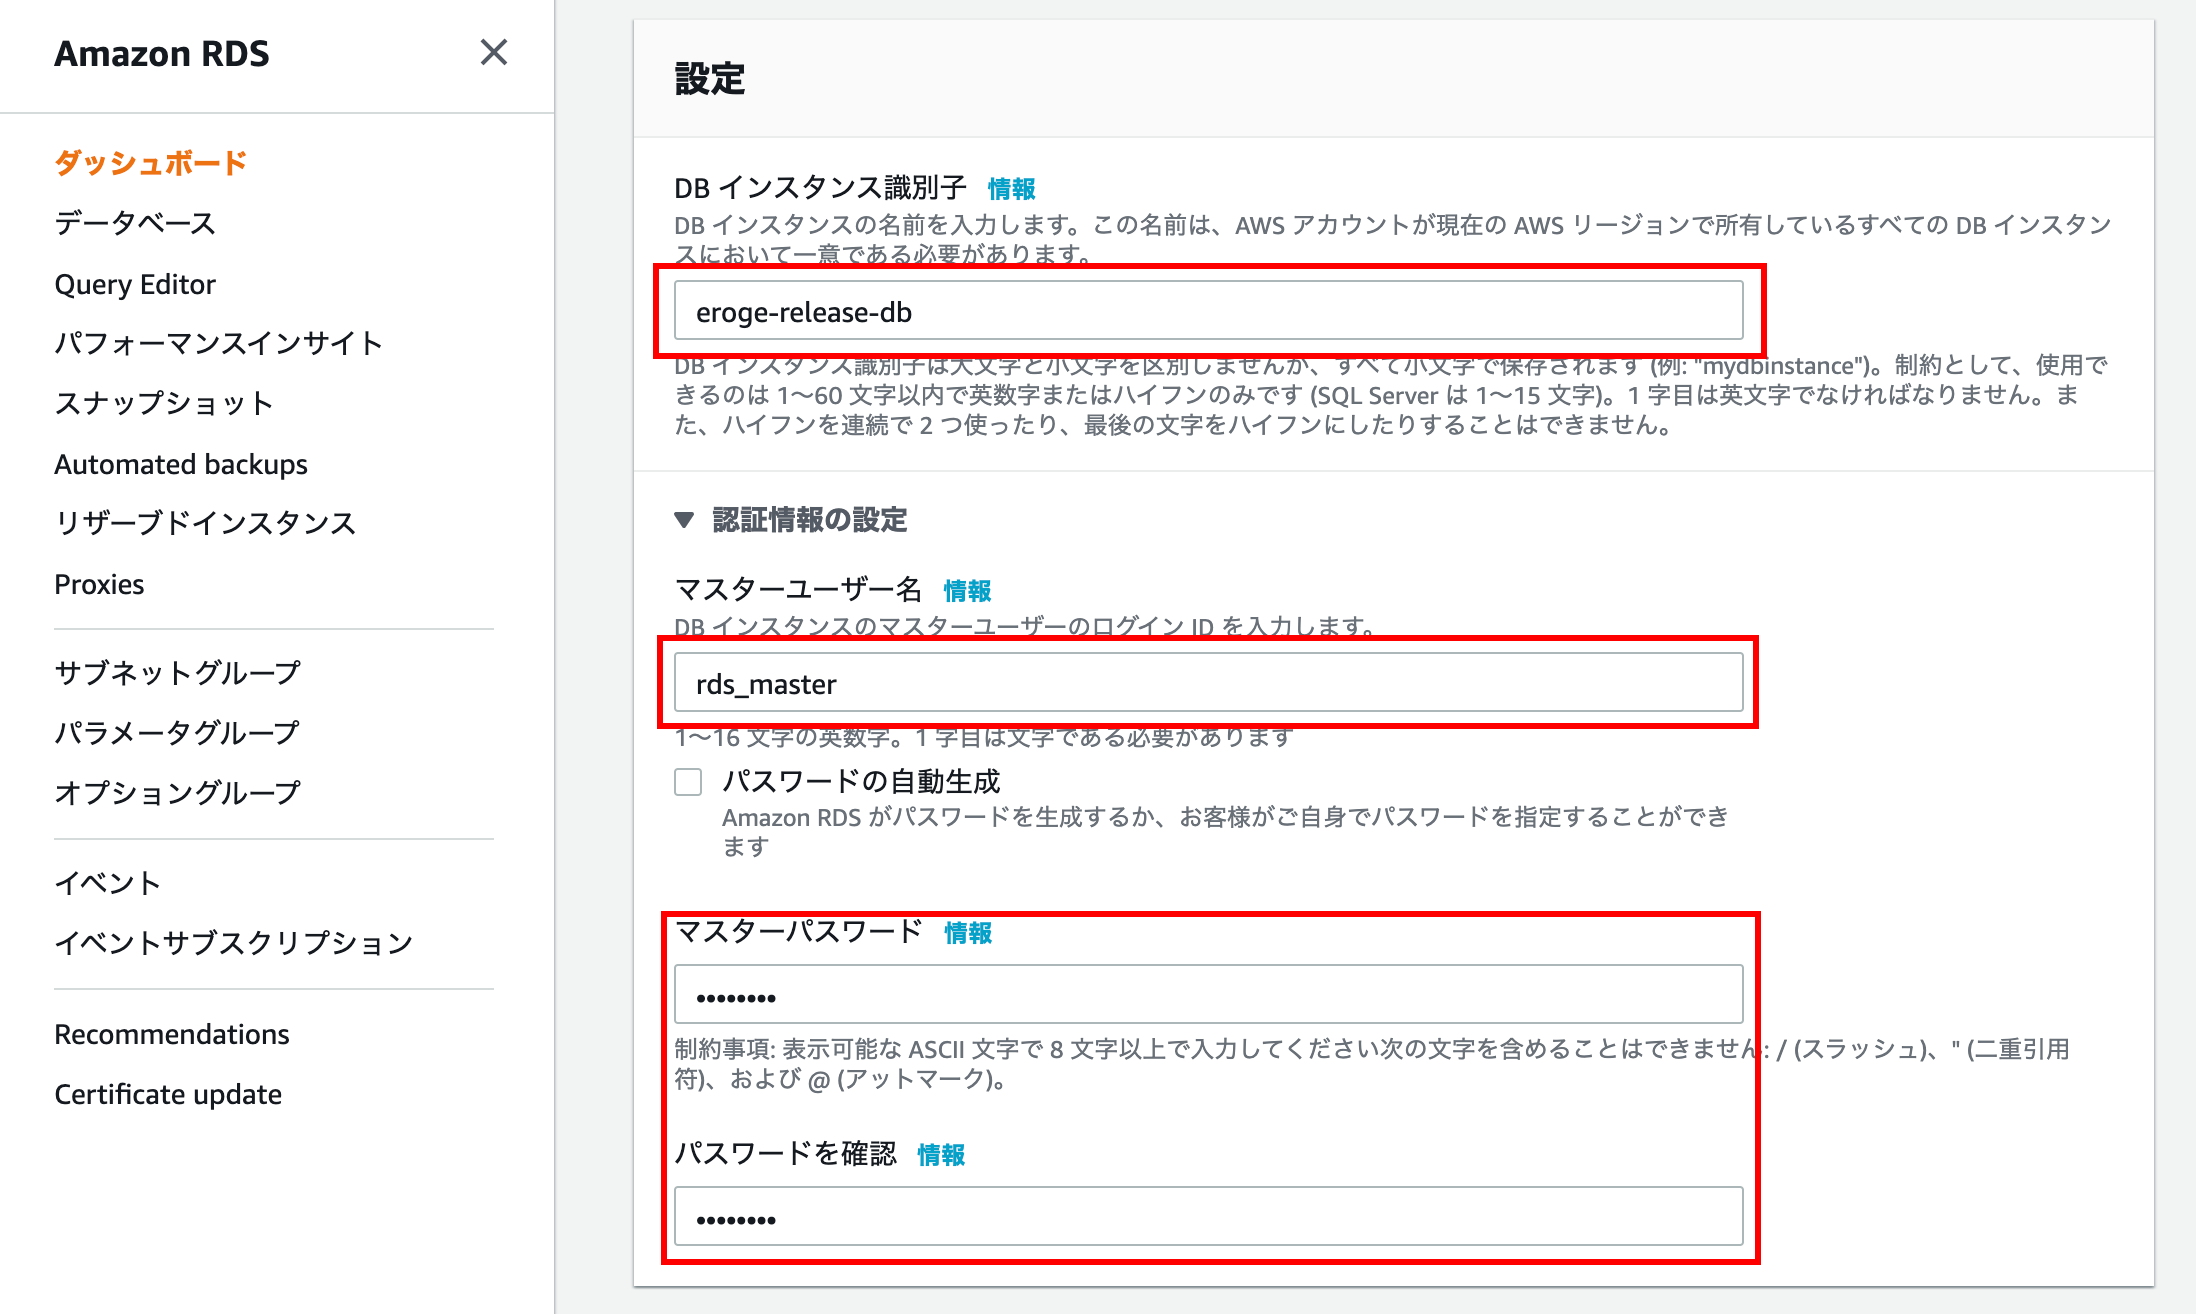
Configuration
Enter the DB instance identifier, master username, and master password
DB instance identifier is the name displayed on the console screen. Please be careful as it is not a database name
Check the following documents for master users
--Master User Account Privileges --Amazon Relational Database Service
DB instance size
For personal use, I would like to choose the one with the lowest specifications that is kind to the wallet in terms of price, but if I select Development / Test, a considerably high spec will be selected.
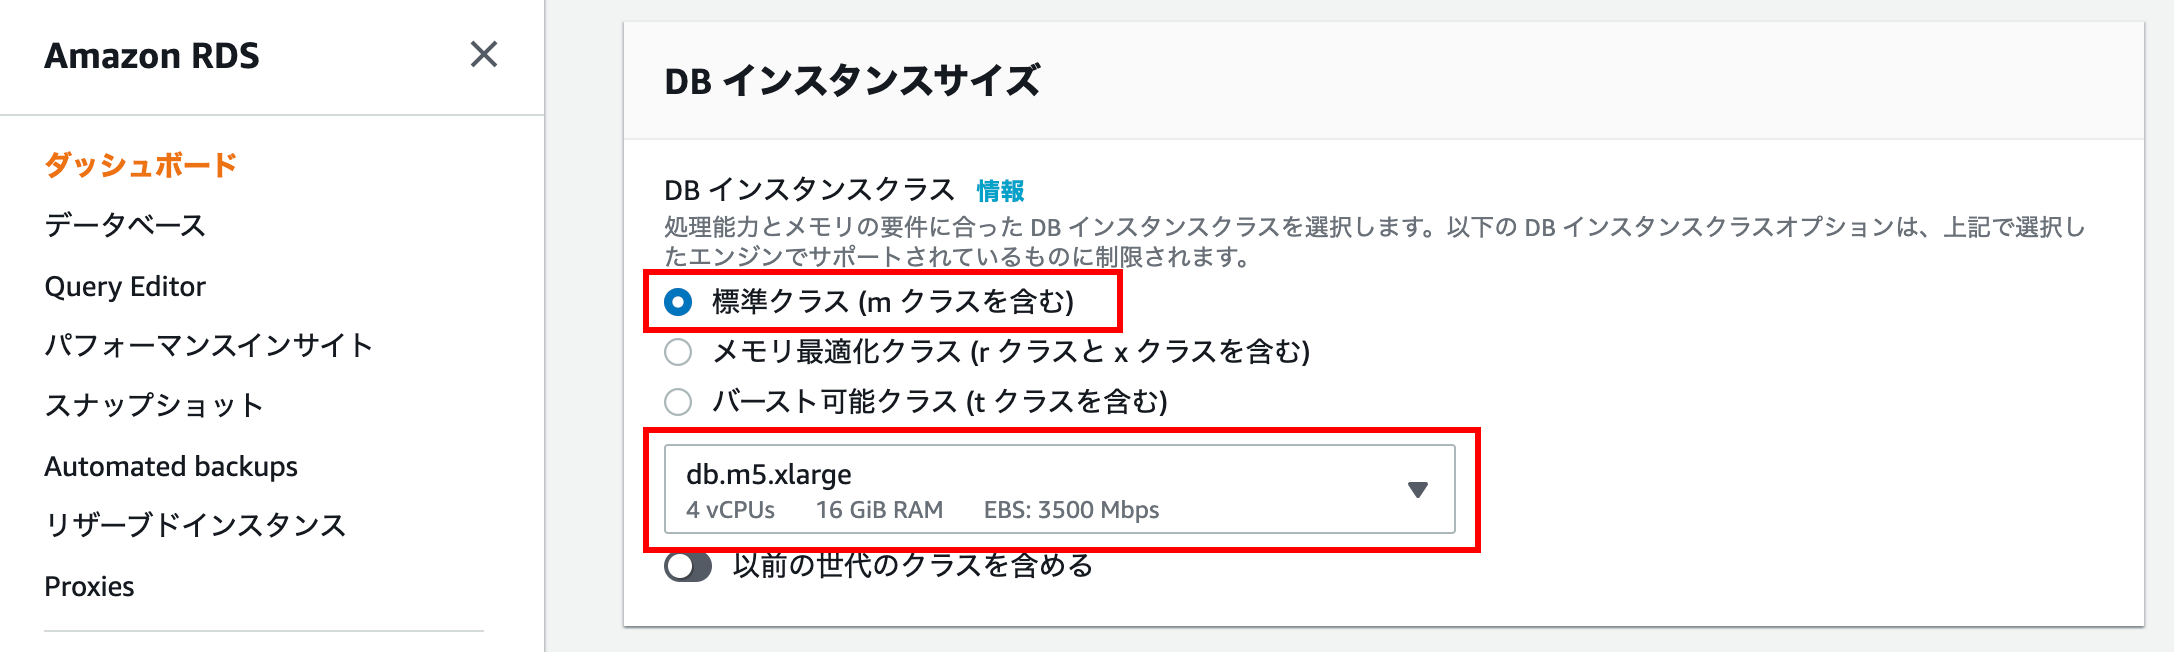
By selecting burstable class (including t class), you will be able to select wallet-friendly specifications.

storage
If you use it personally, you can leave the default
With the multi-AZ layout configuration, 20GB will cost about $ 5 per month.
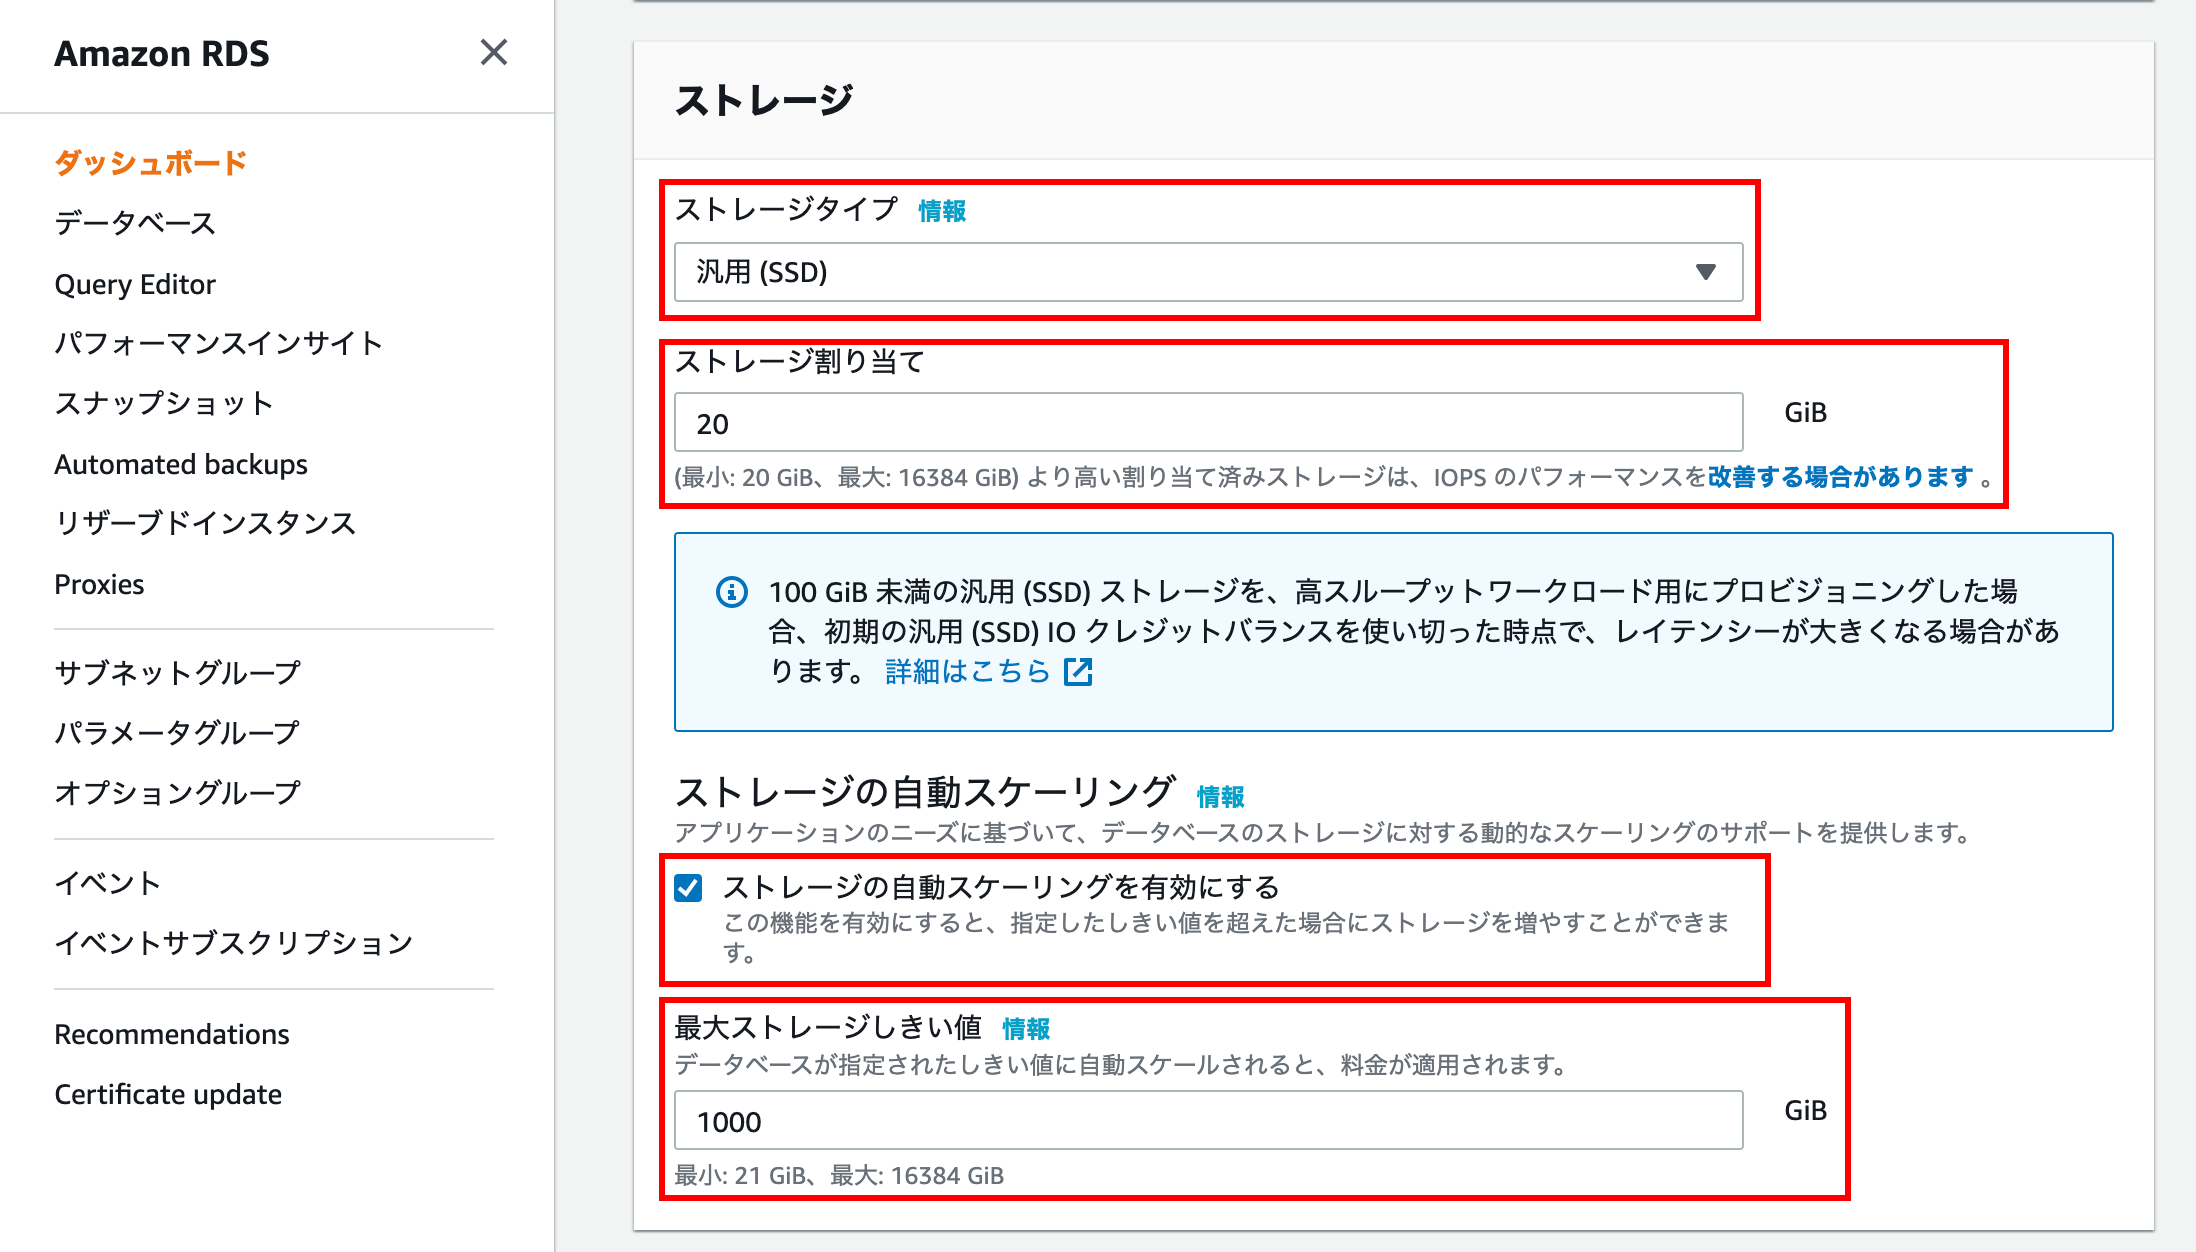
Please check the following documents for detailed charges
-Price --Amazon RDS for PostgreSQL | AWS
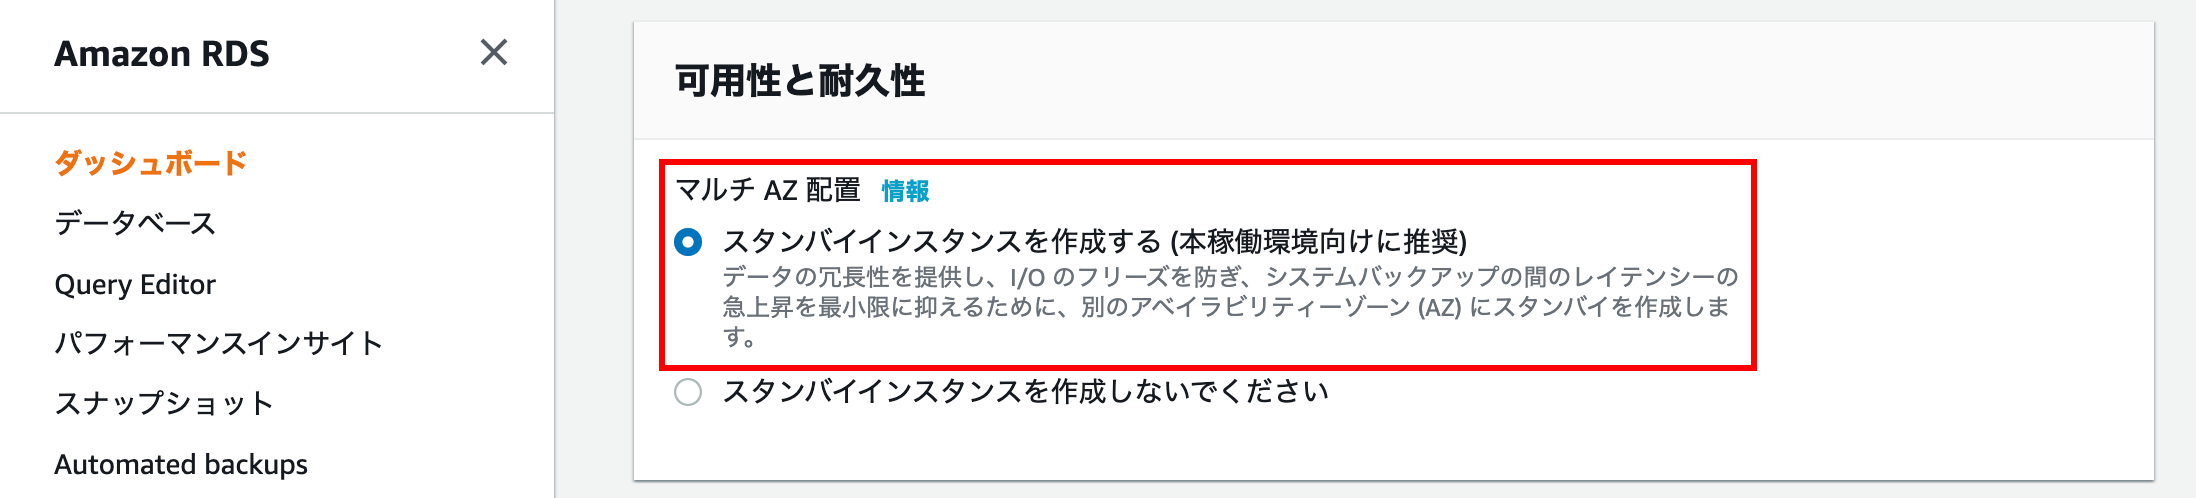
Availability and durability
Select Create standby instance (recommended for production environment) to create a multi-AZ deployment.
** Note: If the template is set to the free usage frame, it will be grayed out and cannot be selected, so be sure to develop / test **
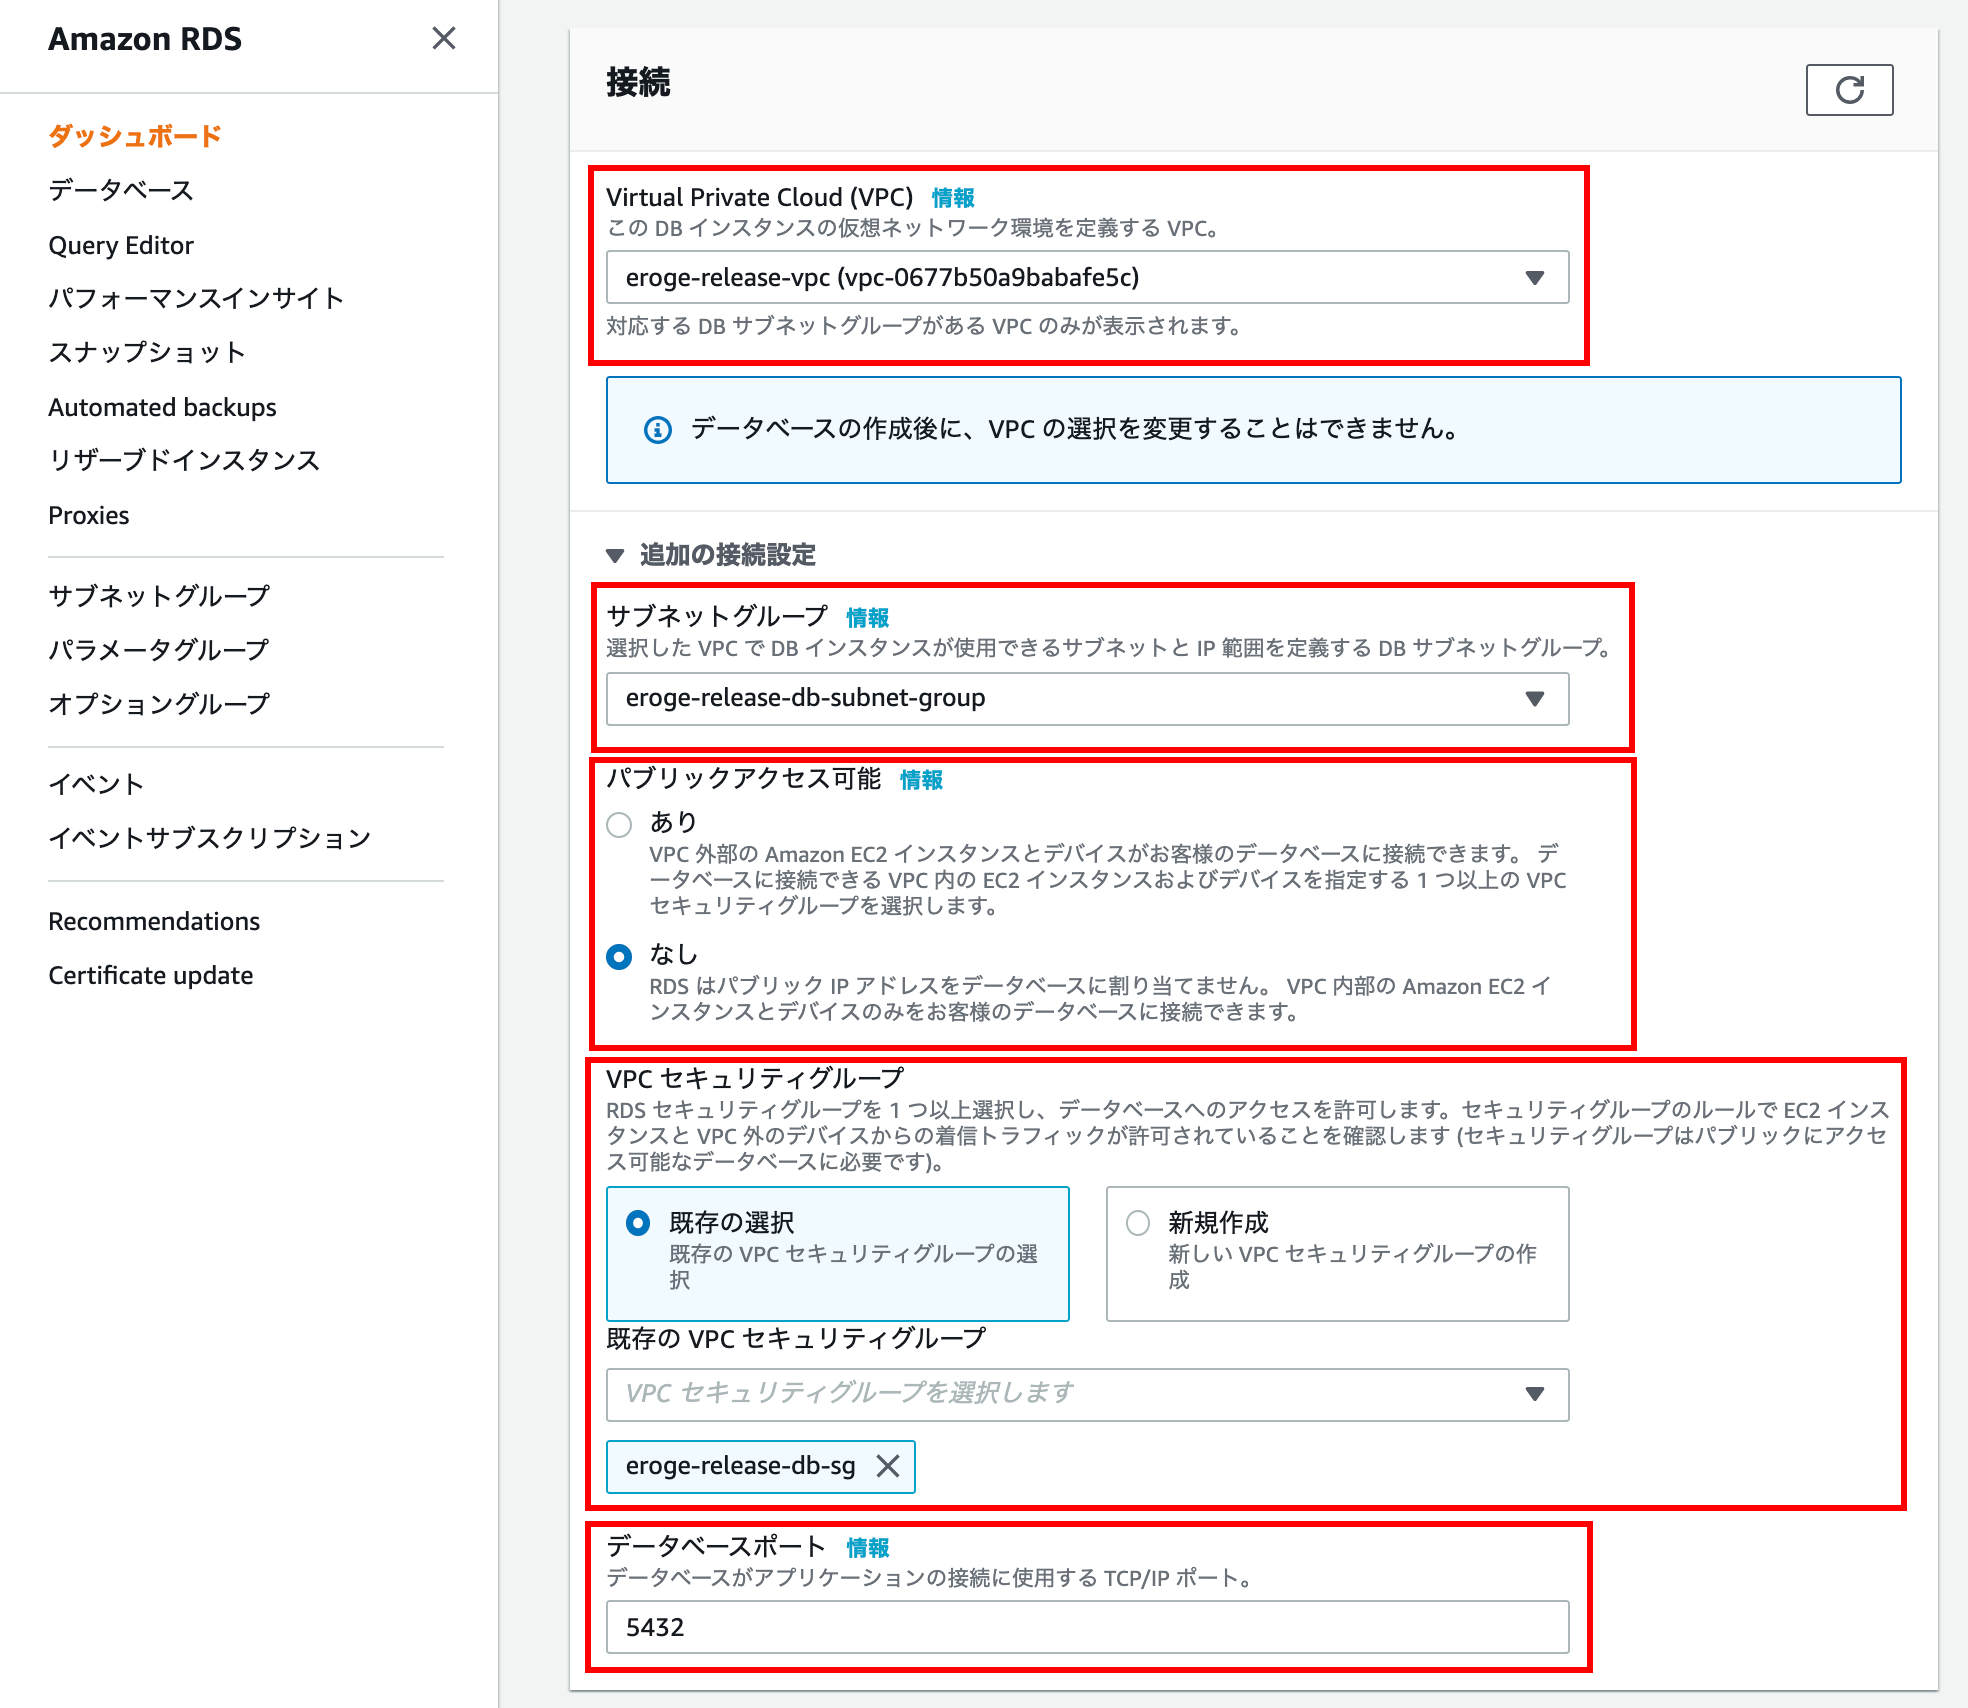
Connect
Enter the target VPC in Virtual Private Cloud (VPC)
** Note: Make sure to select the created VPC instead of the default VPC **
Click Additional connection settings and enter more information
For Subnet group, select the subnet group you created earlier.
Select None for Public accessible
** Select None to allow access via the bastion server **
For VPC Security Group, select the security group you just created.
You can leave the database port at the default
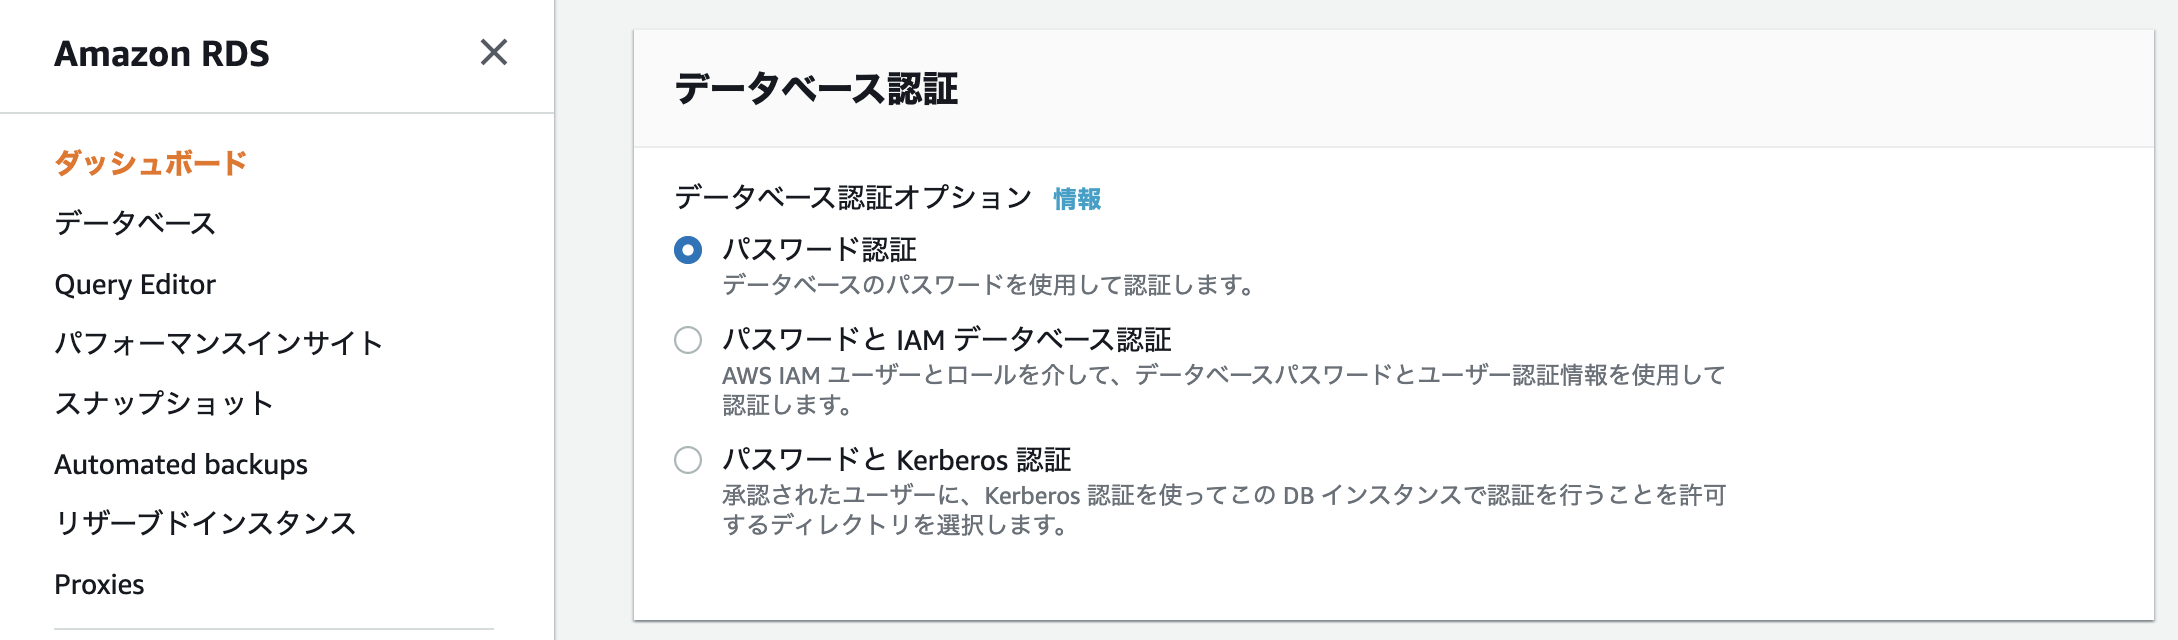
Database authentication
If you don't need to authenticate your database using IAM credentials, the default password authentication is fine.
Please check the following documents for details
-Allow users to connect to Amazon RDS with IAM credentials
Additional settings
I will explain each additional setting
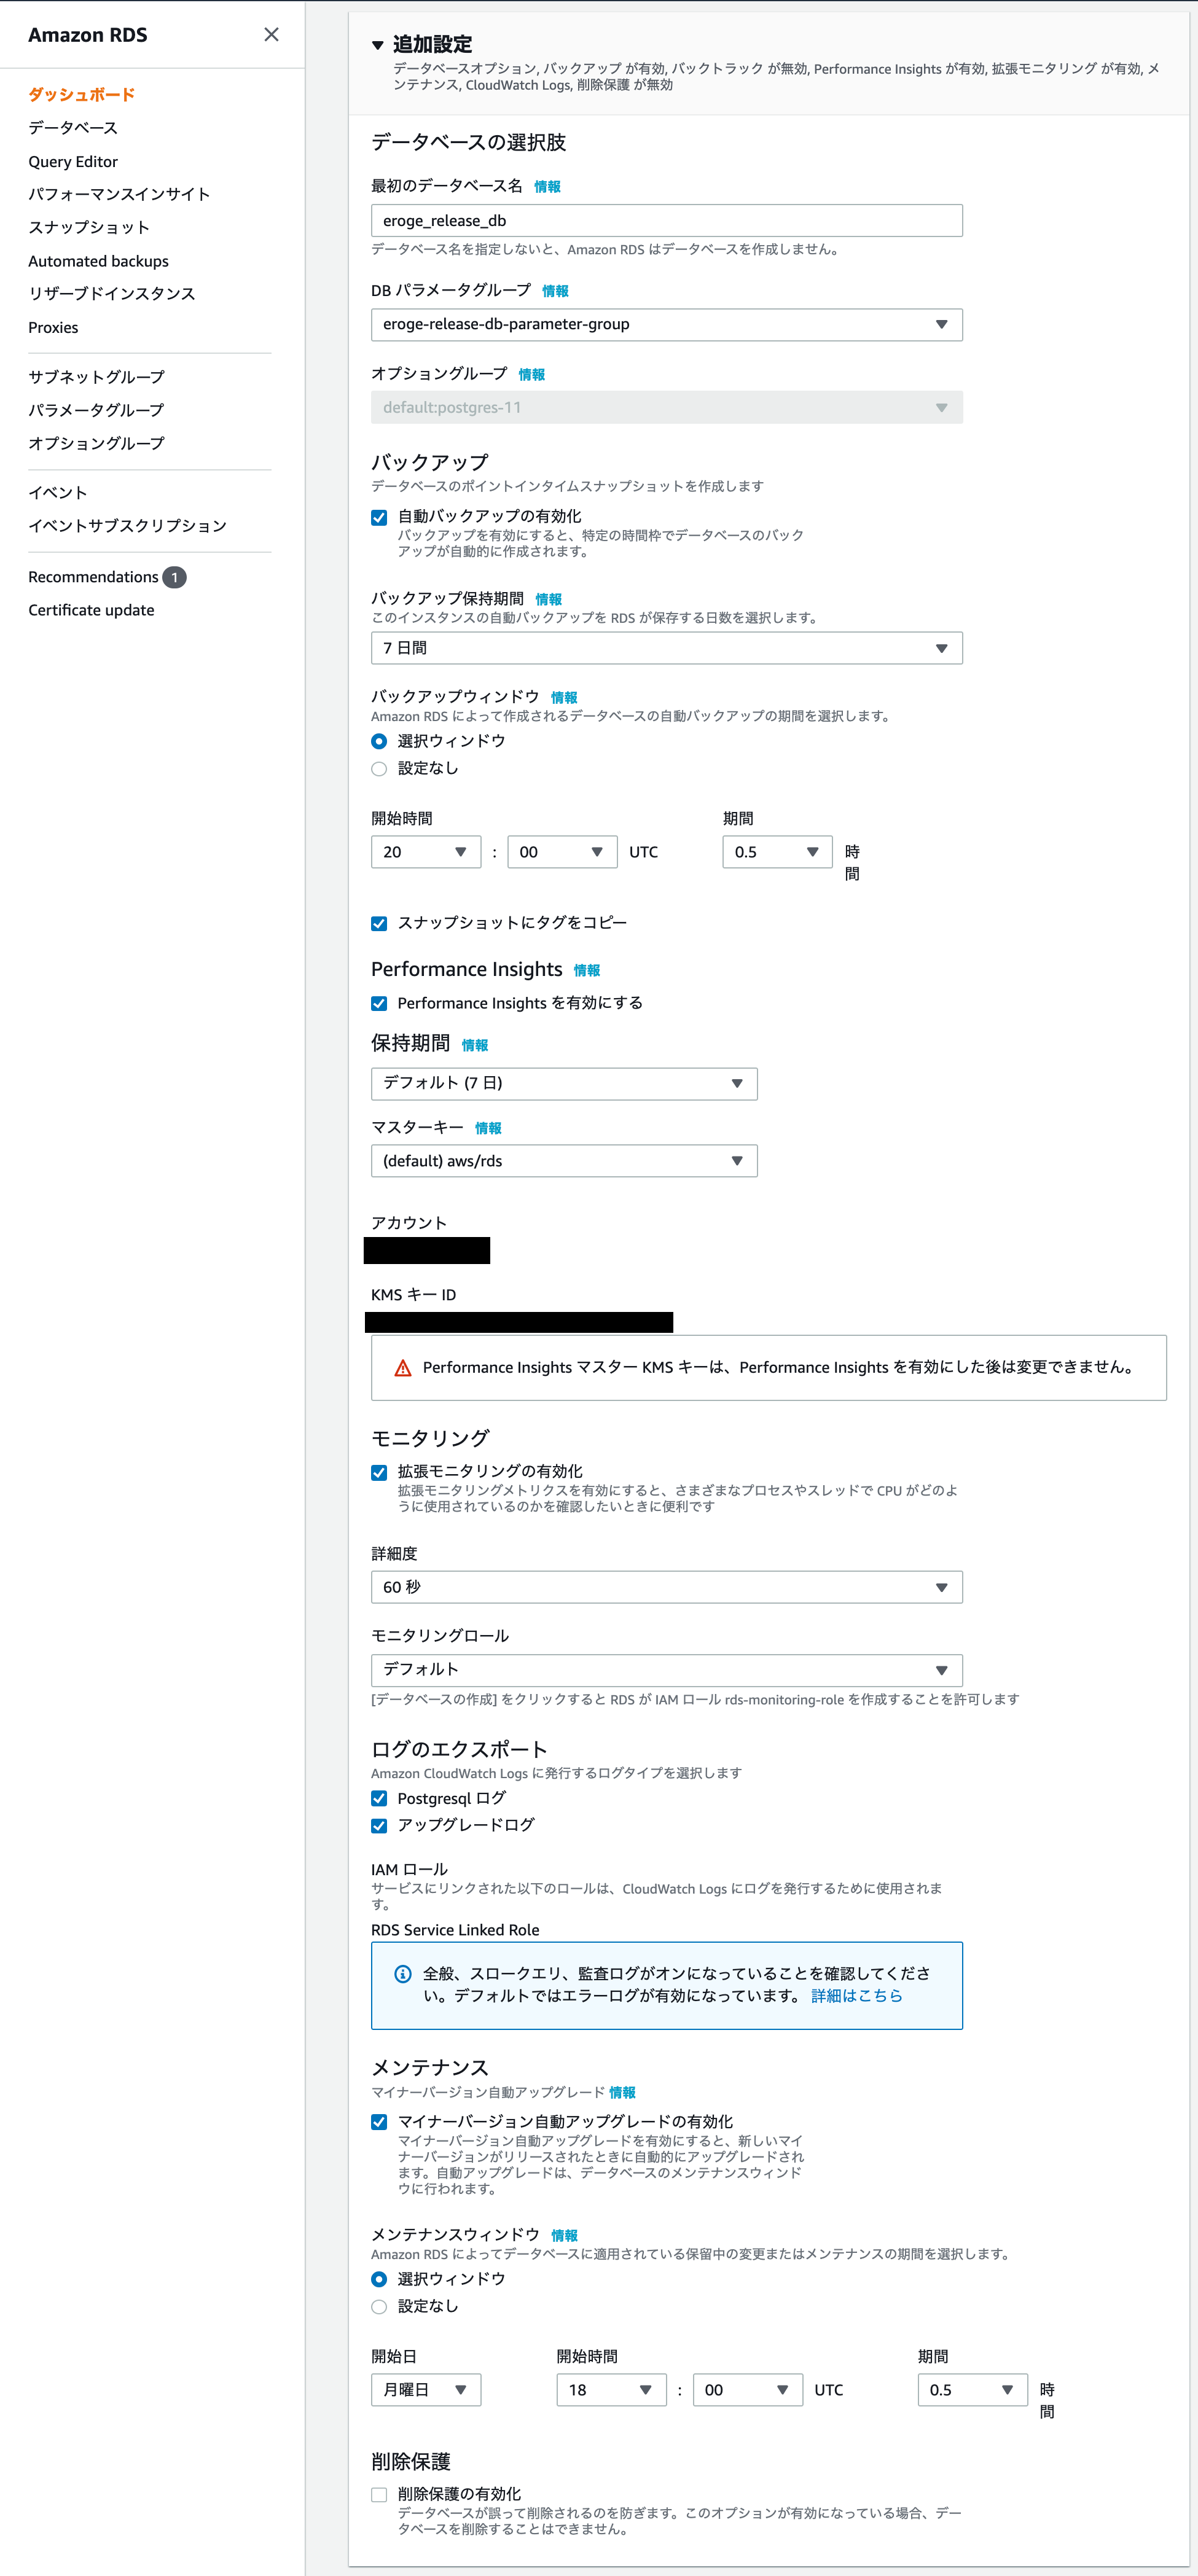
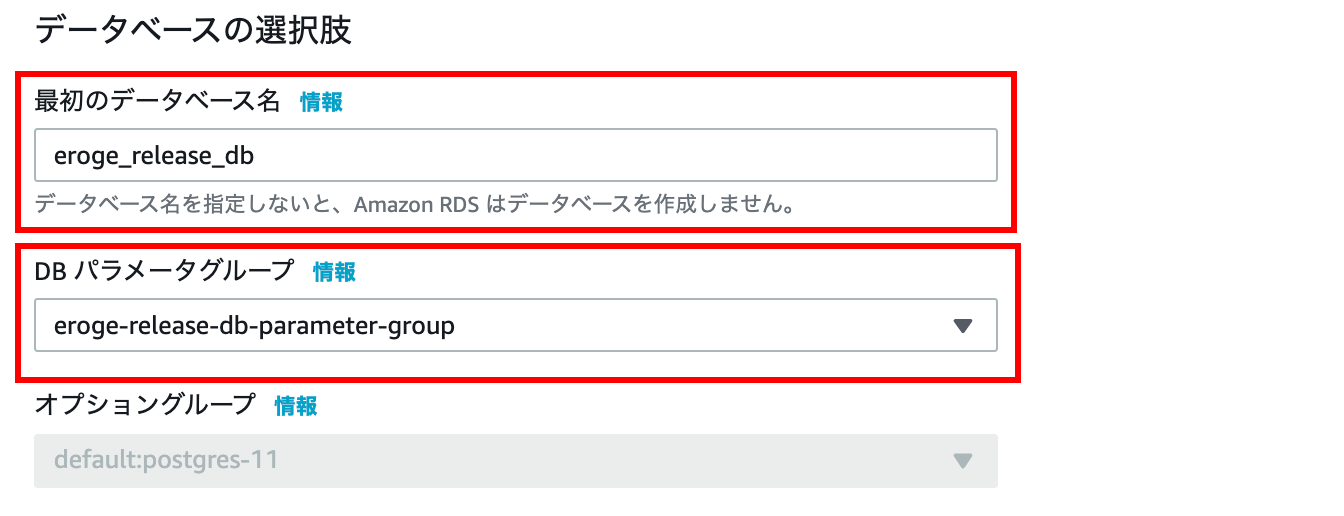
Database choices
By specifying first database name, RDS will be built with the database created.
For DB parameter group, specify the parameter group created earlier.
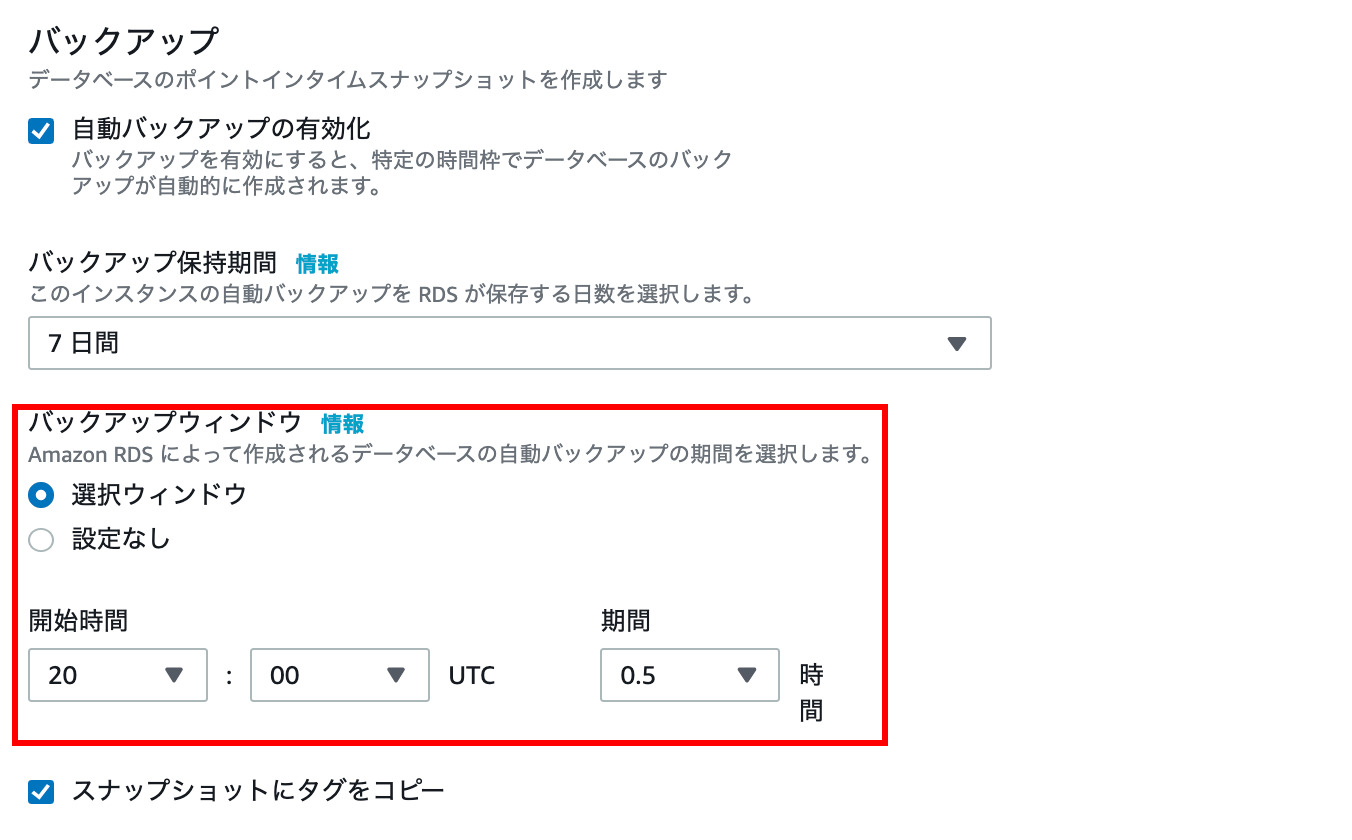
backup
In the backup window, select the selection window and set the start time to 20: 00.
With this setting, you will be able to back up between 5 and 30 minutes in the morning.
Please check the following documents for details
--Use Backup--Amazon Relational Database Service
Performance Insights
You can leave the defaults for Performance Insights

Please check the following documents for details
-Performance Insights (Analyzing and Tuning RDS Performance) | AWS --Enable Performance Insights--Amazon Relational Database Service
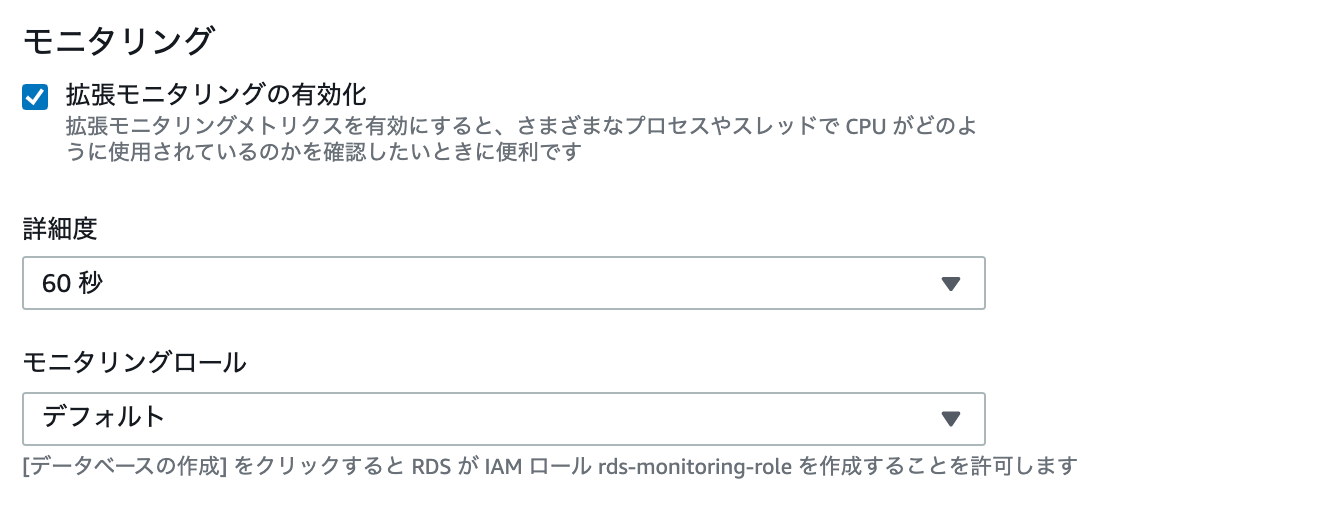
monitoring
You can leave the default for monitoring
Please check the following documents for details
--Amazon RDS Monitoring Overview --Amazon Relational Database Service -Extended Monitoring --Amazon Relational Database Service
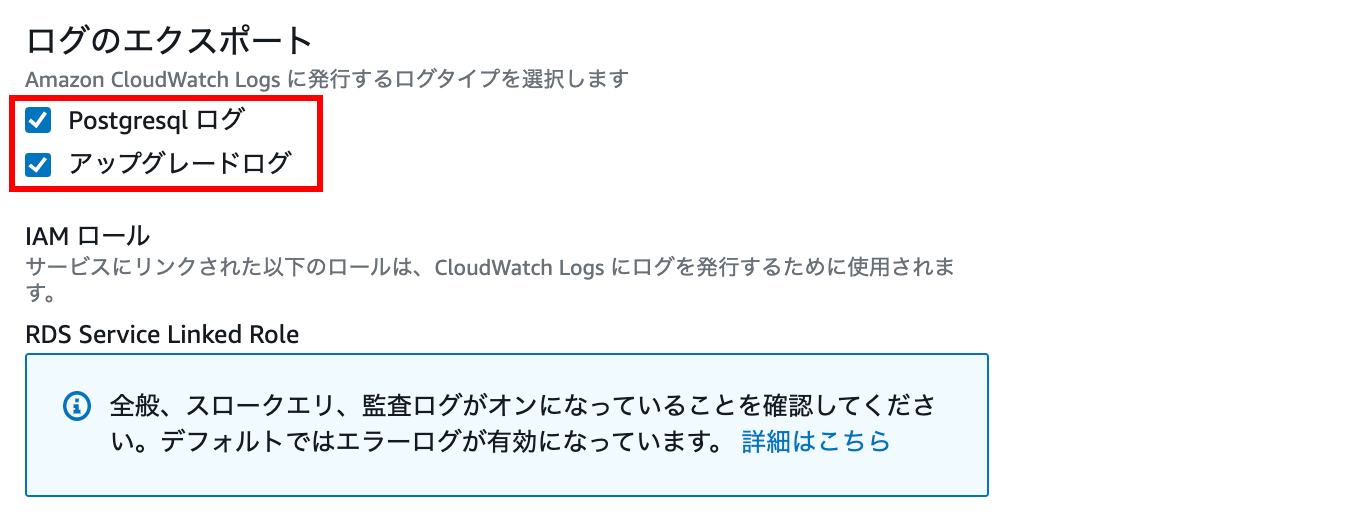
Export log
Check Postgresql log, Upgrade log
By checking, you can check the log output by CloudWatch Logs.
Please check the following documents for logs
--Amazon RDS Database Log File --Amazon Relational Database Service --PostgreSQL Database Log File --Amazon Relational Database Service -Publish Amazon RDS or Aurora for MySQL logs to CloudWatch
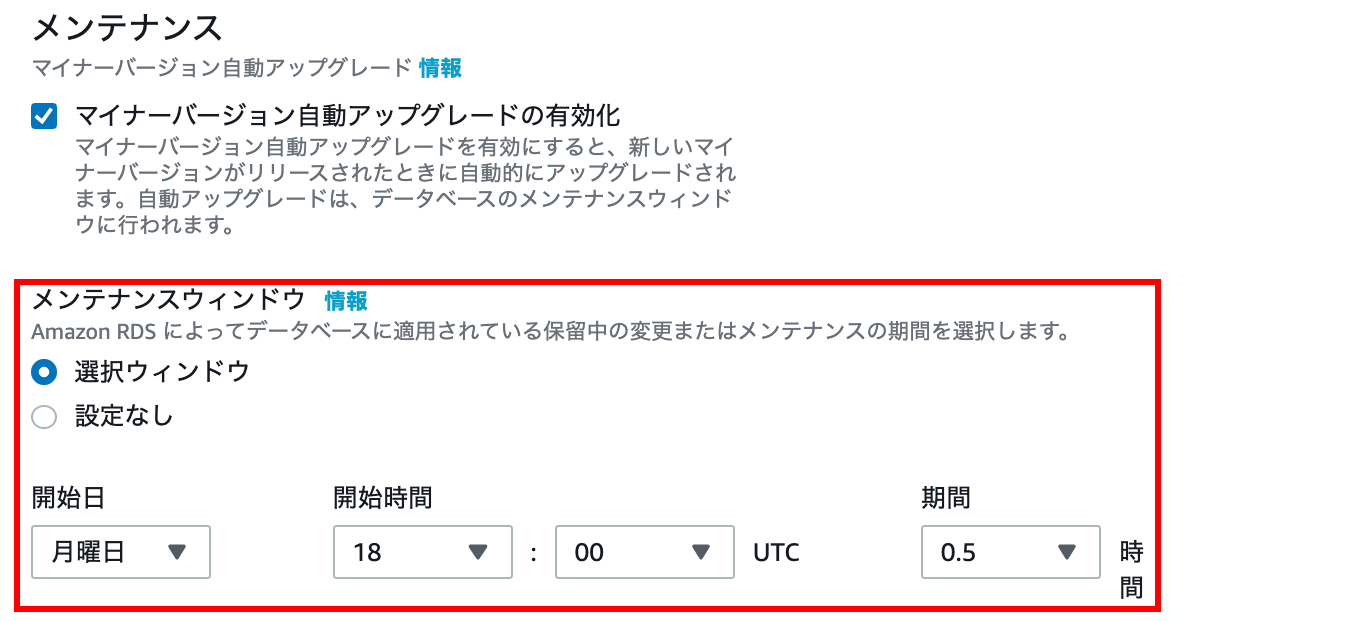
maintenance
In the maintenance window, select the selection window and set the start time to 18:00.
With this setting, you will be able to upgrade the minor version within 30 minutes at 3 o'clock on Tuesday morning.
Please check the following documents for minor version upgrades
-Upgrading the engine version of the DB instance --Amazon Relational Database Service
Delete protection
If you check it, you will not be able to delete the database. ** You can delete it by changing the setting **

Creating a database
Finally, check the estimated monthly cost and if so, click the Create Database button.
This completes RDS construction!

Please check the following documents for pricing details
-Price --Amazon RDS for PostgreSQL | AWS
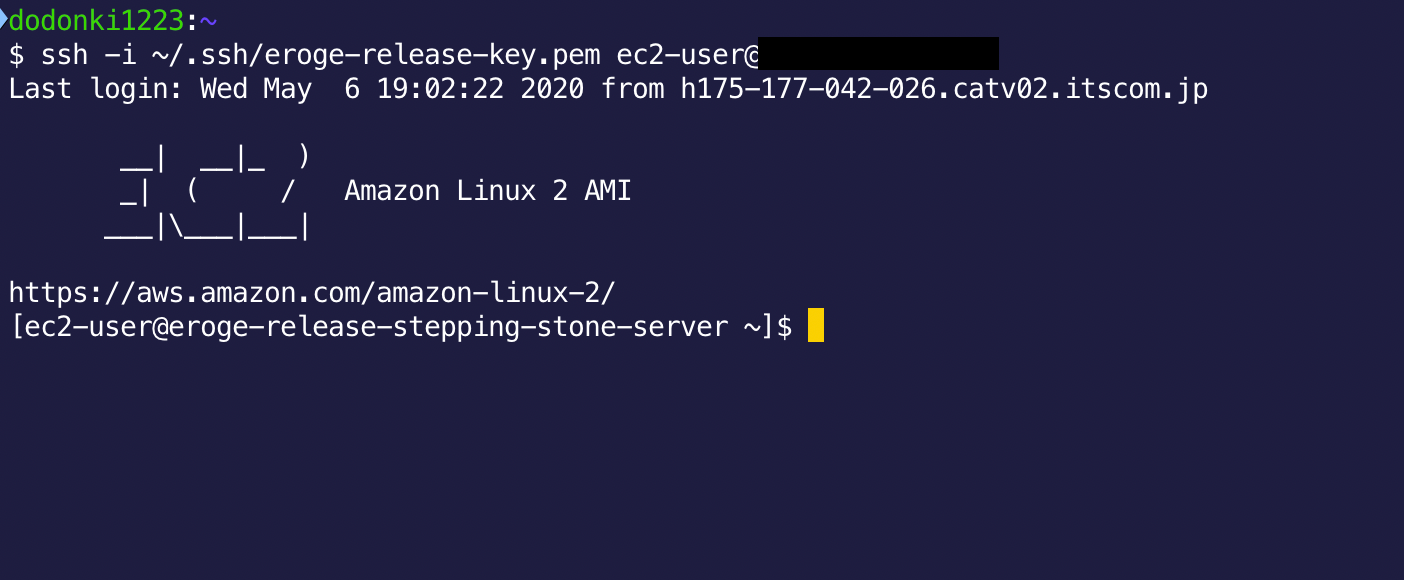
Connect to RDS from the bastion server
Connect to the bastion server
Access the bastion server using a command similar to the following
** The key pair will be the one you downloaded when you created your EC2 instance **
$ ssh -i key pair ec2–user@Elastic IP address
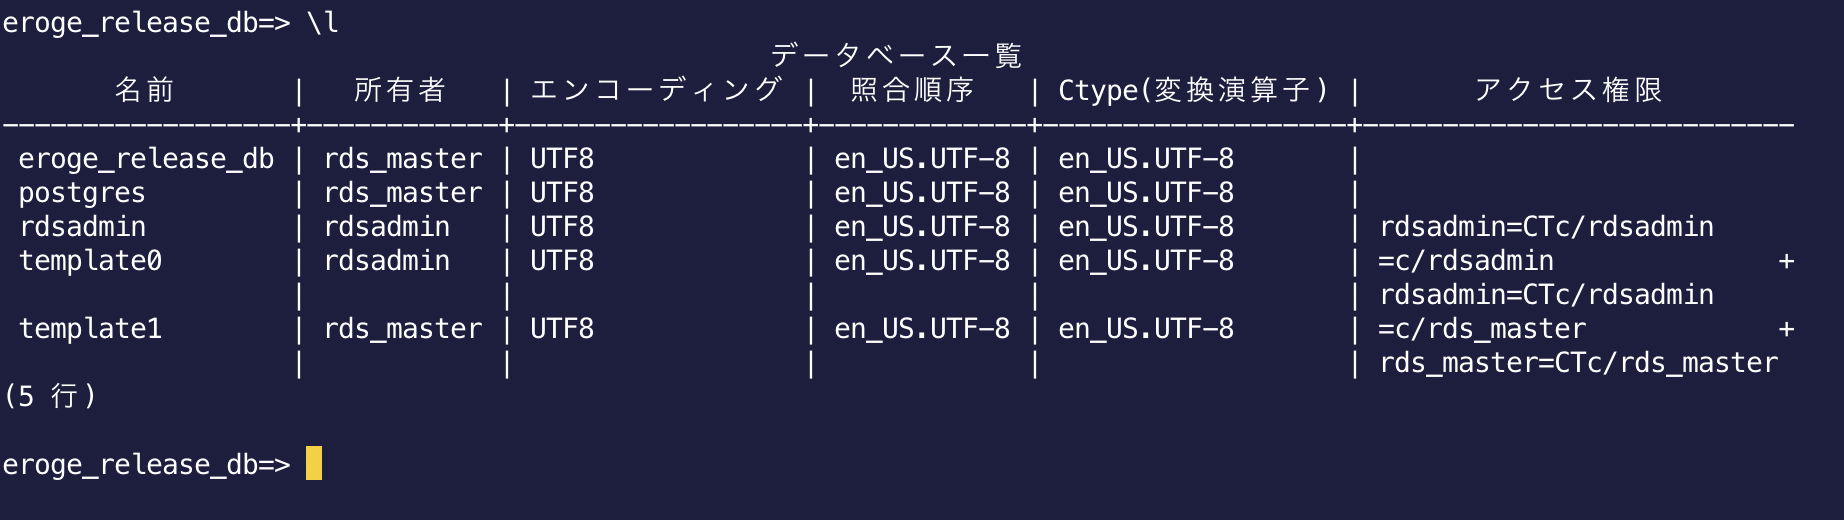
Connect to RDS
Access RDS using a command similar to the following
$ psql -h RDS endpoint-U master user name database name

If you can access it, there is no problem Subsequent work will be done from this screen
About PostgreSQL
I will review at least the terms necessary for building an environment with PostgreSQL
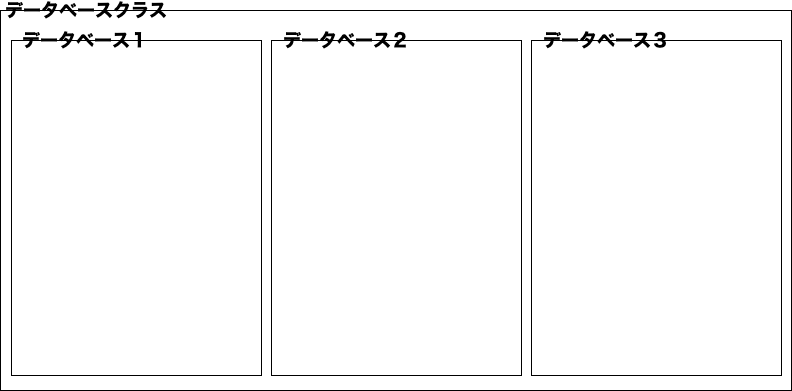
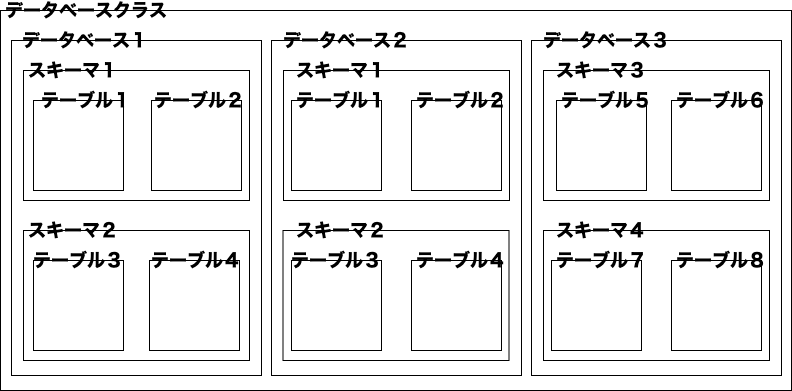
Database cluster
A database cluster is a collection of databases

When created with RDS, the first database , postgres, rdsadin, tempalte0, and template1 set on the RDS setting screen are created in the database cluster.
Please check the following documents for details
-18.2. Creating a database cluster
Database
A database is a named collection of database objects (tables, views, functions and operators, etc.)
Please check the following documents for details
-22.1. Overview -22.2. Creating a database
Schema
Schemas can group database objects (tables, views, functions and operators, etc.) in the database
Please check the following documents for details
About rolls
The role approves the connection to the database. Roles are divided into database users (users who log in to the database) and groups of database users.
There are two types of SQL to create a role: The difference between the two is whether they have the LOGIN attribute
--Create a group of database users
CREATE ROLE name;
--Create database user
CREATE USER name;
Please check the following documents for details
-21.1. Database Roles -21.2. Role Attributes -21.3. Role Membership
Manage users and roles
We will build an environment based on best practices for managing users and roles by referring to the AWS blog article.
I will create it with reference to the following two articles
-PostgreSQL User and Role Management | Amazon Web Services Blog
Goals to aim for

--Use the master user to create roles for each application or use case such as
readonlyorreadwrite--Add permissions to allow these roles to access various database objects. For example, thereadonlyrole can only executeSELECTqueries --Give the role the minimum permissions required for the feature --Create a new user for each application or individual feature, such as ʻapp_userorreporting_user--Assign the appropriate roles to these users and quickly grant them the same privileges as the roles. For example, grant thereadwriterole to ʻapp_userand thereadonlyrole toreporting_user. --At any time, you can remove a role from a user to revoke permissions
The above images and text are taken from PostgreSQL User and Role Management | Amazon Web Services Blog.
What I'm saying is to create a group role such as read permission, read / write permission, and grant it to the user according to the purpose.
public schema
** Note: The rest of the work will be done by connecting to RDS from the step server as the master user **
Creating a new database will create a public schema
Creating a database object such as a table will belong to the public schema
Even if you create a new user and grant permissions and restrict it, it will be created in the public schema, so the newly created user will be meaningless.
You need to revoke create permissions on the public schema
The official PostgreSQL documentation says:
Standard SQL also does not have the concept of a public schema. The public schema should not be used to maximize compliance with the standard.
It's best not to use the public schema
Please check the official document below for details
Prevent the use of public schema
Execute the following SQL to disable the public schema

--Revoke the default create permission for the public schema from the public role
REVOKE CREATE ON SCHEMA public FROM PUBLIC;

--Disable the ability of public roles to connect to the database
-- ※eroge_release_db is the database name
REVOKE ALL ON DATABASE eroge_release_db FROM PUBLIC;
Create a schema
Normally it is better to create a schema for each user who creates it, but this time I will create only one schema so that all users will see that schema
Check the official documentation for recommended schema usage patterns
Execute the following SQL to create the schema

--Creating a schema
-- ※eroge_release_db_schema is the schema name
CREATE SCHEMA eroge_release_db_schema;
Create a read permission role
Create a role that only allows you to read the data It will be a role that can not update data
It also automatically grants permissions so that future tables and views can be accessed by the readonly role.
Execute the following SQL
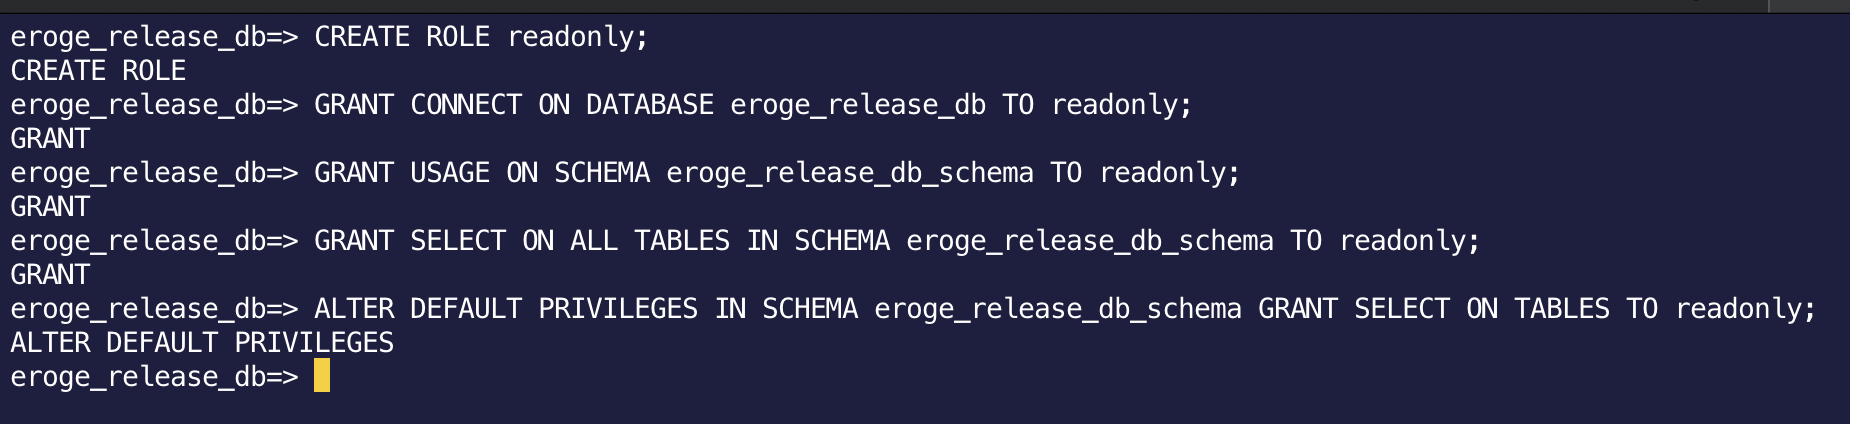
--Create a role named readonly(Role without password or authority)
CREATE ROLE readonly;

--readonly role is eroge_release_Grant access to db
-- ※eroge_release_db is the database name
GRANT CONNECT ON DATABASE eroge_release_db TO readonly;

--Grant readonly role access to schema
-- ※eroge_release_db_schema is the schema name
GRANT USAGE ON SCHEMA eroge_release_db_schema TO readonly;

--Grant access to all tables and views in the schema
-- ※eroge_release_db_schema is the schema name
GRANT SELECT ON ALL TABLES IN SCHEMA eroge_release_db_schema TO readonly;

--When a new table or view is created in the future, you will not have access rights.
--So when a new table or view is created in the future, access authority will be automatically granted
-- ※eroge_release_db_schema is the schema name
ALTER DEFAULT PRIVILEGES IN SCHEMA eroge_release_db_schema GRANT SELECT ON TABLES TO readonly;
Create a read / write permission role
Create a role that allows writing in addition to reading data
It also automatically grants permissions so that future tables and views can be accessed by the readwrite role.
Execute the following SQL
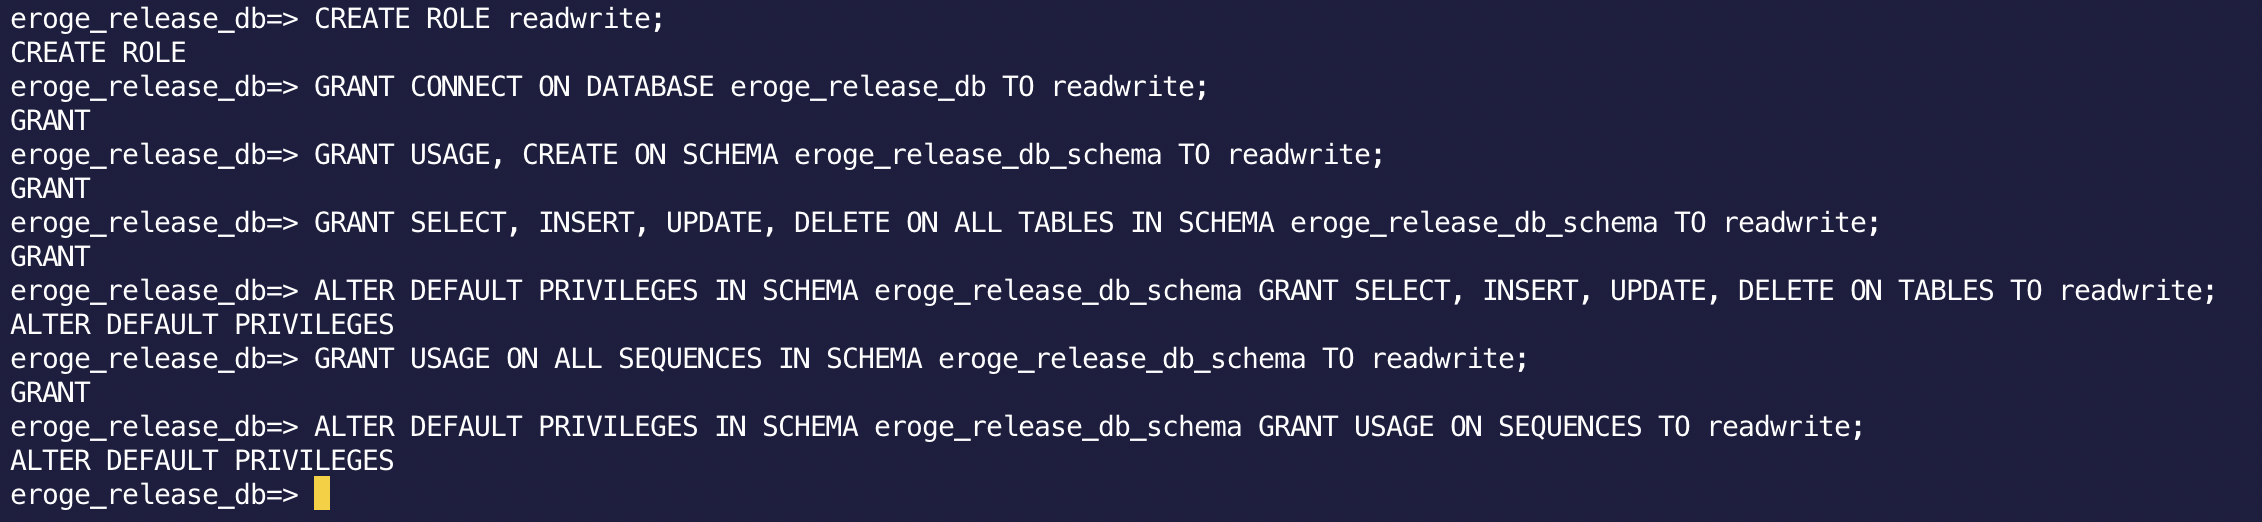
--Create a role named readwrite(Role without password or authority)
CREATE ROLE readwrite;

--The readwrite role is eroge_release_Grant access to db
-- ※eroge_release_db is the database name
GRANT CONNECT ON DATABASE eroge_release_db TO readwrite;

--Grant the readwrite role permission to create new Objects in the schema
-- ※eroge_release_db_schema is the schema name
GRANT USAGE, CREATE ON SCHEMA eroge_release_db_schema TO readwrite;

--Grant access to all tables and views in the schema, as well as add / delete / update permissions
-- ※eroge_release_db_schema is the schema name
GRANT SELECT, INSERT, UPDATE, DELETE ON ALL TABLES IN SCHEMA eroge_release_db_schema TO readwrite;

--When a new table or view is created in the future, you will not have access authority and add / delete / update authority.
--Therefore, when a new table or view is created in the future, access authority and add / delete / update authority are automatically granted.
-- ※eroge_release_db_schema is the schema name
ALTER DEFAULT PRIVILEGES IN SCHEMA eroge_release_db_schema GRANT SELECT, INSERT, UPDATE, DELETE ON TABLES TO readwrite;

--Grant access to the sequence because you also need to use the sequence
-- ※eroge_release_db_schema is the schema name
GRANT USAGE ON ALL SEQUENCES IN SCHEMA eroge_release_db_schema TO readwrite;

--When a new sequence is created in the future, you will not have access privileges.
--So when a new sequence is created in the future, access authority will be granted automatically
-- ※eroge_release_db_schema is the schema name
ALTER DEFAULT PRIVILEGES IN SCHEMA eroge_release_db_schema GRANT USAGE ON SEQUENCES TO readwrite;
Create a user and grant a role
Create a login user and grant the role you just created
Create users for read and read / write
--app_readonly --app (read / write)
Please execute the following SQL

--Create a readonly user and grant the read permission role
-- ※app_readonly is the username, password is the password to log in
CREATE USER app_readonly WITH PASSWORD 'password';
GRANT readonly TO app_readonly;

--readwrite User created and read/Grant write permission role
--* App is the user name, password is the password for logging in
CREATE USER app WITH PASSWORD 'password';
GRANT readwrite TO app;
Check if the user and role have been created
ʻApp, ʻapp_readonly Users are displayed, and check if the roles are properly assigned by executing the following SQL.
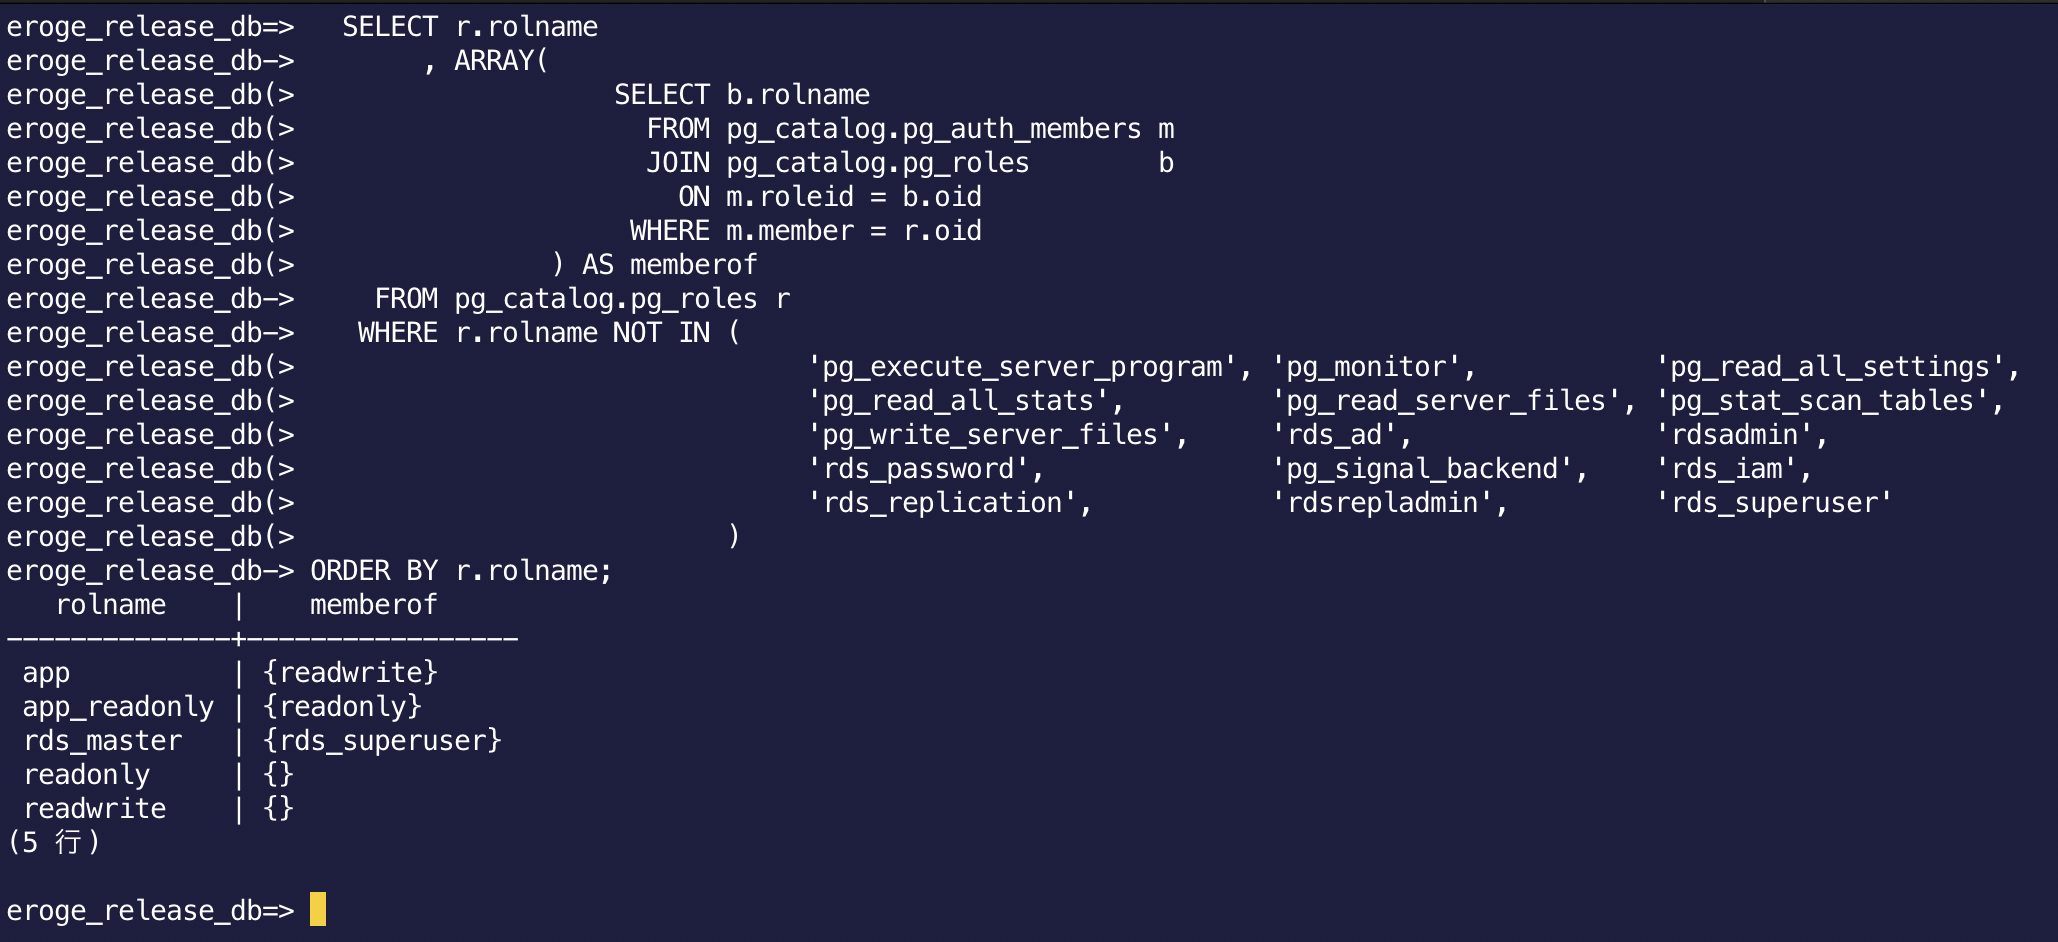
--Permission confirmation SQL
  SELECT r.rolname
       , ARRAY(
                   SELECT b.rolname
                     FROM pg_catalog.pg_auth_members m
                     JOIN pg_catalog.pg_roles        b
                       ON m.roleid = b.oid
                    WHERE m.member = r.oid
               ) AS memberof
    FROM pg_catalog.pg_roles r
   WHERE r.rolname NOT IN (
                               'pg_execute_server_program', 'pg_monitor',           'pg_read_all_settings',
                               'pg_read_all_stats',         'pg_read_server_files', 'pg_stat_scan_tables',
                               'pg_write_server_files',     'rds_ad',               'rdsadmin',
                               'rds_password',              'pg_signal_backend',    'rds_iam',
                               'rds_replication',           'rdsrepladmin',         'rds_superuser'
                          )
ORDER BY r.rolname;
Change the default search_path
With the default search_path setting, you cannot search the table by omitting the created ʻeroge_release_db_schemaname. Change thesearch_path setting so that you can search the table even if you omit the ʻeroge_release_db_schema name.
** Replace eroge_release_db_schema with the schema name you created **
Check the following documents for more information on search_path
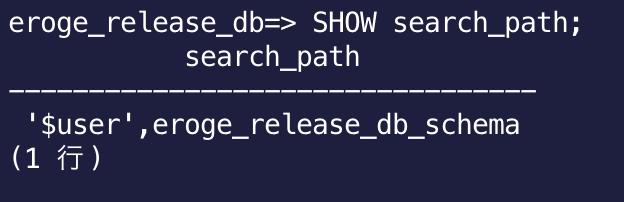
Check the default search_path
Execute the following SQL
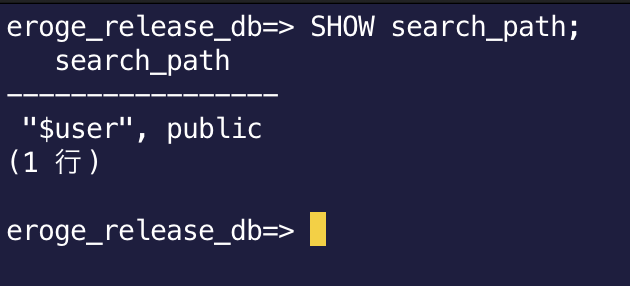
SHOW search_path;
In the default state, it looks for the same schema name as the login user name, otherwise it looks for the public schema.
You can search the table by adding ʻeroge_release_db_schema` to search_path.
If you check the current current schema, it will be public
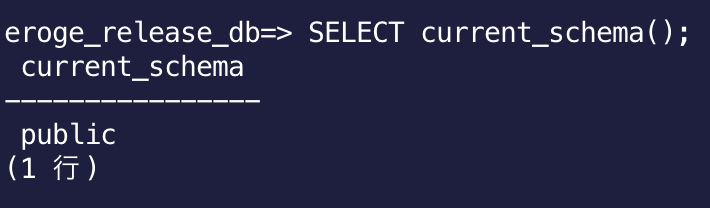
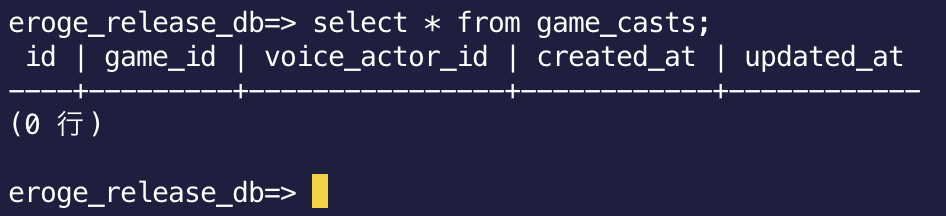
If you try to search the table without the schema name, you will get the following error.

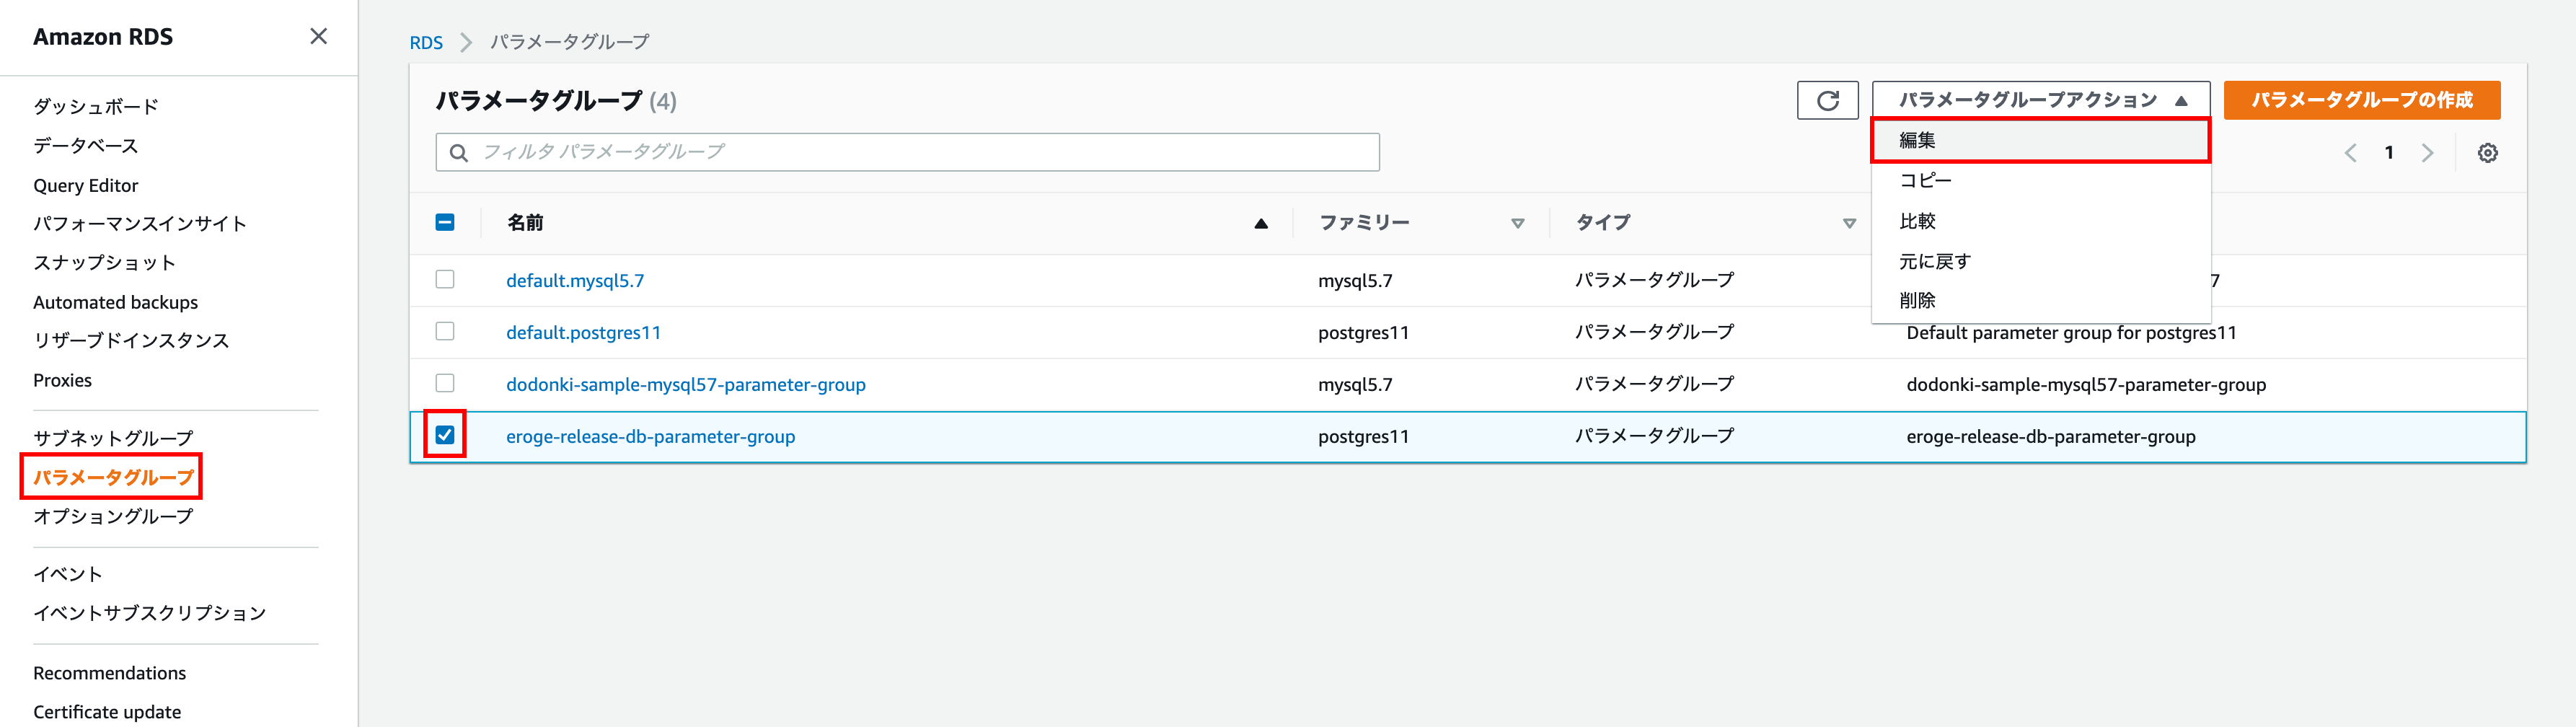
Change search_path from DB parameter group
Select the DB parameter group you created and edit it
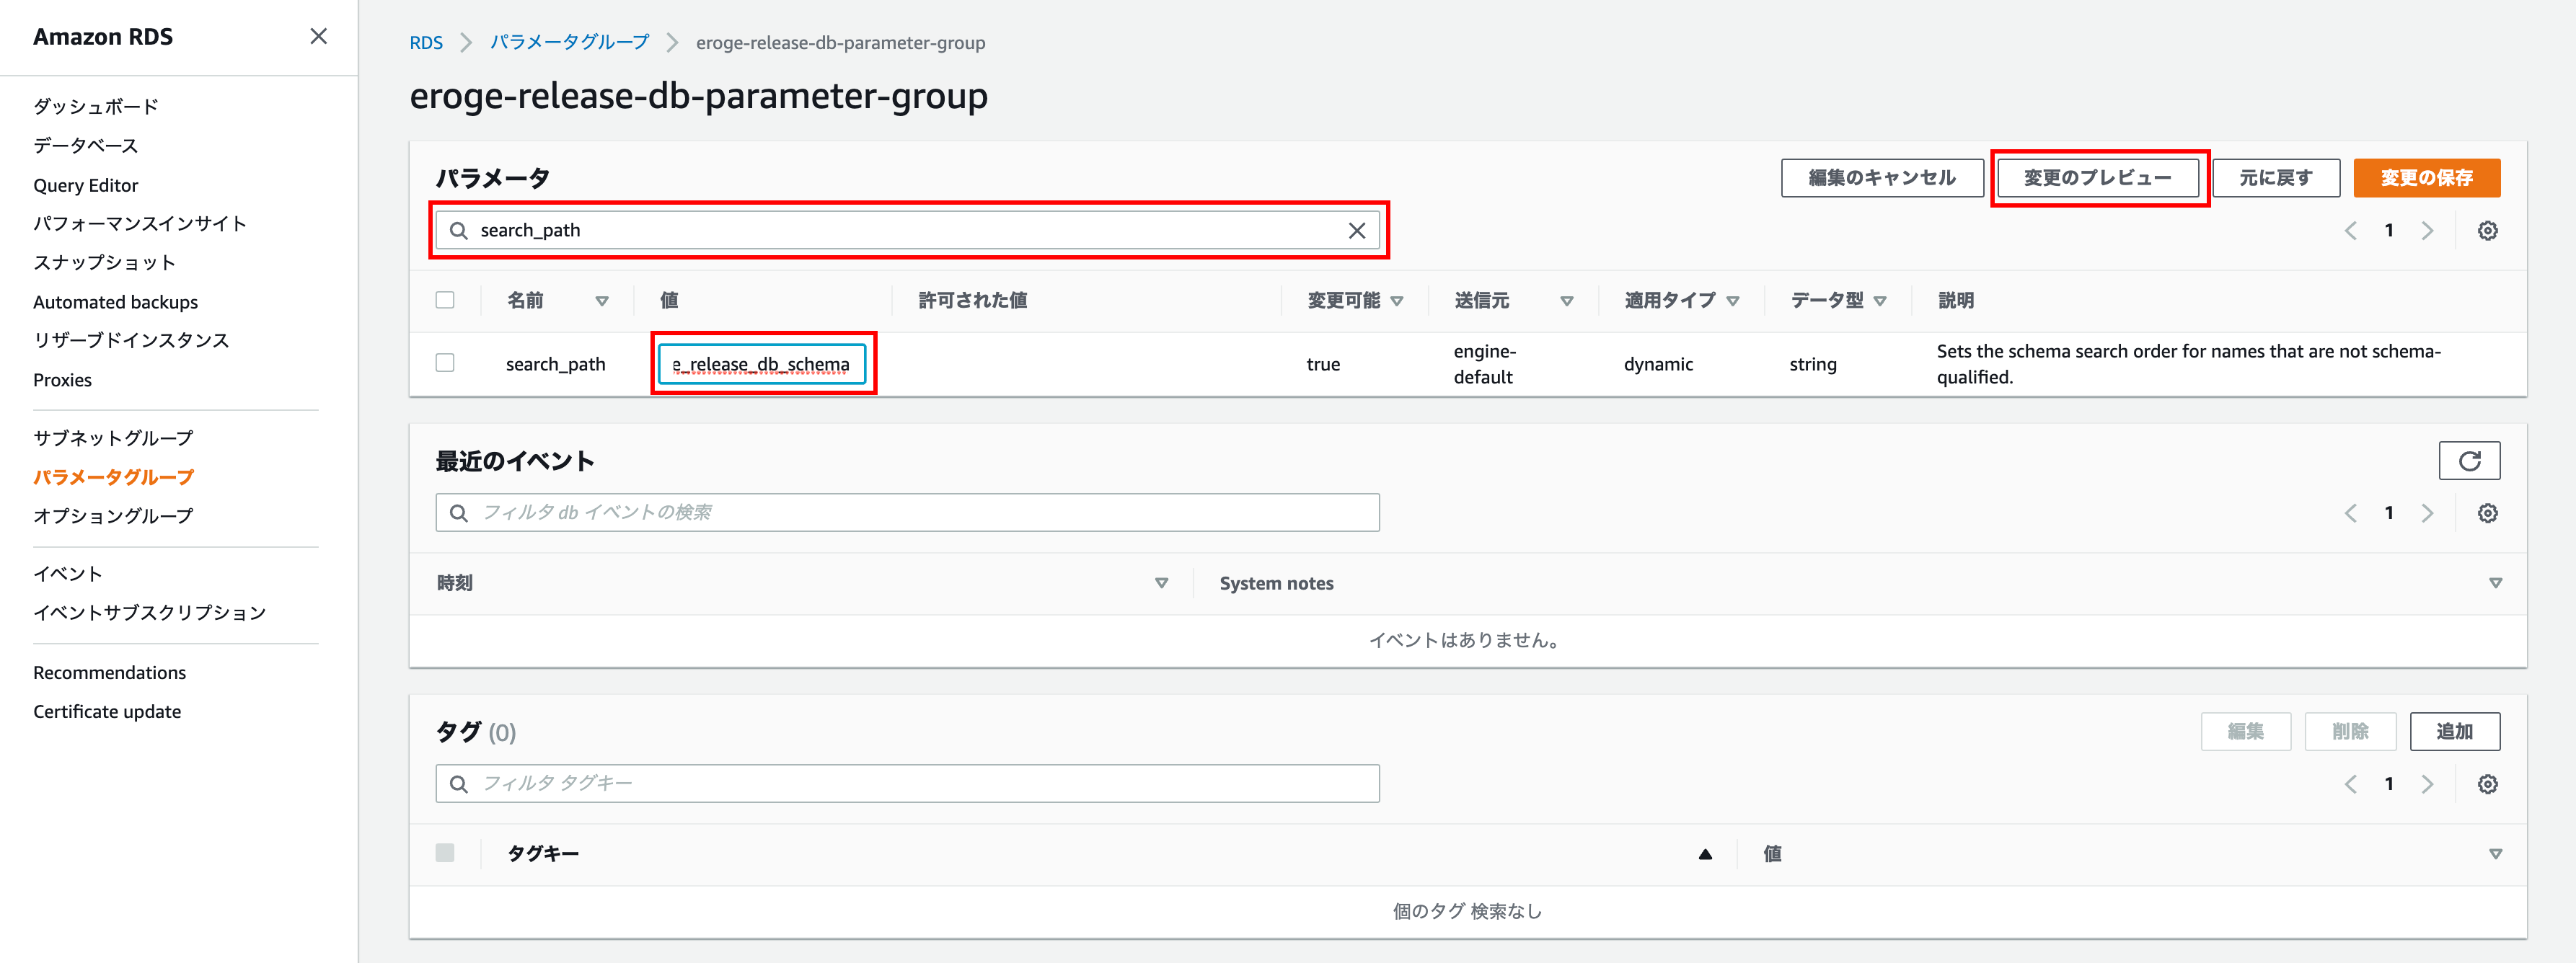
Enter search_path for the parameter, enter'$ user', eroge_release_db_schema for the value, and click Preview Changes.
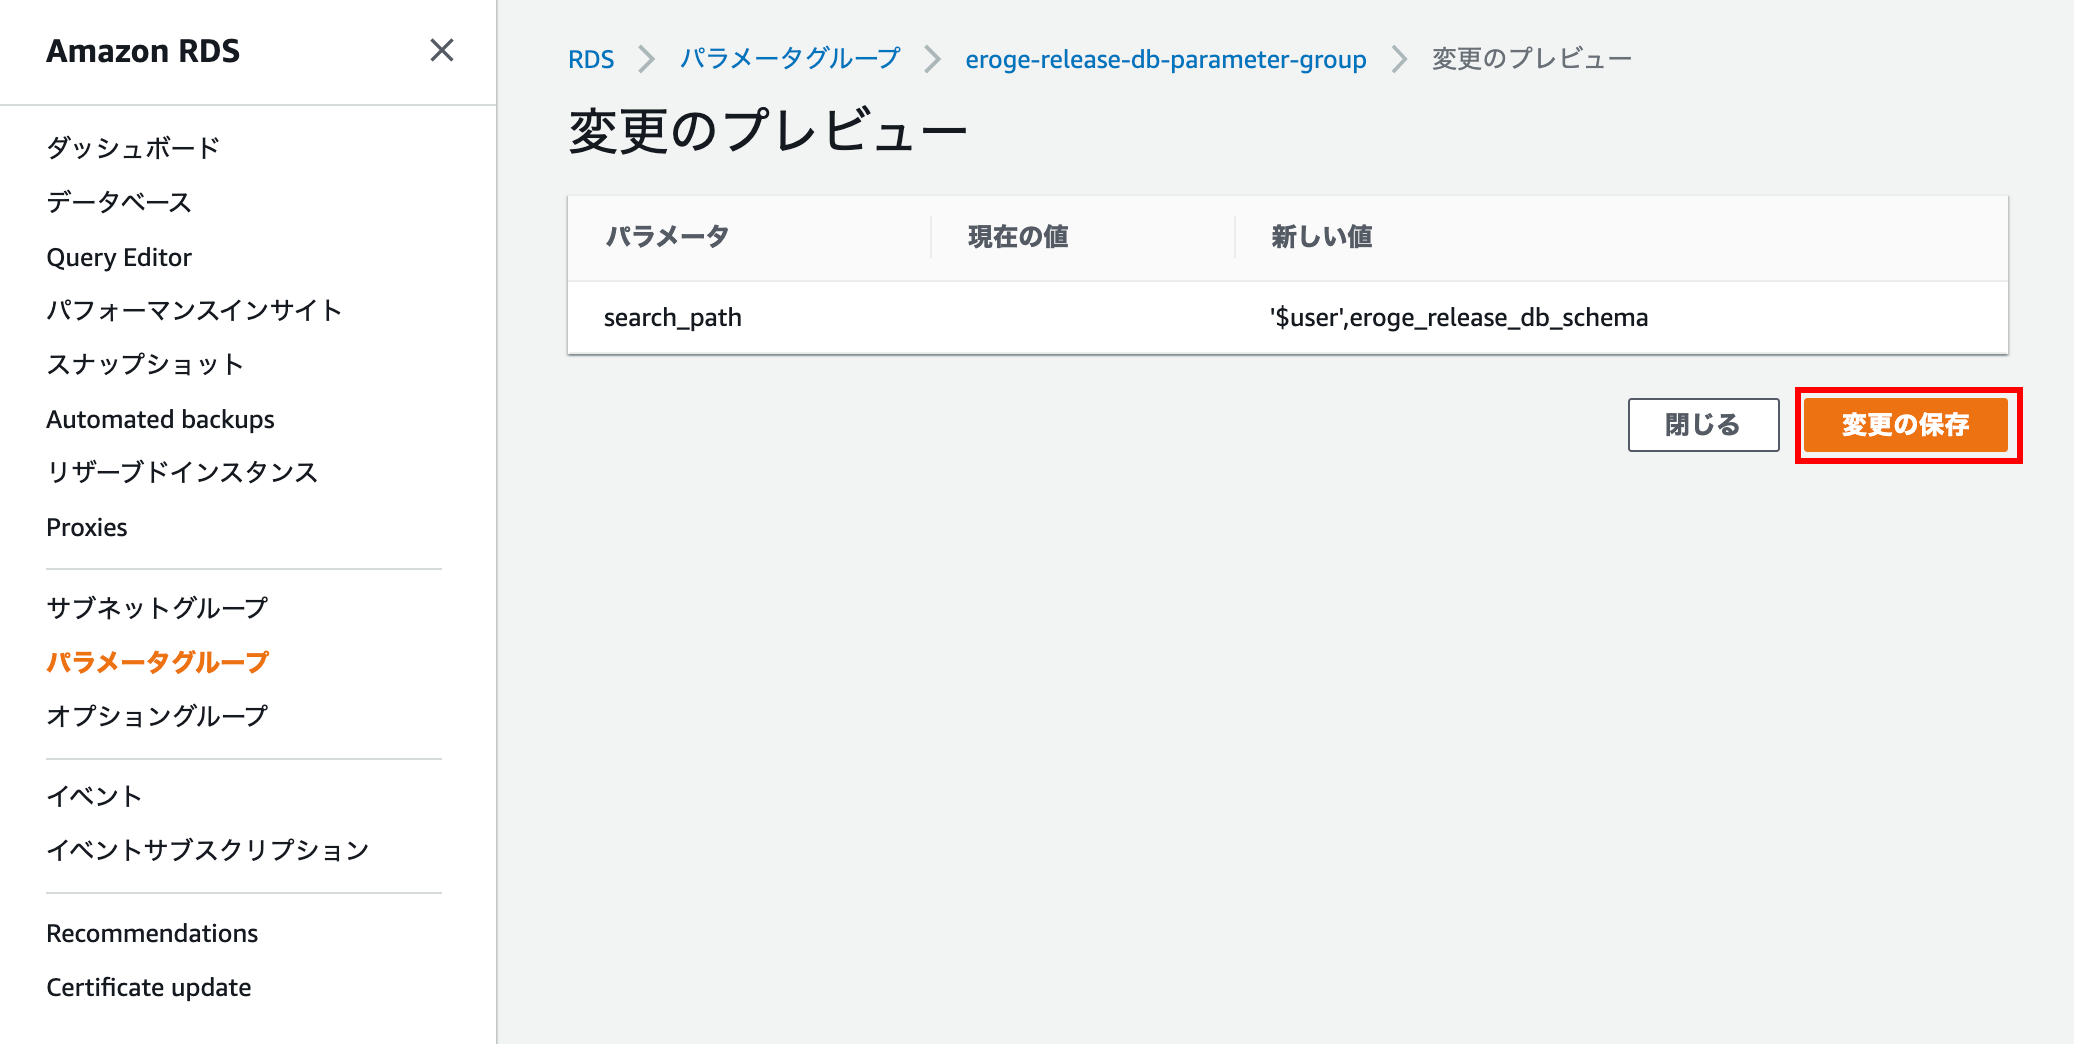
Make sure the new value is '$ user', eroge_release_db_schema and click Save Changes
Check the changed search_path
Execute the following SQL
SHOW search_path;
Make sure you have the changed values in the DB parameter group If you also check the current current schema, it will be ʻeroge_release_db_schema`.
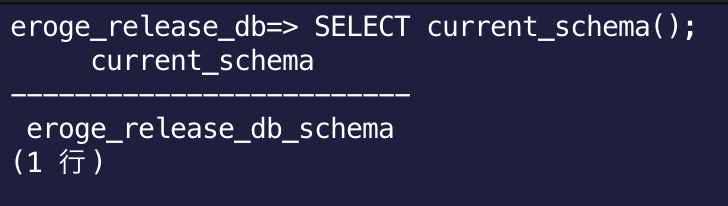
If you omit the schema name and search the table, you can see that it was displayed without an error.
** This completes the construction of RDS **
Finally
You should normally use AWS CDK or Terraform to code your infrastructure. First of all, I made it from the AWS console screen It took a long time as a good thing, but I was able to grasp the whole picture and it was a very good start. Eventually, I would like to code the environment created this time as well!
Recommended Posts