[LINUX] Reintroduction to Docker
It's been almost four years since 2016 to use Docker at work. I will try to organize the knowledge about Docker that I have learned fragmentarily so far as a result of the company's technical chat. This sentence delves into the technology used behind docker, why docker is originally created, rather than how to write docker operation commands and Dockerfile.
table of contents
--Looking back on the evolution of IT infrastructure
- Virtualization
- Docker --Features of Docker
~ Looking back on the evolution of IT infrastructure ~
About 70 years have passed since the invention of computers, and IT infrastructure has undergone various evolutions. In that process, various technologies were born to enable efficient use of IT infrastructure resources. The origin of current server virtualization became the virtualization technology used for mainframes in the 1970s, and after that, x86 CPU server virtualization with the birth of VMWare was promoted at once around 1999.
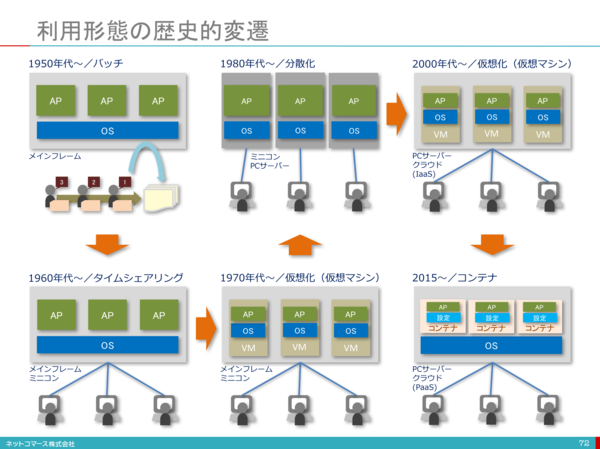 The figure is based on [1].
Indispensable in the cloud era ~ Virtualization ~
There are various types of virtualization, even if it is called virtualization. There are many keywords such as network virtualization, server virtualization, and application virtualization. Here we will focus on server virtualization.
Server virtualization
Server virtualization is to operate on one physical server as if it were multiple servers. Server virtualization leads to cost reduction by reducing the number of servers. So what kind of method is server virtualization? Whenever I search for virtualization on the net, I get the word that there are host type and hypervisor type. However, looking at the definition of hypervisor on wikipedia, it can be said that all of these two types are actually hypervisors. In the first place, [Hypervisor](https://ja.wikipedia.org/wiki/%E3%83%8F%E3%82%A4%E3%83%91%E3%83%BC%E3%83%90% E3% 82% A4% E3% 82% B6) [2] is a control program for realizing a virtual machine (virtual machine), which is one of computer virtualization technologies in computer terms. It is also called a virtualization monitor or a virtualized OS. According to the definition of wikipedia, there are two types of hypervisors.
--Type 1 ("native" or "bare metal") hypervisor
A method in which the hypervisor runs directly on the hardware and all OSs (guest OSs) run on the hypervisor. The narrow sense of "hypervisor" refers only to this.
Product: Microsoft Hyper-V, Citrix XenServer

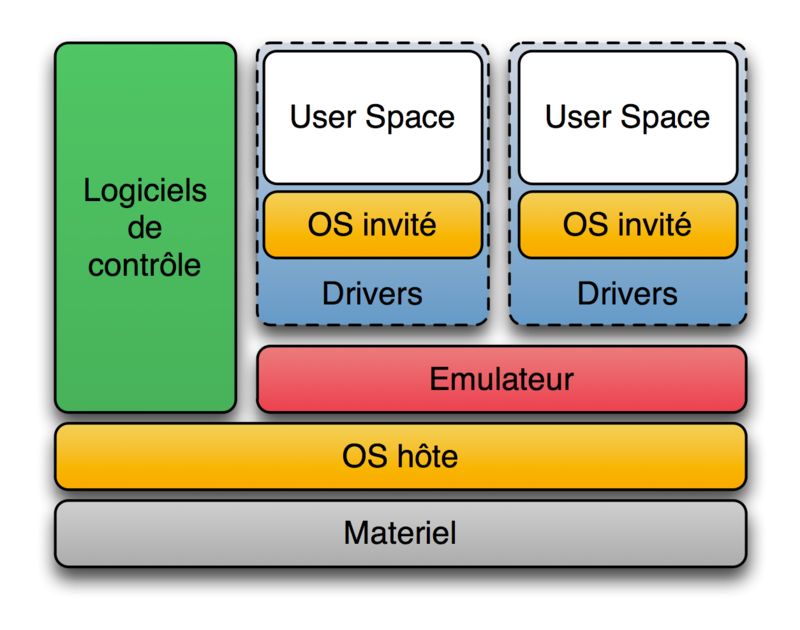
--Type 2 ("host") hypervisor
Another OS runs on the hardware first (this OS is called the host OS), then the hypervisor runs (as an application of the host OS), and then another OS (this OS) runs on the hypervisor. This is a method of running an OS (called a guest OS). In a narrow sense, Type 2 is not included in the hypervisor.
Products: Oracle's VirtualBox, Parallels Parallels Workstation and Parallels Desktop
Hosted virtualization is often referred to as hypervisor Type2, and hypervisor is Type1.
Type 1 has the advantage of high processing speed because resources are completely separated and each virtual server directly interacts with the hardware. On the other hand, it also has the disadvantage of high installation costs.
Type 2 has the advantage of low installation cost because you can build a virtual server immediately by installing virtualization software on the host OS, but the virtual server interacts with the hardware via the host OS, so the overhead is large. There is a demerit that the processing speed drops.
Linux container (LXC) Normally, in a host OS installed on a physical server, multiple applications running on one OS use the same system resources. At this time, multiple running applications share a directory to store data and communicate with the same IP address set on the server. Therefore, if the middleware and library versions used by multiple applications are different, care must be taken not to affect each other's applications [3]. By virtualizing the server, it is possible to completely solve the above problem by separating the entire OS and implementing one application in each virtual OS, but if you do so, the utilization rate of the physical server will be very high. It would be bad. That's why hypervisors have created a high-level, lightweight virtualization technology.
LXC (English: Linux Containers) [4] is a multiple isolated Linux system on a control host running one Linux kernel. OS-level virtualization software that runs (containers).
The Linux kernel provides a feature called cgroups that allows you to limit and prioritize resources (CPU, memory, block I / O, networks, etc.), for which you need to use virtual machines. Absent. You can also use the namespace isolation feature to completely isolate the operating system environment from the application's perspective, virtualizing process trees, networks, user identifiers, and mounted file systems. Can be transformed into.
LXC combines kernel croups with support for isolated namespaces to provide an isolated environment for your applications. cgroup cgroups (control groups) [5] limits and isolates the use of process group resources (CPU, memory, disk I / O, etc.) Linux kernel features. Rohit Seth began development in September 2006 under the name "process containers", was renamed cgroups in 2007, and was merged into the Linux kernel 2.6.24 in January 2008. Since then, many features and controllers have been added.
The description of Linux man [6] is as follows.
Control groups, usually referred to as cgroups, are a Linux kernel feature which allow processes to be organized into hierarchical groups whose usage of various types of resources can then be limited and monitored. The kernel's cgroup interface is provided through a pseudo-filesystem called cgroupfs. Grouping is implemented in the core cgroup kernel code, while resource tracking and limits are implemented in a set of per-resource-type subsystems (memory, CPU, and so on).
Subsystems should be understood as a resource module of the kernel. The Subsystems controlled by the cgroup are:
  cpu (since Linux 2.6.24; CONFIG_CGROUP_SCHED)
          Cgroups can be guaranteed a minimum number of "CPU shares"
          when a system is busy.  This does not limit a cgroup's CPU
          usage if the CPUs are not busy.  For further information, see
          Documentation/scheduler/sched-design-CFS.txt.

          In Linux 3.2, this controller was extended to provide CPU
          "bandwidth" control.  If the kernel is configured with CON‐
          FIG_CFS_BANDWIDTH, then within each scheduling period (defined
          via a file in the cgroup directory), it is possible to define
          an upper limit on the CPU time allocated to the processes in a
          cgroup.  This upper limit applies even if there is no other
          competition for the CPU.  Further information can be found in
          the kernel source file Documentation/scheduler/sched-bwc.txt.

   cpuacct (since Linux 2.6.24; CONFIG_CGROUP_CPUACCT)
          This provides accounting for CPU usage by groups of processes.

          Further information can be found in the kernel source file
          Documentation/cgroup-v1/cpuacct.txt.

   cpuset (since Linux 2.6.24; CONFIG_CPUSETS)
          This cgroup can be used to bind the processes in a cgroup to a
          specified set of CPUs and NUMA nodes.

          Further information can be found in the kernel source file
          Documentation/cgroup-v1/cpusets.txt.

   memory (since Linux 2.6.25; CONFIG_MEMCG)
          The memory controller supports reporting and limiting of
          process memory, kernel memory, and swap used by cgroups.

          Further information can be found in the kernel source file
          Documentation/cgroup-v1/memory.txt.

   devices (since Linux 2.6.26; CONFIG_CGROUP_DEVICE)
          This supports controlling which processes may create (mknod)
          devices as well as open them for reading or writing.  The
          policies may be specified as allow-lists and deny-lists.
          Hierarchy is enforced, so new rules must not violate existing
          rules for the target or ancestor cgroups.

          Further information can be found in the kernel source file
          Documentation/cgroup-v1/devices.txt.

   freezer (since Linux 2.6.28; CONFIG_CGROUP_FREEZER)
          The freezer cgroup can suspend and restore (resume) all pro‐
          cesses in a cgroup.  Freezing a cgroup /A also causes its
          children, for example, processes in /A/B, to be frozen.

          Further information can be found in the kernel source file
          Documentation/cgroup-v1/freezer-subsystem.txt.

   net_cls (since Linux 2.6.29; CONFIG_CGROUP_NET_CLASSID)
          This places a classid, specified for the cgroup, on network
          packets created by a cgroup.  These classids can then be used
          in firewall rules, as well as used to shape traffic using
          tc(8).  This applies only to packets leaving the cgroup, not
          to traffic arriving at the cgroup.

          Further information can be found in the kernel source file
          Documentation/cgroup-v1/net_cls.txt.

   blkio (since Linux 2.6.33; CONFIG_BLK_CGROUP)
          The blkio cgroup controls and limits access to specified block
          devices by applying IO control in the form of throttling and
          upper limits against leaf nodes and intermediate nodes in the
          storage hierarchy.

          Two policies are available.  The first is a proportional-
          weight time-based division of disk implemented with CFQ.  This
          is in effect for leaf nodes using CFQ.  The second is a throt‐
          tling policy which specifies upper I/O rate limits on a
          device.

          Further information can be found in the kernel source file
          Documentation/cgroup-v1/blkio-controller.txt.

   perf_event (since Linux 2.6.39; CONFIG_CGROUP_PERF)
          This controller allows perf monitoring of the set of processes
          grouped in a cgroup.

          Further information can be found in the kernel source file
          tools/perf/Documentation/perf-record.txt.

   net_prio (since Linux 3.3; CONFIG_CGROUP_NET_PRIO)
          This allows priorities to be specified, per network interface,
          for cgroups.

          Further information can be found in the kernel source file
          Documentation/cgroup-v1/net_prio.txt.

   hugetlb (since Linux 3.5; CONFIG_CGROUP_HUGETLB)
          This supports limiting the use of huge pages by cgroups.

          Further information can be found in the kernel source file
          Documentation/cgroup-v1/hugetlb.txt.

   pids (since Linux 4.3; CONFIG_CGROUP_PIDS)
          This controller permits limiting the number of process that
          may be created in a cgroup (and its descendants).

          Further information can be found in the kernel source file
          Documentation/cgroup-v1/pids.txt.

   rdma (since Linux 4.11; CONFIG_CGROUP_RDMA)
          The RDMA controller permits limiting the use of RDMA/IB-spe‐
          cific resources per cgroup.

          Further information can be found in the kernel source file
          Documentation/cgroup-v1/rdma.txt.
Example: Limit CPU utilization
Cgroup operations are performed via a file system called cgroupfs. Basically, when Linux boots, cgroupfs is automatically mounted.
$ mount | grep cgroup
cgroup on /sys/fs/cgroup/unified type cgroup2 (rw,nosuid,nodev,noexec,relatime,nsdelegate)
cgroup on /sys/fs/cgroup/systemd type cgroup (rw,nosuid,nodev,noexec,relatime,xattr,name=systemd)
cgroup on /sys/fs/cgroup/cpu,cpuacct type cgroup (rw,nosuid,nodev,noexec,relatime,cpu,cpuacct)
cgroup on /sys/fs/cgroup/blkio type cgroup (rw,nosuid,nodev,noexec,relatime,blkio)
cgroup on /sys/fs/cgroup/hugetlb type cgroup (rw,nosuid,nodev,noexec,relatime,hugetlb)
cgroup on /sys/fs/cgroup/memory type cgroup (rw,nosuid,nodev,noexec,relatime,memory)
cgroup on /sys/fs/cgroup/freezer type cgroup (rw,nosuid,nodev,noexec,relatime,freezer)
cgroup on /sys/fs/cgroup/pids type cgroup (rw,nosuid,nodev,noexec,relatime,pids)
cgroup on /sys/fs/cgroup/perf_event type cgroup (rw,nosuid,nodev,noexec,relatime,perf_event)
cgroup on /sys/fs/cgroup/net_cls,net_prio type cgroup (rw,nosuid,nodev,noexec,relatime,net_cls,net_prio)
cgroup on /sys/fs/cgroup/devices type cgroup (rw,nosuid,nodev,noexec,relatime,devices)
cgroup on /sys/fs/cgroup/rdma type cgroup (rw,nosuid,nodev,noexec,relatime,rdma)
cgroup on /sys/fs/cgroup/cpuset type cgroup (rw,nosuid,nodev,noexec,relatime,cpuset)
From here, you can use cgroup to limit the CPU usage of your app. All operations are done with ubuntu 18.04.
- First, create a simple infinite loop c program.
loop_sample_cpu.c
#include <stdio.h>

int main(){
        while(1){
        }
}
Compile the program.
$ gcc -o loop_sample_cpu loop_sample_cpu.c
I will do it.
$./loop_sample_cpu
Check the CPU usage rate. The utilization rate of loop_sample_cpu is close to 100%.
zhenbin@zhenbin-VirtualBox:~$ top

top - 14:51:45 up 28 min,  1 user,  load average: 0.29, 0.08, 0.02
Tasks: 175 total,   2 running, 140 sleeping,   0 stopped,   0 zombie
%Cpu(s): 98.6 us,  1.4 sy,  0.0 ni,  0.0 id,  0.0 wa,  0.0 hi,  0.0 si,  0.0 st
KiB Mem :  8345424 total,  6421164 free,   875200 used,  1049060 buff/cache
KiB Swap:  2097148 total,  2097148 free,        0 used.  7187568 avail Mem

  PID USER      PR  NI    VIRT    RES    SHR S %CPU %MEM     TIME+ COMMAND
10403 zhenbin   20   0    4372    764    700 R 95.0  0.0   0:19.75 loop_sample_cpu
 9547 zhenbin   20   0 3020252 278368 108992 S  2.3  3.3   0:09.34 gnome-shell
10342 zhenbin   20   0  870964  38352  28464 S  1.0  0.5   0:00.88 gnome-termi+
 9354 zhenbin   20   0  428804  95048  61820 S  0.7  1.1   0:02.25 Xorg
  922 root      20   0  757084  82776  45764 S  0.3  1.0   0:00.50 dockerd
    1 root      20   0  159764   8972   6692 S  0.0  0.1   0:01.06 systemd
    2 root      20   0       0      0      0 S  0.0  0.0   0:00.00 kthreadd
    3 root       0 -20       0      0      0 I  0.0  0.0   0:00.00 rcu_gp
    4 root       0 -20       0      0      0 I  0.0  0.0   0:00.00 rcu_par_gp
    6 root       0 -20       0      0      0 I  0.0  0.0   0:00.00 kworker/0:0+
    7 root      20   0       0      0      0 I  0.0  0.0   0:00.15 kworker/u2:+
    8 root       0 -20       0      0      0 I  0.0  0.0   0:00.00 mm_percpu_wq
    9 root      20   0       0      0      0 S  0.0  0.0   0:00.13 ksoftirqd/0
   10 root      20   0       0      0      0 I  0.0  0.0   0:00.16 rcu_sched
   11 root      rt   0       0      0      0 S  0.0  0.0   0:00.00 migration/0
   12 root     -51   0       0      0      0 S  0.0  0.0   0:00.00 idle_inject+
   13 root      20   0       0      0      0 I  0.0  0.0   0:00.11 kworker/0:1+
- Add CPU limit to cgroup Create folders under / sys / fs / cgroup / cpu, cpuacct.
$ cd /sys/fs/cgroup/cpu,cpuacct
$ mkdir loop_sample_cpu
$ cd loop_sample_cpu
Add the PID of loop_sample_cpu to the cgroup. Here, only the root user is done.
$ sudo su
$ echo 10403 > cgroup.procs
Add CPU limits. There are some resource restriction types in the loop_sample_cpu folder, but this time we are operating on these two. Please refer to [7] for the meanings of other items.
-
cpu.cfs_period_us Specifies the interval, in microseconds (µs, but here indicated as "us"), to reallocate access to CPU resources by cgroups. If the tasks in the cgroup need access to a single CPU for 0.2 seconds per second, set cpu.cfs_quota_us to 200000 and cpu.cfs_period_us to 1000000. The cpu.cfs_quota_us parameter has an upper limit of 1 second and a lower limit of 1000 microseconds.
-
cpu.cfs_quota_us Specifies the total time, in microseconds (µs, but here indicated as "us"), that all tasks in a cgroup will run over a period of time (defined in cpu.cfs_period_us). If all the tasks in the cgroup use up the time specified by the quota, the task will be throttled for the remaining time specified by that period and will not be allowed to run until the next period. Set cpu.cfs_quota_us to 200000 and cpu.cfs_period_us to 1000000 if the tasks in the cgroup need access to a single CPU for 0.2 seconds per second. Note that the quota and period parameters operate on a CPU basis. To make the process fully available on the two CPUs, for example, set cpu.cfs_quota_us to 200000 and cpu.cfs_period_us to 100000. Setting the value of cpu.cfs_quota_us to -1 indicates that the cgroup does not comply with the CPU time limit. This is also the default value for all cgroups (except root cgroups).
Limit the CPU to 20% per core. (Only 10ms CPU time is available every 50ms)
$ echo 10000 > cpu.cfs_quota_us
$ echo 50000 > cpu.cfs_period_us
The CPU utilization of loop_sample_cpu is limited to 20%.
zhenbin@zhenbin-VirtualBox:~$ top

top - 15:06:05 up 42 min,  1 user,  load average: 0.40, 0.72, 0.57
Tasks: 181 total,   2 running, 146 sleeping,   0 stopped,   0 zombie
%Cpu(s): 23.8 us,  1.0 sy,  0.0 ni, 75.2 id,  0.0 wa,  0.0 hi,  0.0 si,  0.0 st
KiB Mem :  8345424 total,  6366748 free,   912068 used,  1066608 buff/cache
KiB Swap:  2097148 total,  2097148 free,        0 used.  7134248 avail Mem

  PID USER      PR  NI    VIRT    RES    SHR S %CPU %MEM     TIME+ COMMAND
10403 zhenbin   20   0    4372    764    700 R 19.9  0.0  12:16.90 loop_sample_cpu
 9547 zhenbin   20   0 3032212 287524 111556 S  1.7  3.4   0:18.14 gnome-shell
 9354 zhenbin   20   0  458868 125556  77832 S  1.3  1.5   0:06.06 Xorg
10342 zhenbin   20   0  873156  40500  28464 S  1.0  0.5   0:03.34 gnome-termi+
 9998 zhenbin   20   0 1082256 120516  36164 S  0.3  1.4   0:01.92 gnome-softw+
    1 root      20   0  159764   8972   6692 S  0.0  0.1   0:01.12 systemd
    2 root      20   0       0      0      0 S  0.0  0.0   0:00.00 kthreadd
    3 root       0 -20       0      0      0 I  0.0  0.0   0:00.00 rcu_gp
    4 root       0 -20       0      0      0 I  0.0  0.0   0:00.00 rcu_par_gp
    6 root       0 -20       0      0      0 I  0.0  0.0   0:00.00 kworker/0:0+
    7 root      20   0       0      0      0 I  0.0  0.0   0:00.24 kworker/u2:+
    8 root       0 -20       0      0      0 I  0.0  0.0   0:00.00 mm_percpu_wq
    9 root      20   0       0      0      0 S  0.0  0.0   0:00.16 ksoftirqd/0
   10 root      20   0       0      0      0 I  0.0  0.0   0:00.22 rcu_sched
   11 root      rt   0       0      0      0 S  0.0  0.0   0:00.00 migration/0
   12 root     -51   0       0      0      0 S  0.0  0.0   0:00.00 idle_inject+
   14 root      20   0       0      0      0 S  0.0  0.0   0:00.00 cpuhp/0
Namespace Namespace [8] is a global system resource covered with an abstraction layer in the namespace. It's a mechanism that makes processes look like they have their own separate global resources. Changes to global resources are visible to other processes that are members of the namespace, but not to other processes. One use of namespaces is to implement containers.
Example: Network Namespace
It is possible to create two virtual networks on one NIC using Network Namespace.
- Create a Network Namespace
zhenbin@zhenbin-VirtualBox:~$ sudo unshare --uts --net /bin/bash
root@zhenbin-VirtualBox:~# hostname container001
root@zhenbin-VirtualBox:~# exec bash
root@container001:~# ip link set lo up
root@container001:~# ifconfig
lo: flags=73<UP,LOOPBACK,RUNNING>  mtu 65536
        inet 127.0.0.1  netmask 255.0.0.0
        inet6 ::1  prefixlen 128  scopeid 0x10<host>
        loop  txqueuelen 1000  (Local Loopback)
        RX packets 0  bytes 0 (0.0 B)
        RX errors 0  dropped 0  overruns 0  frame 0
        TX packets 0  bytes 0 (0.0 B)
        TX errors 0  dropped 0 overruns 0  carrier 0  collisions 0
root@container001:~# echo $$ # $$Is the PID of the command itself(Process ID)Variable to be set
1909
- Create a virtual network interface link. See [9] for an explanation of the virtual network interface. Launch a new shell. Create a link pair.
$ sudo ip link add veth0 type veth peer name veth1
Assign veth1 to the network namespace you just created.
$ sudo ip link set veth1 netns 1909
Set up veth0
$ sudo ip address add dev veth0 192.168.100.1/24
$ sudo ip link set veth0 up
Set up veth1 with the shell of container001.
$ sudo ip address add dev veth1 192.168.100.2/24
$ sudo ip link set veth1 up
You can now communicate between the host and container001.
zhenbin@zhenbin-VirtualBox:~$ ping 192.168.100.2
PING 192.168.100.2 (192.168.100.2) 56(84) bytes of data.
64 bytes from 192.168.100.2: icmp_seq=1 ttl=64 time=0.019 ms
64 bytes from 192.168.100.2: icmp_seq=2 ttl=64 time=0.037 ms
^C
--- 192.168.100.2 ping statistics ---
2 packets transmitted, 2 received, 0% packet loss, time 1001ms
rtt min/avg/max/mdev = 0.019/0.028/0.037/0.009 ms
Introducing Docker to make full use of LXC
Early versions of Docker used LXC as a container execution driver, but it became an option in Docker v0.9 and is no longer supported in Docker v1.10. Subsequent Docker uses a library called libcontainer developed by Docker to control cgroups and namespaces.
Here is one important point. Docker is not a virtualization technology! If anything, it exists as a cgroup and namespace management tool. It is a tool that makes it easier for developers and server operators to use the virtualization functions provided by the linux kernel. In addition, the presence of Dockerfile and Docker Hub has improved application encapsulation and portability!
Here, I would like to emphasize the characteristics of docker's resource isolation and control over general docker commands.
Example: Limit the CPU usage of container with docker.
- Create a docker container that contains your application.
Create an ubuntu-based docker image that includes the program loop_sample_cpu.c created earlier.
FROM ubuntu

RUN apt update && apt install -y gcc

WORKDIR /src

COPY loop_sample_cpu.c .

RUN gcc -o loop_sample_cpu loop_sample_cpu.c

CMD ./loop_sample_cpu
Build docker image.
docker build -t ubuntu_cpu .
- Start a container without CPU restrictions.
docker run -d ubuntu_cpu
Let's look at the CPU usage rate.
zhenbin@zhenbin-VirtualBox:~/workspace/presentation$ top

top - 17:06:45 up 43 min,  1 user,  load average: 0.89, 0.56, 0.37
Tasks: 178 total,   2 running, 142 sleeping,   0 stopped,   0 zombie
%Cpu(s): 99.0 us,  1.0 sy,  0.0 ni,  0.0 id,  0.0 wa,  0.0 hi,  0.0 si,  0.0 st
KiB Mem :  8345424 total,  6156972 free,   894060 used,  1294392 buff/cache
KiB Swap:  2097148 total,  2097148 free,        0 used.  7184360 avail Mem

  PID USER      PR  NI    VIRT    RES    SHR S %CPU %MEM     TIME+ COMMAND
 8853 root      20   0    4372    804    740 R 94.0  0.0   0:15.97 loop_sample_cpu
 1253 zhenbin   20   0 3020528 278012 108704 S  2.0  3.3   0:31.41 gnome-shell
 1056 zhenbin   20   0  424560  90824  55364 S  1.3  1.1   0:09.92 Xorg
 1927 zhenbin   20   0  877384  44356  28584 S  1.3  0.5   0:08.01 gnome-terminal-
    1 root      20   0  225292   9040   6724 S  0.0  0.1   0:01.62 systemd
    2 root      20   0       0      0      0 S  0.0  0.0   0:00.00 kthreadd
    3 root       0 -20       0      0      0 I  0.0  0.0   0:00.00 rcu_gp
    4 root       0 -20       0      0      0 I  0.0  0.0   0:00.00 rcu_par_gp
    6 root       0 -20       0      0      0 I  0.0  0.0   0:00.00 kworker/0:0H-kb
    8 root       0 -20       0      0      0 I  0.0  0.0   0:00.00 mm_percpu_wq
    9 root      20   0       0      0      0 S  0.0  0.0   0:00.29 ksoftirqd/0
   10 root      20   0       0      0      0 I  0.0  0.0   0:00.31 rcu_sched
   11 root      rt   0       0      0      0 S  0.0  0.0   0:00.00 migration/0
   12 root     -51   0       0      0      0 S  0.0  0.0   0:00.00 idle_inject/0
   14 root      20   0       0      0      0 S  0.0  0.0   0:00.00 cpuhp/0
   15 root      20   0       0      0      0 S  0.0  0.0   0:00.00 kdevtmpfs
   16 root       0 -20       0      0      0 I  0.0  0.0   0:00.00 netns
- Start the container that limits the CPU.
docker run -d --cpu-period=50000 --cpu-quota=10000 ubuntu_cpu
Let's check the CPU utilization.
zhenbin@zhenbin-VirtualBox:~$ top

top - 17:08:50 up 45 min,  1 user,  load average: 0.77, 0.68, 0.45
Tasks: 178 total,   2 running, 141 sleeping,   0 stopped,   0 zombie
%Cpu(s): 25.8 us,  2.3 sy,  0.0 ni, 71.9 id,  0.0 wa,  0.0 hi,  0.0 si,  0.0 st
KiB Mem :  8345424 total,  6160808 free,   892384 used,  1292232 buff/cache
KiB Swap:  2097148 total,  2097148 free,        0 used.  7188556 avail Mem

  PID USER      PR  NI    VIRT    RES    SHR S %CPU %MEM     TIME+ COMMAND
 9066 root      20   0    4372    800    740 R 19.9  0.0   0:04.36 loop_sample+
 1253 zhenbin   20   0 3017968 275536 106144 S  3.0  3.3   0:32.83 gnome-shell
 1056 zhenbin   20   0  422000  88336  52876 S  2.7  1.1   0:10.59 Xorg
 1927 zhenbin   20   0  877380  44468  28584 S  2.0  0.5   0:08.54 gnome-termi+
  580 root      20   0  776548  46696  24888 S  0.3  0.6   0:02.71 containerd
 1202 zhenbin   20   0  193504   2912   2536 S  0.3  0.0   0:03.92 VBoxClient
 1461 zhenbin   20   0  441756  22836  17820 S  0.3  0.3   0:00.09 gsd-wacom
 1475 zhenbin   20   0  670048  23676  18316 S  0.3  0.3   0:00.29 gsd-color
    1 root      20   0  225292   9040   6724 S  0.0  0.1   0:01.65 systemd
    2 root      20   0       0      0      0 S  0.0  0.0   0:00.00 kthreadd
    3 root       0 -20       0      0      0 I  0.0  0.0   0:00.00 rcu_gp
    4 root       0 -20       0      0      0 I  0.0  0.0   0:00.00 rcu_par_gp
    6 root       0 -20       0      0      0 I  0.0  0.0   0:00.00 kworker/0:0+
    8 root       0 -20       0      0      0 I  0.0  0.0   0:00.00 mm_percpu_wq
    9 root      20   0       0      0      0 S  0.0  0.0   0:00.30 ksoftirqd/0
   10 root      20   0       0      0      0 I  0.0  0.0   0:00.32 rcu_sched
   11 root      rt   0       0      0      0 S  0.0  0.0   0:00.00 migration/0
I checked / sys / fs / cgroup / cpu, cpuacct and found that a folder called docker was created.
zhenbin@zhenbin-VirtualBox:/sys/fs/cgroup/cpu,cpuacct$ ls
cgroup.clone_children  cpuacct.usage             cpuacct.usage_percpu_user  cpu.cfs_quota_us  notify_on_release  user.slice
cgroup.procs           cpuacct.usage_all         cpuacct.usage_sys          cpu.shares        release_agent
cgroup.sane_behavior   cpuacct.usage_percpu      cpuacct.usage_user         cpu.stat          system.slice
cpuacct.stat           cpuacct.usage_percpu_sys  cpu.cfs_period_us          docker            tasks
Now we know that using cgroups and namespaces in docker limits the application's runtime resources.
Features of Docker
――As explained above, docker is just a management tool, that is, it is a process of the OS. Therefore, it starts up faster than a virtual machine. -Good portability. Since the Dockerfile describes the environment (library, parameters) that the application executes, the same application can be reproduced anywhere. --To execute one process in one container. Basically, it is not recommended to have docker container run multiple processes. After all, running multiple processes makes it impossible to separate resources, which is the same as running an application on the host in the same environment. --You cannot change the kernel or hardware. Containers running on the host share the host's kernel, so any changes to the kernel module will affect all containers. Also, there are many restrictions on hardware. For example, operations such as usb are quite problematic. --Since the file system inside docker container is saved in memory, when the container is deleted, the data is also deleted, so if you want to persist the data, you have to mount the file system of the host on the container. However, in general, it is recommended that the application executed by docker be stateless.
Reference URL
[1] https://blogs.itmedia.co.jp/itsolutionjuku/2017/10/1it_1.html [2] https://ja.wikipedia.org/wiki/%E3%83%8F%E3%82%A4%E3%83%91%E3%83%BC%E3%83%90%E3%82%A4%E3%82%B6 [3] https://codezine.jp/article/detail/11336 [4] https://ja.wikipedia.org/wiki/LXC [5] https://ja.wikipedia.org/wiki/Cgroups [6] http://man7.org/linux/man-pages/man7/cgroups.7.html [7] https://access.redhat.com/documentation/ja-jp/red_hat_enterprise_linux/6/html/resource_management_guide/sec-cpu [8] https://linuxjm.osdn.jp/html/LDP_man-pages/man7/namespaces.7.html [9] https://gihyo.jp/admin/serial/01/linux_containers/0006
Recommended Posts