[PYTHON] Introducing AE scripts that may make sound matching in C4D a little easier
This is the 5th day article of After Effects Advent Calendar 2016. Yesterday's article was I tried using ErgoDox for anime shooting by @tetsuoh.
Introduction
I'm making a video. This is Shuto. ** Cinema 4D ** (commonly known as C4D), which is often used in the production of motion graphics works such as BGA and Vocaloid MV, is 3DCG production software developed by MAXON, which is headquartered in Germany. Many people know the name of After Effects CC these days because it has a function such as "Cineware" and you can use "Cinema 4D Lite" without buying a C4D standalone product.
Now, let's get into the main subject, but this time I will introduce a script that makes ** sound matching ** a little easier when creating a CG scene that matches music using C4D. ..
As many of you may have noticed, this article is intended for C4D and AE users. I'm sorry if you are not a C4D user. Please forgive me because it is an AE script Anything ry </ del>
By the way, regarding the environment, this is using CS6 (11.0.4.2) of Windows 10.
Sound matching problems in C4D
In C4D, when the scene gets heavier, the preview of the work screen will not play. The audio playback may be jerky, or the preview frame rate may be 1 fps or less.
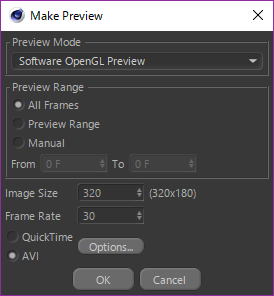
If you're an AE user, you might think, "Then it's a RAM preview!", But C4D doesn't have a RAM preview. Instead, the preview that is simply rendered and then played is the "hardware (software) preview" of "preview creation", but when the scene becomes complicated, this "preview creation" is also very heavy. It often becomes.

In the sound matching of video production, basically, you will go through trial and error many times to find a movement that fits comfortably. However, if you do this heavy "preview creation" many times, you will be exhausted by trial and error. In order to produce efficiently, it is important how close to the ideal sound squeeze timing can be achieved by creating a preview once.
Solution and procedure
It is difficult to guess the timing if you suddenly match the sound with C4D from the beginning.
AE has a function to export a .c4d file, so let's make good use of it and bring the ** sound matching mark ** created in AE to C4D.
The procedure is like this. ** 1 to 4 are all work in AE. ** **
The script in the title will be described at the end.
1. Read the music file on the AE side and check the timing using the RAM preview
Normally, let AE read mp3s and music files and preview them in RAM. Check the timing to some extent here.
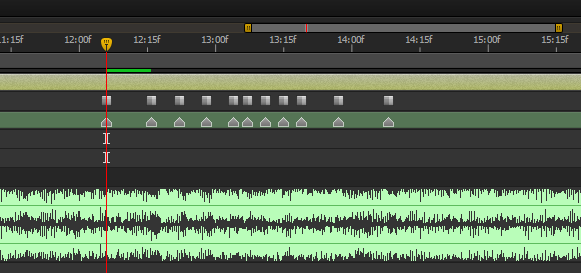
2. Install ** AE marker ** at the characteristic sound timing that is the key point of sound squeezing.
 In this way, you can put markers on the layers of music files.
As an example, if you want to make such a fine movement in 2 seconds, it is difficult to match the sound with C4D.
In this way, you can put markers on the layers of music files.
As an example, if you want to make such a fine movement in 2 seconds, it is difficult to match the sound with C4D.
3. Create a light layer and keyframe the coordinates etc. at the same timing as the marker installed in 2.
 Converts the marker hit in 2 to the keyframe of the position property of the light layer. You can do it by hand, but it's difficult, so here is ** automated with a script **.
The "light layer" can be the "camera layer". Anything will do as long as you have keyframes in C4D.
Converts the marker hit in 2 to the keyframe of the position property of the light layer. You can do it by hand, but it's difficult, so here is ** automated with a script **.
The "light layer" can be the "camera layer". Anything will do as long as you have keyframes in C4D.
- The point that the keyframe interpolation method is "stop" will be explained in the next section.
4. Export the composition to .c4d format
 You can bring AE lights to C4D, including information on the keyframes struck. Let's also ** automate this with a script **.
You can also export manually from the menu ** "File> Export> CINEMA 4D Exporter" **.
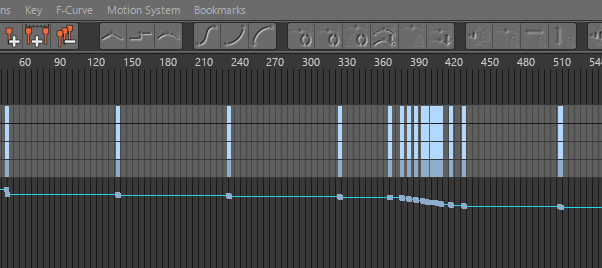
However, one thing to note is that the ** keyframe completion method for hitting the light layer of 3 is "Stop" **. You can export with other complement methods, but any complement method that does not support C4D seems to be baked without permission, and you will not know where the marker timing is. (Figure exported by interpolation method linear)
You can bring AE lights to C4D, including information on the keyframes struck. Let's also ** automate this with a script **.
You can also export manually from the menu ** "File> Export> CINEMA 4D Exporter" **.
However, one thing to note is that the ** keyframe completion method for hitting the light layer of 3 is "Stop" **. You can export with other complement methods, but any complement method that does not support C4D seems to be baked without permission, and you will not know where the marker timing is. (Figure exported by interpolation method linear)

5. Read the exported .c4d file in C4D and make a sound by referring to the keyframe timing of the light layer.
If you set the keyframe completion method to "stop" and export it as a .c4d file, you can bring the light with the keyframes struck only at the required timing like this when reading with C4D.
 Of course, in production, it is necessary to create a hardware (software) preview several times to check that the movement and timing are correct, but by using this method to bring the sound mark, it is generally necessary. You can keep moving in a state where the timing is right.
As an aside, I also used it in the BGA of CO5M1C R4ILR0AD by kanone that I recently produced.

About scripts
Finally, I will introduce the script, but in this way ** "Based on the marker information created by AE, keyframe the light layer that can be taken to C4D and export it to the C4D file" ** It was. I couldn't think of a good procedure for explaining what kind of script I wrote and why I wrote such a script, so I wrote it in a roundabout way. In addition, it seems that it was implemented recently, but since the method to access the component marker was not prepared, noriaki iwatani's [script to get the composition marker](http://nariakiiwatani.net/?p= 351) is rented.
The script created below.
Since saving copy and paste is troublesome, please save here with Ctrl + S or ⌘ + S.
** Make sure the save format is .jsx. ** **
markerToC4DasLight.js
//When used with a component or layer selected, a new light layer is created and keyframes are struck at the same time as the component or layer marker.
//If one layer is selected, use the marker for that layer.
//If the component is selected(If no layer is selected), Use the marker of that component.
//Since CS6 does not have a method to get the marker of the component, I borrowed the script of nariakiwatani as it is.


var activeComp = app.project.activeItem;  //Get active item in project panel

function main() {
    var markers = null;


    if (activeComp instanceof CompItem == false) {  //Repels active items other than components
        alert("No component is selected.");
        return;
    }
    if (activeComp.selectedLayers.length > 1) {  //Repel if there are two or more layers selected in activeComp
        alert ("Select only one layer or only the components.\If n layers are not selected, the active component marker will be used.");
        return;
    } else if (activeComp.selectedLayers.length == 1) {  //If there is only one layer selected, get the marker for that layer
        markers = activeComp.selectedLayers[0].property("Marker");
    } else if (activeComp.selectedLayers.length == 0) {  //Get markers for that component if no layer is selected
        markers = getCompMarker(activeComp);
    }
    if (markers.numKeys < 1) {  //Repel if the marker is 0
        alert ("There are no markers on the selected layer or component.");
        return;
    }


    var newLight = activeComp.layers.addLight("Marker_Light", [0, 0]);  //Generate a light layer and store it in newLight
    newLight.property("position").setValue([0, 0, 0]);  //If the coordinates of the light layer are initial, it will be disgusting, so change it
    newLight.property("pointOfInterest").setValue([0, 0, 100]);
    for (var i=0; i<=markers.numKeys; i++) {  //Hit keyframes for the acquired markers
        var keyIdx = newLight.property("position").addKey((i==0)?0:markers.keyTime(i));  //Hit a keyframe and store the index of that keyframe in keyIdx
        newLight.property("position").setValueAtKey(keyIdx, [0, 0, i*-10]);  //Change the coordinate value of the key based on the stored index
        //Change the interpolation method in the same way
        newLight.property("position").setInterpolationTypeAtKey(keyIdx, KeyframeInterpolationType.HOLD, KeyframeInterpolationType.HOLD);
    }


    var version = parseInt(app.version.split(".")[0]);
    var msg_export = "Marker_Generated Light.\n continue.Do you want to output to a c4d file?";
    var code_export = (version>11)?5022:5006;
    var execute = confirm(msg_export);  //Show confirmation dialog
    if (execute) app.executeCommand(code_export);  //If yes, start exporter

}

app.beginUndoGroup("markerToC4DasLight");  //from here
main();
app.endUndoGroup(); //The processing up to this point can be returned with one Undo


/*
Script to get composition markers in After Effects
2013.10.31 by nariakiiwatani
MIT License - http://sourceforge.jp/projects/opensource/wiki/licenses%2FMIT_license
*/

//Pass the composition for which you want to get marker information
function getCompMarker(comp) {

//Get a list of compositions included in the project
function getCompAll(proj) {
    var ret = [];
    for(var i = 1; i <= proj.numItems; ++i) {
        if(proj.item(i) instanceof CompItem) {
            ret.push(proj.item(i));
        }
    }
    return ret;
}
//Get array diff
function getArrayDiff(a, b) {
    var ret = [];
    for(var _a in a) {
        var found = false;
        for(var _b in b) {
            if(a[_a] === b[_b]) {
                found = true;
                break;
            }
        }
        if(!found) {
            ret.push(a[_a]);
        }
    }
    var tmp = a;
    a = b;
    b = tmp;
    for(var _a in a) {
        var found = false;
        for(var _b in b) {
            if(a[_a] === b[_b]) {
                found = true;
                break;
            }
        }
        if(!found) {
            ret.push(a[_a]);
        }
    }
    return ret;
}

//Since the selection information of the project window is operated, save the state before the operation.
var selected = app.project.selection;
var selection = [];
for(var i = 0; i < selected.length; ++i) {
    selection.push(selected[i].selected);
    selected[i].selected = false;
}

//The main body of processing from here
comp.selected = true;   //Select the composition to be exported
//"New composition from multiple items" cannot be used unless the project window is focused, so forcibly activate it.
app.project.showWindow(false);
app.project.showWindow(true);

var allComps = getCompAll(app.project); //List of compositions before command execution
app.executeCommand(2796);   //Execute "New Composition from Multiple Items"
var added = getArrayDiff(getCompAll(app.project), allComps)[0]; //Find the composition added by executing the command
var marker = added.layer(1).marker; //This is the marker I wanted!

//Clean up from here
added.remove(); //Delete increased composition
comp.selected = false;  //Deselect
for(var i = 0; i < selected.length; ++i) {   //Return to the selected state before executing the script
    selected[i].selected = selection[i];
}
//Returns marker information
return marker;
}
Bonus C4D script
As for the method of reading music with C4D, as you can see if you google it, you can add a special track called ** "sound" ** to the object (null etc.), but this is also from the UI Due to poor accessibility, every time you change the "Sound" parameter, you need to open the timeline and select the "Sound" track to display in the Attribute Manager.
 ↑ You must select and activate the added special track "Sound" ↓ This property cannot be displayed.

Other parameters, such as coordinates and other tags, are ** basically displayed in the Attribute Manager by selecting the object or tag itself from the object manager (tree) **, but to display the "sound" attributes. Must ** select "Sound" in the timeline **.
 ↑ Even if you select the "null" object in the object manager, the "sound" property is not displayed.
So if you add a "sound" track to a new null object (named ** Music **) (actually this step is quite a hassle) and then select that Music object, you can easily add it to the "sound" properties like this I wrote a script that can access to.
 As a mechanism, I always use the Python tag to look at the value of the "Sound" tab of the attribute manager ↑ and put it in the value of the special track of "Sound". In other words, if you change the values of "Use Sound" and "Start Time" in ↑, it will be automatically reflected in the special track.
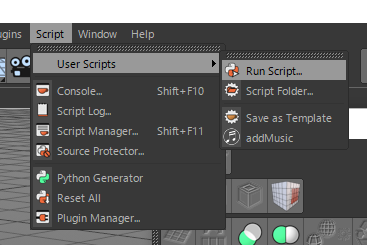
** * Please be careful about how to use it! Be sure to save it as a script file without copying and pasting it into a Python script tag, and execute it from the menu "Script> User Script> Execute Script". </ font> **
As with AE scripts, save the script from here.
** Please be careful that the save format is .py as well as jsx. ** **
addMusic.py
import c4d
import time

def main():
    obj = c4d.BaseObject(c4d.Onull)
    obj.SetName("Music")
    doc.InsertObject(obj)
    doc.SetSelection(obj)

    tr = c4d.CTrack(obj,c4d.DescID(c4d.DescLevel(c4d.CTsound, c4d.CTsound, 0)))
    obj.InsertTrackSorted(tr)

    pyTag = obj.MakeTag(c4d.Tpython)
    pyTag.SetName("Music")

    rootGroup = c4d.GetCustomDataTypeDefault(c4d.DTYPE_GROUP)
    rootGroup[c4d.DESC_NAME] = "Sound Properties"
    rootGroup[c4d.DESC_SHORT_NAME] = "Sound"
    rootGroup[c4d.DESC_TITLEBAR] = 1
    rootGroup[c4d.DESC_GUIOPEN] = 1
    rootGroup[c4d.DESC_PARENTGROUP] = c4d.DescID()
    descId = obj.AddUserData(rootGroup)

    secondGroup = c4d.GetCustomDataTypeDefault(c4d.DTYPE_GROUP)
    secondGroup[c4d.DESC_NAME] = "Basic Properties"
    secondGroup[c4d.DESC_SHORT_NAME] = "Basic"
    secondGroup[c4d.DESC_TITLEBAR] = 1
    secondGroup[c4d.DESC_GUIOPEN] = 1
    secondGroup[c4d.DESC_PARENTGROUP] = descId
    descId = obj.AddUserData(secondGroup)

    label = ["Use Sound", "Start Time", "Sound"]
    default = [1, c4d.BaseTime(), ""]
    typ = [c4d.DTYPE_BOOL, c4d.DTYPE_TIME, c4d.DTYPE_FILENAME]

    for i in range(3):
        bc = c4d.GetCustomDataTypeDefault(typ[i])
        bc[c4d.DESC_NAME] = label[i]
        bc[c4d.DESC_SHORT_NAME] = label[i]
        bc[c4d.DESC_PARENTGROUP] = descId
        bc[c4d.DESC_DEFAULT] = default[i]
        bc[c4d.DESC_ANIMATE] = c4d.DESC_ANIMATE_OFF
        descId2 = obj.AddUserData(bc)
        obj[descId2] = default[i]

    pyTag[c4d.TPYTHON_CODE] = 'import c4d\n#Welcome to the world of Python\n\n\ndef main():\n    obj = op.GetObject()\n    tr = obj.GetCTracks()[0]\n    tr[c4d.CID_SOUND_ONOFF] = obj[(c4d.ID_USERDATA, 3)]\n    tr[c4d.CID_SOUND_START] = obj[(c4d.ID_USERDATA, 4)]\n    tr[c4d.CID_SOUND_NAME] = obj[(c4d.ID_USERDATA, 5)]\n'

if __name__=='__main__':
    main()
    c4d.EventAdd()
-
- Added immediately after publication * Yarita-san According to C4D standard UI, accessing the "Sound" property is as easy as adding MoGraph's "Sound Effector" to the scene. It seems that it can be done. However, the "sound effector" ** does not play sound in "preview creation" such as hardware preview **, so it seems that it will be necessary to use it properly. If you don't create a preview, that alone will be easy enough, but if you basically always create a preview like me, I think that such a script is useful.
- Addition up to here *
Finally
At this point, it is already past 0:15, which is scheduled to be released. sorry. I wrote it in a hurry, so I think it was very difficult to read, but if there are any mistakes or confusing points, please contact me in the comments or Twitter!
-
- Added immediately after publication * In addition, after the article was published, Mr. I did ** how to lighten the C4D scene in the first place **. Therefore, I think that this crap will be helpful, so I think you should read this as well.
- Addition up to here *
See you tomorrow at @ kickbase's Tips for unforgivable man multibyte folder names! I'm also a man who doesn't allow multibyte folder names, so I'm really looking forward to it! * * Updated on December 6, 2016 ↑ Link added *